Transcription
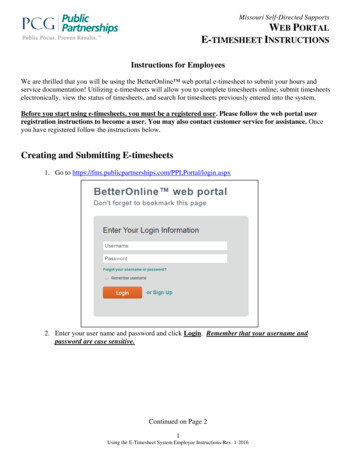
Missouri Self-Directed SupportsWEB PORTALE-TIMESHEET INSTRUCTIONSInstructions for EmployeesWe are thrilled that you will be using the BetterOnline web portal e-timesheet to submit your hours andservice documentation! Utilizing e-timesheets will allow you to complete timesheets online, submit timesheetselectronically, view the status of timesheets, and search for timesheets previously entered into the system.Before you start using e-timesheets, you must be a registered user. Please follow the web portal userregistration instructions to become a user. You may also contact customer service for assistance. Onceyou have registered follow the instructions below.Creating and Submitting E-timesheets1. Go to .aspx2. Enter your user name and password and click Login. Remember that your username andpassword are case sensitive.Continued on Page 21Using the E-Timesheet System Employee Instructions-Rev. 1-2016
Missouri Self-Directed SupportsWEB PORTALE-TIMESHEET INSTRUCTIONS3. When you log in you will be taken directly to the Employee View Timesheet screen4. Click on Create Timesheet on the top left of the screen.a. You will see the list of the Individual(s) who you provide services for.5. Click on Create Timesheet to the right of the Individual for whom you would like to create atimesheet.a. You will be directed to the Submit Timesheet page.6. Select the date you would like to submit time for by clicking on the calendar icon or typing the datein the date field and clicking enter.a. The system will determine the appropriate pay period based on the date you selected. You willsee the screen below.2Using the E-Timesheet System Employee Instructions-Rev. 1-2016
Missouri Self-Directed SupportsWEB PORTALE-TIMESHEET INSTRUCTIONSOption: Selecting a common service will populate the selected service for all lines. Onlyuse this if you perform the same service every day. Selecting it will populate the sameservice for every day in the timesheet.7. Choose a service for the first day you provided services for the Individual you serve.8. You are required to enter documentation for each shift that you work. To enter your shiftdocumentation, click, “Service Documentation” after you enter in the service.9. When you click, Service Documentation the following screen will appear:10. The “Activities” checklist is OPTIONAL; you do not need to select any checklist items. Youcan choose to select one or more checklist items, or not use the Activities checklist. If you do3Using the E-Timesheet System Employee Instructions-Rev. 1-2016
Missouri Self-Directed SupportsWEB PORTALE-TIMESHEET INSTRUCTIONSchoose to use the Activities checklist, you must still include Notes. The Activities checklist cannotbe used as an alternative to notes.11. Next document your shift documentation in the Notes field. The total character counter will helpyou track home long your notes are. There is no limit to the amount of characters you can include.Please be sure to indicate whether services were provided in or outside the individual’s home.a. PLEASE NOTE: If you leave the service documentation window open and are not enteringyour notes in the system, the session will expire in 15 minutes. If you are writing your notes in aseparate document, please complete the notes in that system before entering them inBetterOnline to ensure you are able to enter them in the system without losing any work.12. When you have completed your shift documentation, click, “OK”.13. Select the time that your shift started by selecting from the Time In hour and minute drop-downa. If your shift is an overnight shift, the system will prompt you to change and entry to 12:01 AM14. Select the time that your shift ended by selecting from Time Out hour and minute drop-downa. If you shift is an overnight shift, the system will prompt you to change the entry to 11:59 PM15. If you provide multiple services during a given day, click on There are more services to chooseanother service and add more hours.a. If you are providing a different service in your second shift, please select that service from thedrop down before moving on to enter your service documentation, as our system auto selects thesame service you provided in your last shift.16. When you are finished entering your time, go to the bottom of the screen and click on Next.4Using the E-Timesheet System Employee Instructions-Rev. 1-2016
Missouri Self-Directed SupportsWEB PORTALE-TIMESHEET INSTRUCTIONSa. The system will produce an overview of the timesheet and sum up the hours submitted.17. At this time, you have the option of changing the timesheet (by choosing Edit); saving what youhave entered so far (by choosing Save My Work) or submitting the timesheet for theIndividual/Employer to approve/reject. (see picture below)Please Note: A Timesheet can only be edited by clicking on the edit button. Do not hit the backbutton to return to the previous page.18. Select the “Submit” button when all hours of service have been completed for that pay period,otherwise hit “Save My Work” so that you can return to the timesheet and add more hours.19. In order to Submit your timesheet, you must mark the check box next to the statement “I, theEmployee, have worked the hours and services indicated above. I acknowledge that I have reviewedand have received training from my employer on the Individual Service Plan (ISP). I acknowledgethat false information or misrepresentation on this documentation sheet constitutes MedicaidFraud.” If you do not check this box, you will not be able to submit your timesheet.20. The final step is for the Individual/Employer to approve your timesheet.Important: PPL cannot pay an electronic timesheet until it has been approved by theIndividual/Employer.5Using the E-Timesheet System Employee Instructions-Rev. 1-2016
Missouri Self-Directed SupportsWEB PORTALE-TIMESHEET INSTRUCTIONSViewing the Status of TimesheetsYou can use the e-timesheet system to see if your timesheets have been approved by the Individual, whattimesheets have been received, and where the timesheet is in the payment process.1. Log into the portal.RESULT: The system will bring you to the Timesheet List screen. This screen lists alltimesheets that you have submitted for payment. The timesheets are sorted by submitteddate.2. Look at the “Status” column. This column provides information about the status of timesheets you DeniedPaidIn ProcessPendingGood to payWhat it meansHours have been entered into the timesheet and it is saved in our system.Saved timesheets have not been submitted for approval and will not be paidTimesheet has been submitted electronically by the Employee but notapproved yet by the Individual/EmployerTimesheet has been submitted electronically by the Employee, has beenapproved by the Individual/Employer, and waiting to be processed by PPLTimesheet has been submitted electronically by the Employee and rejectedby the Individual/Employer. Employees with rejected timesheets shouldcorrect and resubmit or speak directly with the Individual if you do notagree with the rejection.PPL has rejected a timesheet. Information letting you know why atimesheet was denied will appear on the timesheetTimesheet has been paid and has a check numberTimesheet has been approved for payment and is in the process of beingpaidTimesheet has been submitted and approved but could not be processed tobe paid. Information letting you know why a timesheet is pending willappear on the timesheetTimesheet has been processed and will be paid in the next pay cycle3. You can view any timesheet in the list by clicking View on the left-hand sideRESULT: This view will provide you with a detail listing of the time submitted.4. You can print off timesheets by clicking on Show Printable Version.RESULT: This will produce a pdf copy of the timesheet, which you can then print for yourrecords.6Using the E-Timesheet System Employee Instructions-Rev. 1-2016
Missouri Self-Directed SupportsWEB PORTALE-TIMESHEET INSTRUCTIONS5. If you realize you made a mistake after you have submitted a timesheet for approval, you can still edittimesheets that have been submitted to the Individual, IF THEY HAVE NOT YET BEEN APPROVEDby clicking Edit. You can also delete timesheets that have been submitted to the Individual but have notyet been approved by clicking Delete.Searching for TimesheetsYou can also use the web portal to search for a particular timesheet. There are several categories to help narrowdown your search.1. Log into the portal.2. If you want to search by current status of your timesheet, use the Timesheet Status field. This fieldallows you to search for all of the timesheets under your name or for paid or unpaid timesheets as youchoose.3. If you would like to search by timesheet start date, select the Timesheet Start Date Range. This fieldallows you to enter in the date of a specific pay period. For example, if you enter in February 7, 2016,every timesheet which begins with this time period will appear below:4. If you would like to search by timesheet start date, select the Timesheet Submitted Date Range. Thisfield allows you to enter in the date a timesheet was submitted. This is a helpful field if you wanted tosee all of the timesheets you submitted on a given day, even if they are for different pay periods.7Using the E-Timesheet System Employee Instructions-Rev. 1-2016
We are thrilled that you will be using the BetterOnline web portal e-timesheet to submit your hours and service documentation! Utilizing e-timesheets will allow you to complete timesheets online, submit timesheets electronically, view the status of timesheets, and search for timesheets previously entered into the system. .