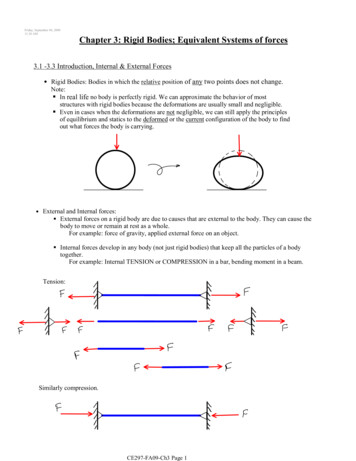
Transcription
RIGID ENGINEERED LUXURY VINYLGENERAL INSTALLATION INSTRUCTIONS FOR VÄLINGE 2G ANGLE-TO-ANGLE FLOORINGWARNINGPrior to installation, please ensure that the product received is the correct style and color as well as to thecustomer’s satisfaction. If there are any doubts, do not install the flooring and contact the retailer. BeaulieuCanada will not be held responsible for any costs relating to the installation of unsatisfactory or incorrectproduct.ACCLIMATIONIf the product was previously stored in a temperature between 45 F and 105 F (7.2 C - 40.5 C), noacclimation is required. If that is not the case, store the UNOPENED BOXES in the room where the flooring isto be installed for at least 48 hours prior to installation. Always store the boxes on a flat and level surface;never store the boxes on their sides. Heating and air conditioning should be operational and set between65 F - 85 F (18.3 C - 29.4 C) for the acclimation and installation period.RECOMMENDED TOOLS AND MATERIALS Safety glasses Measuring tape Square Utility knife Straight edge Spacers Chalk line Embossing leveler/floor patch (if necessary) 6 mil (0.006’’/0.15 mm) polyethylene (if necessary)UNDERLAYMENTDo not install a separate underlayment if the product you purchased already comes with an attachedunderlayment.SUITABLE SUBSTRATESBeaulieu Canada RELVF can be installed over many floors. All carpeting and padding need to be removed.Make sure that the surface is clean, dry, structurally sound and flat within 3/16" per 10 foot radius (4.7 mmper 3 m). Supporting floors must be rigid as too much deflection can result in a failed installation. Maximumdeflection should not exceed 3/64" (1.1 mm).Beaulieu Canada RELVF should not be installed over plank floors, cushioned-backed vinyl flooring, asphaltbased floors, carpet, self-adhering plank or tile, laminate or other floating flooring or structurally-damagedconcrete; concrete should be free from dust, solvents, paint, wax, grease, oil, sealing compounds or curingagents.Page 1 6
GENERAL INSTALLATION INSTRUCTIONSRIGID ENGINEERED LUXURY VINYL VÄLINGE 2G ANGLE-TO-ANGLECONCRETE SUBSTRATESConcrete subfloors must be inspected prior to installation and if they do not meet the followingrequirements, do not install flooring. Concrete shall have a minimum compressive strength of 3500 psi.Concrete subfloors must be cured for 60 days prior to installation of the flooring, and should be tested forexcessive moisture. Moisture vapor emission rate should not exceed 5 lb/1000 sq. ft. (2.27 kg/92.9 sq. m)/24hours per ASTM F1869. When using the ASTM F2170 test method, the internal relative humidity should notexceed 80%, and the pH level should be between 7 and 9. If the concrete subfloor is not tested for moistureand pH and/or does not meet the stated requirements, a 6 mil (0.006’’/0.15 mm) polyethylene must beinstalled over the concrete prior to the installation of the finished flooring.WOODEN SUBSTRATESWood floors should be a minimum of 3/4" (19 mm) thick, APA approved grade tongue and groove plywoodor 23/32" (18.25 mm) OSB, with a smooth finish, free from spring and deflection. If the wooden subfloor isnot an APA approved flooring grade underlayment, a minimum of 1/4" (6.35 mm) approved woodunderlayment must be adhered to the existing substrate. Make sure that the surface is clean, dry, structurallysound and flat within 3/16" per 10 foot radius (4.7 mm per 3 m). All fastener indentations and joints shouldbe level and smooth using appropriate patching compounds. Deflection should not exceed 3/64" (1.1 mm).EXISTING RESILIENT FLOORSWhen installing Beaulieu Canada RELVF over existing resilient flooring, ensure that the existing sheet goodor tile product is in good condition, that it was installed in the full spread glue method and is properlysecured. Beaulieu Canada RELVF can be installed over one layer of non-cushioned sheet good flooring.Existing tile or sheet resilient floorings should be stripped using a product that is an appropriate stripper forvinyl to remove wax or other contamination, rinsed with clear water and allowed to dry. Very smooth orhigh-gloss floors need to be lightly abraded to rough up the surface to allow proper adhesive bonding.GYPSUM FLOORSBeaulieu Canada RELVF can be installed as a floating floor over flooring grade gypsum subfloors whenproperly installed over a subfloor that is structurally sound and flat within 3/16" per 10-foot radius (4.7 mmper 3 m).MARBLE, QUARRY TILE, TERRAZZO, CERAMIC TILEProperly cleanse substrate using a commercial degreasing/dewaxing solution. Grind or abrade any highlypolished or irregular surfaces. Fill any low areas, chips and grout joints that may telegraph through the newflooring.RADIANT-HEATED FLOORSBeaulieu Canada RELVF can be installed over embedded radiant-heated floors provided the operatingtemperature never exceeds 85 F (29.4 C). The radiant system should be in operation for three (3) weeksprior to installation of the flooring. For 48 hours prior to and during installation, the system should be keptat 65 F (18.3 C). Once the installation is completed, the heat should be gradually increased by a maximumof 5 F (2.8 C) per day until the desired setting is reached. Do not use radiant heat systems that expose theflooring to wide variations in temperature, such as a wire induction mat system. The installation area of theflooring shall not contain heated and non-heated areas, unless expansion joints separate them. Keep in mindthat loose rugs or carpets may accidentally function as heat insulators and raise the temperature to morethan the tolerated maximum surface temperature of 85 F (29.4 C).Page 2 6
GENERAL INSTALLATION INSTRUCTIONSRIGID ENGINEERED LUXURY VINYL VÄLINGE 2G ANGLE-TO-ANGLEJOB SITE CONDITIONS/SUBSTRATE PREPARATION Room temperature must be maintained between 65 F (18.3 C) and 85 F (29.4 C) at all times. Substrate should be free of dust, debris from paint, varnish, wax, oils, curing sealers, solvents andother foreign matter. Any adhesive residue from prior installations should be completely removed. Any looseness of the substrate should be secured. High spots should be levelled and low spots should be filled with a proper material to ensure substrateis flat within 3/16" per 10 foot radius (4.7 mm per 3 m). All construction seams, expansion joints, and holes should be filled level with the surrounding surfaceto eliminate telegraphing of such irregularities.Caution: If you plan to remove old resilient flooring material or any type of old adhesive, please be awarethat it may contain asbestos fibers or crystalline silica; therefore, avoid creating dust. Inhalation of such dustis a cancer and respiratory tract hazard and local regulations may require professional removal. Instructionsfor the removal of old flooring materials and adhesives may be found in the RFCI Recommended WorkPractices for Removal of Resilient Floor Coverings. You may contact the Resilient Floor Covering Institute at706-882-3833 or www.rfci.com.PATCHING AND LEVELINGUse only cement-based patching and leveling compounds. Check with patching and leveling compoundmanufacturer for curing times. Check moisture levels before starting installation to ensure moisture levelsare within guidelines as outlined in the "Concrete Substrates" paragraph.The contractor or owner is responsible for cure time, moisture content testing, and the structural integrityof any leveling or patching compound used.EMBOSSING LEVELERWhen installing over an existing resilient flooring material, an embossing leveler may be required to preventthe existing material pattern from telegraphing through the new material.PRIOR TO INSTALLATION Cartons should be stored horizontally at all times. Protect carton corners from damage. Inspect all planks/tiles for visible defects and damage before and during installation. Do not installdamaged planks/tiles. Beaulieu Canada will not accept responsibility for claims on flooring installed withvisible defects. During installation, inspect the groove area and remove any debris that may preventproper assembly of planks/tiles. Beaulieu Canada RELVF is production-run sensitive. Ensure that all planks/tiles you are installing comefrom the same production run. Beaulieu Canada cannot guarantee that any future replacement oradditional installation will match the originally-installed product. Ensure that all boxes are of the correct product and when installing, open several boxes at a time andmix planks/tiles from different boxes for best results and overall look. Room temperature should be no less than 65 F (18.3 C) for 48 hours before, during and afterinstallation. Remove all existing moldings. Undercut doorway moldings to the thickness of the flooring. Beaulieu Canada RELVF is a floating floor and should never be nailed down to the substrate.Page 3 6
GENERAL INSTALLATION INSTRUCTIONSRIGID ENGINEERED LUXURY VINYL VÄLINGE 2G ANGLE-TO-ANGLE Beaulieu Canada RELVF is intended for indoor use only. Determine in which direction the planks/tiles will be installed. It is recommended that the flooring beinstalled running parallel to the longest wall. Carefully measure the room to determine the width of the last row of planks/tiles. If the width is lessthan 2" (50 mm), excluding the tongue, the width of the first row of planks/tiles will have to be cutaccordingly. A minimum of 1/4" (6.35 mm) expansion space is required around the perimeter of the room and allvertical objects.COMMERCIAL INSTALLATIONAll commercial installations require approval by a Beaulieu Canada sales representative.Contact your Beaulieu Canada retailer for further details.INSTALLATION1. Begin laying planks/tiles from the left side of the starting wall and work to the right side. The tongueof the plank/tile should face the starting wall.2. Place 1/4" (6.35 mm) spacers between the short and long side of the planks/tiles and the wall. Alwaysposition one spacer between the wall and where the planks/tiles join.3. The end joints of the planks/tiles in the first row are assembled by inserting the tongue side into thegroove side of the previous plank/tile at a low angle. Gradually lower the plank/tile down flat until theend joint closes, ensuring that the planks/tiles are perfectly aligned. Install remaining full planks/tilesin the first row.4. The last plank/tile in the first row will need to be cut. Measure the distance between the wall and thesurface of the last full plank/tile. Subtract 1/4" (6.35 mm) from this measurement to allow for thespacer. If this measurement is less than 8" (20 cm), the first plank/tile in the row should be cut. Thefirst and last plank/tile in each row should be at least 8" (20 cm) in length. Planks/tiles are cut using asharp utility knife and a square. Score the surface of the plank/tile with the knife and snap theplank/tile at the score line.5. The remaining piece cut off from the last plank/tile in the first row may serve as the first plank/tile inthe second row provided it is at least 8" (20 cm) long. Always stagger end joints from row to row aminimum of 8" (20 cm) apart.6. Install the long side of the first plank/tile of the second row. Place a 1/4" (6.35 mm) spacer betweenthe wall and the short side of the plank/tile. Insert the tongue side into the groove side of the plank/tilefrom the previous row at a low angle and lower flat to the substrate.7. Install the second plank/tile of the second row. Position the long side of the plank/tile with the tongueside overlapping the groove of the planks/tiles in the previous row approximately 1/8" (3.2 mm). Then,angle the end joint into the previous plank/tile. Angle the plank/tile up and gently push forward untilthe plank/tile locks into the plank/tile of the previous row. Continue installing planks/tiles in thesecond row. It is important to make sure that the first two rows are straight and square as they canaffect the entire installation.8. Continue working from left to right, row by row. Be sure to maintain a 1/4" (6.35 mm) space aroundall walls and vertical objects. To maintain a random appearance, remember to offset end joints aminimum of 8" (20 cm).9. Transition moldings are required every 65 feet (19.19 m) in any direction.Page 4 6
GENERAL INSTALLATION INSTRUCTIONSRIGID ENGINEERED LUXURY VINYL VÄLINGE 2G ANGLE-TO-ANGLEFINISHING THE INSTALLATION After all planks/tiles have been installed, remove spacers from perimeter of room. Do not fasten any moldings through the flooring. Install quarter-round or baseboard molding. Molding should be of sufficient size to cover the1/4" (6.35 mm) space and should be fastened to the wall, not to the flooring.IMPORTANT Use plywood to cover the top of the flooring when moving heavy furniture or appliances into position. Use floor protectors under the legs of furniture and chairs. Do not nail down Beaulieu Canada RELVF. Beaulieu Canada RELVF is intended for indoor use only. Beaulieu Canada RELVF is warranted as a floor covering only. Post-installation temperature should be maintained between -4 F and 122 F (-20 C - 50 C). Relativehumidity should be maintained between 40% and 70%.Follow the Beaulieu Canada Care and Maintenance instructions to properly care for your flooring. These canbe found on our website at beaulieucanada.com or you may contact your Beaulieu Canada retailer.INSTALLATION ILLUSTRATIONSPage 5 6
GENERAL INSTALLATION INSTRUCTIONSRIGID ENGINEERED LUXURY VINYL VÄLINGE 2G ANGLE-TO-ANGLEINSTALLATION VIDEOhttps://www.youtube.com/watch?v qe6VP JhgqMHomeowner ObligationsTo maintain warranty coverage and ensure fast and easy warranty service, the homeowner is responsible forthe following: Keep five (5) planks/tiles of the RELVF product after installation for testing purposes.Keep and be able to provide the original sales receipt or documentation illustrating proof of purchaseand installation date of the product.Make sure the flooring is installed according to Beaulieu Canada Installation Instructions.Keep a list of cleaners used to maintain the flooring.Please visit our website at beaulieucanada.com for the most up-to-date version of this documentas it may have been revised and updated since this printed version.Warranty Guide as well as Care and Maintenance instructions can also be found on our website atbeaulieucanada.com, or you may contact your retailer.10.07.2021Page 6 6
RIGID ENGINEERED LUXURY VINYL GENERAL INSTALLATION INSTRUCTIONS FOR VÄLINGE 2G ANGLE-TO-ANGLE FLOORING WARNING . flooring. RADIANT-HEATED FLOORS Beaulieu Canada RELVF can be installed over embedded radiant-heated floors provided the operating temperature never exceeds 85 F (29.4 C). The radiant system should be in operation for three (3 .