Transcription
Puritan Bennett 840 VentilatorUser’s Pocket GuidePuritan Bennett 840 Ventilator Pocket Guidei
The Puritan Bennett 840 Ventilator System is manufactured in accordancewith Covidien proprietary information, covered by one or more of the followingU.S. Patents and foreign equivalents: 4,954,799; 5,161,525; 5,271,389; 5,301,921;5,319,540; 5,339,807; 5,368,019; and 5,390,666. 840, Flow-by, DualView, SandBox,SmartAlert and Bi-Level are trademarks of Covidien Puritan Bennett .The information contained in this manual is the sole property of Covidien andmay not be duplicated without permission. This manual may be revised orreplaced by Covidien at any time and without notice. While the information setforth herein is believed to be accurate, it is not a substitute for the exercise ofprofessional judgment.The ventilator should be operated and serviced only by trained professionals.Covidien acknowledges sole responsibility with respect to the ventilator, and its use,as stated in the limited warranty provided.Nothing in this publication shall limit or restrict in any way Covidien theright to revise or otherwise change or modify the equipment (including itssoftware) described herein, without notice. In the absence of an express, writtenagreement to the contrary, Covidien has no obligation to furnish any suchrevisions, changes or modifications to the owner or user of the equipment(including its software) described herein.iiPuritan Bennett 840 Ventilator Pocket Guide
Table of contentsIntroduction. . . . . . . . . . . . . . . . . . . . . . . . . . . . . . . . . . . . . . . . . . . . . . . . . 1The Puritan Bennett 840 Ventilator. . . . . . . . . . . . . . . . . . . . . . . . . . . . 2Connections . . . . . . . . . . . . . . . . . . . . . . . . . . . . . . . . . . . . . . . . . . . . . . . . . 4Power . . . . . . . . . . . . . . . . . . . . . . . . . . . . . . . . . . . . . . . . . . . . . . . . . . . . 4Air and oxygen supplies. . . . . . . . . . . . . . . . . . . . . . . . . . . . . . . . . . . . . . . 6Patient circuit. . . . . . . . . . . . . . . . . . . . . . . . . . . . . . . . . . . . . . . . . . . . . . . . 8Patient setup. . . . . . . . . . . . . . . . . . . . . . . . . . . . . . . . . . . . . . . . . . . . . . . . 12New patient setup. . . . . . . . . . . . . . . . . . . . . . . . . . . . . . . . . . . . . . . . . 13Apnea settings. . . . . . . . . . . . . . . . . . . . . . . . . . . . . . . . . . . . . . . . . . . . 14Calibrating the oxygen sensor. . . . . . . . . . . . . . . . . . . . . . . . . . . . . . . 14Once patient setup is complete. . . . . . . . . . . . . . . . . . . . . . . . . . . . . . 14Inspiratory pause. . . . . . . . . . . . . . . . . . . . . . . . . . . . . . . . . . . . . . . . . . 15Expiratory pause. . . . . . . . . . . . . . . . . . . . . . . . . . . . . . . . . . . . . . . . . . 15Alarm settings. . . . . . . . . . . . . . . . . . . . . . . . . . . . . . . . . . . . . . . . . . . . . . . 21Main setting changes. . . . . . . . . . . . . . . . . . . . . . . . . . . . . . . . . . . . . . . . . 22Mode, breath type and batch (multiple) changes. . . . . . . . . . . . . . . . . 23Previous setup. . . . . . . . . . . . . . . . . . . . . . . . . . . . . . . . . . . . . . . . . . . . 23Humidification type, humidifier volume, O2 sensorenable/disable, and disconnect sensitivity (Dsens). . . . . . . . . . . 24Constant during rate change. . . . . . . . . . . . . . . . . . . . . . . . . . . . . . . . 25Alarm handling . . . . . . . . . . . . . . . . . . . . . . . . . . . . . . . . . . . . . . . . . . . . . 26Alarm silence. . . . . . . . . . . . . . . . . . . . . . . . . . . . . . . . . . . . . . . . . . . . . 27Alarm reset. . . . . . . . . . . . . . . . . . . . . . . . . . . . . . . . . . . . . . . . . . . . . . . 27Alarm log. . . . . . . . . . . . . . . . . . . . . . . . . . . . . . . . . . . . . . . . . . . . . . . . 28Alarm messages. . . . . . . . . . . . . . . . . . . . . . . . . . . . . . . . . . . . . . . . . . . 29Graphics. . . . . . . . . . . . . . . . . . . . . . . . . . . . . . . . . . . . . . . . . . . . . . . . . . . .37Display . . . . . . . . . . . . . . . . . . . . . . . . . . . . . . . . . . . . . . . . . . . . . . . . . . 37Color. . . . . . . . . . . . . . . . . . . . . . . . . . . . . . . . . . . . . . . . . . . . . . . . . . . . 37Freezing . . . . . . . . . . . . . . . . . . . . . . . . . . . . . . . . . . . . . . . . . . . . . . . . . 39Plot setup. . . . . . . . . . . . . . . . . . . . . . . . . . . . . . . . . . . . . . . . . . . . . . . . 39Once graphics are displayed. . . . . . . . . . . . . . . . . . . . . . . . . . . . . . . . 40The ? key. . . . . . . . . . . . . . . . . . . . . . . . . . . . . . . . . . . . . . . . . . . . . . . . . . . 41Bi-Level. . . . . . . . . . . . . . . . . . . . . . . . . . . . . . . . . . . . . . . . . . . . . . . . . . . . 42Patient setup. . . . . . . . . . . . . . . . . . . . . . . . . . . . . . . . . . . . . . . . . . . . . .42Constant during rate change. . . . . . . . . . . . . . . . . . . . . . . . . . . . . . . . 43Using pressure support with Bi-Level. . . . . . . . . . . . . . . . . . . . . . . . 44Manual inspiration in Bi-Level mode . . . . . . . . . . . . . . . . . . . . . . . . 45Tube compensation. . . . . . . . . . . . . . . . . . . . . . . . . . . . . . . . . . . . . . . . . . 46Patient setup. . . . . . . . . . . . . . . . . . . . . . . . . . . . . . . . . . . . . . . . . . . . . .46Ventilator self-tests . . . . . . . . . . . . . . . . . . . . . . . . . . . . . . . . . . . . . . . . . . 48Running SST . . . . . . . . . . . . . . . . . . . . . . . . . . . . . . . . . . . . . . . . . . . . . 48Safety modes. . . . . . . . . . . . . . . . . . . . . . . . . . . . . . . . . . . . . . . . . . . . . . . . 53Preventive maintenance. . . . . . . . . . . . . . . . . . . . . . . . . . . . . . . . . . . . . . 55Puritan Bennett 840 Ventilator Pocket Guideiii
FiguresFigure 1.Figure 2.Figure 3.Figure 4.Figure 5.Figure 6.Figure 7.Figure 8.Figure 9.Figure 10.Figure 11.Figure 12.Figure 13.Figure 14.Figure 15.Figure 16.Puritan Bennett 840 Ventilator components. . . . . . . . . 3Connecting the ventilator power cord. . . . . . . . . . . . . . . . 4Connecting the air and oxygen supplies. . . . . . . . . . . . . . 6Connecting the patient circuit . . . . . . . . . . . . . . . . . . . . . . 8Installing the expiratory filter andcollector vial. . . . . . . . . . . . . . . . . . . . . . . . . . . . . . . . . . . . . . 9Using the collector vial with or withoutdrain bag. . . . . . . . . . . . . . . . . . . . . . . . . . . . . . . . . . . . . . . . 10Ventilator startup screen. . . . . . . . . . . . . . . . . . . . . . . . . . 12Puritan Bennett 840 Ventilatorgraphic user interface (GUI). . . . . . . . . . . . . . . . . . . . . . . 20Alarm setup . . . . . . . . . . . . . . . . . . . . . . . . . . . . . . . . . . . . .21Constant during rate change(inspiratory time selected). . . . . . . . . . . . . . . . . . . . . . . . . 25Alarm indicators. . . . . . . . . . . . . . . . . . . . . . . . . . . . . . . . . 26Alarm log. . . . . . . . . . . . . . . . . . . . . . . . . . . . . . . . . . . . . . . 29Alarm message format. . . . . . . . . . . . . . . . . . . . . . . . . . . . 30Pressure-volume loop. . . . . . . . . . . . . . . . . . . . . . . . . . . . . 38Bi-Level breath timing bar. . . . . . . . . . . . . . . . . . . . . . . . . 43Bi-Level with pressure support. . . . . . . . . . . . . . . . . . . . . 45TablesTable 1.Table 2.Table 3.Table 4.Table 5.Table 6.ivInspiratory pause maneuver displays. . . . . . . . . . . . . . . . 16Alarm messages. . . . . . . . . . . . . . . . . . . . . . . . . . . . . . . . . . 31Ideal body weight (IBW) and tube I.D. . . . . . . . . . . . . . 47Individual test results in SST. . . . . . . . . . . . . . . . . . . . . . . 50Overall SST results. . . . . . . . . . . . . . . . . . . . . . . . . . . . . . . 51Maintenance summary. . . . . . . . . . . . . . . . . . . . . . . . . . . .55Puritan Bennett 840 Ventilator Pocket Guide
IntroductionThis pocket guide gives you a quick overview of how to setup and use the Puritan Bennett 840 Ventilator System.As you read through this pocket guide, this symbol: asks you to take an actionThis pocket guide is intended to supplement (not replace)the Puritan Bennett 840 Ventilator Operator’s andTechnical Reference Manual, which should always beavailable while using the ventilator.Different versions of the Puritan Bennett 840 Ventilatorcan have minor variations in labeling (e.g., keyboard overlays and off-screen alarm status indicators).For more detailed information on any of the topics coveredin this pocket guide, please see the Puritan Bennett 840Ventilator Operator’s and Technical Reference Manual.(Also please see the Puritan Bennett 840 VentilatorService Manual.)Puritan Bennett 840 Ventilator Pocket Guide1
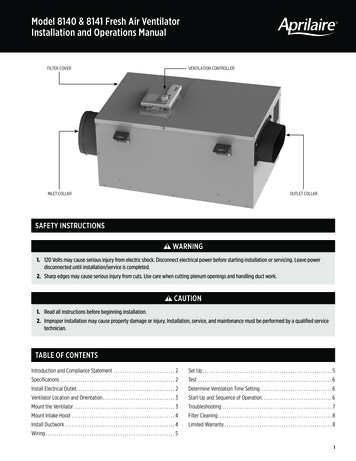
The Puritan bennett 840 VentilatorThe Puritan Bennett 840 Ventilator includes a breath delivery unit (BDU) that controls ventilation, and a graphicuser interface (GUI) that monitors and displays ventilatorand monitored data (see Figure 1). The ventilator suppliesmandatory (pressure or volume controlled) or spontaneousbreaths (inspiratory flows of up to 200 L/min, with or withoutpressure support) with a preset oxygen concentration. Breathscan be pressure- or flow-triggered (using Flow-by).Touch screens display monitored data separately from ventilator settings for easy assessment of your patient’s condition.This allows you to preview settings before applying themto your patient, and the Alarm System helps you to quicklydetermine the urgency and root cause of alarm conditions.The optional 806 Compressor provides compressed air to theBDU, and can be used in place of wall or cylinder air. Thestandard 802 Backup Power Source (BPS) provides dc powerto the BDU and GUI in the event that ac power is lost.Puritan Bennett 840 Ventilator mounting options include acart, pole mount or wall mount.2Puritan Bennett 840 Ventilator Pocket Guide
Graphic UserInterface (GUI)CompressorCartBreath DeliveryUnit (BDU)802 Backup PowerSource (BPS)Figure 1.Puritan Bennett 840 Ventilator componentsPuritan Bennett 840 Ventilator Pocket Guide3
ConnectionsThis section tells you how to connect the Puritan Bennett 840 Ventilator to AC power, air and oxygen supplies andthe patient circuit.Power Plug the ventilator power cord to AC power(see Figure 2). The power cord retainer protects againstaccidental disconnection, and must always be in placeduring operation.WARNINGTo avoid electrical shock hazard, connect the ventilatorpower cord into a grounded AC power outlet.Power cordPower cord retainerTo AC powerFigure 2.Connecting the ventilator power cord4Puritan Bennett 840 Ventilator Pocket Guide
Normally, the Puritan Bennett 840 Ventilator System is mains-powered. The mandatory 802 Backup Power Source(BPS) operates the ventilator when AC power drops below aminimum level. The ventilator recharges the BPS during ACpower operation.NOTE:The BPS is designed for short-term use only, and is notintended as a primary alternative power source. The BPSis intended to power the BDU and GUI only. In case ofAC power loss, no power is available for the compressoror humidifier.If you turn on the ventilator after it has been unplugged foran extended period, the LOW BATTERY alarm may becomeactive. If so, recharge the BPS by leaving it connected toan operating ventilator for up to eight hours. If the LOWBATTERY alarm is still active or if the INOPERATIVEBATTERY alarm is active, the BPS battery must be replacedby a qualified service technician.Puritan Bennett 840 Ventilator Pocket Guide5
Air and oxygen supplies Connect air and oxygen supplies to the ventilator (seeFigure 3). The ventilator can use air and oxygen fromcylinder or wall supplies. Supply pressures must be 35 to100 psi (241 to 690 kPa).Air inletconnectorAir inletfilter bowlOxygen inletconncerAir hose(from airsupply)Oxygen hose(from oxygensupply)Figure 3.Connecting the air and oxygen suppliesWARNINGConnect only air to the air inlet, and only oxygen to theoxygen inlet. Do not attempt to switch air and oxygenor connect any other gas.6Puritan Bennett 840 Ventilator Pocket Guide
WARNINGTo ensure that a constant gas supply is available to thepatient, always connect at least two gas sources to theventilator. (There are three gas source connections: thecompressor, air inlet and oxygen inlet.)CAUTIONTo prevent damage to the ventilator, ensure thatthe connections to the air and oxygen supplies are cleanand unlubricated, and that there is no water in the air oroxygen supply gas. If you suspect water in the air supplygas, use an external wall air water trap to prevent waterdamage to the ventilator and its components.Puritan Bennett 840 Ventilator Pocket Guide7
Patient circuit Connect the patient circuit to the ventilator (see Figure 4).(From patient)(To patient)Expiratory filterInspiratory filterTubingCollector vialInspiratory limbof patient circuitHumidifierFigure 4.Connecting the patient circuit8Puritan Bennett 840 Ventilator Pocket Guide
Figure 5 shows you how to install the expiratory filterand collector vial to the ventilator. Attach the expiratorylimb of the patient circuit to the filter’s expiratory limbconnection.Pull latchup to installfilter, pulldown tohold filterand collectorvial in placeSlide filter rimonto these tracksFilterhousingareaExpiratorylimb connectionFigure 5.Installing the expiratory filter and collector vialPuritan Bennett 840 Ventilator Pocket Guide9
Cap the collector vial drain port if you are not using thedrain bag (see Figure 6). If you are using the drain bag, install clamp on tubing.Uncap collector vial drain port and install tubing tocollector vial drain port. Connect other end of tubingto drain bag. If the ventilator is mounted on the cart,place the drain bag in the cart drawer (see Figure 6).The drain bag is designed to lie flat, and is not designedto be suspended.Place drainbag in cartdrawerTubingFigure 6.Using the collector vial with or without drain bag10Puritan Bennett 840 Ventilator Pocket Guide
WARNINGCovidien recommends that you use one of the identifiedpatient circuits (see the Puritan Bennett 840 VentilatorOperator’s and Technical Reference Manual for patientcircuit testing specifications). Using a circuit with ahigher resistance does not prevent ventilation, but cancause an SST fault or compromise the patient’s ability tobreathe through the circuit.NOTE:To ensure optimum compliance compensation, Covidienrecommends that you use low-compliance patient circuits.(For pediatric patients, the compliance compensationvolume limit is four times the set tidal volume, in additionto the set tidal volume.)NOTE:To ensure optimum ventilation, use pediatric circuits forpatients whose ideal body weight (IBW) is 24 kg (53 lbs)or less, and adult circuits for patients whose IBW is morethan 24 kg.Puritan Bennett 840 Ventilator Pocket Guide11
Patient setupOnce you turn on the ventilator or run SST, the ventilatorruns POST, then displays the Ventilator Startup screen(see Figure 7) on the lower screen.NOTE:If TC was used on the previous patient setup, a noteemphasizing tube type and tube I.D. appears below theSAME PATIENT button explanation.Figure 7.Ventilator startup screen Touch SAME PATIENT, then press ACCEPT tocontinue ventilating with the most recent settings.Ventilation does not begin until a patient is connected. Touch NEW PATIENT to begin ventilating withnew settings.12Puritan Bennett 840 Ventilator Pocket Guide
NOTE:If you are unsure of the meaning of any symbol forventilator settings, alarms or monitored data, touch thesymbol on the screen; its definition will appear at the leftbottom corner of the lower screen. (Figure 8 shows wheresymbol definitions appear on the GUI.)New patient setup Touch the IBW button, then turn the knob to adjustthe IBW. (Many initial settings and setting limits areautomatically determined based on the IBW.) Theproposed value is shown in red.TouchCONTINUE (this button does not appear until you touch IBW), or touch RESTART to return to theVentilator Startup screen. At the New Patient Setup screen, settings for mode,mandatory type (for manual inspirations, if the selectedmode is SPONT), spontaneous type (if applicable)and trigger type appear. For any setting you want tochange, touch its button, then turn the knob to selectthe value. When you are finished changing settings,touch CONTINUE. At the New Patient Settings screen, more settings appear.Touch each setting you want to change, then turn theknob to select its value. (To cancel a highlighted change,press CLEAR.)PressACCEPT to put all settings into effect. Normal ventilation begins once a patient is connected. (Any timebefore you press ACCEPT, you can touch RESTART torestart setting changes.)Puritan Bennett 840 Ventilator Pocket Guide13
Apnea settingsAlthough you aren’t required to change or confirm apneasettings, you should verify that they are appropriate forthe patient. Apnea settings are automatically determinedbased on IBW, but can be changed. If you selected NEW PATIENT, the Current ApneaSettings screen appears at the end of patient setup. If you selected SAME PATIENT, touch the APNEAbutton at the bottom of the lower screen to viewapnea settings.If you change any apnea settings, press ACCEPT to putnew settings into effect.Calibrating the oxygen sensorPress the 100% O2 /CAL 2 MIN key. This causes theventilator to deliver 100% oxygen (if available) for twominutes and calibrates the oxygen sensor.The ventilator’s oxygen monitoring feature is alwaysactive unless you disable the oxygen sensor (see the MoreSettings screen). The oxygen sensor is always enabled whenyou power up the ventilator.Once patient setup is completeOnce the settings are accepted, you can attach a patient tothe ventilator. Ventilation only begins when the ventilatorsenses that a patient is attached. (If you attach a patientbefore completing setup, the ventilator begins safetyventilation and declares a PROCEDURE ERROR alarmthat resets once patient setup is complete.)14Puritan Bennett 840 Ventilator Pocket Guide
Inspiratory pausePressing the INSP PAUSE key causes the ventilator to schedulean automatic pause maneuver as follows (see Table 1). At the next scheduled inspiration, the inspiratory andexpiratory valves close to allow pressure to equilibratebetween the patient and the circuit. The inspiratory pause continues until a stable pressure isreached or until two seconds elapse, whichever comes first. The graphics screen will automatically be displayed (if itis not already active). The trace freezes and the values forcompliance and resistance are displayed. You can extend the pause beyond two seconds to amaximum of seven seconds by holding down the INSPPAUSE key.Expiratory pausePressing the EXP PAUSE key causes the ventilator toschedule an automatic expiratory pause maneuver asfollows: Press EXP PAUSE key to schedule automatic expiratorypause maneuver. During the next exhalation, the inspiratory and expiratoryvalves close to allow pressure to equilibrate between thecircuit and the patient. The expiratory pause continues until a stable pressure isreached or two seconds elapse, whichever comes first. The graphics screen will automatically be displayed (if itis not already active). The trace freezes and the values forintrinsic (auto) PEEP and total PEEP are displayed. You can extend the pause beyond two seconds to amaximum of 20 seconds by holding down the EXP PAUSEkey.Puritan Bennett 840 Ventilator Pocket Guide15
16R (******)R (******)R()Message asdictated by othertestsC (******)C(0)orC (500)Or Resistance (R)(if displayed):C (******)When you seeCompliance (C):Check the breathing waveforms andmonitored patient data for cluesabout these questionable inputs.Check the breathing waveforms andmonitored patient data for cluesabout these questionable inputs.Check the patient-ventilator interaction, the breathing waveforms, andthe patient circuit for underlyingcauses.The difference in pressure between end plateau and end exhalation 0.1 cm H2O. Thisis below the limits of reliable resolution. TheR and C values are therefore questionable.C 0 mL/cm H2O or C 500 mL/cm H2O.These measurements are outside ofphysiological limits.Do this:C 0.1 mL/cm H2O or patient flow 0.1 L/min. This points to questionable inputs tothe C equation, which would in turn renderR questionable. The low patient flow is belowthe threshold of reliable measurement.It means:Table 1. Inspiratory pause maneuver displaysPuritan Bennett 840 Ventilator Pocket Guide
R 0 cm H2O/L/s or R 500 cm H2O/L/s.These measurements are outside of physiological limits.Sub-threshold input value(s) C 1/3 of ventilator breathing system compliance (derivedfrom SST). Both C and R are questionable.Exhalation was not complete. This rendersend-expiratory pressure and total exhaledflow values questionable.R (yyy)R (yyy)IncompleteexhalationC (xxx)C (xxx)IncompleteexhalationIt means:R(0)orR (500)Or Resistance (R)(if displayed):C( )Message asdictated byother testsWhen you seeCompliance (C):Check for an insufficient expiratoryinterval. If possible, shorteninspiration time and reducerespiratory rate.If the patient’s IBW 24 kg, considerinstalling a pediatric patient circuit.Check the patient-ventilatorinteraction, the breathingwaveforms, and the patientcircuit for underlying causes.Do this:Table 1. Inspiratory pause maneuver displays (continued)Puritan Bennett 840 Ventilator Pocket Guide17
When you seeCompliance (C):18C 1.0 mL/cm H2O. This results fromquestionable input data. This out-of-rangevalue also renders R questionable.R 150 cm H2O/L/s. This results fromquestionable input data, possibly C.R (yyy)Out of rangePlateau is not “flat” (lung and circuitpressures did not equilibrate) or pausepressure was excessively noisy. Theseproblems render R and C questionable.It means:R (yyy)QuestionablemeasurementR (yyy)No plateauOr Resistance (R)(if displayed):Check the breathing waveforms andmonitored patient data for cluesabout these questionable inputs.Check the breathing waveforms andmonitored patient data for cluesabout these questionable inputs.If plateau continues to decline, checkfor a leak in the breathing circuit,possibly around the cuff. If plateauis unstable, check for moisturecondensing in a “lazy” loop or abreathing circuit being jiggled.Do this:Table 1. Inspiratory pause maneuver displays (continued)Puritan Bennett 840 Ventilator Pocket Guide
When you seeCompliance (C):The pressure rose slowly at the end of thesquare flow waveform. This suggests thatthe pressures, volumes and flows involvedare minimal and questionable. This is notexpected during normal ventilation.The difference between the circuit pressureat the end of the plateau and the pressureat the end of exhalation 0.5 cm H2O. Thisresults in a questionable R value.R (yyy)QuestionablemeasurementIt means:R (yyy)QuestionablemeasurementOr Resistance (R)(if displayed):Check for a highly compliant lunginflated slightly. If the tidal volumecan be safely increased, try that.Check the pressure-time waveformto see whether the patient delayedinspiration until the end of gasdelivery.Do this:Table 1. Inspiratory pause maneuver displays (continued)Puritan Bennett 840 Ventilator Pocket Guide19
The top of the upper screen shows monitored data (dataoutside the normal range flashes). Once normal ventilationis in progress, ventilator settings are displayed across thetop of the lower screen. (Figure 8 shows how information isdisplayed on the GUI.)Upper screen:monitoredinformation(alarms,patient data)Lowerscreen:ventilatorsettingsOff-screen keysKnobFigure 8.Puritan Bennett 840 Ventilator graphic user interface (GUI)20Puritan Bennett 840 Ventilator Pocket Guide
Alarm settingsMost alarm settings are initially set based on the patient’sIBW. You should review all alarm settings. Touch the ALARM SETUP button (lower screen) to viewthe current alarm setup (see Figure 9). Touch the alarm you want to change. Turn the knob to set the value you want. Proposed valuesare shown in red. You can change several alarm settingsin a batch change. To cancel a highlighted change,press CLEAR. Review all settings. Press ACCEPT to apply the new alarm settings.Press the ALARM SETUP button to cancel allalarm changes.You can touch the ALARM SETUP button at anytime during ventilation to show the current limits andmonitored value for each alarm. If an alarm annunciates,the alarm slider on the Alarm Setup screen will turn acolor indicating the urgency of the alarm state: red forhigh urgency, yellow for medium and low urgency.Figure 9.Alarm setupPuritan Bennett 840 Ventilator Pocket Guide21
NOTE:The upper limits for the spontaneous exhaled tidal volumeand mandatory exhaled tidal volume alarms are always thesame. Changing the upper limit of one alarm automaticallychanges the upper limit of the other.Main setting changesMain settings are the buttons displayed at the top of thelower screen, and you can only change them individually.Follow these steps to change main settings: Touch the setting you want to change Turn the knob to the set value Press ACCEPT to apply the new settingRemember: touch, turn, ACCEPT!22Puritan Bennett 840 Ventilator Pocket Guide
Mode, breath type and batch(multiple) changes Touch the SETUP button on the lower screen.The Current Vent Setup screen appears. To change ventilation setup (mode, mandatory breathtype, spontaneous type or trigger type), touch its button,then turn the knob to set the value. Proposed changes areshown in red. (Press CLEAR to cancel a change you’vejust made.) Once you’ve made all the changes you want (you don’thave to make any changes at all), touch CONTINUE.Appropriate settings for the ventilation setup you’veselected appear on the lower screen. For each of the current ventilator settings you want tochange, touch its button, then turn the knob to set itsvalue. (Press CLEAR to cancel a change you’ve just made.)Onceyou’ve made any changes you want, review the settings, then press ACCEPT to apply all the new settingsat the same time. (Touch SETUP to cancel all changes.)Previous setupOnce ventilator settings are in effect, the PREVIOUSSETUP button appears at the bottom of the lower screenwhen you press SETUP, and allows you to restore theentire previous setup (including alarm and apnea settings)that was in effect immediately before you made settingchanges using the Ventilator Setup screen. To restore the previous setup, touch PREVIOUS SETUP,then press ACCEPT.Puritan Bennett 840 Ventilator Pocket Guide23
Humidification type, humidifier volume, O2 sensorenable/disable and disconnect sensitivity (Dsens)To view or change: Touch the OTHER SCREENS button, then touch theMore Settings button. Touch each setting you want to change (you can changemultiple settings), then turn the knob to set its value. Toleave settings unchanged, touch the OTHER SCREENSbutton again. Press ACCEPT to apply the new settings.24Puritan Bennett 840 Ventilator Pocket Guide
Constant during rate changeIf you selected pressure control (PC), you can select oneof three timing variables (inspiratory time, I:E ratio, orexpiratory time) to be held constant when the respiratoryrate setting changes. Touch SETUP. Touch CONTINUE. The breath timing bar appears in thelower screen (see Figure 10). Touch one of the lock icons to select TI, I:E, or TE asthe setting that remains constant when the rate settingchanges. Review settings and change if necessary, then pressACCEPT. The value displayed is the one held constantduring rate changes, and becomes the only setting you canadjust directly.Figure 10.Constant during rate change (inspiratory time selected)NOTE:You can change the value of the constant setting at anytime, but the value does not change as a result of changingthe rate setting.Puritan Bennett 840 Ventilator Pocket Guide25
Alarm handlingThe SmartAlert Alarm System offers prioritized alarmannunciation that distinguishes primary alarms fromsecondary, dependent alarms (that is, alarms that arise dueto the initial alarm condition) and indicates the urgencylevel of each alarm. An alarm log keeps a time-and-datestamped record of alarms, alarm silences, and resets inorder of occurrence.Alarms on the Puritan Bennett 840 Ventilator are classifiedas high-, medium- or low-urgency (see Figure 11).High-urgency alarm indicator(red): Immediate attentionrequired to ensure patient safety.Medium-urgencyalarm indicator(yellow): Promptattention required.Low-urgency alarmindicator (yellow):Indicates a change in thepatient-ventilator system.Figure 11.Alarm indicatorsNOTE:You can always change an alarm setting even when alarmsare active. You do not need to press ALARM RESET or waitfor the alarm to autoreset.26Puritan Bennett 840 Ventilator Pocket Guide
Alarm silencePressing ALARM SILENCE mutes the alarm sound for twominutes. The key’s LED lights during the silence period, andturns off if the alarm is reset. Every time you press ALARMSILENCE, the two-minute silence period restarts. An on-screenalarm silence notification appears on the display when alarmsilence is active.WARNINGNever leave patient unattended when ALARM SILENCEis activated. ALARM RESET will cancel silence.Alarm resetPressing the off-screen ALARM RESET key resets thedetection algorithms of all active alarms, except for these:AC POWER LOSSCOMPRESSOR INOPERATIVEDEVICE ALERTO2 SENSORINOPERATIVE BATTERYLOW AC POWERLOW BATTERYNO AIR SUPPLYNO O2 SUPPLYPROCEDURE ERRORPressing ALARM RESET has no effect on patient data.If an alarm condition persists, the alarm becomes activeagain, according to the detection algorithm for that alarm.For example, if the APNEA alarm is active, ALARM RESETresets the apnea detection algorithm to its initial state andreturns the venti
Power Plug the ventilator power cord to AC power (see Figure 2). The power cord retainer protects against accidental disconnection, and must always be in place during operation. To avoid electrical shock hazard, connect the ventilator power cord into a grounded AC power outlet. Power cord retainer Power cord To AC power WarninG fiGUre 2.