Transcription
Sitecore Experience Platform 7.5Sitecore Security Hardening Guide Rev: 2017-08-17Sitecore Experience Platform 7.5Sitecore SecurityHardening GuideRecommendations for making Sitecore more secureSitecore is a registered trademark. All other brand and product names are the property of their respective holders. Thecontents of this document are the property of Sitecore. Copyright 2001-2017 Sitecore. All rights reserved.
Sitecore Experience Platform 7.5Table of ContentsChapter 1 Security Improvements . 31.1Introduction. 41.2General Security Information . 51.2.1 Change the Administrator Password. 51.3Limiting Access to .XML, .XSLT, and .MRT Files . 61.3.1 Providing Access to Specific Files . 61.4Protecting Folders in the IIS . 81.4.1 Limiting Anonymous Access to Folders . 81.5Restrict Access to Client Interfaces . 101.6The Structure of the Website Folder . 111.7Turn off Auto Complete of Username in the Login Page . 121.8Making the Sitecore Login Page Available to SSL Requests Only . 131.9Controlling File Upload . 141.9.1 Deny Execute Permissions on the Upload Folder . 14Denying Execute Permission in IIS . 14Prevent Users from Uploading Files to the Temp Folder . 151.9.2 Disabling the Upload Watcher . 151.9.3 The Upload Filter Tool . 15Installing the Upload Filter Tool. 16Configuring the Upload Filter Tool . 161.10 Secure the Telerik Controls . 181.11 Protecting Media Requests . 191.12 Security and Client RSS Feeds. 201.12.1Disabling Client RSS Feeds . 201.13 Removing Headers from Responses . 211.13.1Removing the X-Aspnet-Version HTTP Header . 211.13.2Removing the X-Powered-By HTTP Header . 211.13.3Removing the X-AspNetMvc-Version HTTP Header . 211.14 Recommended Reading . 221.14.1Other Resources . 22MongoDB . 22Sitecore is a registered trademark. All other brand and product names are the property of their respective holders. Thecontents of this document are the property of Sitecore. Copyright 2001-2017 Sitecore. All rights reserved.Page 2 of 22
Sitecore Security Hardening GuideChapter 1Security ImprovementsThis chapter describes the steps you can take to improve security in your Sitecoreinstallation.This chapter contains the following sections: Introduction General Security Information Limiting Access to .XML, .XSLT, and .MRT Files Protecting Folders in the IIS Restrict Access to Client Interfaces The Structure of the Website Folder Turn off Auto Complete of Username in the Login Page Making the Sitecore Login Page Available to SSL Requests Only Controlling File Upload Secure the Telerik Controls Protecting Media Requests Security and Client RSS Feeds Removing Headers from Responses Recommended ReadingSitecore is a registered trademark. All other brand and product names are the property of their respective holders. Thecontents of this document are the property of Sitecore. Copyright 2001-2017 Sitecore. All rights reserved.Page 3 of 22
Sitecore Experience Platform 7.51.1IntroductionThe Security Hardening Guide is designed to help you make your Sitecore Experience Platform installation as secure as possible.Sitecore is of course subjected to rigorous testing before each release and any bugs or securitythreats that may exist are fixed and removed as soon as they are discovered. We also releaseupdates whenever necessary.However, the way you implement your Sitecore installation has a significant effect on the security ofyour website.This document contains details of our best practices and recommendations for ensuring that yourSitecore installation is as secure as possible.Sitecore is not responsible for the security of any other software products that you use with yourwebsite. We strongly recommend that you install every available service pack and update for all of thesoftware products that you use.It is important to remember that secure software is a goal that we are constantly trying to achieve butmay never reach.Security is risk management; it is about understanding the risks and concrete threats to yourenvironment and mitigating against them. You must analyze the threats and risks that your installationfaces and then do your utmost to secure your installation against these threats.This document does not describe the Sitecore Security system. For more information about theSitecore security system, see the Security Administrators Cookbook.Sitecore is a registered trademark. All other brand and product names are the property of their respective holders. Thecontents of this document are the property of Sitecore. Copyright 2001-2017 Sitecore. All rights reserved.Page 4 of 22
Sitecore Security Hardening Guide1.2General Security InformationAlthough Sitecore can run on several different operating systems, we recommend that you use thenewest operating systems with the most up-to-date security features. Use the Windows update /Automatic update service to keep all your client computers and servers up-to-date with the mostrecent security updates and service packs.You should also create a disaster recovery plan to ensure the rapid resumption of services should adisaster occur. The recovery program should include: A plan for acquiring new or temporary equipment. A plan for restoring backups. Testing the recovery plan.When you use the installation program to install Sitecore, all of the appropriate security settings areset. However, if you install Sitecore from a .zip file or if you install a website on a server withoutrunning the setup.exe, there are a number of settings that you will have to set manually. Thesesettings are described in detail in the Sitecore CMS Installation Guide.1.2.1Change the Administrator PasswordBefore you deploy your Sitecore installation, you must change the administrator password to a strongpassword. Changing the password prevents unauthorized users from using the default password toaccess the admin account.Sitecore is a registered trademark. All other brand and product names are the property of their respective holders. Thecontents of this document are the property of Sitecore. Copyright 2001-2017 Sitecore. All rights reserved.Page 5 of 22
Sitecore Experience Platform 7.51.3Limiting Access to .XML, .XSLT, and .MRT FilesTo improve the security of your Sitecore installation, you must edit the web.config file. This file isstored in the \WebSite folder of you installation, for example atC:\Inetpub\wwwroot\YourWebsite\WebSiteTo limit access to .XML, .XSLT, and .MRT files:1. Open the web.config file.2. Add the following lines to the system.webServer handlers section: system.webServer handlers !-- Add managed handler for IIS Classic Mode in order to prevent access to filesNotice: Must correspond to the handlers defined in httpHandlers section -- add path "*.xml" name "xml Handler (classic)" verb "*" modules "IsapiModule"scriptProcessor "%windir%\Microsoft.NET\Framework\ v4.0.30319\aspnet isapi.dll"resourceType "Unspecified" preCondition "classicMode,runtimeVersionv4.0" / add path "*.xslt" name "xslt Handler (classic)" verb "*" modules "IsapiModule"scriptProcessor "%windir%\Microsoft.NET\Framework\ v4.0.30319\aspnet isapi.dll"resourceType "Unspecified" preCondition "classicMode,runtimeVersionv4.0" / add path "*.config.xml" name "config.xml handler (classic)" verb "*"modules "IsapiModule" scriptProcessor t isapi.dll" resourceType "Unspecified"preCondition "classicMode,runtimeVersionv4.0" / add path "*.mrt" name "mrt handler (classic)" verb "*" modules "IsapiModule"scriptProcessor "%windir%\Microsoft.NET\Framework\ v4.0.30319\aspnet isapi.dll"resourceType "Unspecified" preCondition "classicMode,runtimeVersionv4.0" / !-- Prevent files from being served in IIS Integrated Mode -- add path "*.xml" verb "*" type "System.Web.HttpForbiddenHandler" name "xml (integrated)"preCondition "integratedMode"/ add path "*.xslt" verb "*" type "System.Web.HttpForbiddenHandler" name "xslt(integrated)" preCondition "integratedMode"/ add path "*.config.xml" verb "*" type "System.Web.HttpForbiddenHandler" name "config.xml(integrated)" preCondition "integratedMode"/ add path "*.mrt" verb "*" type "System.Web.HttpForbiddenHandler" name "mrt (integrated)"preCondition "integratedMode"/ 3. Add the following lines to the system.web httpHandlers section: system.web httpHandlers !- add add addPrevent files from being served in IIS Classic Mode -- path "*.xml" verb "*" type "System.Web.HttpForbiddenHandler" validate "true" / path "*.xslt" verb "*" type "System.Web.HttpForbiddenHandler" validate "true" / path "*.config.xml" verb "*" type "System.Web.HttpForbiddenHandler" validate "true"/ add path "*.mrt" verb "*" type "System.Web.HttpForbiddenHandler" validate "true" / Sitecore under Windows x64If Sitecore is running under Windows x64, you must set the scriptProcessor attribute to theFramework64 folder: scriptProcessor ing Access to Specific FilesThe above configuration restricts access to all files with described extensions. To allow a specific filepath to be accessed in an unrestricted manner (such as /sitemap.xml), add the following changes:1. Open the Web.config file.2. Add the following line to the system.webServer handlers section: add path "sitemap.xml" verb "GET"type "System.Web.StaticFileHandler" name "xml allow" / Sitecore is a registered trademark. All other brand and product names are the property of their respective holders. Thecontents of this document are the property of Sitecore. Copyright 2001-2017 Sitecore. All rights reserved.Page 6 of 22
Sitecore Security Hardening Guide3. Add the following lines to the system.web httpHandlers section: add path "sitemap.xml" verb "GET"type "System.Web.StaticFileHandler" name "xml allow" / Sitecore is a registered trademark. All other brand and product names are the property of their respective holders. Thecontents of this document are the property of Sitecore. Copyright 2001-2017 Sitecore. All rights reserved.Page 7 of 22
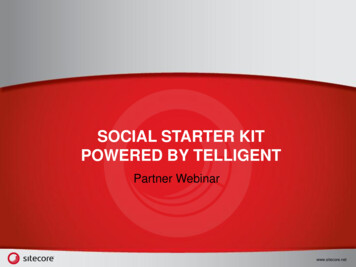
Sitecore Experience Platform 7.51.4Protecting Folders in the IISYou can improve security by preventing anonymous users from accessing certain key folders.You should prevent anonymous users from accessing the following folders: /App Config /sitecore/admin /sitecore/debug /sitecore/shell/WebService1.4.1Limiting Anonymous Access to FoldersTo limit anonymous access to the /App Config folder:1. Open the IIS.2. Navigate to the Web Sites\Default Web Site\App Config folder.3. In Features View, double-click Authentication.Sitecore is a registered trademark. All other brand and product names are the property of their respective holders. Thecontents of this document are the property of Sitecore. Copyright 2001-2017 Sitecore. All rights reserved.Page 8 of 22
Sitecore Security Hardening Guide4. In the Authentication window, select Anonymous Authentication and in the Actions panel,click Disable.5. Restart IIS.Repeat this process for the /sitecore/admin, /sitecore/debug and/sitecore/shell/WebService folders.Sitecore is a registered trademark. All other brand and product names are the property of their respective holders. Thecontents of this document are the property of Sitecore. Copyright 2001-2017 Sitecore. All rights reserved.Page 9 of 22
Sitecore Experience Platform 7.51.5Restrict Access to Client InterfacesTo prevent unauthorized access to the Sitecore client interfaces, you must restrict access to the clientinterfaces on every Sitecore content delivery server.To restrict access to the client interfaces, we recommend that you implement IP-based securityrestrictions or disable Anonymous IIS access to the /sitecore/admin, /sitecore/login,/sitecore/shell folders and to the /sitecore/default.aspx page.The /sitecore/service folder should be excluded from the IIS restrictions because it contains anumber of service ASPX pages that are used by Sitecore to report various conditions that can occurin the application, such as, 404 Page Not Found or 403 Forbidden to the web client.However, you can move the files from the /sitecore/service folder to the /sitecore folder. Ifyou move the files, you must also update the following settings in the web.config file: ErrorPage NoAccessUrl NoLicenseUrl LayoutNotFoundUrl ItemNotFoundUrl LinkItemNotFoundUrlFor more information about configuring IP-based security restrictions in IIS 7 and later, rver/security/ipSecurity.For more information about configuring IP-based security restrictions in IIS 6 and earlier, -30724d1a2f29.mspx?mfr true.Sitecore is a registered trademark. All other brand and product names are the property of their respective holders. Thecontents of this document are the property of Sitecore. Copyright 2001-2017 Sitecore. All rights reserved.Page 10 of 22
Sitecore Security Hardening Guide1.6The Structure of the Website FolderYou can improve security by placing the following folders outside the website root folder: /data /indexesAfter moving the /data folder, you must edit the web.config file to point to the new location. Youmust also configure permissions for ASP.NET requests. For more information, see the section FileSystem Permissions for ASP.NET Requests in the CMS Installation Guide.You can install Sitecore using: The installation program. A .zip file.Using the Installation ProgramIf you use the installation program to install Sitecore, the /data folder is created outside the websiteroot folder and the web.config file is edited to point to this location. The /indexes folder is placedin the /data folder.This is the recommended configuration and you don’t need to make any changes.Using a .zip FileIf you use a .zip file to install Sitecore, the data folder is created outside the website root folder, butthe web.config file is not edited to point to this location. The /indexes folder is placed in the/data folder. When you run Sitecore for the first time, it creates another data folder in the /WebSitefolder.We therefore recommend that you edit the web.config file to point to the correct location.The web.config file should look like this: sitecore database "SqlServer" sc.variable name "dataFolder" value "C:\Inetpub\wwwroot\SitecoreWebsite\data\" / sc.variable name "mediaFolder" value "/upload" / sc.variable name "tempFolder" value "/temp" / Sitecore is a registered trademark. All other brand and product names are the property of their respective holders. Thecontents of this document are the property of Sitecore. Copyright 2001-2017 Sitecore. All rights reserved.Page 11 of 22
Sitecore Experience Platform 7.51.7Turn off Auto Complete of Username in the Login PageYou can specify that Sitecore should not complete the username of users automatically when they login. This is useful, for example, if you do not want user names to be disclosed when content authorslog into Sitecore on a shared or public computer. In addition, you can disable the Remember mecheckbox. To disable auto complete of user names, open the web.config file and set theLogin.DisableAutoComplete setting to true. This disables autocomplete on the Sitecore loginforms on the /sitecore/login/default.aspx and /sitecore/admin/login.aspx pages. To disable the Remember me checkbox on the login page, open the web.config file and setthe Login.DisableRememberMe setting to true. This also ignores any existing Remember Mecookies, and all users have to log in again.Sitecore is a registered trademark. All other brand and product names are the property of their respective holders. Thecontents of this document are the property of Sitecore. Copyright 2001-2017 Sitecore. All rights reserved.Page 12 of 22
Sitecore Security Hardening Guide1.8Making the Sitecore Login Page Available to SSL RequestsOnlyYou can configure the Sitecore CMS to use only SSL requests for the Sitecore login page.Create a custom redirect processor that will redirect from http://hostname/sitecore/login tohttps://hostname/sitecore/login, and redirect all other pages from https to http.Use the following code as an example:public class SslLogin{public void Process(PipelineArgs args){string absUrl HttpContext.Current.Request.Url.AbsoluteUri;string localUrl HttpContext.Current.Request.Url.LocalPath;if (localUrl.StartsWith("/sitecore/login") && absUrl.StartsWith("http://")&& urn;}if (!localUrl.StartsWith("/sitecore/login")&& absUrl.StartsWith("https://") && itecore is a registered trademark. All other brand and product names are the property of their respective holders. Thecontents of this document are the property of Sitecore. Copyright 2001-2017 Sitecore. All rights reserved.Page 13 of 22
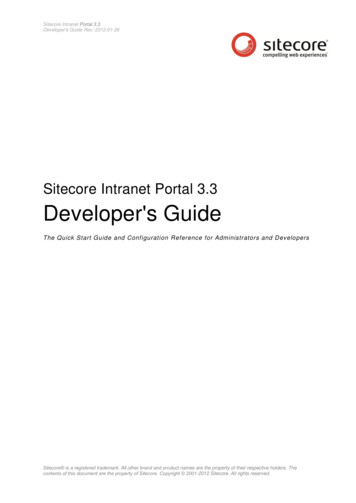
Sitecore Experience Platform 7.51.9Controlling File UploadYou can strengthen security of your Sitecore installation by controlling access to files that areuploaded by the users.1.9.1Deny Execute Permissions on the Upload FolderIf you allow users to modify the content of the /upload folder, you also give them the permission toplace scripts and executable programs in the folder. Executing these scripts and programs can causean unexpected behavior on the server. You must therefore prevent an uploaded file from beingexecuted on the server side when a user attempts to download it.We recommend that you deny permissions to run scripts and executable files in the /upload folder.NoteYou only need to perform this step if your configuration allows content authors to place files directly tothe /upload folder. For example, if you use a shared directory or FTP server, content authors canquickly place a lot of media in the media library.For more information about Execute permission in IIS, see http://support.microsoft.com/kb/313075.Denying Execute Permission in IISYou must deny both Script and Execute permission to the upload folder.1. Navigate to the /upload folder for the database that you are interested in.Sitecore is a registered trademark. All other brand and product names are the property of their respective holders. Thecontents of this document are the property of Sitecore. Copyright 2001-2017 Sitecore. All rights reserved.Page 14 of 22
Sitecore Security Hardening Guide2. Select the /upload folder and click Handler Mappings and then in the Actions pane, clickEdit Feature Permissions.3. In the Edit Feature Permissions dialog box, clear the Script and Execute check boxes.Prevent Users from Uploading Files to the Temp FolderYou should also deny users Script and Execute permission to the /temp folder. This prevents themfrom uploading files to the /temp folder.NoteThis step is primarily needed if your configuration allows content authors to place files directly to the/temp folder using a shared directory or a FTP server. But we recommend that you perform this stepin any case to avoid potential security problems if .aspx files for some reason end up being saved inthe /temp folder (for example from custom code).1.9.2Disabling the Upload WatcherWe recommend that you disable Upload Watcher and thereby ensure that the only way to uploadfiles is from the Media Library. This ensures that you can only upload files from within the Sitecoreclient and have control over the files that are uploaded.When Upload Watcher is disabled, files that are placed in the /upload folder are not automaticallyuploaded to the Media Library.To disable the Upload Watcher, remove the following line from the modules section of theWeb.config file. system.webServer modules remove name "ScriptModule"/ add type "Sitecore.Nexus.Web.HttpModule,Sitecore.Nexus" name "SitecoreHttpModule"/ add type "Sitecore.Resources.Media.UploadWatcher, Sitecore.Kernel"name "SitecoreUploadWatcher"/ 1.9.3The Upload Filter ToolIf you want to have complete control and prevent users from uploading certain file types, you shoulduse the Upload Filter tool.Sitecore is a registered trademark. All other brand and product names are the property of their respective holders. Thecontents of this document are the property of Sitecore. Copyright 2001-2017 Sitecore. All rights reserved.Page 15 of 22
Sitecore Experience Platform 7.5The Upload Filter tool lets you prevent certain file types from being uploaded, for example .exe,.dll, and so on.You can download the Upload Filter tool — Upload Filter-1.0.0.2.zip — from the SitecoreDeveloper Network where it is available as a Sitecore package file along with this Security HardeningGuide.The Sitecore package contains the following files:File NameDestination FolderUploadFilter.configWebsite\App ing the Upload Filter ToolYou must install the Sitecore package file before you can use the Upload Filter tool.To install Upload Filter tool:1. In the Sitecore Desktop, click Sitecore, Control Panel.2. In the Sitecore Control Panel, click Administration, Install a Package.3. The wizard will guide you through the installation process.Configuring the Upload Filter ToolAfter you install the package, you must configure the tool.To configure the Upload Filter tool:1. Open the UploadFilter.config file. processors uiUpload processor mode "on" type .UploadFilter" patch:before "*[1]" param desc "Allowed extensions (comma separated)" /param param desc "Blocked extensions (comma separated)" exe,dll /param /processor /uiUpload /processors 2. In the Allowed extensions parameter, enter a comma-separated list of the file extensiontypes that can be uploaded.OrIn the Blocked extensions parameter, enter a comma-separated list of the file extensiontypes that cannot be uploaded.You must enter the file extension without the dot.ImportantIf you set the Allowed extensions parameter, the Blocked extensions parameter isignored.Sitecore is a registered trademark. All other brand and product names are the property of their respective holders. Thecontents of this document are the property of Sitecore. Copyright 2001-2017 Sitecore. All rights reserved.Page 16 of 22
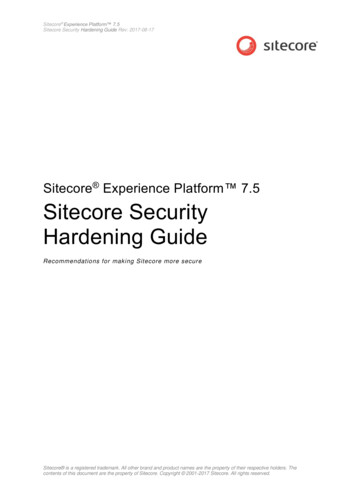
Sitecore Security Hardening Guide3. If you try to upload a file type that is on the blocked list, you see the following message:Sitecore is a registered trademark. All other brand and product names are the property of their respective holders. Thecontents of this document are the property of Sitecore. Copyright 2001-2017 Sitecore. All rights reserved.Page 17 of 22
Sitecore Experience Platform 7.51.10Secure the Telerik ControlsSitecore uses some UI controls from Telerik. These controls are only used in a Content Managementenvironment.ImportantYou must first apply this critical security hotfix.To reduce the attack surface area:1. In all non-Content Management environments, in the web.config file, remove the followingnodes: add name "Telerik Web UI DialogHandler aspx" verb "*" preCondition "integratedMode"path "Telerik.Web.UI.DialogHandler.aspx" type "Telerik.Web.UI.DialogHandler" / add name "Telerik Web UI SpellCheckHandler axd" verb "*"preCondition "integratedMode" path "Telerik.Web.UI.SpellCheckHandler.axd"type "Telerik.Web.UI.SpellCheckHandler" / add name "Telerik Web UI WebResource axd" verb "*" preCondition "integratedMode"path "Telerik.Web.UI.WebResource.axd" type "Telerik.Web.UI.WebResource" / 2. In a Content Management environment, you must configure the encryption key that is used tosecure the Telerik upload control.In the web.config file, in the appSettings section, create a node for the Telerikconfiguration encryption keys:For example: appSettings add key lue "YOUR ENCRYPTION KEY HERE" / add key "Telerik.Upload.ConfigurationHashKey" value "YOUR ENCRYPTION KEY HERE" / add key e "YOUR ENCRYPTION KEY HERE" / /appSettings Replace the "YOUR ENCRYPTION KEY HERE" placeholder text with a string of charactersthat are used to secure the Telerik controls.The string should be a set of random characters and numbers, with a maximum length of 256characters. We recommend that you use a minimum of 32 characters.For more information, see the Telerik documentation.Sitecore is a registered trademark. All other brand and product names are the property of their respective holders. Thecontents of this document are the property of Sitecore. Copyright 2001-2017 Sitecore. All rights reserved.Page 18 of 22
Sitecore Security Hardening Guide1.11Protecting Media RequestsTo use the Sitecore media request protection feature optimally and make your solution more secure,open the /App nfig file andchange the Media.RequestProtection.SharedSecret setting to a random string.In a multi-server setup, you must use the same value for theMedia.RequestProtection.SharedSecret setting on every server. This ensures that dynamicimage scaling will work correctly when the image URL is generated by one server and the request ishandled by a different server.Sitecore is a registered trademark. All other brand and product names are the property of their respective holders. Thecontents of this document are the property of Sitecore. Copyright 2001-2017 Sitecore. All rights reserved.Page 19 of 22
Sitecore Experience Platform 7.51.12Security and Client RSS FeedsRSS technology is designed so that users who follow an RSS link can come directly to the itemspecified in the URL of the RSS feed. Most RSS readers do not support authentication. This meansthat users who subscribe to Sitecore client RSS feeds have direct access to the item specified in theURL of the RSS feed and do not have to identify themselves to the Sitecore security system whenthey view the RSS feed. However, the Sitecore security system verifies that they are authorized userswhen they try to perform any actions associated with the client feed.If someone else gains access to the URL of the RSS feed: They can follow the link and view all the content contained in the RSS feed even though theirown security permissions do not give them access to this item. They cannot perform any actions on the content. They cannot view any other content. They cannot gain access to the username or password of the original owner of the RSS feed. They cannot modify the link to gain access to any other content.ImportantSitecore users should not share RSS feeds.1.12.1Disabling Client RSS FeedsIf your Sitecore installation contains sensitive information that you want to protect, you can disableSitecore client RSS feeds.To disable Sitecore client feeds:1. Open the web.config file.2. Locate the httpHandlers section. Depending on your IIS pool, this section may becalled Handlers.3. Remove the following handler: add verb "*" path "sitecore feed.ashx"type "Sitecore.Shell.Feeds.FeedRequestHandler, Sitecore.Kernel"/ Removing this handler disables all the client feeds that are available inside Sitecore. However, anypublic RSS feeds that you have created are still available to Website visitors.Sitecore is a registered trademark. All other brand and product names are the propert
Sitecore security system, see the Security Administrators Cookbook. Sitecore is a registered trademark. All other brand and product names are the property of their respective holders.