Transcription
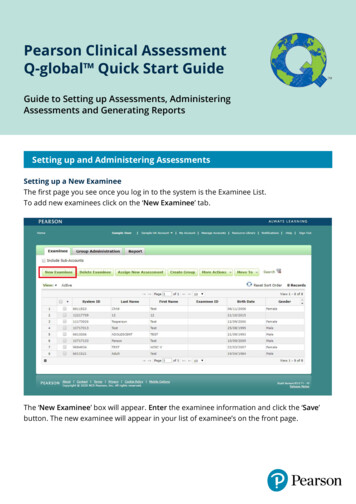
Pearson Clinical AssessmentQ-global Quick Start GuideGuide to Setting up Assessments, AdministeringAssessments and Generating ReportsSetting up and Administering AssessmentsSetting up a New ExamineeThe first page you see once you log in to the system is the Examinee List.To add new examinees click on the ‘New Examinee’ tab.The ‘New Examinee’ box will appear. Enter the examinee information and click the ‘Save’button. The new examinee will appear in your list of examinee’s on the front page.
2 Pearson Clinical Assessment Q-globalTM Quick Start Guide: Setting up and Administering AssessmentsNote: You can also upload Examinee’s in a group. For information please refer to the User Guide.Which can be found by clicking on the ‘Resource Library’ from the menu option at the top of theQ-global screen, select Resources About Q-global Q-global User Guide.pdfAssigning an AssessmentTo assign an assessment to an examinee click in the box next to the examinee name thenclick ‘Assign New Assessment’
3 Pearson Clinical Assessment Q-globalTM Quick Start Guide: Setting up and Administering AssessmentsFrom the list of available assessments Click the assessment you want to assignThe ‘Assessment Details’ screen will appear showing the Examinee and Assessment details.
4 Pearson Clinical Assessment Q-globalTM Quick Start Guide: Setting up and Administering AssessmentsFrom the ‘Assessment Details’ section will see some or all of the following delivery typeoptions, dependent on the assessment chosen: Manual Entry On-Screen Administration Remote On-Screen AdministrationIf delivery option ‘Remote On-Screen Administration’ is selected enter the ‘Recipient’information then Click ‘Preview and Send Invitation’
5 Pearson Clinical Assessment Q-globalTM Quick Start Guide: Setting up and Administering AssessmentsThe Invitation email page will open after selecting Preview and Send Invitation button.From the ‘View Template’ drop-down, select the appropriate invitation e-mail template.You can modify the template or click the ‘Send Invitation’ button to email the URL link to theOn Screen Administrator.
6 Pearson Clinical Assessment Q-globalTM Quick Start Guide: Generating ReportsGenerating ReportsExaminee TabFrom the Home screen select the Examinee Tab.Select the Examinee by double clicking on their name.This will open the Examinee profile screen where you can: view and edit the examinee demographics assign a new assessment un-assign an assessment delete an assessment generate a report view assessment / examinee status / administration date etc
7 Pearson Clinical Assessment Q-globalTM Quick Start Guide: Generating ReportsSelect the assessment that you want to generate a report for by clicking on the box next tothe assessment name, then select Generate Report.The Generate Report screen will display the assessment that is ready for reporting.
8 Pearson Clinical Assessment Q-globalTM Quick Start Guide: Generating ReportsClick on the report you would like to generate.The Report Configuration screen will display.This screen displays: Examinee information Assessment Status Report - update and change from the drop down menu Format - note only PDF format available. This will be available in Word in futurereleases Inventory Needed – number of usage(s) required to generate the report Available Inventory – how many usage(s) available in your inventory Include – option to Use Respondent Name and print item responses Settings – Select Norm Group / Significance Level for Confidence Intervals / Significancelevel for Index Discrepancies Update options as required then select Generate Report (top left).A pop up window will display as follows allowing you to select to open the file or save the fileto a nominated location.A1646 Version1-03/2020Further SupportIf you need further assistance please contact our support team.
Pearson Clinical Assessment Q-global Quick Start Guide Guide to Setting up Assessments, Administering Assessments and Generating Reports Setting up a New Examinee The first page you see once you log in to the system is the Examinee List. To add new examinees click on the 'New Examinee' tab. The 'New Examinee' box will appear.