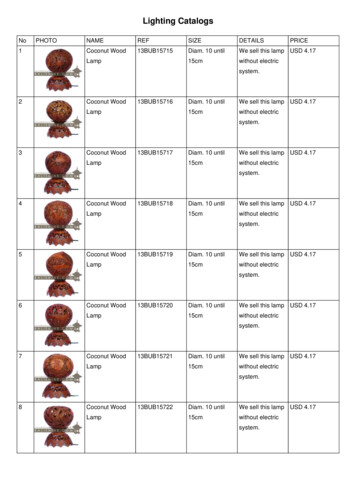
Transcription
092759 RevA draft3ColorLogic Pool LampColor LED Replacement LampOwner's n.5BPCUS11120Hayward Pool Products620 Division Street, Elizabeth NJ 07207Phone (908)-355-7995www.hayward.comUSE ONLY HAYWARD GENUINE REPLACEMENT PARTS
IMPORTANT SAFETY INSTRUCTIONSSAFETY WARNING: Do not open. Lamp has no user serviceable parts inside. Improper installationmay result in death or serious injury to bathers or service personnel or others by way of electricshock. Disconnect electrical power before installing or servicing this equipment. Read and follow allinstructions. This product to be installed by qualified personnel only.ModelInput (Volts, Amps, Watts)BPCUS11120120 VAC 60 Hz, 0.24A, 28.5WIMPORTANT WIRING CHECKLISTDo not skip any steps in this or any section of the manual. The above safety warnings and the complete installation instructions in this manual havebeen read and followed. The cord length has not been extended beyond the guidelines in this manual. The cord jacket is not damaged, cut or spliced except as noted below. Extensions or splices to the cord are only made in a safety listed Pool/Spa junction boxor junction box transformer system. The light fixture strain relief is firmly secured. The luminaire is firmly secured to the pool wall and cannot be removed without removalof the strain relief. The luminaire has been installed by qualified personnel in compliance with the NationalElectrical Code (NEC) or Canadian Electric Code (CE Code) and any applicable localcodes and/or regulations. Bonding wire is secure and properly attached to bonding system. Ground is secure and properly attached. Power is shut off.LEAVE THESE INSTRUCTIONS WITH PROPERTY OWNER1USE ONLY HAYWARD GENUINE REPLACEMENT PARTS
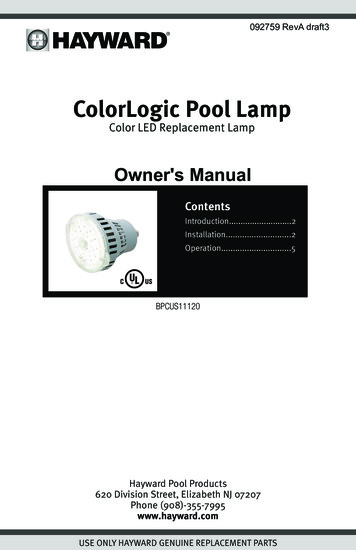
IntroductionThe Hayward BPCUS11120 is a UL Listed Color LED replacement lamp designed for use in compatible light fixtures listed below. Using up to 86% less energy and lasting up to 10x longer thanconventional 300 watt incandescent and halogen lamps, the BPCUS11120 makes an efficient andlong lasting replacement for your existing pool light. When used in standalone mode, lamp colors arecontrolled by turning on/off power repeatedly. When used with a Hayward automation control, colorscan be programmed with schedules and easily changed and saved with a button.Pool & Spa Light Housing CompatibilityReplacement LED in-ground pool lamps must be installed in a compatible Nationally Recognized Testing Laboratory (NRTL) approved pool light fixture or housing. Compatible NRTL light fixtures include: Hayward Astrolite SP058 Series Pentair Amerlite 784 Series Swimquip 05086 SeriesHayward Pool Control CompatibiltiyThe Hayward BPCUS11120 is compatible with the following Hayward Pool controls: OmniLogic OmniHub Pro Logic ColorLogic Light ControllerInstallationBefore You BeginBefore attempting to install, confirm that you have a compatible light fixture. Disconnect power tothe pool light at the main panel before attempting to service the lamp. Refer to the original manufacturer’s pool light installation manual before proceeding. This service should be performed by aqualified individual.Because the BPCUS11120 must be kept dry, be sure to have a new replacement gasket for yourlight fixture before starting the installation. Do not re-use the existing gasket as a leak inside thefixture could cause serious injury or death due to electrical shock.Safety precautions and Installation notes Do not open, service or tamper with any internal component of the BPCUS11120 LED underwater pool lamp.Do not directly expose or immerse the lamp in water before installation.During removal of the old lamp and installation of the BPCUS11120, keep the inside of thelight housing dry.Handle the lamp with care. Be careful not to drop the unit or permanent damage can occur.The BPCUS11120 can not be used with dimmers or dimming systems.2USE ONLY HAYWARD GENUINE REPLACEMENT PARTS
Installation Stepscover plate and lensgasketlight fixture removed from nichepower cordBPCUS11120 LEDreplacement lamp1.Remove existing light fixture from nicheWith power off at the circuit breaker, carefully remove the existing light fixture from the poollight niche and place it on the pool deck. There should be enough power cord length to reachthe deck. If the power cord is too short to reach the pool deck surface, the light fixture shouldbe reinstalled with the proper length cord by a qualified individual before attempting to installthe new lamp.2.Remove glass lensRefer to the manufacturer’s owner’s manual for lamp removal instructions. Typically, screwsand/or a clamp fastens the cover plate and lens to the housing. Loosen fasteners and carefullyremove the lens and gasket from the light fixture.3.Inspect fixture and remove old lampWhile the fixture is out of the pool and the lens is off, inspect the housing for wear or damage.Do not install the BPCUS11120 into a fixture that may be prone to failure. Inspect the rubberseal where the power cord enters the housing for leaks or deterioration. Check the surfacewhere the lens and gasket seats for warping or dents. Replace the tensioning clamp or otherfasteners if worn or damaged. After inspection, unscrew the old lamp and remove.4.Clean lens and install the BPCUS11120Make sure the inside of the light housing is completely dry. Take this opportunity to clean bothsides of the glass lens. Remove any gasket residue from the lens. Wipe completely dry. Carefullyscrew the BPCUS11120 into the lamp socket.3USE ONLY HAYWARD GENUINE REPLACEMENT PARTS
5.Install lensFailure to install a new lens gasket could result in a leak that can damage the BPCUS11120and cause serious injury or death due to electrical shock. Before installing the lens, clean anyold gasket residue from the light fixture. The surface must be clean for the new gasket to seatproperly. Install your new replacement gasket onto the glass lens. Set the lens and cover plateon the light housing and secure by tightening the screws and/or clamp, allowing the gasket toseal evenly.6.Test light fixture in waterSubmerge the assembled light fixture in the water and visually check that air bubbles are notescaping from the gasket area or at the power cord entrance. If bubbles appear, immediatelyremove the light fixture from the water and re-seat the gasket and lens. Continue the installationonly if there are no air leaks.7.Install light fixture into nicheIf there are no leaks, complete the installation by wrapping the cord around the light fixture inthe same manner as when it was removed. Secure the light fixture to the niche using the originalor equivalent fasteners.8.InspectTurn power on to the lamp at the main panel. With the light on, check for air bubbles exitingthe light housing. Leave the lamp on for 30 minutes and continue to inspect. If there are no airbubbles, the housing is watertight and installation is complete.4USE ONLY HAYWARD GENUINE REPLACEMENT PARTS
OperationBPCUS11120 Lamp modesThe Hayward BPCUS11120 lamp is designed to operate in one of two modes; Universal ColorLogicor Omni Direct.Universal ColorLogic mode (default): The lamp is shipped in this mode. Use this mode for newinstallations and for installations with other Universal ColorLogic lights.Omni Direct mode: Omni Direct mode offers unique colors as well as speed and brightness control.It must be configured and controlled by a Hayward OmniLogic or OmniHub pool controller only. Referto the controller’s manual for more information.How to change modes:1. Turn on lights and then turn off for between 11-15 seconds.2. Turn on lights and then turn off for between 11-15 seconds.3. Turn on lights and then turn off for between 11-15 seconds.4. The light should blink one of two colors indicating which mode it is currently in. Refer to the tablebelow to determine which mode the BPCUS11120 lamp is in. Note that new lights are shippedfrom the factory in Universal ColorLogic mode (blinking red).MODECOLORUniversal ColorLogicRedOmni DirectPurple5. To change modes, turn the light off and then back on. Continue this method until you arrive atthe desired mode. Note that Universal ColorLogic modes (blinking red) are repeated 4 times soit may take a few cycles to arrive at Omni Direct mode (blinking purple).6. When the light is in the desired mode, remove power from the lights for at least one minute.7. The light will restart in the new mode the next time it is turned on.Operating the BPCUS11120 lampThe BPCUS11120 lamp is controlled through power-cycling: a method of changing light programswhich requires no special controller or interface. To activate the light, simply turn on the switch. Todeactivate the light, turn off the switch. To advance to the next light program (fixed color or colorshow), turn the switch off, then back on within 10 seconds.When the light has been off for over 60 seconds, and is first turned on, it will come on to white for 15seconds for quick clear view of your pool, then go to the last fixed color or color show it was running.Light SynchronizationIf your pool or spa has multiple BPCUS11120 lamps, they may be operated independently, or theycan be easily synchronized so they will all display the same colors and shows at the same time. For5USE ONLY HAYWARD GENUINE REPLACEMENT PARTS
light synchronization, all lights must be wired to the same switch. Once installed, all lights shouldbe automatically synchronized, however, if they get out of sync, they can be re-synchronized easily.To re-synchronize your lights, turn the switch on, then back off, then wait between 11-15 secondsand turn the switch back on. When the lights come back on, they should enter program #1, and besynchronized.ProgramsWhen in Universal ColorLogic mode (default), the BPCUS11120 lamp has the capability to display17 different programs; 10 fixed colors and 7 color-changing shows. These programs are advancedusing power-cycling (quickly powering the lights on, then off, then back on). The programs are listedbelow:10. Fixed-Vivid Violet1. Show-Voodoo Lounge11. Fixed-Sangria2. Fixed-Deep Blue Sea12. Show-Twilight3. Fixed-Royal Blue13. Show-Tranquility4. Fixed-Afternoon Skies14. Show-Gemstone5. Fixed-Aqua Green15. Show-USA6. Fixed-Emerald7. Fixed-Cloud White 16. Show-Mardi Gras17. Show-Cool Cabaret8. Fixed-Warm Red9. Fixed-FlamingoRefer to the included color card as a quick reference to the available programs.Omni DirectThe BPCUS11120 lamp must be configured and controlled by a Hayward OmniLogic or OmniHubpool control to use Omni Direct mode. This mode offers some unique colors as well as speed andbrightness control. The programs are listed below.15. Show-USA1. Show-Voodoo Lounge16. Show-Mardi Gras2. Fixed-Deep Blue Sea17. Show-Cool Cabaret3. Fixed-Royal Blue18. Fixed-Yellow4. Fixed-Afternoon Skies19. Fixed-Orange5. Fixed-Aqua Green20. Fixed-Gold6. Fixed-Emerald7. Fixed-Cloud White 21. Fixed-Mint22. Fixed-Teal8. Fixed-Warm Red23. Fixed-Burnt Orange9. Fixed-Flamingo24. Fixed-Pure White10. Fixed-Vivid Violet25. Fixed-Crisp White11. Fixed-Sangria26. Fixed-Warm White12. Show-Twilight27. Fixed-Bright Yellow13. Show-Tranquility14. Show-GemstoneRefer to the OmniLogic or OmniHub manuals for Omni Direct configuration and operation information.6USE ONLY HAYWARD GENUINE REPLACEMENT PARTS
WARNING - Read and follow all instructions in this owner’s manual and on the equipment. Failureto follow instructions can cause severe injury and/or death.WARNING – Suction Entrapment Hazard Suction in suction outlets and/or suction outletcovers which are, damaged, broken, cracked, missing, or unsecured can cause severe injury and/or death due to the following entrapment hazards:Hair Entrapment- Hair can become entangled in suction outlet cover.Limb Entrapment- A limb inserted into an opening of a suction outlet sump or suction outlet coverthat is damaged, broken, cracked, missing, or not securely attached can result in a mechanical bindor swelling of the limb.Body Suction Entrapment- A negative pressure applied to a large portion of the body or limbs canresult in an entrapment.Evisceration/ Disembowelment - A negative pressure applied directly to the intestines throughan unprotected suction outlet sump or suction outlet cover which is, damaged, broken, cracked,missing, or unsecured can result in evisceration/ disembowelment.Mechanical Entrapment- There is potential for jewelry, swimsuit, hair decorations, finger, toe orknuckle to be caught in an opening of a suction outlet cover resulting in mechanical entrapment.WARNING - To Reduce the risk of Entrapment Hazards: When outlets are small enough to be blocked by a person, a minimum of two functioningsuction outlets per pump must be installed. Suction outlets in the same plane (i.e. floor orwall), must be installed a minimum of three feet (3’) [1 meter] apart, as measured from nearpoint to near point.Dual suction fittings shall be placed in such locations and distances to avoid “dual blockage”by a user.Dual suction fittings shall not be located on seating areas or on the backrest for such seatingareas.The maximum system flow rate shall not exceed the flow rating of as listed on Table 1.Never use Pool or Spa if any suction outlet component is damaged, broken, cracked, missing,or not securely attached.Replace damaged, broken, cracked, missing, or not securely attached suction outlet components immediately.In addition two or more suction outlets per pump installed in accordance with latest ASME,APSP Standards and CPSC guidelines, follow all National, State, and Local codes applicable.Installation of a vacuum release or vent system, which relieves entrapping suction, is recommended.WARNING – Failure to remove pressure test plugs and/or plugs used in winterization of the pool/spa from the suction outlets can result in an increase potential for suction entrapment as describedabove.WARNING – Failure to keep suction outlet components clear of debris, such as leaves, dirt, hair,paper and other material can result in an increase potential for suction entrapment as describedabove.WARNING – Suction outlet components have a finite life, the cover/grate should be inspectedfrequently and replaced at least every ten years or if found to be damaged, broken, cracked, missing, or not securely attached.CAUTION – Components such as the filtration system, pumps and heater must be positioned soas to prevent their being used as means of access to the pool by young children. To reduce risk ofinjury, do not permit children to use or climb on this product. Closely supervise children at all times.Components such as the filtration system, pumps, and heaters must be positioned to prevent children from using them as a means of access to the pool.WARNING – Hazardous Pressure Pool and spa water circulation systems operate underhazardous pressure during start up, normal operation, and after pump shut off. Stand clear ofcirculation system equipment during pump start up. Failure to follow safety and operation instructions could result in violent separation of the pump housing and cover, and/or filter housing andclamp due to pressure in the system, which could cause property damage, severe personal injury,7USE ONLY HAYWARD GENUINE REPLACEMENT PARTS
or death. Before servicing pool and spa water circulation system, all system and pump controlsmust be in off position and filter manual air relief valve must be in open position. Before startingsystem pump, all system valves must be set in a position to allow system water to return back tothe pool. Do not change filter control valve position while system pump is running. Before startingsystem pump, fully open filter manual air relief valve. Do not close filter manual air relief valve untila steady stream of water (not air or air and water) is discharged.WARNING – Separation Hazard Failure to follow safety and operation instructions couldresult in violent separation of pump and/or filter components. Strainer cover must be properlysecured to pump housing with strainer cover lock ring. Before servicing pool and spa circulationsystem, filters manual air relief valve must be in open position. Do not operate pool and spa circulation system if a system component is not assembled properly, damaged, or missing. Do not operate pool and spa circulation system unless filter manual air relief valve body is in locked position infilter upper body. Never operate or test the circulation system at more than 50 PSI. Do not purgethe system with compressed air. Purging the system with compressed air can cause componentsto explode, with risk of severe injury or death to anyone nearby. Use only a low pressure (below 5PSI), high volume blower when air purging the pump, filter, or piping.WARNING – Risk of Electric Shock All electrical wiring MUST be in conformance with ap-plicable local codes, regulations, and the National Electric Code (NEC). Hazardous voltage canshock, burn, and cause death or serious property damage. To reduce the risk of electric shock, doNOT use an extension cord to connect unit to electric supply. Provide a properly located electricalreceptacle. Before working on any electrical equipment, turn off power supply to the equipment. To reduce the risk of electric shock replace damaged wiring immediately. Locate conduitto prevent abuse from lawn mowers, hedge trimmers and other equipment. Do NOT ground to agas supply line.WARNING – Risk of Electric Shock Failure to ground all electrical equipment can cause serious or fatal electrical shock hazard. Electrical ground all electrical equipment before connectingto electrical power supply.WARNING – Risk of Electric Shock Failure to bond all electrical equipment to pool structurewill increase risk for electrocution and could result in injury or death. To reduce the risk of electricshock, see installation instructions and consult a professional electrician on how to bond all electrical equipment. Also, contact a licensed electrician for information on local electrical codes forbonding requirements.Notes to electrician: Use a solid copper conductor, size 8 or larger. Run a continuous wire fromexternal bonding lug to reinforcing rod or mesh. Connect a No. 8 AWG (8.4 mm2) [No. 6 AWG(13.3 mm2) for Canada] solid copper bonding wire to the pressure wire connector provided on theelectrical equipment and to all metal parts of swimming pool, spa, or hot tub, and metal piping (except gas piping), and conduit within 5 ft. (1.5 m) of inside walls of swimming pool, spa, or hot tub.IMPORTANT - Reference NEC codes for all wiring standards including, but not limited to, grounding, bonding and other general wiring procedures.WARNING – Risk of Electric Shock The electrical equipment must be connected only to asupply circuit that is protected by a ground-fault circuit-interrupter (GFCI). Such a GFCI shouldbe provided by the installer and should be tested on a routine basis. To test the GFCI, push thetest button. The GFCI should interrupt power. Push reset button. Power should be restored. Ifthe GFCI fails to operate in this manner, the GFCI is defective. If the GFCI interrupts power to theelectrical equipment without the test button being pushed, a ground current is flowing, indicatingthe possibility of an electrical shock. Do not use this electrical equipment. Disconnect the electrical equipment and have the problem corrected by a qualified service representative before using.CAUTION – HAYWARD pumps are intended for use with permanently-installed pools and may beused with hot tubs and spas if so marked. Do not use with storable pools. A permanently-installedpool is constructed in or on the ground or in a building such that it cannot be readily disassembledfor storage. A storable pool is constructed so that it is capable of being readily disassembled forstorage and reassembled to its original integrity.SAVE THESE INSTRUCTIONS8USE ONLY HAYWARD GENUINE REPLACEMENT PARTS
9USE ONLY HAYWARD GENUINE REPLACEMENT PARTS
10USE ONLY HAYWARD GENUINE REPLACEMENT PARTS
For further information or consumertechnical support, visit our website atwww.hayward.comHayward is a registered trademark and ColorLogic is a trademarkof Hayward Industries, Inc. 2019 Hayward Industries, Inc.All other trademarks not owned by Hayward are the property of their respective owners.Hayward is not in any way affiliated with or endorsed by those third parties.USE ONLY HAYWARD GENUINE REPLACEMENT PARTS
Hayward Pool Products 620 Division Street, Elizabeth NJ 07207 Phone (908)-355-7995 www.hayward.com ColorLogic Pool Lamp Color LED Replacement Lamp Owner's Manual BPCUS11120 Contents Introduction.2 Installation.2 Operation.5 092759 RevA draft3 USE ONLY HAYWARD GENUINE REPLACEMENT PARTS .