Transcription
SmartWatch Eco/Eco CompactDigital Video RecordersSmartWatch EcoSmartWatch Eco CompactQuick User Guide
IndexBox Contents.3Front Panel Controls .4 - 5SmartWatch Eco Compact.4SmartWatch Eco .5Remote Control Functions In Live Mode .6Mouse Functions In Live Mode .7On-Screen Graphical Icons In Live Mode .8On-Screen Graphical Icons In Live Mode When Connected Through ‘DVR Remote Desktop’ .8DVR Login.9Search Mode.9 - 11Event Search.10Time Search.11File Search .11Playback Mode.12Remote Control Functions In Playback Mode .12Mouse Functions In Playback Mode .12Backup Mode .13PTZ Control.14Remote Control Functions In PTZ Mode .14Mouse Functions in PTZ Mode .14Rear Panel Connections .15 - 19SmartWatch Eco Compact (4 Channel).15SmartWatch Eco Compact (8 Channel).16SmartWatch Eco (4 Channel) .17SmartWatch Eco (8 Channel) .18SmartWatch Eco (16 Channel) .192
Box Contents1. DVR2. Quick User Guide3. IR Remote Control4. Batteries x 25. CD6. Power Adaptor7. Power Cord8. 25 Way Connector(8 / 16 channel models only)3
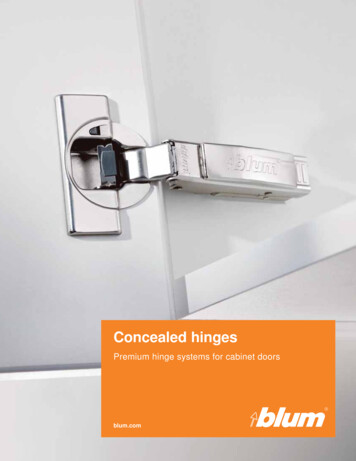
SmartWatch Eco Compact - Front Panel Controls12 34561Power LEDPower status2LAN LEDConnected to the internet (green). Remote user logged in (red).3Play LEDDVR is in playback mode4Record LEDDVR is recording5IR SensorInput sensor for the remote control6USB PortUSB port4
SmartWatch Eco - Front Panel Controls12345691011121378141DVD WriterDVD-RW backup device2 / In Setup mode, press to move cursor down. In Playback mode, press to stop. / SLOWIn Setup mode, press to move cursor up. In Playback mode, press to slow down. / In Setup mode, press to move cursor right. In Playback mode, press to fast forward. / In Setup mode, press to move cursor left. In Playback mode, press to rewind.3RECStart or stop recording (depending on schedule setup).4PLAYStart playback (from start of current hour).5T-SHEnter search menu.6BACKUP / ESCIn Live mode, press to display the Backup menu. In Setup mode, press to return to previous page.7USB PortUSB port8LED Display: Power status.: Hard Drive status.: Connected to the internet (green). Remote user logged in (red).: DVR is recording.: DVR is in playback mode.9ENTERIn Setup mode, press to enter values. In Playback mode, press to switch between full screen quad, 9channel & 16-channel displays.10PIPIn Live mode, press to display picture in picture.11ZOOMIn Live or Playback modes, press to zoom in digitally on images.12AUTOAuto sequence display13MENU / IIIn Live mode, press to display menu. In Playback mode, press to pause playback.14IR SensorInput sensor for the remote control.5
Remote Control Functions In Live ModePress DVR1 on the remote control to enable itButtonDescriptionRECStart or stop recording (depending on schedule setup).PLAYStart playback (from start of current hour).LOCKLock DVR controls (password required).1,2,3,4.Select channel.FREEZEFreeze picture.Displays quad division.Displays 9-channel division (N/A on 4-channel DVR).Displays 13-channel division (N/A on 4-channel or 8-channel DVR).Displays 16-channel division (N/A on 4-channel or 8-channel DVR).ENTER/MODEToggle between cameras and quad mode.MENU / IIEnter setup menu.BK-UP/ESCEnter backup menu.SRHEnter search menu.MUTEMute live audio.STATUSDisplay DVR status.OSDToggle the on-screen display.ZOOM/ZOOM -Digital zoom.PIP/ZOOM Enter ‘picture in picture’ mode.PTZEnter PTZ mode (when PTZ cameras are connected).AUTORun camera sequence on main monitor.DVR 1 / 2 / 3 / 4Selects DVR to control when used on sites with multiple DVRs.6
Mouse Functions In Live ModeRight-clicking the mouse anywhere on the screen will bring up the following iconsDescriptionIconResting the cursor on this icon will bring up the following four menu icons.Enter setup menu.Enter search menu.Enter backup menu.Enter PTZ mode (when PTZ cameras are connected).Start or stop recording (depending on schedule setup).Start playback (from start of current hour).Resting the cursor on this icon will bring up the following five display icons.Freeze pictureEnter ‘picture in picture’ mode.Digital zoomRun camera sequence on main monitor.Lock DVR controls (password required).Full screen display.Quad display.9-channel display.13-channel display.16-channel display.7
On-Screen Graphical Icons In Live ModeIconDescriptionDVR is recording.Live audio is on.1 4Live audio is off.Motion is detected.Sensor is triggered.Video loss detected.USB device detected.DVD burner is detected.Connected to the LAN cable.Film: Normal recording.Clock: Schedule recording.Auto sequence is on.2X - 8XDigital zoom level.Live screen is paused.DVR is locked.PTZ.HDD status (99% used).Current time display (can be repositioned)On-Screen Graphical Icons In Live Mode WhenConnected Through ‘DVR Remote Desktop’IconDescription//Transmit at high / low quality.Full screen / half screen display.Record locally.Take snap shot.Set up path for saving recordings and snapshots.Enable / disable shortcut toolbar.8
DVR LoginTo enter the DVR menus, a user name and password are required. The default password for the administrator is ‘123456’.Virtual KeyboardItemDescriptionSwitch between capital and small letters./Switch between numbers and letters.Press to cancel the setup, and re-choose the login account.Delete the last character.Press to enter the password. If the password is correct, the required menu will open.Space key.Search ModeTo enter search mode: Press T-SH on the front panel Press SRH on the remote control Clickfollowed bywhen using the mouseSelect ‘Event Search’ to search by event or ‘Time Search’ to search by time/calendar9
Search ModeEvent Search:The DVR will automatically log events with event type, time and additional information (e.g. channel, user). If there isrecorded data for an event, a yellow signal ( ) will be displayed on the left side of event information. Press ‘Enter’, or leftclick your mouse to playback the recorded data.ItemDescriptionDate/TimeDate/time when the event occurred.Event type, defined as follows:MotionMotion detectedSensorSensor detectedVideo LossVideo lossRemote LoginUser logged in over the networkRemote LogoutUser logged out over the networkPower OnDVR powered onHDD FullHDD fullHDD ErrorHDD error detectedRebootDVR rebootedEvent TypeInfoThe channel on which the event occurred or the user responsible for event.Event Search - Criteria:It is also possible to filter the search results by selecting the criteria icon. The search can be filtered by date, time, event typeand channel.10
Time Search:Time search will allow you to search for data from a specific date and time. Press ‘Enter’ or left click on the desired date(note that dates with recorded data are marked with a red square).The time bar will now load.Now enter the required time. Click OK and the recorded data will start playing.File Search:When a USB device is connected to the DVR, the file search option can be used to search through any recorded data thathas been backed up to the USB device.Select the required file to search through the recorded data.11
Playback ModeTo enter playback mode: Press PLAY on the front panel Press PLAY on the remote control Clickwhen using the mouseRemote Control Functions In Playback ModeButtonDescriptionENTER/MODESwitch between full screen, quad, 9-channel and 16-channel displaysMENU / IIPause playbackPLAYPlay back at normal speed / SLOWSlows playback by 1/2, 1/4, 1/8 or 1/16 / Rewind playback at 2X, 4X 8X, 16X, 32X and 64X speeds / Fast forward playback at 2X, 4X 8X, 16X, 32X and 64X speeds / Stop playbackMouse Functions In Playback ModeIconDescriptionRewindFast forward/Play / pauseSlow playbackStop playbackPlayback frame by frameFull screen displayQuad displayDigital zoom in playbackTo display a single camera on the full screen in playback mode, double left click it on the multi-camera display. To revertback to the multi-camera display, double left click again.12
Backup ModeTo enter backup mode: Press BACKUP / ESC on the front panel Press BK-UP / ESC on the remote control Clickwhen using the mouseData can be backed up to a USB storage device or to a CD/DVD (on supported models)ItemDescriptionFromEnter the required start time.ToEnter the required end time.DeviceSelect USB, or DVD as the backup device.Free SpaceDisplays the available space in your backup device.RefreshRecalculate the available space in your backup device.Required SpaceSpace required for backup.CalculateCalculate the size of backup file.StartStart backup operation.Note: Be sure to calculate the size of backup file BEFORE beginning the backup. Do not unplug the USB device orturn off the DVR during the backup process. This will cause errors.13
PTZ ControlTo enter PTZ mode: Press PTZ on the remote control Clickwhen using the mouseRemote Control Functions In PTZ ModeButtonDescription / SLOWMove PTZ up. / Move PTZ down. / Move PTZ to the left. / Move PTZ to the right.ZOOM PTZ zoom-in.ZOOM -PTZ zoom-out.FOCUS PTZ focus-in.FOCUS -PTZ focus-out.IRIS PTZ iris-open.IRIS -PTZ iris-close.TOURActivate PTZ preset tour (when preset is programmed).PRESETTo save a preset location, move the camera to the desired scene, press PRESET and a number key.This will save this scene as the preset number selected e.g. to save a scene as Preset 1, press‘PRESET’ and ‘1’.PLAY NUMBER To call a preset, press Play and the number of the desired preset.Mouse Functions In PTZ ModeWhen the PTZ iconis displayed in the upper left corner of the screen, thefunction icons will be displayed in the lower right corner of the screen. These can bedragged around the screen using the mouse.IconDescriptionExit PTZ Mode and return to Live Mode.Preset number N (1 64).Go to preset number N.Set current PTZ location at preset number N.Move PTZ in 360 PTZ zoom in; PTZ zoom outPTZ focus in; PTZ focus out.PTZ IRIS open; PTZ IRIS close.14
SmartWatch Eco Compact (4 channel) - Rear PanelConnections31421DC 12VDC 12V input2VIDEO outMain monitor output (BNC)3VIDEO inCamera inputs4AUDIO inAudio input5AUDIO outAudio output6VGAMain monitor output (VGA)7USBUSB port for connecting mouse8RS-485RS-485 port for PTZ control9LANEthernet port5156789
SmartWatch Eco Compact (8 channel) - Rear PanelConnections142531VGAMain monitor output (VGA)2DC 12VDC 12V input3VIDEO outMain monitor output (BNC)4VIDEO inCamera inputs5AUDIO inAudio input6AUDIO outAudio output7RS-485RS-485 port for PTZ control8LANEthernet port9USBUSB port for connecting mouse616879
SmartWatch Eco (4 Channel) - Rear Panel Connections162738491011121SPOT monitorSpot monitor output (BNC)2VIDEO inCamera inputs3AUDIO inAudio input4VGAMain monitor output (VGA)5FanFan6DC 12VDC 12V input7MAIN monitorMain monitor output (BNC)8AUDIO outAudio output9NTSC/PALSwitch between NTSC and PAL format (make sure the switch is in the PAL position)10LANEthernet port11External I/OExternal I/O port (see below for pin layout)12USBUSB port for mouse connectionExternal I/O Pin Layout175
SmartWatch Eco (8 Channel) - Rear Panel Connections1823495101SPOT monitorSpot monitor output (BNC)2VIDEO inCamera inputs3AUDIO inAudio inputs4AUDIO outAudio outputs5LANEthernet port6VGAMain monitor output (VGA)7FanFan8DC 12VDC 12V input9MAIN monitorMain monitor output (BNC)10USBUSB port for mouse connection11External I/OExternal I/O port (see below for pin layout)External I/O Pin Layout186117
SmartWatch Eco (16 Channel) - Rear Panel Connections1237489101112513141MAIN monitorMain monitor output (BNC)2SPOT monitorSpot monitor output (BNC)3VIDEO inCamera inputs4AUDIO inAudio inputs5External I/OExternal I/O port (see below for pin layout)6FanFan7NTSC/PALSwitch between NTSC and PAL format (make sure the switch is in the PAL position)8AUDIO outAudio output9USBUSB port for mouse connection10LANEthernet port11ON/OFFPower switch12DC 12VDC 12V input13e-SATAExternal SATA hard disks port for external storage14VGAMain monitor output (VGA)External I/O Pin Layout196
20
DVR is locked. PTZ. HDD status (99% used). Current time display (can be repositioned) On-Screen Graphical Icons In Live Mode When Connected Through 'DVR Remote Desktop' Icon Description / Transmit at high / low quality. / Full screen / half screen display. Record locally. Take snap shot. Set up path for saving recordings and snapshots.