Transcription
Achieving GreaterMobility and IndependenceDIANA Operating InstructionComfort – Compact - SonjaSerial No. .HORCHER GmbH - REHA SYSTEME
Stand Rev.1 / Page 2Dear Customer!We would like to thank you, for your confidence in our Lift as well as your choice inbuying a Horcher GmbH Diana Lift.Please read this manual carefully and familiarize yourself with the safetyinstructions and the handling before utilizing the Lift for the first time.EC-Declaration of ConformityIs done in compliance with Annex VII of the Council Directive 93/42/EWG of 14 June 1993concerning medical devicesWe, the Horcher GmbH, Philipp-Reis-Str. 3, 61130 Nidderau, declare that thePatient Lift „DIANA“Serial No: .is in compliance with the essential Requirements of the Council Directive 93/42 EWG 14 June1993 Annex 1.Nidderau, 04/06/1998Horcher GmbHManaging DirectorWilli HorcherStefan HorcherThe „DIANA“ – Patient Lift helps to achieve a greater mobility and independence for thehandicapped and older people in their daily living activities, especially in private homes,hospitals and in Senior Citizens homes.This manual is for the following Diana Lift’sSonjaComfortCompactH,E,ENH,EH,E,ENHorcher GmbH - 61130 Nidderau - Ph.-Reis Str.3 - Telephone (06187) 9204.0 - Fax (06187) 9204.15-email-office@horcher.com -internet www.horcher.com
Stand Rev.1 / Page 3Safety InstructionPlease acknowledge the following safety instructionsThe patient Lift Diana should only be utilized on a hard even and clean floor, (noton a stony or uneven surface) the floor has to be clean and free of all obstacles.A sight check is absolutely necessary and should be done before utilizing theDiana or any other kind of Lift. If you notice any kind of defect do not use the Lift.Only authorized persons form the Horcher GmbH are allowed to repair the Lift.Before using the Diana Lift and after each move or transport the wheels should belocked.Do not utilize the Lift for long transportation’s like up or down hill. Please use awheelchair for long transports.Caution has to be used when driving through tight area such as door frames.Before using the Lift please make sure that all the straps and / or hooks areattached and secured and that the sling is adjusted in the right place.The battery charger is not to be installed in damp areas or close to water faucets.To clean the Lift just use a damp cloth don’t use any strong detergent.The model Diana Comfort E can only to be utilized in connection with a V2Afloor plate, before using the swivel option.Keep the wheels clear of all dirt such as hair dust or lose thread (lint).Avoid sudden movements like pushing or shoving. This might cause accidents.Ignoring one or more of the safety instructions causes you to lose all warrantythrough Horcher GmbH.A yearly maintenance service check through authorized personnel from theHorcher GmbH is recommended.We recommend that you purchase a service contract through your supplier orHorcher GmbH.Table of contentsHorcher GmbH - 61130 Nidderau - Ph.-Reis Str.3 - Telephone (06187) 9204.0 - Fax (06187) 9204.15-email-office@horcher.com -internet www.horcher.com
Stand Rev.1 / Page 41. Where the mobile „DIANA“ Patient Lift can be utilized2. General operating instructions552.1 Utilizing the „DIANA“ - Lift2.2 Base adjustment2.3 Wheels with breaks2.4 Cleaning3. Instruction for adjusting different height3.1 Handling the adjustable hydraulic (H-Model)3.2 Handling the electrical height adjustment ( E-Model)4. Model and Data4.1 „DIANA“ - Sonja4.2 „DIANA“ - Compact4.2.1 Compact E with the electrical Patient Positioner4.3 „DIANA“ - Comfort4.4 „DIANA“ - E - Model – electrical Data5. The mechanical Emergency Relief Handle6. The Sling System7811126.1 Original - Horcher – Sling System6.2 Applying the Sling6.2.1 Applying the Sling in a sitting position6.2.2 Applying the Sling in a lying position6.2.3 Applying the Sling to the legs6.3 Attaching the Sling to the Lift6.4 Sling System for the patient positioner6.4.1 Applying the Sling System6.4.2 Applying the Sling to the Lift6.5 Caring for the Sling6.6 Sling SystemService- Maintenance and Warranty Information147. Information about the capacity for the IBS Battery System7.1 Intelligent Battery System „ IBS“7.2 Battery capacity7.3 Information about the loading station8 Additional accessory Scale20Horcher GmbH - 61130 Nidderau - Ph.-Reis Str.3 - Telephone (06187) 9204.0 - Fax (06187) 9204.15-email-office@horcher.com -internet www.horcher.com
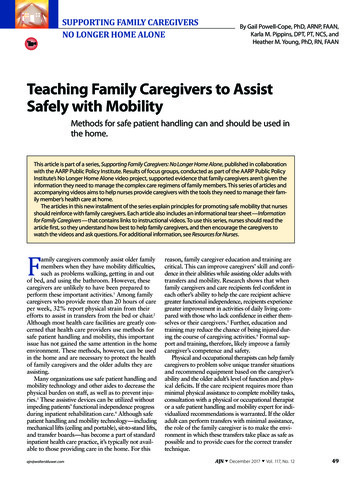
Stand Rev.1 / Page 51. Where the “DIANA” floor model Patient Lifts can be utilized.Since 1986 the Horcher GmbH has developed the “DIANA” Lift. During that time wehave reached a high technical standard for efficiency and reliability. Our systemshave been developed extensively for individuals which are either handicapped orwith limitations in their mobility.Serving individuals, families and professionals in private homes, hospitals, resthomes and Senior Citizens resident as well as in a variety of other settings. They aremost efficient transfer devices, serving both the care-giver and the caretaker.The “DIANA” Lift is especially designed to be used on flat, hard surfaces and isprimarily intended for indoor use only.This Lift is can be utilized for lifting and moving patients in and out of bed, bathtub,wheel chair and many more varieties.2. General InstructionThe “Diana” Lift is delivered to you as ready to use unit. Insert the loadedbattery pack by pushing it straight in the receptacle on the back of Lift.To start the Lift just pull out the red knob on top of the console. The bigred knob is also the emergency ON / OFF button. When pushing thered button down the electric circuit is interrupted and the Lift stopsimmediately. Pulling the red button starts the Lift. The black knob onthe side of the console moves the Lifts up or down.Control lightsGreen lightRed light continuos tonLiftBattery lowready to useneeds to be charged.2.1 Important:Each time you utilize the Diana Lift great caution must be taken. The nurse /assistant or family member should watch the patient at all time’s while in thelifting is in the process. Only responsible adult person’s should utilize this Liftand only for the purpose of lifting patients. During the lifting explain theprocedure to the patient.2. 2 Base Adjustment.To get as close as possible to the patient you can adjust the base to threedifferent width. The handle for the base adjustment is located on the bottombase of the Lift. After the base is adjusted to your need, the handle can beremoved for more freedom of movement.123handle to the lefthandle to the middlehandle to the right base is parallelbase is half openbase is wide open2.2 Lock WheelsHorcher GmbH - 61130 Nidderau - Ph.-Reis Str.3 - Telephone (06187) 9204.0 - Fax (06187) 9204.15-email-office@horcher.com -internet www.horcher.com
Stand Rev.1 / Page 6Prior to operating the Diana Lift you should always make sure that the rearwheels are looked. To lock the wheels step on the break lever on the hindwheels. Release the break by pulling lever up.We the Horcher GmbH can offer you two different types of Diana Lift’s-hydraulic height adjustment Diana H –Modelelectric height adjustment Diana E- Model3.1 Handling the hydraulic elevation ( H-Model)With this „Diana“ Lift you have in your possession a hydraulic valve operatingmodel with a hydraulic pump to lift or lower the patient.Lifting the patient:To lift the patient you have to close the valve. To do so turn the valve clockwisetill it stops. Now you can use the handle to pump slowly up and down until thepiston has reached the maximum pressure (length). Check if all sling straps areproperly connected to the swivel bar. Be sure patient and sling are free of anyobstacles. Now the patient can be moved.Lowering the patient:To lower the Lift, carefully open the hydraulic valve just a crack for a gentlelowering. Great caution has to be used when opening the valve. Opening thevalve to fast could result in an a rapid decline and startle or scare the patient.Handling the electric remote control, for the E- Models,Lifting / Lowering: Press the top left button to lift the patient and the top rightbutton to lower patient.4. Model and DataWith all „DIANA“ – Model’s you can either use the manual or motorized patientpositioner.All H-Model’s come with a hand powered Hydraulic pump.4.1 „DIANA“ - SonjaThis Model is a available in three sizes.„DIANA“ - Sonja - EN„DIANA“ - Sonja - ETechnical Data for the Sonja LiftLift base length with wheels1020 mmHorcher GmbH - 61130 Nidderau - Ph.-Reis Str.3 - Telephone (06187) 9204.0 - Fax (06187) 9204.15-email-office@horcher.com -internet www.horcher.com
Stand Rev.1 / Page 7Base width with wheels585 mmBase width fully spread870 mmLift height with mast1200 mmWeight of the Lift37,5 kgMin. radius600 mmmax. Lifting load160 kg4.2 „DIANA“ - Compact„DIANA“ - Compact - EN„DIANA“ - Compact – Ewith mechanical emergency reliefwith electric patient positionerTechnical Data CompactLift base length with wheels1170 mmBase width with wheels580 mmBase width fully spread980 mmLift height with mast1360 mmMin. radius590 mmWeight of the Lift37,5 kgmax. Lifting load160 kg4.2.1 Compact E with motorized patient positionerOperating instructions for the electric hand control „DIANA“ Compact – E with motorized patient positioner :UP/DOWNPress the top left button to lift the top right button to lowerpatient.Positioning Patient:Second row or optional middle row of buttons; Press the left button to raise legstraps and recline patient. Right button to lower leg strapsand the patient is in a sitting position.Geometrcal Data for Compact E with motorized patientpositionerHorcher GmbH - 61130 Nidderau - Ph.-Reis Str.3 - Telephone (06187) 9204.0 - Fax (06187) 9204.15-email-office@horcher.com -internet www.horcher.com
Stand Rev.1 / Page 8Type 1.Type 2.1170 mm1170 mmBase width with wheels580 mm640 mmBase width fully spread980 mm1020 mmMin. radius655 mm670 mmWeight of the Lift37 kg39 kgMax. Lifting load160 kg160 kgLift base Length with wheels4.3 „DIANA“ - ComfortAll Comfort Models have the capability to be equipped with a swivel mast.Before the swivel mast can be utilized a special V2A plate has to be mounted into thefloor and fasten with concrete anchors. The installation should only be done throughauthorized technicians.The Lift must be secured to the floor plates before you can use the swivel option. Themast can be pivot at an 180 . This is only possible if the safety bolt is removed on theturning point of the Lift and the stop screw has to be pushed down with the help ofthe pedal until the rotation is free of the lock. Please make sure the mast is locked inthe stop screw again when the turning is completed.Geometrical Data ComfortLift base length with wheels1170 mmBase width with wheels580 mmBase width fully spread980 mmLift height with mast1450 mmWeight of the Lift38,5 kgmax. Lifting load160 kgmin. Radius655 mm4.4 „DIANA“ - E - Model – electronically DataOne 24 V Battery.Electrical supply24VBattery capacity24V / 2,7 AhCharging station220 V / 24 V / 1 AFuse type for charging stationType G. 124-1T 0,315 A in Loading station5. Mechanical emergency relief (not standard)The mechanical emergency relief helps to let the patient down in case of electrical failure.Horcher GmbH - 61130 Nidderau - Ph.-Reis Str.3 - Telephone (06187) 9204.0 - Fax (06187) 9204.15-email-office@horcher.com -internet www.horcher.com
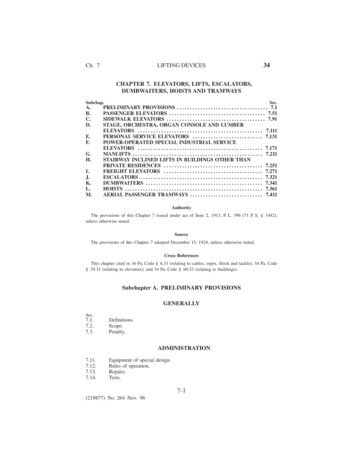
Stand Rev.1 / Page 9The emergency cylinder is located between the T-bar and the lifting arm.Handling the emergency relief :Remove the ring on the end of the pin and pull the pin out. The cylinder looks like part of aratchet and also works like one just turn the red part on the bottom.6. The Sling-SystemThese original Sling Systems from the Horcher GmbH can be used withthe Diana Lift.USB, USS, USS K, UTK, UPGFor more information check our Horcher GmbH booklet for SlingSystems.6.1 Original - Horcher – Sling-systemThe sling can be applied to either a sitting or reclined person.The USSK sling with the head support is for patients who are notable to hold up their head on their own. The head support staysare made out of plastic and can be removed for easy washing.6.2 Applying the sling6.2.1 Applying the sling in a sitting positionThe nurse stands behind the patient’s back, and takes the sling (seedrawing ) starting at the shoulders and working it down his back, pastthe hips to the surface of the seat. The back of the sling should bepushed down behind the back as far as possible. The top portion of thesling should end at the shoulders or the head depending on the slingyou are using. For a more comfortable sitting position the sling should be pushed allthe way down the bottom. Take the straps for the legs and turn them from theoutside to the in side.6.2.2 Applying the sling in a lying position:Position the sling under a patient in a lying position, using the same way asmentioned above by lifting the upper body enough if that is possible to slide the slingbehind the back. If this is not possible the patient can be “log rolled” onto his or herside. The sling can be fan folded and placed behind the patient’s back. Roll thepatient back onto the sling and the fan folded part can be pulled through to the otherside.6.2.3 Applying the sling on the leg’s:The straps on the bottom of the leg’s are wrapped around separately under thepatient’s leg’s , above the knee and as high as possible up to the thigh. The legstraps should be as straight as possible (no wrinkles), for patient’s comfort andproper positioning. Another variation for applying the leg straps is to pull both strapsHorcher GmbH - 61130 Nidderau - Ph.-Reis Str.3 - Telephone (06187) 9204.0 - Fax (06187) 9204.15-email-office@horcher.com -internet www.horcher.com
Stand Rev.1 / Page 10under both legs and attach the straps to the outside points on the spreader bar. Thisholds the legs together rather than open.6.3 Attaching the sling to the Lift:The sling is attached to the swivel bar with either four or six loops for the headsupport, it always depends on the sling you are using.Attention: All loops/hooks must be attached to the Lift prior to lifting the patient.You have four loops on the USS sling. There are two pair of straps on the sling; onepair on each side of the patient’s shoulder’s and one pair at the bottom on each sideof the patients leg’s. The slings can be attached to the spreader bar in two differentway’s. Attachment is either by Safety Clips which lock onto the swivel bar or bystraps. Slings with straps have a choice of three different lengths short, medium andlong. Choice of straps dependent’s on the patient’s condition. Care must be taken tochoose straps of equal lengths for the top pair and equal lengths for the bottom pair,or the patient will be positioned unevenly in the sling when being lifted.Attention:It is very important that you check whether all strap’s are hooked tothe swivel bar and that they have the same lengths.The USSK has two additional straps on each side of the head, be careful, so thepatient’s head or neck is not flexed it must be supported at all times.-. The head and shoulder strap’s are hooked on the outside of the swivel bar.-. The leg straps are hooked on the inside of the swivel bar.6.4 Sling Care.(a)Remove head support stays before washing. The Sling may bemachine washed, using normal cycle, warm water, and tried on lowtemperature settings.(b)The sling should be inspected frequently for any unusual tear and wear,including the straps and where they are attached to the sling. The slingshould be replaced without hesitation in the event of accidental tearingor cutting and never ever repaired.(c)It is recommended that the Sling should be replaced every 12 month,regardless of evidence of wear.7. SERVICE AND WARRANTY INFORMATIONAll mechanical and electrical components of the Horcher GmbH “Diana” Lift, have alimited two year warranty from the date of the original purchase and delivery,providing such defect is the result of poor craftsmanship or inherent defect incomponent material and not the result of improper use or handling.Horcher GmbH - 61130 Nidderau - Ph.-Reis Str.3 - Telephone (06187) 9204.0 - Fax (06187) 9204.15-email-office@horcher.com -internet www.horcher.com
Stand Rev.1 / Page 11Please send the warranty card with the serial number of your Lift and date ofpurchase back to the:Horcher GmbH,Philipp-Reis-Str. 3,61130 Nidderrau 1This will make it easier should a problem arise with your Lift during the warrantyperiod.Thank you!!Horcher GmbH - 61130 Nidderau - Ph.-Reis Str.3 - Telephone (06187) 9204.0 - Fax (06187) 9204.15-email-office@horcher.com -internet www.horcher.com
Stand Rev.1 / Page 12Horcher GmbH - 61130 Nidderau - Ph.-Reis Str.3 - Telephone (06187) 9204.0 - Fax (06187) 9204.15-email-office@horcher.com -internet www.horcher.com
Stand Rev.1 / Page 13Horcher GmbH - 61130 Nidderau - Ph.-Reis Str.3 - Telephone (06187) 9204.0 - Fax (06187) 9204.15-email-office@horcher.com -internet www.horcher.com
Stand Rev.1 / Page 14Horcher GmbH - 61130 Nidderau - Ph.-Reis Str.3 - Telephone (06187) 9204.0 - Fax (06187) 9204.15-email-office@horcher.com -internet www.horcher.com
Stand Rev.1 / Page 15Horcher GmbH - 61130 Nidderau - Ph.-Reis Str.3 - Telephone (06187) 9204.0 - Fax (06187) 9204.15-email-office@horcher.com -internet www.horcher.com
Stand Rev.1 / Page 168. 1 What is IBSThe New Intelligent Battery SystemYour Lift has been equipped with this new battery system. The battery is chargedbefore delivery.We the Horcher GmbH have developed this new IBS Battery System forrechargeable batteries. It consists of an integrated regulated memory chip this safesthe battery from handled the wrong way.Turns automatically to sleep modus after three minutes.Reminds the user when battery is low through an interval tune.If the user disregards this message then a continuance tune will remind him that thebattery is low and need’s to be recharged.Battery shuts off automatically when voltage is low, so no damage occurs to thebattery. When not in use, the IBS battery shuts of automatically after three minutes,safe’s energy.8.2 The battery capacityThis battery has a capacity of 2,7 Ah. When the lifting is in process the battery usesapproximately 3.6 A.The approximate lifting capacity of this battery is about 0.75 hours by lifting 160 kg/lbs. You can use this battery about 90 times at a lifting time of 0,5 minutes with aweight of 160 kg/lbs. If the patients weighs less then the battery has a longer usingtime.8.3 Battery chargerPlug battery into charging station, make sure the charging station is plugged into thewall outlet. Charger light will glow brightly green while being charged. Your battery istotally charged when the control light goes out.The wall mounted battery charger should only be installed in dry areas and close toan electrical outlet. Make sure the battery charger is not installed close to a waterfaucet or in a damp area.Horcher GmbH - 61130 Nidderau - Ph.-Reis Str.3 - Telephone (06187) 9204.0 - Fax (06187) 9204.15-email-office@horcher.com -internet www.horcher.com
Stand Rev.1 / Page 179. Accessories ScaleDirection for use of the personnel scale Model Number 878 ( DIANA / UDL )Push the Zero button to set system to zero. The digit 0 will pan across the display fora few seconds then the display will read “0.0.”On the left side of the display you will see the weight unit in either Kg stands forKilogram and lbs. which stands for American pounds.To change form Kg/lbs. push the Kg/ lbs. button and it will change. The scale willmemorize the change.Remove the sling. Position the patient in to the sling, than reattach the sling to theswivel bar.Carefully lift the patient and make sure he is free of obstacles. When the motion hasstabilized, press the Operate button once again.Read the weight on the display of the scale and check that you have the correctsetting either for Kg or Lbs.The scale Model 878 shuts off automatically after 60 Seconds.To activate the scale again, just push the Operate button again.For the following weighing just repeat point four, always use the same sling.You only have to repeat point 1-3 if you changed the sling.Point 3 only if you want to change from Kg to lbs. or vice versa.System specification:Measuring in Kg or lbs. changeable.Weight Rangethe authorized leverage for the Lift.AccuracyCalibrated accuracyScale SizePower supplyBattery capacityapproximatelyDisplay180,0 kg or 400 lbs. Please regard0,1 %0.1 %approximately 80 X 150 X 80 mm9 Volt Battery3000 timesLiquid crystal displayExchanging the batteryWhen battery replacement is needed an indicator will appear on the display. Batteryshould only be changed from an authorized technician.You must loosen the bolts on the lifting arm to access the battery remove the twoscrews on the case now you can remove the battery. Please make sure that the boltsare secured again after replacing the battery.Caution: Do not apply pressure to the display.Caution: When inserting battery watch for the polarity.To set scale again start at point one again.Horcher GmbH - 61130 Nidderau - Ph.-Reis Str.3 - Telephone (06187) 9204.0 - Fax (06187) 9204.15-email-office@horcher.com -internet www.horcher.com
Stand Rev.1 / Page 18Equipment dataInventory-No.EquipmentType of EquipmentFactory-No.Manufacturer/ ImporterSupplierYear of purchaseHorcher GmbH - 61130 Nidderau - Ph.-Reis Str.3 - Telephone (06187) 9204.0 - Fax (06187) 9204.15-email-office@horcher.com -internet www.horcher.com
Stand Rev.1 / Page 19AInventory-No.Functional cturer/ Su Name of the person Signaturepplierresponsible forInstructingHorcher GmbH - 61130 Nidderau - Ph.-Reis Str.3 - Telephone (06187) 9204.0 - Fax (06187) 9204.15-email-office@horcher.com -internet www.horcher.com
Stand Rev.1 / Page 20BInventory-No.PersonnelDateInstructorName of the person Signaturebeing instructedHorcher GmbH - 61130 Nidderau - Ph.-Reis Str.3 - Telephone (06187) 9204.0 - Fax (06187) 9204.15-email-office@horcher.com -internet www.horcher.com
Stand Rev.1 / Page 21CInventory-No.Technical Safety ControlDatePerformed through SolutionPerson / FirmObservationHorcher GmbH - 61130 Nidderau - Ph.-Reis Str.3 - Telephone (06187) 9204.0 - Fax (06187) 9204.15-email-office@horcher.com -internet www.horcher.com
Stand Rev.1 / Page 22DInventory-No.Maintenance Service(Maintenance / Inspection / Repair)DatePerformed through Short description of MaintenancePerson / FirmHorcher GmbH - 61130 Nidderau - Ph.-Reis Str.3 - Telephone (06187) 9204.0 - Fax (06187) 9204.15-email-office@horcher.com -internet www.horcher.com
Stand Rev.1 / Page 23EInventory-No.Functional disturbances or repeated operating mistakesDateFDescription of problemsInventory-No.Horcher GmbH - 61130 Nidderau - Ph.-Reis Str.3 - Telephone (06187) 9204.0 - Fax (06187) 9204.15-email-office@horcher.com -internet www.horcher.com
Stand Rev.1 / Page 24Essential Addresses:A)Inform the person responsible in case of problemsName:Telephone:Technical Service:Name:Telephone:Emergency No.:Name: Horcher GmbHTelephone: 06187/92040B)Operating Manual to be found:C) Accidents with personal injuryNotify:Telephone:Notify: Horcher GmbHTelephone: 06187/92040Horcher GmbH - 61130 Nidderau - Ph.-Reis Str.3 - Telephone (06187) 9204.0 - Fax (06187) 9204.15-email-office@horcher.com -internet www.horcher.com
Stand Rev.1 / Page 25Inventory ListType of LIFT:Serial No:Year of purchase:Manufacturer:Horcher GmbHFactory Id No:Side of locationYearly technical safety controls:(see label on the product)Horcher GmbH - 61130 Nidderau - Ph.-Reis Str.3 - Telephone (06187) 9204.0 - Fax (06187) 9204.15-email-office@horcher.com -internet www.horcher.com
Horcher GmbH - 61130 Nidderau - Ph.-Reis Str.3 - Telephone (06187) 9204.0 - Fax (06187) 9204.15 -email-office@horcher.com -internet www.horcher.com Dear Customer! We would like to thank you, for your confidence in our Lift as well as your choice in buying a Horcher GmbH Diana Lift.