Transcription
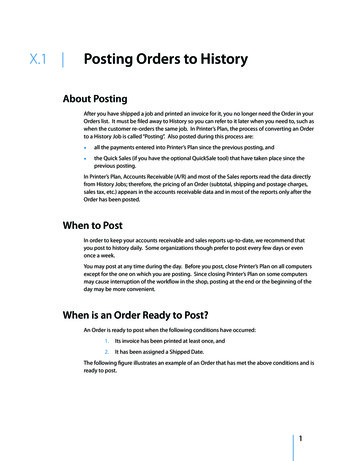
X.1 Posting Orders to HistoryAbout PostingAfter you have shipped a job and printed an invoice for it, you no longer need the Order in yourOrders list. It must be filed away to History so you can refer to it later when you need to, such aswhen the customer re-orders the same job. In Printer’s Plan, the process of converting an Orderto a History Job is called “Posting”. Also posted during this process are:.all the payments entered into Printer’s Plan since the previous posting, andthe Quick Sales (if you have the optional QuickSale tool) that have taken place since theprevious posting.In Printer’s Plan, Accounts Receivable (A/R) and most of the Sales reports read the data directlyfrom History Jobs; therefore, the pricing of an Order (subtotal, shipping and postage charges,sales tax, etc.) appears in the accounts receivable data and in most of the reports only after theOrder has been posted.When to PostIn order to keep your accounts receivable and sales reports up-to-date, we recommend thatyou post to history daily. Some organizations though prefer to post every few days or evenonce a week.You may post at any time during the day. Before you post, close Printer’s Plan on all computersexcept for the one on which you are posting. Since closing Printer’s Plan on some computersmay cause interruption of the workflow in the shop, posting at the end or the beginning of theday may be more convenient.When is an Order Ready to Post?An Order is ready to post when the following conditions have occurred:1.Its invoice has been printed at least once, and2.It has been assigned a Shipped Date.The following figure illustrates an example of an Order that has met the above conditions and isready to post.1
X.1 Posting Orders to HistoryCONDITION 1ORDER STATUSFROM WHEN WINDOWCONDITION 2NOTE: The only way to take an Order out of the “Ready to Post” status is to remove the“Shipped” date. To do this, open the When window and click in the box in the Shippedfield to remove the check mark.How to PostCAUTION: Posting is not reversible; that is, after an Order is posted and it becomes aHistory Job, you cannot convert it back to its original Order properties. (To makerevisions in History Jobs, please see “Correcting Invoices”.) Therefore, we stronglyrecommend that you verify the Orders before posting them and that you back upyour database before you post. If you post an Order by mistake, restoring your backupis the only way to return to the pre-posting stage. (To perform a quick backup, go toHome About My Database.)Before posting:Wait until after all the payments of the day have been entered into Printer’s Plan,then:Back up your database.Posting process:1.2In the Jobs section, list the Ready to Post Orders.
X.1 Posting Orders to HistoryJobs SectionVerify the Orders to be posted. If an Order is not shipped yet but is accidentallymarked Shipped, open the Order and remove the Shipped date.2.In A/R, open Invoices Ready-to-Post, and click List. The same Ready to PostOrders list you saw in the Jobs section appears on the right.3.To post all the Orders on the list, click Post Now A/R SctionIf the list includes Orders that you do not want to post yet, select (highlight) theOrders you want to post, and then click Post Now When you click Post Now , the Post window appears, giving you an option topost only the highlighted Orders or all of them.4.Select the appropriate option, and click OK to post. A confirmation windowappears.3
Posting Orders to HistoryX.1 5.If you haven’t backed up yet, click No to cancel the posting, and then back up yourdatabase. Otherwise, click Yes. A second confirmation window appears.6.Click Yes. When the posting is finished, a message window appears, summarizingthe posted items.7.Click OK. The Print window opens, listing all the Posting Reports that are availableto print.Print Window For Posting ReportsPrint Window For Posting ReportsPosting reports give information on the Orders, Payments, and QuickSale items (if you have theoptional QuickSale tool) that were just posted.8.Check/un-check any reports that you do/do not want to print.9.Click Print Now or Print to. to print the reports.NOTE: To change the default selections of reports in this window, go to Settings Printing Favorite Posting Reports.4
X.1 Posting Orders to HistoryNOTE: If you accidentally close the Print window before you print the reports, don’t worry.See the following paragraph.Re-printing the Posting Reports at a Later TimeYou can, at any time, re-print the Posting reports for a specific “posting” in the past.1.Go to the Reports section.2.Open Posting Journal.3.Right-click on any one of the options (Regular Sales, Total Sales, or All Fields)and select Add Filter RIGHT CLICK MENUThe Find window appears.4.Define the date or the number of the “posting”, and click Find Now. The “posting”is listed as a line item on the right.THE REQUESTED “POSTING”5.Select the item and click Print. The Print window appears.5
X.1 Posting Orders to History6.6Select Posting Reports to print the reports for the selected “posting”.
X.1 4 Posting Orders to History 5. If you haven't backed up yet, click No to cancel the posting, and then back up your database. Otherwise, click Yes.A second confirmation window appears. 6. Click Yes.When the posting is finished, a message window appears, summarizing