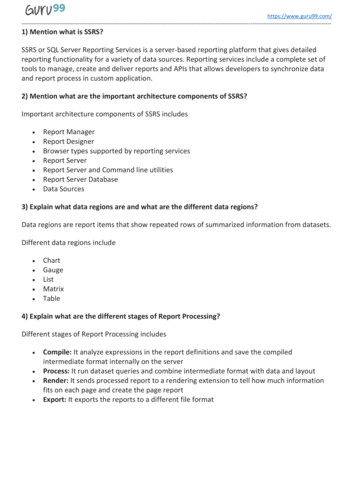
Transcription
PI OLEDB Basics, LearnHow to Query PIAll rights reserved. No part of this publication may be reproduced, stored in a retrievalsystem, or transmitted, in any form or by any means, mechanical, photocopying, recording,or otherwise, without the prior written permission of OSIsoft, LLC. Copyright 1995-2009 OSIsoft, LLC, 777 Davis St., Suite 250, San Leandro, CA 94577Page 1
1.1PI OLEDB Basics, Learn How to Query PI1.1.1DescriptionThis tutorial will show how easy it is to get started and provides the minimum SQLknowledge to perform data queries.1.1.2 1.1.3ObjectivesUnderstand how the PI Server Catalogs and Tables are exposed via PI OLEDBDiscover the SQL Language in the context of querying PIProblem DescriptionThe SQL connectivity of the PI Enterprise Server is very popular in middleware scenarios,e.g. to connect PI with Oracle or MS SQL Server. But it is also a very powerful end user tool.Unfortunately many users are scared of the SQL language and never look into this greatopportunity. This tutorial will show how easy it is to get started and provides the minimumSQL knowledge to be able to formulate data queries. So step through the examples and learnhow to write SQL queries for PI OLEDB.Here is an introduction to the PI OLEDB Provider. This information is good to know but isnot necessary to perform this lab using the Step-by-Step Instructions. At any time, feel free tojump to the "Approach" and "Step-by-Step Instructions" sections of this document.The PI OLEDB data provider simply exposes data from PI Servers in the form of Tables,categorized in Catalogs. All of this is available through the standard way to communicatewith relational databases: OLEDB.The following catalogs exist in the current version:piarchivecontains archive related tablespibatchcontains batch data tablespidscontains PI digital state tablespifunctioncontains tables representing PE functionspiheadingcontains heading tablespilogcontains the pimessagelog tablepimodulecontains tables representing the Module DatabaseAll rights reserved. No part of this publication may be reproduced, stored in a retrievalsystem, or transmitted, in any form or by any means, mechanical, photocopying, recording,or otherwise, without the prior written permission of OSIsoft, LLC. Copyright 1995-2009 OSIsoft, LLC, 777 Davis St., Suite 250, San Leandro, CA 94577Page 2
pipointcontains tag configuration tables (one per point class)pisystemcontains product version informationpiusercontains user database tablesThe user can also create new tables in the pipoint and pids catalog. This is equivalent tocreating new point classes and new digital state sets, respectively.Another function is to create Views. Large tables like the picomp table which represents allevents in the PI archive may be unwieldy for end users. Also, it might be more convenient tovirtually merge tables to a new table. This can be done with Views. A newly created Viewwill be available to other users too.This product is licensed with the PI Data Access (DA) server module and needs to beinstalled on the various computers from which one needs to access PI via OLEDB.When installed on a user PC it may update the Microsoft MDAC components and will installor update the PI SDK. PI OLEDB is mainly a DLL, comparable to a printer driver or ODBCdriver. It requires an application (in OLE DB terms called a consumer) to make use of it. Oneapplication that supports standard OLE DB providers by default is MS Excel (XP or higher).Also there are ActiveX controls that connect to OLE DB providers that can for example beinserted into ProcessBook displays. Finally PI OLEDB comes with a number of exampleapplications that show how to develop your own OLE DB applications.1.1.4Suggested ApproachPart AUse the PI OLEDB snap-in for MMC to explore the table structure. Starting from the example query of the piarchive.piinterp table, extract the values ofthe last day – with their timestamp – for the tag ba:level.1 (only the time and valuecolumns should be displayed)Create a new laboratory PI point in the pipoint.classic table, whose name is"LabTag1" and type is "Int32"Send two laboratory measurement values in the LabTag1 point, using thepiarchive.picomp2 table, then make sure these values appear in the pimin and pimaxtables:Value of -111, at the current time minus a few secondsValue of 222, at the current timeCreate a new digital state set (in the pids catalog) named "AlertStates", that contains3 states: "Information", "Warning" and "Danger"Delete the point and the digital state set you just createdAll rights reserved. No part of this publication may be reproduced, stored in a retrievalsystem, or transmitted, in any form or by any means, mechanical, photocopying, recording,or otherwise, without the prior written permission of OSIsoft, LLC. Copyright 1995-2009 OSIsoft, LLC, 777 Davis St., Suite 250, San Leandro, CA 94577Page 3
Part BUse the PI OLEDB Tester to experiment with custom-built SQL statements. Read PI Archive values;Write PI Values to the Archive.Add a new user (with your name) in the piuser.piuser table using an INSERT INTOstatement.Then modify the description of this new user to "User created with PI OLEDB",using an UPDATE statement.Make sure the user is created by issuing a SELECT statement.Finally, delete the new user with a DELETE statement.Part CUse the Sample Statements provided in the PI OLEDB Tester Execute the query example that extracts the points from the PI system with theirdescription, when their pointsource attribute is equal to "R".Then modify the query so it extracts the creation date (creationdate column) as well,when the points' pointsource attribute is equal to "R" or "9".Try to do this exercise on your own before proceeding to the Step‐by‐StepInstructions.All rights reserved. No part of this publication may be reproduced, stored in a retrievalsystem, or transmitted, in any form or by any means, mechanical, photocopying, recording,or otherwise, without the prior written permission of OSIsoft, LLC. Copyright 1995-2009 OSIsoft, LLC, 777 Davis St., Suite 250, San Leandro, CA 94577Page 4
1.1.5Step-by-Step InstructionsPart A1.2.3.4.5.Open the Windows File Explorer and navigate to the following directory: C:\ProgramFiles\PIPC\OLEDB\Tools\MMCDouble-click the file PIOLEDB.mscYou can alternatively run "mmc" from a Command Window and add the PIOLEDB snap-in to theMicrosoft Management ConsoleOpen the PI Servers branch and select one of the available PI ServerIn the PI Server Login window that appears, check the Use Trusted Connection.All rights reserved. No part of this publication may be reproduced, stored in a retrievalsystem, or transmitted, in any form or by any means, mechanical, photocopying, recording,or otherwise, without the prior written permission of OSIsoft, LLC. Copyright 1995-2009 OSIsoft, LLC, 777 Davis St., Suite 250, San Leandro, CA 94577Page 5
6.Browse through the tree and discover the "Catalogs" and "Tables"Most tables have a predefined "WHERE" condition so that on a simple click you only see asubset of the available data in that table.7.Select the piinterp table in the piarchive catalog and modify the example query by right-clicking onthe table and choosing the Query option.All rights reserved. No part of this publication may be reproduced, stored in a retrievalsystem, or transmitted, in any form or by any means, mechanical, photocopying, recording,or otherwise, without the prior written permission of OSIsoft, LLC. Copyright 1995-2009 OSIsoft, LLC, 777 Davis St., Suite 250, San Leandro, CA 94577Page 6
8.9.Move the tag, status, svalue and timestep columns to the left-hand pane so they do not appear in theresults grid.First clear the “Default” checkbox, then modify the conditions of the WHERE clause in order toextract only the positive values, for the tag ba:level.1, in the last day.All rights reserved. No part of this publication may be reproduced, stored in a retrievalsystem, or transmitted, in any form or by any means, mechanical, photocopying, recording,or otherwise, without the prior written permission of OSIsoft, LLC. Copyright 1995-2009 OSIsoft, LLC, 777 Davis St., Suite 250, San Leandro, CA 94577Page 7
The complete filter expression should look like this:tag 'ba:level.1' AND time BETWEEN '*-1d' AND '*' AND value 010. Click OK to execute the query.This results in the following SQL expression with results as shown below.SELECT time,value FROM piarchive.piinterpWHERE tag 'ba:level.1' AND time BETWEEN '*-1d' AND '*' AND value 0All rights reserved. No part of this publication may be reproduced, stored in a retrievalsystem, or transmitted, in any form or by any means, mechanical, photocopying, recording,or otherwise, without the prior written permission of OSIsoft, LLC. Copyright 1995-2009 OSIsoft, LLC, 777 Davis St., Suite 250, San Leandro, CA 94577Page 8
11. Click the Refresh button(or F5) to see what happens to the results.Note that the timestamps (and the values) change according to the current time. This table offersinterpolated values at regular intervals (the timestep column), which is set to '1h' by default12. Open the classic table in the pipoint catalog.13. In the last line (the one preceded by a star), add the new point by typing "LabTag1" in the tagcolumns and "int32" in the pointtypex columns14. Open the picomp2 table in the piarchive catalog15. In the last line (the one preceded by a star), add the value by typing "LabTag1" in the tag column, "111" in the value column and the timestamp (current time, minus a few seconds) in the time column,according to the regional format (see other values shown in this same table).16. Repeat the last step with a value of 222, at the current time17. Open the pimin table and verify that in the last hour, only the smallest value is extracted for the tagLabTag1 (you have to modify the query for tag LabTag1)18. Open the pimax table and verify that in the last hour, only the largest value is extracted for the tagLabTag1 (you have to modify the query for tag LabTag1).19. Select the pids catalog, right-click on its Table collection and choose the Create Table optionAll rights reserved. No part of this publication may be reproduced, stored in a retrievalsystem, or transmitted, in any form or by any means, mechanical, photocopying, recording,or otherwise, without the prior written permission of OSIsoft, LLC. Copyright 1995-2009 OSIsoft, LLC, 777 Davis St., Suite 250, San Leandro, CA 94577Page 9
20. Name the table "AlertStates" and click on OK.21.22.23.24.Open the new AlertStates table that now appears in the pids catalog.Add the first state by typing "Information" in the name columnIn the last line (the one preceded by a star), type "Warning" in the name columnRepeat the previous step for the "Danger" state25. Open the classic table in the pipoint catalog.26. Select the line of the point LabTag1 (by clicking on the gray box at the beginning of the line) andbutton in the toolbar.press the Delete key on your keyboard or click on the27. Click on Yes in the window that appears to delete the point.All rights reserved. No part of this publication may be reproduced, stored in a retrievalsystem, or transmitted, in any form or by any means, mechanical, photocopying, recording,or otherwise, without the prior written permission of OSIsoft, LLC. Copyright 1995-2009 OSIsoft, LLC, 777 Davis St., Suite 250, San Leandro, CA 94577Page 10
28. Right-click on the AlertStates table in the pids catalog, then choose the Drop Table option.29. In the window that appears, click on Yes.For more information on using the PI OLEDB snap-in for MMC, refer to Appendix C in the PI OLEDBDocumentation:C:\Program Files\PIPC\OLEDB\Doc\PIOLEDB.docPart BAs a first step in PI SQL we provide a simple Consumer application called PI OLEDB Tester.It allows executing SQL statements against PI OLEDB and displays results in the MicrosoftData Grid ActiveX control.1.2.3.4.Open the Windows File Explorer and navigate to the following directory: C:\ProgramFiles\PIPC\OLEDB\Tools\PI OLEDB TesterDouble-click the file PIOLEDBTester.exeIn the PI Server Login window that appears, either check the Use Trusted Connection checkbox oruse "piadmin" as the User ID with a blank PasswordYou can now enter PI SQL commands into the SQL Statement text fieldAll rights reserved. No part of this publication may be reproduced, stored in a retrievalsystem, or transmitted, in any form or by any means, mechanical, photocopying, recording,or otherwise, without the prior written permission of OSIsoft, LLC. Copyright 1995-2009 OSIsoft, LLC, 777 Davis St., Suite 250, San Leandro, CA 94577Page 11
The way to retrieve data from a table is to use a SELECT query. A simple SELECT query looks asfollows:SELECT column 1, column 2, column NFROM table1WHERE column 1 'text' AND column 2 0A SELECT query returns a table (called result set). The columns of the result set are the ones that werespecified between the SELECT and FROM keywords. As columns you can specify any or all of thecolumns that exist on the table (table1) that you query data from. Instead of specifying all columns youcan also use the '*' as shortcut:All rights reserved. No part of this publication may be reproduced, stored in a retrievalsystem, or transmitted, in any form or by any means, mechanical, photocopying, recording,or otherwise, without the prior written permission of OSIsoft, LLC. Copyright 1995-2009 OSIsoft, LLC, 777 Davis St., Suite 250, San Leandro, CA 94577Page 12
SELECT * FROM table1After the WHERE keyword you specify a condition (expression) that each row of the originating tablemust meet in order to be copied to your result set. If you omit the WHERE part (it is optional) you willreceive all rows of the originating table.5.Type the following command and click Execute to read data from PI:SELECT tag, descriptor, zero, span FROM pipoint.classicNote the "2 dots" notation in PIPoint.Classic.To insert new rows into a table this table must be fully updatable or at least support inserts. The picomp2table for example is fully updatable and inserting a new row into the picomp2 table is equivalent tosending a new value into a certain PI Point.The related query looks as follows:INSERT piarchive.picomp2 (tag, time, value, status)VALUES ('somePIPoint', 'y 8h', 12.5, 0)After the INSERT keyword you find the target table name followed by a list of column names set inparentheses. Then after the VALUES keyword you provide the values for each given column (again inparentheses) in the same order as the columns were specified before. String values have to be surroundedby single quotes.It is not required that all columns be present in the query. Columns that are left out will get default values.However, some tables have columns that are mandatory to be contained in the INSERT query.All rights reserved. No part of this publication may be reproduced, stored in a retrievalsystem, or transmitted, in any form or by any means, mechanical, photocopying, recording,or otherwise, without the prior written permission of OSIsoft, LLC. Copyright 1995-2009 OSIsoft, LLC, 777 Davis St., Suite 250, San Leandro, CA 94577Page 13
6.Type the following command and click Execute to write data to PI:INSERT piarchive.picomp2 (tag, time, value, status)VALUES ('TestPoint', '*', 12.5, 0)7.Because the specified tag does not exist (TestPoint) the query returns an error:8.Type the following command and click Execute to create it into PI:INSERT pipoint.classic (tag, pointtypex)VALUES ('TestTag', 'float32')9. Try steps 10 and 11 again; that will write a value of 12.5 at the current time10. Verify that the value was written by typing this command clicking Execute:SELECT * FROM piarchive.picomp2WHERE Tag 'TestTag' AND time '*-1h'11. To create the new user (with your name), type the following INSERT INTO statement in the SQLStatement field, then click on the Execute button:INSERT INTO piuser.piuser (name) VALUES ('YourName')12. To modify the description of the new user, execute the following UDPATE statement:UPDATE piuser.piuser SET description 'User created with PI OLEDB'WHERE name 'YourName'13. To make sure the user is correctly created, list all users by executing the following SELECT query:SELECT name, description FROM piuser.piuser14. Delete the new user from the table using the following DELETE statement. Execute the query. AAll rights reserved. No part of this publication may be reproduced, stored in a retrievalsystem, or transmitted, in any form or by any means, mechanical, photocopying, recording,or otherwise, without the prior written permission of OSIsoft, LLC. Copyright 1995-2009 OSIsoft, LLC, 777 Davis St., Suite 250, San Leandro, CA 94577Page 14
message will inform you the operation was completed successfully.DELETE FROM piuser.piuser WHERE name 'YourName'Make sure the user with your name has been deleted from the piuser.piuser table.It is possible to modify the tables directly in the grid:- Add new users in the last line.- Modify users directly in the grid.- Delete a user by choosing a line and then pressing the Suppr keyIn order for the changes to be effective, you must click in another line of the grid.Here are small examples that demonstrate the power of PI SQL. They perform tasks that cannot easily bedone with other tools. Feel free to execute them in PI OLEDB Tester.Count Tags by Point Source AttributeSELECT pointsource, COUNT(*)FROM pipoint.classic GROUP BY pointsourceHow Many Events since Beginning of This MonthSELECT COUNT(*) FROM piarchive.picomp2WHERE tag 'sinusoid' AND time BOM('*')All rights reserved. No part of this publication may be reproduced, stored in a retrievalsystem, or transmitted, in any form or by any means, mechanical, photocopying, recording,or otherwise, without the prior written permission of OSIsoft, LLC. Copyright 1995-2009 OSIsoft, LLC, 777 Davis St., Suite 250, San Leandro, CA 94577Page 15
Get Annotated EventsSELECT time, value, annotationsFROM piarchive.picomp2WHERE tag 'mytag' AND time 't' AND annotated TRUEMore example queries can be found in the PI OLEDB manual, Compendium of SQL Statements.Part C1.2.Still in the PI OLEDB Tester application, click the Sample Statements buttonYou should see the following:All rights reserved. No part of this publication may be reproduced, stored in a retrievalsystem, or transmitted, in any form or by any means, mechanical, photocopying, recording,or otherwise, without the prior written permission of OSIsoft, LLC. Copyright 1995-2009 OSIsoft, LLC, 777 Davis St., Suite 250, San Leandro, CA 94577Page 16
3.4.5.Browse through the available categories of statements (top-left corner list), select one of theavailable statements (top-right corner list) and click on the Execute button.In the left-hand list, select the Point Database Statements categoryIn the right-hand list, select the query that extracts the points for which the pointsource attribute isequal to "R", and then click on the Execute button.All rights reserved. No part of this publication may be reproduced, stored in a retrievalsystem, or transmitted, in any form or by any means, mechanical, photocopying, recording,or otherwise, without the prior written permission of OSIsoft, LLC. Copyright 1995-2009 OSIsoft, LLC, 777 Davis St., Suite 250, San Leandro, CA 94577Page 17
6.In the SQL Statement field, modify the query as follows, and then click on the Execute button:SELECT tag, descriptor, creationdateFROM pipoint.classic WHERE pointsource 'R' OR pointsource '9'Note that some queries may depend on previous queries. For example, in order to return with successinserting a value into a PI Point depends on the previous query that created that PI Point.All rights reserved. No part of this publication may be reproduced, stored in a retrievalsystem, or transmitted, in any form or by any means, mechanical, photocopying, recording,or otherwise, without the prior written permission of OSIsoft, LLC. Copyright 1995-2009 OSIsoft, LLC, 777 Davis St., Suite 250, San Leandro, CA 94577Page 18
Understand how the PI Server Catalogs and Tables are exposed via PI OLEDB Discover the SQL Language in the context of querying PI 1.1.3 Problem Description The SQL connectivity of the PI Enterprise Server is very popular in middleware scenarios, e.g. to connect PI with Oracle or MS SQL Server. But it is also a very powerful end user tool.