Transcription
Establish an IPsec VPN connection between Android client and mGuard device1Establish an IPsec VPN connection between Androidclient and mGuard deviceDocument-ID: 108394 en 00Document-Description: AH DE MGUARD ANDROID SUPPORT PHOENIX CONTACT 2018-02-01Make sure you always use the latest documentation.It can be downloaded using the following link phoenixcontact.net/products.Content of this documentThis document describes the required steps to configure a VPN connection between themGuard server and an Android client (tablet PC or mobile phone with Android OS version6.0).1.11.21.31.41.5Introduction . 1Manage certificates . 2Configure VPN connections . 5Start VPN connections on the Android client . 10Check VPN connections on the mGuard . 111.1IntroductionThe Android device acts as a remote client that initiates the IPsec VPN connection. ThemGuard acts as the local server and configures and provides the local network for theclients via the XAuth/Mode Config extension.The VPN connections require the installation of X.509 certificates and keys both on theAndroid client and the mGuard device.For general information on how to configure VPN connections, please refer to the“Software Reference Manual – mGuard Firmware”, available online or in the PHOENIXCONTACT Webshop at: phoenixcontact.net/products. For further information regardingthe Android client, please refer to the corresponding manufacturer's web page.Settings and user interfaces may look different on different Android devices. They dependon the manufacturer‘s implementation. The present document was created on the basis ofthe following device: SAMSUNG SM-T580 with installed Android version 6.0.1.1.1.1–––RequirementsmGuard device with installed firmware 8.5 or laterAndroid device with installed firmware version 6.0All required and signed certificatesHow to obtain X.509 certificates?For further information about certificate management please refer to the application noteX.509 CERTIFICATES, available in the PHOENIX CONTACT Webshop at:phoenixcontact.net/products.108394 en 00PHOENIX CONTACT1
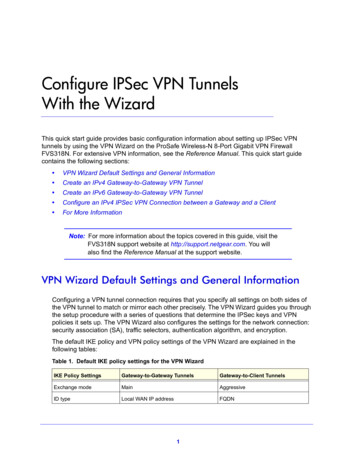
mGuard1.2Manage certificatesTo establish an IPsec VPN connection between an Android client and the mGuard server,the devices need to authenticate each other via X.509 certificates.Table 1-1Required certificatesDeviceRequired certificateFormatmGuardCA CertificatePEM / CERmGuard Machine Certificate (signed by CA) PKCS#12Android clientmGuard Machine Certificate (signed by CA) PEM / CERAndroid Client Certificate (signed by CA)Figure 1-1PKCS#12Certificate handling for connections initiated by Android clientsThe terms “Machine Certificate” and “Client Certificate” signify an X.509 certificate and it‘scorresponding private key by which the machine/client identifies itself to it‘s peers.1.2.1Required certificates on the mGuard deviceThe following certificates need to be installed on the mGuard device.mGuard Machine Certificate (PKCS#12)The Android client verifies the mGuard on the basis of the mGuard Machine Certificate.The mGuard Machine Certificate must therefore be installed on the Android client.1.2.2Required certificates on the Android clientThe following certificates need to be installed on the Android device (see page 2).1. mGuard Machine Certificate (PEM/CER)The Android client verifies the mGuard server on the basis of the mGuard MachineCertificate.2. Android Client Certificate (PKCS#12)The mGuard verifies the Android client on the basis of the Android Client Certificate signedby the CA. The signing CA Certificate must therefore be installed on the mGuard.2PHOENIX CONTACT108394 en 00
Establish an IPsec VPN connection between Android client and mGuard device1.2.3Install certificates on the mGuard deviceMachine CertificateTo upload the mGuard Machine Certificate to the mGuard, proceed as follows:1. Select the menu Authentication Certificates Machine Certificates.2. Click the iconto create a new table row.3. Click the icon.4. Choose the Machine Certificate (PKCS#12 file) and click “Open”.5. Enter the password, that has been used to protect the private key of the certificate.6. Click the button “Upload”. The uploaded certificate appears in the certificates list.7. Click “Apply” to save the settings. The mGuard Machine Certificate has been uploaded and can be used for authentication towards the Android client (see “Configure the mGuard” , Tab “Authentication”).CA CertificateTo upload the CA Certificate to the mGuard, proceed as follows:1. Select the menu Authentication Certificates CA Certificates.2. Click the iconto create a new table row.3. Click the icon.4. Choose the CA Certificate (PEM or CER file) and click “Open”.5. Click the button “Upload”. The uploaded certificate appears in the certificates list.6. Click “Apply” to save the settings. The CA Certificate has been uploaded and can be used to authenticate the Androidclient certificate (see “Configure the mGuard” , Tab “Authentication”).108394 en 00PHOENIX CONTACT3
mGuard1.2.4Install certificates on the Android clientTo install the Android Client Certificate (PKCS#12 file with signing CA certificate) and themGuard Machine Certificate (PEM / CER file) on the Android client, proceed as follows:1. To use the VPN feature on the Android device, you must set the screen lock typepattern, PIN, or password.2. Make the certificate files available on the Android client.3. Open the PKCS#12 file (*.p12) to extract and install the Android Client and signing CACertificates. The screen “Extract from certificate name ” appears.If the screen does not appear and the device displays the content of the fileinstead, download the file to the storage of your device or make it availablevia SD card. Open the file from the corresponding directory.4.5.6.7.Enter the password and click “OK”. The screen “Certificate name” appears.Optional: Assign a new name to the certificate to easily locate the certificate in thecertificate list.Click “OK” to finish the installation of the Android Client and signing CA Certificate. The installed certificates appear in the user certificates list (Apps Settings Lock screen and security Other security settings User certificates).Open the PEM or CER file (*.pem / *.cer) to install the mGuard Machine Certificate. The screen “Certificate name” appears.If the screen does not appear and the device displays the content of the fileinstead, download the file to the storage of your device or make it availablevia SD card. Open the file from the corresponding directory.8.4PHOENIX CONTACTClick “OK” to finish the installation of the mGuard Machine Certificate. The installed certificate appears in the user certificates list (Apps Settings Lock screen and security Other security settings User certificates).108394 en 00
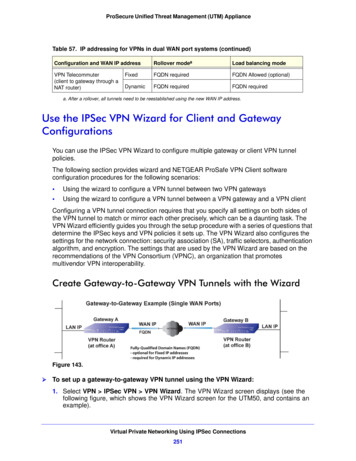
Establish an IPsec VPN connection between Android client and mGuard device1.31.3.1Configure VPN connectionsConfigure the mGuardThe IPsec VPN connection between the Android client and the mGuard will be establishedusing the XAuth/Mode Config extension. The configuration of the iOS client will beconfigured by the mGuard and communicated to the iOS client.Figure 1-21.3.1.1mGuard VPN configuration – Mode ConfigurationTab “General”To configure a VPN connection to an Android client on the mGuard, proceed as follows:1. Select the menu “IPsec VPN Connections”.2. Click the iconto create a new table row.3. Click the icon“Edit row”. The tab “General” appears.4. Enter a descriptive name for the connection and change further settings optionally.Verify that the input field “Address of the remote site’s VPN gateway” containsthe value “%any” and “Connection startup” is set to “Wait” (default values).5.6.In section Mode Configuration select Mode configuration Server.Local: Enter the local network(s) on the server side (mGuard) that shall be accessibleby the Android client via VPN connection.– Fixed: The Local IP network must be set to 0.0.0.0/0. In this case, all traffic from theAndroid client will be sent over the VPN connection.– From table below: Only traffic to the Networks listed in the table below will besend over the VPN connection.Android clients do not fully support this feature. Traffic from Android clients tonetworks not defined in the table below will be blocked!108394 en 00PHOENIX CONTACT5
mGuard7.6PHOENIX CONTACTRemote: Define the network pool (From the pool below) from which the mGuardallocates a variable tranche (Tranches of size) to be used by the remote client‘snetwork.108394 en 00
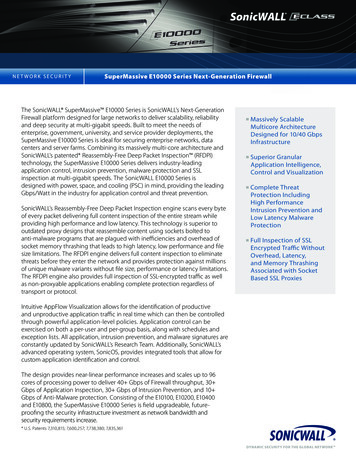
Establish an IPsec VPN connection between Android client and mGuard device1.3.1.2Figure 1-3Tab “Authentication”mGuard VPN configuration – AuthenticationThe VPN connection between an Android client and the mGuard must be authorized byX.509 certificates, that have to be installed on the corresponding devices (see “Managecertificates” on page 2).To assign the required certificates to a VPN connection, proceed as follows:1. Select the menu “IPsec VPN Connections”.2. Edit the desired VPN connection (Tab “Authentication”).3. Select the Authentication method “X.509 Certificate”.4. As the Local X.509 certificate select the mGuard Machine Certificate.Only for connections from iOS clients: The CN of the certificate mustcorrespond with the external IP address or DNS name of the mGuard server.The certificate must have been signed by the CA Certificate that has beeninstalled on the Android client.5.6.As the Remote CA certificate select the CA Certificate that has been used to sign theiOS Client Certificate and the Android Client Certificate.Click “Apply” to save the settings. The VPN connection will be established after being initiated by the Android client.1.3.1.3Tab“Firewall”The VPN firewall restricts the access through the VPN tunnel. You may configure the VPNfirewall if required.By default, any incoming and outgoing traffic will be accepted.108394 en 00PHOENIX CONTACT7
mGuard1.3.1.4Tab “IKE Options”It is necessary to change the default IKE options:1. Select the menu “IPsec VPN Connections”.2. Edit the desired VPN connection (Tab “IKE Options”).3. Configure the following settings and leave all other settings on default.ISAKMP SA (Key Exchange)–––Encryption: AES-256Hash: All algorithmsDiffie-Hellman: All algorithmsIPsec SA (Data exchange) Click the iconto create two table rows and use the following settings:– (Row 1) Encryption: AES-256 Hash: SHA-512– (Row 2) Encryption: AES-256 Hash: SHA-1Perfect Forward Secrecy (PFS)–The PFS must be set to No.(Even if set to No, iOS clients will still be able to use PFS.)ISAKMP SA lifetime–12:00:00 (hh:mm:ss)IPsec SA lifetime–8PHOENIX CONTACT04:00:00 (hh:mm:ss)108394 en 00
Establish an IPsec VPN connection between Android client and mGuard device1.3.2Configure the Android clientTo configure an IPsec VPN connection on the Android client, proceed as follows:1. Select the menu “Settings More connection settings VPN”.2. Click “ADD VPN” or “ ”. The screen “Edit VPN network” appears.3. Configure the following settings:– Name: A descriptive name for the connection– Type: IPSec Xauth RSA– Server address: The external IP address or the DNS name of the mGuard server– IPSec user certificate: Select the name you have assigned to the Android ClientCertificate from the PKCS#12 file.– IPSec CA certificate: Select the name you have assigned to the Android ClientCertificate from the PKCS#12 file.– IPSec Server certificate: Select the name you have assigned to the mGuardMachine Certificate of the mGuard server (VPN gateway).4. Click “Save” to save the configuration. The VPN configuration has been saved and is ready to be started.108394 en 00PHOENIX CONTACT9
mGuard1.4Figure 1-4Start VPN connections on the Android clientStart VPN connection on the Android clientTo start an IPsec VPN connection on the Android client, proceed as follows:1. Select the menu “Apps Settings More connection settings VPN”.2. Click on the name of the appropriate VPN connection. The screen “Connect to connection name ” appears.The username and password for Xauth will be ignored by the mGuard. Entersome random text and save the account information.3.Click “CONNECT” to start the connection. The VPN connection will be established and the status changes from“Not Connected” to “Connecting.” to “Connected”.If the connection fails, click the “gear” symbol of the VPN connection to checkfor errors in the configuration or check your internet connection.10PHOENIX CONTACT108394 en 00
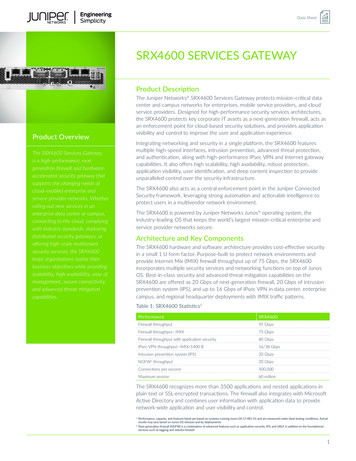
Establish an IPsec VPN connection between Android client and mGuard device1.5Figure 1-5Check VPN connections on the mGuardIPsec VPN statusTo check the status of an IPsec VPN connection, proceed as follows: Select the menu “IPsec VPN IPsec Status”. An established IPsec VPN connection appears in the area “Established”.108394 en 00PHOENIX CONTACT11
mGuard12PHOENIX CONTACT108394 en 00
To configure a VPN connection to an Android client on the mGuard, proceed as follows: 1. Select the menu "IPsec VPN Connections". 2. Click the icon to create a new table row. 3. Click the icon "Edit row". The tab "General" appears. 4. Enter a descriptive name for the connection and change further settings optionally.