Transcription
Navigation SoftwareUser Guide
Thank you for choosing the Sniper Truck Nav as your navigator. You can start using yourSniper Truck Nav right away. This document is the detailed description of the navigationsoftware. You can easily discover Sniper Truck Nav while you are using it or refer to our QuickStart Guide; however, we still recommend that you read this manual to fully understand thescreens and features.2
Table of contents1 Warnings and Safety information .62 Getting started.72.1 Navigation menu . 72.2 Buttons and other controls on the screen. 82.2.1 Using keyboards . 92.2.2 Beyond single screen tap . 102.3 Map screen. 112.3.1 Navigating on the map . 122.3.2 Position markers . 142.3.2.1 Vehimarker and Lock-on-Road . 142.3.2.2 Selected map location (Cursor) and selected map object . 142.3.3 Objects on the map . 142.3.3.1 Streets and roads . 142.3.3.2 Turn preview and Next street . 142.3.3.3 Lane information and Signposts. 162.3.3.4 Motorway exit services . 162.3.3.5 3D object types. 172.3.3.6 Elements of the active route . 172.3.4 Manipulating the map . 182.3.5 Quick menu. 192.3.6 Checking the details of the current position (Where Am I?) . 223 On-road navigation .243.1 Selecting the destination of a route. 243.1.1 Entering an address or a part of the address. 243.1.1.1 Entering an address . 253.1.1.2 Entering the midpoint of a street as the destination. 273.1.1.3 Selecting an intersection as the destination . 283.1.1.4 Selecting a city/town centre as the destination. 303.1.1.5 Entering an address with a postal code . 313.1.1.6 Tips on entering addresses quickly . 333.1.2 Selecting the destination from the Places of Interest . 343.1.2.1 Quick search for a Place of Interest. 343.1.2.2 Searching for a Place of Interest using preset categories. 363.1.2.3 Searching for a Place of Interest by category . 383.1.2.4 Searching for a Place of Interest by name . 403.1.2.5 Selecting nearby assistance from 'Where Am I?' . 433.1.3 Selecting a map location as the destination . 453.1.4 Selecting the destination from your Favourites . 463.1.5 Selecting one of the most likely destinations (Smart History). 473.1.6 Selecting a recent destination from the History . 483
3.1.7 Entering the coordinate of the destination . 493.1.8 Navigate to a location stored in a photo. 503.1.9 Building a route from the list of destinations (Create Route) . 513.2 Viewing the entire route on the map . 523.3 Checking route parameters and accessing route related functions . 523.4 Modifying the route. 533.4.1 Selecting a new destination when already having a route: New Route, Waypoint or FinalDestination. 533.4.2 Setting a new starting position for the route . 543.4.3 Editing the list of destinations (Edit Route). 553.4.4 Pausing the active route . 563.4.5 Cancelling the active route . 563.4.6 Checking route alternatives when planning the route . 573.4.7 Checking route alternatives for an existing route . 583.4.8 Changing the vehicle used in route planning . 593.4.9 Changing the road types used in route planning . 603.5 Saving a location as a Favourite destination. 613.5.1 Editing the details of a Favourite destination. 623.6 Saving a map location as an alert point. 633.7 Editing an alert point . 643.8 Watching the simulation of the route . 654 Off-road navigation.674.1 Selecting the destination of the route . 674.2 Navigating in off-road mode . 675 Reference Guide .685.1 Concepts. 685.1.1 Smart Zoom . 685.1.2 Daytime and night colour themes . 685.1.3 Tunnel view . 685.1.4 Route calculation and recalculation . 695.1.5 Green routing . 715.1.6 Speed limit warning . 715.1.7 GPS position quality indicator and current time . 725.2 'More' menu. 735.3 Settings menu . 745.3.1 Sound and Warnings. 755.3.2 Customise Quick menu. 775.3.3 Route settings. 775.3.4 User profiles. 815.3.5 Map settings. 815.3.6 Visual guidance settings . 834
5.3.7 Display settings. 845.3.8 Regional settings. 855.3.9 Trip monitor settings. 855.3.10 Log collection settings . 866 Glossary.875
1 Warnings and Safety informationThe navigation system helps you find your way to your destination with the built-in GPSreceiver. Sniper Truck Nav does not transmit your GPS position; others cannottrack you.If you accept it when first using the application, Sniper Truck Nav collects usageinformation and GPS logs that may be used for improving the application and the quality andcoverage of maps. The data is processed anonymously; no one will be able to track anypersonal information. If you change your mind later, you can enable or disable the logcollection in Settings (page 86).It is important that you look at the display only when it is safe to do so. If you are the driver ofthe vehicle, we recommend that you operate Sniper Truck Nav before you start yourjourney. Plan the route before your departure and stop if you need to change the route.You must obey the traffic signs and follow the road geometry. If you deviate from therecommended route, Sniper Truck Nav changes the instructions accordingly.Never place Sniper Truck Nav where it obstructs the driver's view, where it is in thedeployment zone of an airbag or where it might cause injuries in an accident.6
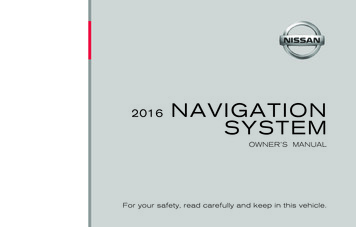
2 Getting startedSniper Truck Nav is optimised for vehicle use. You can use it easily by tapping the screenbuttons and the map with your fingertips.2.1 Navigation menuYou can reach all parts of Sniper Truck Nav from the Navigation menu.You have the following options: Tapto select your destination by entering an address or selectinga place of interest, a location on the map or one of your Favourite destinations. Youcan also look up your recent destinations from the Smart History, enter a coordinate oruse the location saved in a photo. Tapto display the route parameters and the route in its full lengthon the map. You can also perform route-related actions such as editing or cancellingyour route, setting a start point for the route, picking route alternatives, avoiding partsof the route, simulating navigation or adding the destination to your Favourites. Tapto customise the way the navigation software works, tosimulate demo routes or to run some additional applications. Tapto start navigating on the map. The button itself is a miniaturelive map that shows your current position, the recommended route and the surroundingmap area. Tap the button to enlarge the map to the full screen. Tapto stop navigation and exit the software.7
2.2 Buttons and other controls on the screenWhen you are using Sniper Truck Nav, you usually tap buttons on the touchscreen.You only need to confirm selections or changes if the application needs to restart, it needs toperform a major reconfiguration, or you are about to lose some of your data or settings.Otherwise, Sniper Truck Nav saves your selections and applies the new settings withoutconfirmation as soon as you use the controls.TypeExampleDescriptionHow to use itButtonTap it to initiate a function, Tap it once.to open a new screen, orto set a parameter.ButtonwithvalueSome buttons display the Tap it once.current value of a field orsetting. Tap the button tochange the value. After thechange, the new value isshown on the button.IconListShows status information.When you need to selectfrom several options, theyappear in a list.Some icons also functionas a button. Tap themonce.Grab the list anywhereand slide your finger upor down. Depending onthe speed of the sliding,the list will scroll fast orslow, only a bit or till theend.Alternatively, movebetween pages with theandbuttonsand tap the value thatyou want.RadiobuttonWhen there are only a few Tap one of the buttons tochoices, radio buttons may select a new value.be used instead of lists.Only one value can beselected.SwitchWhen there are only twoTap it to turn the switchchoices, a checkmarkon or off.shows whether the featureis enabled.8
SliderWhen a feature can be setto different values in arange, Sniper Truck Navshowsan indicator on a gaugethat displays and sets thevalue. Drag the handle tomove the slider toits new position. Tap the sliderwhere you wantthe handle toappear; the thumbjumps there.Each key is a touchAlphabetic andscreen button.alphanumeric keyboardsto enter text and numbers.Virtualkeyboard2.2.1 Using keyboardsYou only need to enter letters or numbers when you cannot avoid it. You can type with yourfingertips on the full-screen keyboards and you can switch between various keyboard layouts,for example English, Greek or numerical.TaskSwitching to anotherkeyboard layout, forexample from an Englishkeyboard to a GreekkeyboardInstructionTap thekeyboard layout from the list.button and select the newCorrecting your entry on thekeyboardTapto remove the unneeded character(s).Tap and hold the button to delete several characters or theentire input string.Entering a space, forexample between a firstname and a family name orin multi-word street namesEntering upper and lowercase lettersTap thebutton at the bottom centre of the screen.When entering a text, the first character appears in upper casewhile the rest of the text is in lower case. Tapto enter anupper case letter or tap twice to turn on Caps Lock. Tap againand lower case letters return.Entering numbers andsymbolsTapto switch to a keyboard offering numeric and symbolcharacters.Finalising the keyboardentry (accepting thesuggested search result)Tap.9
Finalising the keyboardentry (opening the list ofsearch results)Tap.Tap.Tap.Finalising the keyboardentry (saving your input)Cancelling the keyboardentry (returning to theprevious screen)2.2.2 Beyond single screen tapYou usually need to tap the screen only once. However, some useful features can beaccessed with combined touch screen tapping. Those are the following:ActionTapping and holdingthe screenDetailsTap and keep pressing the following buttons to reach extra functions: Tap and holdthe Map screen appears. Tap and hold any of theon list and menu screens:,,,,, andbuttons on the Map screen: you can rotate, tilt or scalethe map continuously.Gestures(drag&drop) Tap and holdon keyboard screens: you can deleteseveral characters quickly. Tap and holdcontinuously.orin long lists: you can scroll pagesYou need to drag and drop the screen only in cases like: Moving the handle on a slider. Scrolling the list: grab the list anywhere and slide your finger upor down. Depending on the speed of the sliding, the list willscroll fast or slow, only a bit or till the end. Moving the map in map browsing mode: grab the map, andmove it in the desired direction.10
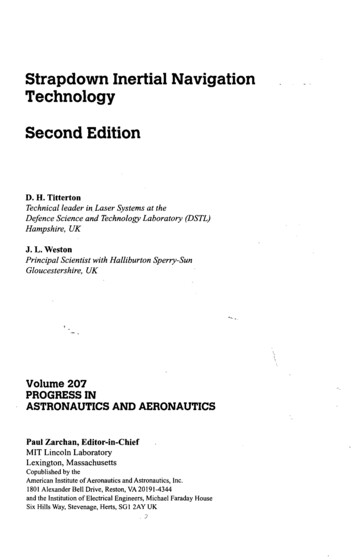
2.3 Map screen2.3.1 Navigating on the mapThe Map screen is the most frequently used screen of SniperTruck Nav.A small live map is displayed on the Navigation menu, as a part of thebutton.To enlarge this small map and open the Map screen, tap.This map shows the current position (the Vehimarker, a blue arrow by default), therecommended route (an orange line), and the surrounding map area.When there is no GPS position, the Vehimarker is transparent. It shows your last knownposition.You see coloured dots circling around a satellite symbol in the top left corner. The more greendots you see, the closer you are to get the valid GPS position.When GPS position is available, the Vehimarker is displayed in full colour, now showing yourcurrent position.There are screen buttons and data fields on the screen to help you navigate. Duringnavigation, the screen shows route information.Thebutton gives quick access to frequently used functions. You can change theavailable functions in Settings.By default, only one data field is displayed in the bottom right corner. Tap this field to see allroute data fields. Tap any of the data fields to suppress others and display only the selectedone.11
The data fields are different when you are navigating an active route and when you have nospecified destination (the orange line is not displayed).Default data fields when cruising without a destination (tap and hold any of the fields tochange its value):FieldDescriptionShows your current speed given by the GPS receiver.Shows the speed limit of the current road if the map contains it.Shows the current time corrected with time zone offset. The accuratetime comes from the GPS satellites, and the time zone informationcomes from the map or it can be set manually in Regional settings.(The current time is always displayed in the top left corner of menuscreens.)Default data fields when navigating a route (tap and hold any of the fields to change its value):FieldDescriptionShows the distance you need to travel on the route before reachingyour final destination.Shows the time needed to reach the final destination of the routebased on information available for the remaining segments of theroute.The calculation cannot take into account traffic jams and other possibledelays.Shows the estimated arrival time at the final destination of the routebased on information available for the remaining segments of theroute.The calculation cannot take into account traffic jams and other possibledelays.12
2.3.2 Position markers2.3.2.1 Vehimarker and Lock-on-RoadWhen your GPS position is available, iGO primo marks your current position with theVehimarker. By default, this marker is a blue arrow, but you can change this icon in Settings.When on-road navigation is selected, the Vehimarker may not show your exact GPS positionand heading. If roads are near, it is aligned to the nearest road to suppress GPS positionerrors, and the direction of the icon is aligned to the direction of the road.If you select off-road navigation: The Vehimarker is at your exact GPS position. The directionof the icon shows your current heading.2.3.2.2 Selected map location (Cursor) and selected map objectYou can mark a map location in the following ways: Tap the map when navigating, Tap the map when you are asked to confirm the destination at the end of a search, or Tap the map in Find on Map (page 45)When a map location is selected, the Cursor appears at the selected point on the map. TheCursor is displayed with a radiating red dot () to make it visible at all zoom levels.The location of the Cursor can be used as the destination of the route, a new alert point, youcan search for Places around it, or you can save this location as one of your Favouritedestinations.You can also select some of the objects on the map. If you tap the map at the icon of a Placeof Interest or an alert point, the object will be selected (you see a red circling border aroundthe object), and you can get information about this object or use it as a route point.2.3.3 Objects on the map2.3.3.1 Streets and roadsSniper Truck Nav shows the streets in a way that is similar to how the paper road maps showthem. Their width and colours correspond to their importance: you can easily tell a motorwayfrom a small street.2.3.3.2 Turn preview and Next streetWhen navigating a route, the top section of the Map screen shows information about the nextroute event (manoeuvre) and the next street or the next city/town.13
There is a field in the top left corner that displays the next manoeuvre. Both the type of theevent (turn, roundabout, exiting motorway, etc.) and its distance from the current position aredisplayed.A smaller icon shows the type of the second next manoeuvre if it is near the first one.Otherwise, only the next manoeuvre is displayed.Most of these icons are very intuitive. The following table lists some of the frequently shownroute events. The same symbols are used in both fields:IconDescriptionTurn left.Turn right.Turn back.Bear right.Turn sharp left.Keep left.Continue straight in the intersection.Go left on the roundabout, 3rd exit (nextmanoeuvre).Enter roundabout (second next manoeuvre).Enter motorway.Exit motorway.Board ferry.Leave ferry.Approaching a waypoint.14
Approaching the destination.2.3.3.3 Lane information and SignpostsWhen navigating on multilane roads, it is important to take the appropriate lane in order tofollow the recommended route. If lane information is available in the map data, Sniper TruckNav displays the lanes and their directions using small arrows at the bottom of themap. Highlighted arrows represent the lanes you need to take.Where additional information is available, signposts substitute arrows. Signposts aredisplayed at the top of the map. The colour and style of the signposts are similar to the realones you can see above road or by the roadside. They show the available destinations andthe number of the road the lane leads to.All signposts look similar when cruising (when there is no recommended route). Whennavigating a route, only the signpost that points to the lane(s) to be taken is displayed in vividcolours; all others are darker.If you want to hide the currently displayed signposts, tap any of them and the normal Mapscreen returns until new signpost information is received.2.3.3.4 Motorway exit servicesYou may need a petrol station or a restaurant during your journey. This feature displays anew button on the map when you are driving on motorways.Tap this button to open a panel with the details of the next few exits or service stations.Tap any of them to display the exit area on the map. You can now easily add this exit as awaypoint to your route if needed.If you want to display other types of Places for the exits, you can change the icons in VisualGuidance settings (page 83).15
2.3.3.5 3D object typesSniper Truck Nav supports the following 3D object types:TypeDescription3D terrain3D terrain map data shows changes in terrain, elevations or depressions inthe land when you view the map in 2D, and use it to plot the route map in3D when you navigate. Hills and mountains are shown in the background ofthe 3D map, and illustrated by colour and shading on the 2D map.Elevated roads3D landmarks3D buildingsComplex intersections and vertically isolated roads (such as overpasses orbridges) are displayed in 3D.Landmarks are 3D artistic or block representations of prominent or wellknown objects.3D block representation of full city building data containing actual buildingsize and position on the map.2.3.3.6 Elements of the active routeSniper Truck Nav shows the route in the following way:SymbolNameCurrent GPS position andStart pointDescriptionYour current position displayed on the map. Ifroads are near, it is aligned to the nearest road.Normally if GPS position is available, the routestarts from the current position. If there is no validGPS position, Sniper Truck Nav uses the lastknown position as the start point.Waypoint (intermediatedestination)Destination (end point)Route colourAn intermediate destination of the route beforereaching the final destination.The final destination of the route.The route always stands out with its colour on themap, both in daytime and in night colour mode.Streets and roads that areYou can choose whether you want to use orexcluded from the navigation avoid certain road types (page 77). However,when Sniper Truck Nav cannot avoid suchroads, the route will include them and it willshow them in a colour that is different from theroute colour.16
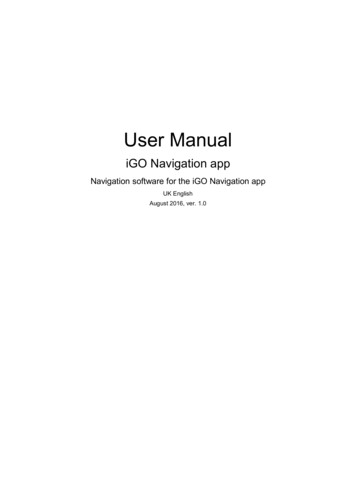
2.3.4 Manipulating the mapTap the map anywhere to browse it during navigation. The map stops following the currentposition (the Vehimarker, a blue arrow by default, is not locked in a fix position on the screenany more) and control buttons appear to help you modify the map view.ActionMoving the mapwith drag&dropButton(s)No buttonsZooming in and out,DescriptionYou can move the map in any direction: tapand hold the map, and move your fingertowards the direction you want to move themap.Changes how much of the map is displayed onthe screen.Sniper Truck Nav uses high-quality vectormaps that let you examine the map atvarious zoom levels, always with optimisedcontent. It always displays street names andother text with the same font size, neverupside-down, and you only see the streets andobjects that you need.Map scaling has a limit in 3D map view mode.If you zoom out further, the map switches to2D view mode.Tap the button once to modify the view in largesteps, or tap and hold the button to modify itcontinuously and smoothly.Tilting up and down,Changes the vertical view angle of the map in3D mode.Tap the button once to modify the view in largesteps, or tap and hold the button to modify itcontinuously and smoothly.Rotating left andrightChanges the horizontal view angle of the map.,2D or 3D view,Tap the button once to modify the view in largesteps, or tap and hold the button to modify itcontinuously and smoothly.Tap this button to switch between the 3Dperspective and 2D top-down map viewmodes.17
Compass in 2Dmap view mode,The direction of the compass shows North.Tap the button to switch to North-up view, andthen tap again to rotate the map in theprevious direction.,The direction of the compass shows North.Tap the button to switch to North-up view, andthen tap again to rotate the map in theprevious direction.Compass in 3Dmap view modeLocationinformationReturn to normalnavigationTap this button to open a new screen withinformation about the selected map point, theCursor.Tap this button to move the map back to followthe current GPS position. Automatic maprotation is also re-enabled.The map manipulation buttons disappear andnavigation continues.Additional optionsSelect destinationTap this button to open a list of additionalfeatures like saving the Cursor as a Favouritedestination, or searching for Places around theCursor.Tap this button to select the Cursor as a newdestination. The route is automaticallycalculated.2.3.5 Quick menuThe Quick menu is a selection of controls and functions that are frequently needed duringnavigation. It can be opened directly from the Map screen by tappingThe menu will close after a few seconds of inactivity or if you tap.Most of these functions are shortcuts. They are accessible from the menu system.18
There are more functions available than the number of buttons in the menu. In Settings, youcan choose the function of each button (page 77). The following options are available:ButtonDescriptionShortcut forOpen the Quick menu, and tap the Makkah button to openthe screen that points in the direction of the Kaaba.This function lets you search for a Place by its name. The Find / Find Places /search is carried out either along your route or around Quick Search (page34)your current location if there is no route calculated.This button opens the list of your Favourite destinations.Find / Favourite(page
Sniper Truck Nav is optimised for vehicle use. You can use it easily by tapping the screen buttons and the map with your fingertips. 2.1 Navigation menu You can reach all parts of Sniper Truck Nav from the Navigation menu. You have the following options: Tap to select your destination by entering an address or selecting