Transcription
Print Audit SecurePrint Audit Secure Installationand Setup Guide 1-2Version: 68 juin 2015 11:31Date:
Table of Contents1. Components . . . . . . . . . . . . . . . . . . . . . . . . . . . . . . . . . . . . . . . . . . . . . . . . . . . . . . . . . 5Installed Components . . . . . . . . . . . . . . . . . . . . . . . . . . . . . . . . . . . . . . . . . . . . . . . . . . . . . . . . . . 6Secure Client . . . . . . . . . . . . . . . . . . . . . . . . . . . . . . . . . . . . . . . . . . . . . . . . . . . . . . . . . . . . . . . . . . 6Secure Server . . . . . . . . . . . . . . . . . . . . . . . . . . . . . . . . . . . . . . . . . . . . . . . . . . . . . . . . . . . . . . . . . 6Secure Release Options . . . . . . . . . . . . . . . . . . . . . . . . . . . . . . . . . . . . . . . . . . . . . . . . . . . . . . . . 7PC based release . . . . . . . . . . . . . . . . . . . . . . . . . . . . . . . . . . . . . . . . . . . . . . . . . . . . . . . . . . . . . . 7Smartphone release . . . . . . . . . . . . . . . . . . . . . . . . . . . . . . . . . . . . . . . . . . . . . . . . . . . . . . . . . . . . . 7Web-based MFP release . . . . . . . . . . . . . . . . . . . . . . . . . . . . . . . . . . . . . . . . . . . . . . . . . . . . . . . . . 8MFP embedded control panel release . . . . . . . . . . . . . . . . . . . . . . . . . . . . . . . . . . . . . . . . . . . . . . . 8Minimum system requirements . . . . . . . . . . . . . . . . . . . . . . . . . . . . . . . . . . . . . . . . . . . . 8Secure Server . . . . . . . . . . . . . . . . . . . . . . . . . . . . . . . . . . . . . . . . . . . . . . . . . . . . . . . . . . . . . . . . . 9Secure Client . . . . . . . . . . . . . . . . . . . . . . . . . . . . . . . . . . . . . . . . . . . . . . . . . . . . . . . . . . . . . . . . . 9Secure Web Release Station . . . . . . . . . . . . . . . . . . . . . . . . . . . . . . . . . . . . . . . . . . . . . . . . . . . . . 9Secure Mobile Release . . . . . . . . . . . . . . . . . . . . . . . . . . . . . . . . . . . . . . . . . . . . . . . . . . . . . . . . . 93. Server Installation . . . . . . . . . . . . . . . . . . . . . . . . . . . . . . . . . . . . . . . . . . . . . . . . . . . . . 9Summary of System Setup . . . . . . . . . . . . . . . . . . . . . . . . . . . . . . . . . . . . . . . . . . . . . . . . . . . . . 10Before you Install . . . . . . . . . . . . . . . . . . . . . . . . . . . . . . . . . . . . . . . . . . . . . . . . . . . . . . . . . . . . . 10Active Directory . . . . . . . . . . . . . . . . . . . . . . . . . . . . . . . . . . . . . . . . . . . . . . . . . . . . . . . . . . . . . . . 10Security with the Web Release Station . . . . . . . . . . . . . . . . . . . . . . . . . . . . . . . . . . . . . . . . . . . . . 10SQL Database installation . . . . . . . . . . . . . . . . . . . . . . . . . . . . . . . . . . . . . . . . . . . . . . . . . . . . . . . 11. . . . . . . . . . . . . . . . . . . . . . . . . . . . . . . . . . . . . . . . . . . . . . . . . . . . . . . . . . . . . . . . . . . . . . . . . . . . 11Secure Server Installation: Step-by-Step . . . . . . . . . . . . . . . . . . . . . . . . . . . . . . . . . . . . . . . . . 124. Configuration . . . . . . . . . . . . . . . . . . . . . . . . . . . . . . . . . . . . . . . . . . . . . . . . . . . . . . . 16Authentication settings . . . . . . . . . . . . . . . . . . . . . . . . . . . . . . . . . . . . . . . . . . . . . . . . . . . . . . . . 17Authentication method . . . . . . . . . . . . . . . . . . . . . . . . . . . . . . . . . . . . . . . . . . . . . . . . . . . . . . . . . . 17Default Embedded Authentication Method . . . . . . . . . . . . . . . . . . . . . . . . . . . . . . . . . . . . . . . . . . 18
Active Directory Server . . . . . . . . . . . . . . . . . . . . . . . . . . . . . . . . . . . . . . . . . . . . . . . . . . . . . . . . . 18Active Directory domain in LDAP format . . . . . . . . . . . . . . . . . . . . . . . . . . . . . . . . . . . . . . . . . . . . 18Active Directory domain in NetBIOS format . . . . . . . . . . . . . . . . . . . . . . . . . . . . . . . . . . . . . . . . . . 18Active Directory Administrator Group . . . . . . . . . . . . . . . . . . . . . . . . . . . . . . . . . . . . . . . . . . . . . . . 19Active Directory user/password . . . . . . . . . . . . . . . . . . . . . . . . . . . . . . . . . . . . . . . . . . . . . . . . . . . 19Active Directory Pin attribute/length . . . . . . . . . . . . . . . . . . . . . . . . . . . . . . . . . . . . . . . . . . . . . . . . 19Active Directory Swipe attribute . . . . . . . . . . . . . . . . . . . . . . . . . . . . . . . . . . . . . . . . . . . . . . . . . . . 20. . . . . . . . . . . . . . . . . . . . . . . . . . . . . . . . . . . . . . . . . . . . . . . . . . . . . . . . . . . . . . . . . . . . . . . . . . . . 20Compress print data . . . . . . . . . . . . . . . . . . . . . . . . . . . . . . . . . . . . . . . . . . . . . . . . . . . . . . . . . . . . 21Enable Follow Me printing . . . . . . . . . . . . . . . . . . . . . . . . . . . . . . . . . . . . . . . . . . . . . . . . . . . . . . . 21Offline behavior . . . . . . . . . . . . . . . . . . . . . . . . . . . . . . . . . . . . . . . . . . . . . . . . . . . . . . . . . . . . . . . 21Enable automatic expiration of jobs . . . . . . . . . . . . . . . . . . . . . . . . . . . . . . . . . . . . . . . . . . . . . . . . 21Duration after which jobs automatically expire . . . . . . . . . . . . . . . . . . . . . . . . . . . . . . . . . . . . . . . . 22Enable automatic purging of jobs . . . . . . . . . . . . . . . . . . . . . . . . . . . . . . . . . . . . . . . . . . . . . . . . . . 22Duration after which expired jobs are automatically purged . . . . . . . . . . . . . . . . . . . . . . . . . . . . . 225. Licensing . . . . . . . . . . . . . . . . . . . . . . . . . . . . . . . . . . . . . . . . . . . . . . . . . . . . . . . . . . . 23Activation . . . . . . . . . . . . . . . . . . . . . . . . . . . . . . . . . . . . . . . . . . . . . . . . . . . . . . . . . . . . . . . . . . . 24Request a trial license . . . . . . . . . . . . . . . . . . . . . . . . . . . . . . . . . . . . . . . . . . . . . . . . . . . . . . . . . 246. Managing Printers . . . . . . . . . . . . . . . . . . . . . . . . . . . . . . . . . . . . . . . . . . . . . . . . . . . 24Printer Manager . . . . . . . . . . . . . . . . . . . . . . . . . . . . . . . . . . . . . . . . . . . . . . . . . . . . . . . . . . . . . . 25Import printers from a CSV file . . . . . . . . . . . . . . . . . . . . . . . . . . . . . . . . . . . . . . . . . . . . . . . . . . . . 25Add a printer manually . . . . . . . . . . . . . . . . . . . . . . . . . . . . . . . . . . . . . . . . . . . . . . . . . . . . . . . . . . 26Edit a printer . . . . . . . . . . . . . . . . . . . . . . . . . . . . . . . . . . . . . . . . . . . . . . . . . . . . . . . . . . . . . . . . . . 27Remove a Printer . . . . . . . . . . . . . . . . . . . . . . . . . . . . . . . . . . . . . . . . . . . . . . . . . . . . . . . . . . . . . . 27. . . . . . . . . . . . . . . . . . . . . . . . . . . . . . . . . . . . . . . . . . . . . . . . . . . . . . . . . . . . . . . . . . . . . . . . . . . . 28Create a Compatible Printer Group . . . . . . . . . . . . . . . . . . . . . . . . . . . . . . . . . . . . . . . . . . . . . . . . 29Edit a Compatible Printer Group . . . . . . . . . . . . . . . . . . . . . . . . . . . . . . . . . . . . . . . . . . . . . . . . . . 30Remove a Compatible Printer Group . . . . . . . . . . . . . . . . . . . . . . . . . . . . . . . . . . . . . . . . . . . . . . . 307. Managing Print Jobs . . . . . . . . . . . . . . . . . . . . . . . . . . . . . . . . . . . . . . . . . . . . . . . . . 30Manage All Print Jobs . . . . . . . . . . . . . . . . . . . . . . . . . . . . . . . . . . . . . . . . . . . . . . . . . . . . . . . . . 31Manage My Print Jobs . . . . . . . . . . . . . . . . . . . . . . . . . . . . . . . . . . . . . . . . . . . . . . . . . . . . . . . . . 31
Maintenance . . . . . . . . . . . . . . . . . . . . . . . . . . . . . . . . . . . . . . . . . . . . . . . . . . . . . . . . . . . . . . . . . 32Printing Statistics . . . . . . . . . . . . . . . . . . . . . . . . . . . . . . . . . . . . . . . . . . . . . . . . . . . . . . 32Print Jobs . . . . . . . . . . . . . . . . . . . . . . . . . . . . . . . . . . . . . . . . . . . . . . . . . . . . . . . . . . . . . . . . . . . 33Cost Savings . . . . . . . . . . . . . . . . . . . . . . . . . . . . . . . . . . . . . . . . . . . . . . . . . . . . . . . . . . . . . . . . 33. . . . . . . . . . . . . . . . . . . . . . . . . . . . . . . . . . . . . . . . . . . . . . . . . . . . . . . . . . . . . . . . . . . . . . . . . . . . 33. . . . . . . . . . . . . . . . . . . . . . . . . . . . . . . . . . . . . . . . . . . . . . . . . . . . . . . . . . . . . . . . . . . . . . . . . . . . 33Environmental Impact . . . . . . . . . . . . . . . . . . . . . . . . . . . . . . . . . . . . . . . . . . . . . . . . . . . . . . . . . 34Failed Jobs . . . . . . . . . . . . . . . . . . . . . . . . . . . . . . . . . . . . . . . . . . . . . . . . . . . . . . . . . . . . . . . . . . 34Expired Jobs . . . . . . . . . . . . . . . . . . . . . . . . . . . . . . . . . . . . . . . . . . . . . . . . . . . . . . . . . . . . . . . . 35Step-by-Step Instructions . . . . . . . . . . . . . . . . . . . . . . . . . . . . . . . . . . . . . . . . . . . . . . . 35Self-generated PINs . . . . . . . . . . . . . . . . . . . . . . . . . . . . . . . . . . . . . . . . . . . . . . . . . . . . 38Administrative Configuration . . . . . . . . . . . . . . . . . . . . . . . . . . . . . . . . . . . . . . . . . . . . . . . . . . . 39Web Release Station workflow . . . . . . . . . . . . . . . . . . . . . . . . . . . . . . . . . . . . . . . . . . . . . . . . . . 39Embedded MFP workflow . . . . . . . . . . . . . . . . . . . . . . . . . . . . . . . . . . . . . . . . . . . . . . . . . . . . . . 4111. Appendix . . . . . . . . . . . . . . . . . . . . . . . . . . . . . . . . . . . . . . . . . . . . . . . . . . . . . . . . . . 41
Print Audit Secure is a stand-alone application which provides secure printing and follow mecapabilities, to help manage document output on your network.Print Audit Secure ensures that print jobs are not printed until you are at the MFP, ready to pickthem, eliminating wasted pages from being left at the output tray. And with follow me printingcapabilities, Print Audit Secure allows users to bypass line-ups at the printer by enabling them torelease their job at any compatible MFP on the network.1.ComponentsPrint Audit Secure Installation and Setup Guide 1-25
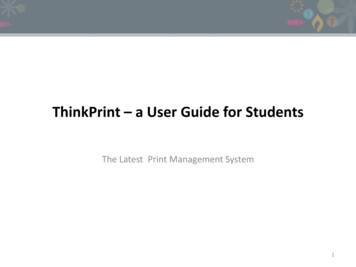
1. ComponentsInstalled ComponentsClick to enlargeSecure ClientThe Secure Client is installed on every workstation where print jobs are to be secured for laterrelease. The Secure Client collects information from every secured job printed at the workstation,and communicates with the Print Audit Secure Server.Secure ServerThe Secure Server handles all user authentication, job transaction calculation and tracking,document release and routing, and administrative tools. One Secure Server is required in everyPrint Audit Secure deployment.Print Audit Secure Installation and Setup Guide 1-26
Secure Release OptionsPC based releaseRegistered users who have submitted jobs through a Secure enabled workstation can use any PCwith a network connection to connect to the host PCS Director Secure Server to select and releaseprint jobs. This would include the users local workstation used to submit jobs.The Release Function is enabled simply by accessing the designated URL for Print Audit Secureand entering the user credentials. Unlike the administrative Print Management access definedearlier in this document, users will only be able to view and manage their own print jobs.Smartphone releaseSimilar to the PC release method, smartphones with network access and a web browser can beused to release user print jobs via a mobile optimized version of the Secure web portal. Secure iscompatible with most modern mobile phones, including Android, iPhone and Blackberry devices.Print Audit Secure Installation and Setup Guide 1-27
Web-based MFP releaseUser Print Release in Print Audit Secure may be enabled through multiple compatible devices.Among these are any PC workstation in the client network, smart phones with internet access andother devices such as many Multi-Functional Printers ("MFP's") that either have a compatible webbrowser capability or that have been enabled with Print Audit Secure embedded software.MFP embedded control panel releaseAny MFP device that has a web browser interface option may be compatible for user print release.Use of this option is subject to configuration options available with the MFP and may requireadditional software options from the dealer or vendor for this MFP device. The common setup forthis type of device is to define the Print Audit Secure server URL as a common "Favorite".Minimumsystem requirementsPrint Audit Secure Installation and Setup Guide 1-28
Minimum system requirementsSecure Server32 or 64–bit versions of Microsoft Windows Server 2003, 2008, 2008R2, or Windows 7IIS version 6 or newerDot NET framework 4.0 or newerSQL Server 2005, 2008, 2012 – Full or ExpressActive DirectoryIf also using Print Audit 6, version 6.5.0 or newer is requiredSecure ClientWindows XP or newerIf also using Print Audit 6, version 6.5.0 or newer is requiredMicrosoft Installer 2.0 or newerSecure Web Release StationCompatible with all modern browsers such as Chrome, Internet Explorer 7 or newer, Firefox,or SafariSecure Mobile ReleaseOptimized for Android 2.2 and newer, IPhone, and most modern smartphones3.Server InstallationPrint Audit Secure Installation and Setup Guide 1-29
3. Server InstallationSummary of System SetupThe following list is a summary of the deployment steps that need to be completed, to set up andconfigure Print Audit Secure. Each of these steps is covered in the following pages of thisInstallation and Setup Guide.1. Install the Print Audit Secure Server software.2. The first time you go to the Print Audit Secure website you will need to set an Administratorusername and password.3. Set your preferred configuration under Setup - Configuration.4. Activate your license key (or request a trial license).5. Enter or import the printers that you want to designate as Secure. We recommend addingonly the devices that you want to include in one Printer Compatibility group.6. Create a Printer Compatibility group and add the devices from step 5.7. Repeat steps 4 and 5 until all of the printers you want to designate as Secure have beenadded.8. Install the Print Audit Secure Client on the workstations.Before you InstallActive DirectoryPrint Audit Secure uses Active Directory to authenticate users. Print Audit Secure Administratorsare pulled from a separate group in Active Directory.Before installing Print Audit Secure this group must be created and populated with all users thatshould have administrative access to Secure.Security with the Web Release StationBy default, the Print Audit Secure server operates under HTTP, not HTTPS, so it is unsecured. Thismeans that any login information used on the web page is sent to the server in clear text. If this is aconcern for you there are steps you can follow to encrypt this information.Print Audit Secure Installation and Setup Guide 1-210
1. Create an SSL certificate.a. Create a simple self-signed certificate. For information on this please visit the linkbelow and start at the IIS Manager section. With this approach, as you can see fromthe example, is that when you try to go to the secure server the browser will display anerror page saying that it cannot verify the certificate.i. sl-on-iis-7/b. Setup a certification authority on your server, if you do not already have one on thedomain, and generate a certificate from that. It will act as a valid certificate on thedomain.c. Acquire a third party certificate.2. Configure the Print Audit Secure web application to use SSL.a. Open the IIS Managerb. Click on Default Web Sitec. Under Edit Site click on Bindingsd. Click the Add buttone. Under Type select https and keep IP address set to All Unassignedf. Select the certificate under SSL certificateg. Click Ok3. Ensure SSL Settings are not set to Require SSL.SQL Database installationThere are several guides available to assist you with installing and configuring SQL for use withPrint Audit Secure . Please download the appropriate SQL database documentation for yourdeployment.Print Audit Secure Installation and Setup Guide 1-211
Secure Server Installation: Step-by-StepPrint Audit Secure is a software application that allows jobs to be placed into a virtual print queue,enabling users to conveniently release them on demand at any printer via web enabled devicessuch as workstations, tablet PCs or mobile device. The jobs will be stored in the Print Audit Securedatabase until the user who printed the jobs releases them or a Print Audit Secure Administratorcancels them. End users connect to this server through a web browser on any web enabledworkstation or mobile device to release their print jobs. The Print Audit Secure Server hosts theSecure application and the database.1. Download the SecureServerSetup.exe file from www.printaudit.com.2. Double click on the SecureServerSetup.exe file to begin the installation.3. Click the Next button on the Welcome screenPrint Audit Secure Installation and Setup Guide 1-212
4. Check "I accept the terms in the License Agreement" and click the Next button.5. Select the location you would like to install Print Audit Secure to or to accept the default clickNext.Print Audit Secure Installation and Setup Guide 1-213
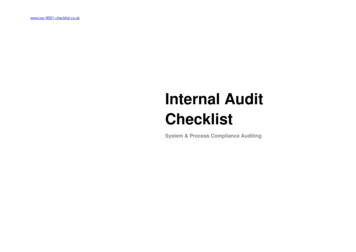
6. Select the name of the server where the database will be installed. For the Express version ofSQL Server, enter a backslash and then the SQL Server instance name (by default: SQLExpress).Then, Select either Windows Authentication or SQL authentication for the database. SQLAuthentication is recommended. If you select SQL Authentication enter the username andpassword of a user that has administrative rights to the SQL Server. Click Next.7. If this is the first time you have installed Print Audit Secure, select Create database and clickNext. If you have an existing database choose Use existing database and select the databasename. If you have an existing database and would like to create a new one with the same name,choose Create database and check Overwrite. This will remove all your current settings.Print Audit Secure Installation and Setup Guide 1-214
8. Select the Website name you would like Print Audit Secure to use. We recommend using theDefault Web Site. Click Next.9. Click the Install button to install Print Audit Secure on your server.NOTE: You do not need to reboot after the install on the server, however, it is recommended thatyou reboot this computer as soon as possible.10. Click Finish to exit the Setup Wizard.Print Audit Secure Installation and Setup Guide 1-215
4.ConfigurationPrint Audit Secure Installation and Setup Guide 1-216
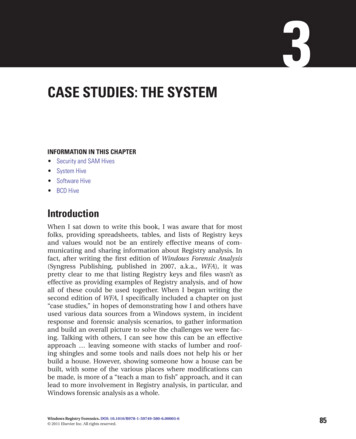
4. ConfigurationAuthentication settingsImmediately after installing Print Audit Secure, there must first be an authentication method setupfor the server.1. Open a web browser and go to http:// SECURESERVERNAME /pasecure2. The following page will appear, with a prompt to configure Print Audit Secure with the ActiveDirectory settings for the environment. Click Ok to be automatically directed to theAuthentication tab under Setup - Configuration page.Important!You must enter the required information for these fields before continuing with the serverconfiguration.Authentication methodSelect the authentication method that will be used to release any Secured print jobs.Print Audit Secure Installation and Setup Guide 1-217
1. Password – The password is the users Active Directory password used for authenticating tothe domain.2. Pin – The Pin comes from an Active Directory attribute that is associated to the users'profiles.3. Swipe – To authenticate with a swipe card, the card number must be entered in an ActiveDirectory attribute.Default Embedded Authentication MethodIf Print Audit Secure will be used in conjunction with a Print Audit Secure Embedded solution, selectthe default authentication method that will be used to release Secure jobs. As with the aboveconfiguration, the selection is Password, Pin, or Swipe authentication.Active Directory ServerEnter the name of the Active Directory server.Active Directory domain in LDAP formatEnter the name of the Active Directory domain in LDAP format.Active Directory domain in NetBIOS formatEnter the name of the Active Directory domain in NetBIOS format.Print Audit Secure Installation and Setup Guide 1-218
Active Directory Administrator GroupEnter the Active Directory group name of users that should have administrative access to the PrintAudit Secure server.Active Directory user/passwordEnter the name of an Active Directory user who has the authority to read and write to ActiveDirectory. Enter the password for this user. Enter the password again to confirm it is correct.Active Directory Pin attribute/lengthIf PIN was selected as the authentication method in step 3, enter the name of the Active Directoryattribute that stores the users' PIN codes.Generate Pin attribute/lengthPrint Audit Secure Installation and Setup Guide 1-219
Check this box to enable users to generate a Pin at the Web Release Station or at MFPs. For moreinformation on this functionality, refer to the Self-generated PINs section that appears further inthis document. Note: this may not be supported on all embedded solutions.Active Directory Swipe attributeIf swipe was selected as the authentication method in step 3, enter the name of the Active Directoryattribute that stores the users' swipe card numbers.Click the Save button, to save these authentication settings.Print Audit Secure Installation and Setup Guide 1-220
Print Audit Secure SettingsLog into the Secure server and from the top menu, select Setup Configuration and then click theSecure Settings tab.Compress print dataTo compress the print job data file that is stored on the Secure server, check this box. It isimportant to select this option if you will be sending large files to the Secure server as there is a 2GB limit on the size of the print job.Enable Follow Me printingCheck this box to enable Follow Me printing.When Follow Me printing is enabled, your users may release their secure print job to an alternateMFP, rather than the one to which the user originally printed.Offline behaviorChoose how to manage disconnected or "Offline" jobs, which only occurs if, for some reason, thePrint Audit Secure Client is not able to connect to the Print Audit Secure Windows service on theserver, at the time a print job is created.Allow - Print jobs will print as they would if Secure is not installed.Disallow - No printing to secure printers will be allowed.Prompt - Users are prompted at the workstation to cancel, or print the job unsecured.Enable automatic expiration of jobsExpired jobs are removed from the secure print queue and are no longer visible or available forrelease. It is recommended that you enable automatic expiry of jobs to prevent the queue frombecoming congested with abandoned jobs that will not be released.Print Audit Secure Installation and Setup Guide 1-221
To automatically expire jobs of a specified age, check this box.Duration after which jobs automatically expireEnter the length of time in days, hours, or minutes, after which the jobs should expire.Enable automatic purging of jobsWhen a secure print job expires, or is cancelled by the user, statistical information about that job isretained by Print Audit Secure for reporting purposes. The automatic purging of jobs will removecancelled and expired jobs completely. Plan only to purge jobs if they are no longer required forstatistic reporting. Purging jobs does not affect any pending jobs being held for secure release.To automatically purge expired jobs from Print Audit Secure check this box.Duration after which expired jobs are automatically purgedEnter the length of time, in days, hours, or minutes, after which the jobs should be purged.Important!Once jobs have been purged from Print Audit Secure there is no way to recover them.Purged jobs will not be included in the job statistics report.Click the Save button to save these settings.Print Audit Secure Installation and Setup Guide 1-222
5.LicensingPrint Audit Secure Installation and Setup Guide 1-223
5. LicensingActivationTo access the Print Audit Secure Licensing page, log into the Print Audit Secure server, and fromthe Top menu, select Setup Licensing.The licensing page is used to activate your license key or request a trial license.If you have purchased seats of the Print Audit Secure, choose this radio button and enter theCompany and License Key.Request a trial licenseIf you have not purchased the software but would like to evaluate Print Audit Secure, select thisradio button, complete all fields and click Submit.The trial license enables the secure tracking of up to 5 printers for 15 days.6.Managing PrintersPrint Audit Secure Installation and Setup Guide 1-224
6. Managing PrintersPrinter ManagerThe Printer Manager manages printers that are designated as secure printers. Print Audit Secure iscompatible with all networked printers. Printers can be either imported from a comma separatedvalues (CSV) file or manually entered individually.Import printers from a CSV filePrint Audit Secure will accept a CSV file to import printers.1. Create a CSV file that contains the list of printers - CSV File Format: (printer ID), (name ofthe device), (IP address), (port), (manufacturer), (model name), (UNC path), (description ofthe device), (Printing Method - Direct IP or Windows Spooler), (Local Printer Name). Note:UNC Path, description of the device, Printing Method, and Local Printer Name are optional.2. Go to www.YOURSERVERNAME\printauditsecure (http://www.YOURSERVERNAME\printauditsecure). Log into the Print Audit Secure Administrator3. Click on Setup, and then select Printer Manager.4. Click the Import button and find the CSV file with the printers which will be designated assecure.5. Click Open then the Ok button.Print Audit Secure Installation and Setup Guide 1-225
Add a printer manuallyIn the Secure Administrator, click on Setup, and then select Printer Manager.Click on the Create New button.1. Printer ID - Enter a Printer ID that is between 3 and 50 characters long. This is a requiredfield. It is recommended to use a similar naming convention for all secure devices, such asan abbreviation of where the device is physically located, or some other unique identifier.2. Name - Enter the name of the device. This is a required field.3. IP Address -Enter the IP address of the device. This is a required field4. UNC path - Enter the UNC path. This field is optional.5. Port - The default is 9100, but can be modified if required. The port will be determined bywhichever port the printer is set to use. This is a required field.6. Manufacturer/Model/Description - Enter the Manufacturer name and Model Name. Theseare required fields. The Description of this device is not a required field7. Printing Method - Select from the drop down menu to determine how the print job will bereleased to the printer.8.Print Audit Secure Installation and Setup Guide 1-226
8. Local Printer Name - This drop down list will contain a list of printers defined on the server,and when used with Windows Spooler as the Printing Method, will release jobs to the spooler, to that printer.a. Direct IP:, The job will be sent to the printer using TCP/IP and the defined IP addressand port.b. Windows Spooler: Print Audit Secure will spool the job to the printer selected underLocal Printer NameEdit a printer1. In the Print Audit Secure Administrator, click on Setup, then Printer Manager.2. Click the Edit link beside the device which is to be modified.3. Make the required changes. Click the Save button.Remove a PrinterA printer cannot be removed if there are any pending jobs still secured on the server. You mustdelete all the secured print jobs to the printer prior to deleting it. When you remove a printer fromPrint Audit Secure printer list, any print jobs sent to this printer will no longer be secured.1. In the Print Audit Secure Administrator, click on Setup, then Printer Manager.2. Click the Delete button next to the device which is to be removed.3.Print Audit Secure Installation and Setup Guide 1-227
3. Click the Delete button on confirmation page to remove this group.4. A confirmation is provided, explaining that the printer has been removed.Print Audit Secure Installation and Setup Guide 1-228
Compatible Printer GroupsThe Print Audit Secure Compatible Printer Groups are used to group similar devices together, sothat users can release jobs to any compatible device. When selecting devices for your CompatiblePrinter Groups, it is important to ensure that the printer drivers within a group are compatible.Compatible drivers are required in order to make sure that a print job that was sent to one printerwill print out as expected on another device. Compatible drivers will ensure that the printers withinthe group can translate the datastream in the print job. Printers can be placed in more than onePrinter Compatibility Group.When Compatible Printer Groups are defined, the user will be able to identify in the Web ReleaseStation, the jobs that are compatible with the printer where they wish to release their job.Recording jobs in the Print Audit 6 databaseWhen using Print Audit Secure with Print Audit 6, remember that the job is alwaysrecorded in the Print Audit 6 database with the original printer attributes (printer name,color usage, job validation, etc) rather than those associated with t
Install the Print Audit Secure Server software. The first time you go to the Print Audit Secure website you will need to set an Administrator username and password. Set your preferred configuration under Setup - Configuration. Activate your license key (or request a trial license). Enter or import the printers that you want to designate as Secure.