Transcription
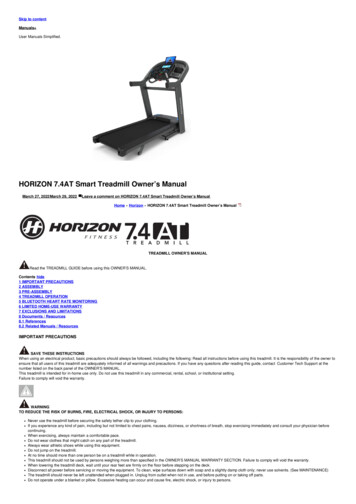
XT185 TreadmillOWNER’S MANUAL
TABLE OF CONTENTS4IMPORTANT SAFETY INSTRUCTIONS5IMPORTANT ELECTRICAL INSTRUCTIONS6IMPORTANT GROUNDING INSTRUCTIONS7IMPORTANT OPERATION INSTRUCTIONS8PRODUCT REGISTRATION9XT185 ASSEMBLY INSTRUCTIONS16CONSOLE OPERATION22PROGRAMMABLE FEATURES26GENERAL MAINTENANCE32MANUFACTURER’S LIMITED WARRANTYThank you for purchasing our product, please save these instructions. Please do not perform or attempt anycustomizing, adjustments, repair or maintenance that is not described in this manual.2
Congratulations on your new treadmill and welcome to the Spirit Fitness family!Thank you for your purchase of this quality treadmill from Spirit Fitness. Your new treadmill was manufactured by one of theleading fitness manufacturers in the world and is backed by one of the most comprehensive warranties available. Through yourdealer, Spirit Fitness will do all we can to make your ownership experience as pleasant as possible for many years to come.If not purchased direct from Spirit Fitness, the local dealership where you purchased this treadmill is your administrator forall Spirit Fitness warranty and service needs. Their responsibility is to provide you with the technical knowledge and servicepersonnel to make your experience more informed and any difficulties easier to remedy.Please take a moment at this time to record the name of the dealer, their telephone number, and the date of purchase belowto make any future, needed contact easy. We appreciate your support and we will always remember that you are the reasonthat we are in business.Yours in Health,Spirit FitnessNAME OF DEALERDEALER PHONE #PURCHASE DATE3
Important Safety InstructionsWARNINGWhen using an electrical appliance, basic precautions shouldalways be followed, including the following:Read all instructions before using this appliance.DANGER - To reduce the risk of electric shock:Always unplug this appliance from the electrical outletimmediately after using and before cleaning.WARNING - To reduce the risk of burns, fire, electricshock, or injury to persons, install the treadmill on a flat levelsurface with access to a 110-volt, 15-amp grounded outletwith only the treadmill plugged into the circuit.DO NOT USE AN EXTENSION CORD UNLESS IT IS A 14AWG ORBETTER, WITH ONLY ONE OUTLET ON THE END: 4 To reduce the risk of burns, fire electric shock, or injuryto persons:An appliance should never be left unattended whenplugged in. Unplug from outlet when not in use, andbefore putting on or taking off parts.Do not operate under blanket or pillow. Excessiveheating can occur and cause fire, electric shock, orinjury to persons.Close supervision is necessary when this applianceis used by, on, or near children, invalids, or disabledpersons.Use this appliance only for its intended use asdescribed in this manual. Do not use attachments notrecommended by the manufacturer.Never operate this appliance if it has a damaged cord or plug, if it is not working properly, if it has beendropped or damaged, or dropped into water. Returnthe appliance to a service center for examination andrepair.Do not carry this appliance by supply cord or use cordas a handle.Keep the cord away from heated surfaces.Never operate the appliance with the air openingsblocked. Keep the air openings free of lint, hair, and thelike.Never drop or insert any object into any opening.Do not use outdoors.Do not operate where aerosol (spray) products arebeing use or where oxygen is being administered.Connect this appliance to a properly grounded outletonly.The appliance is intended for household use.This exercise equipment is not intended for use bypersons with reduced physical, sensory or mentalcapabilities, or lack of experience and knowledge.Keep children under the age of 13 away from thismachine.WARNING: This product can expose you to chemicalsincluding Toluene and Acrylamide which are known to theState of California to cause cancer and birth defects orother reproductive harm.For more information go to www.P65Warnings.ca.govSAVE THESE INSTRUCTIONS - THINK SAFETY!
Fitness Equipment SafetyInstructions(and possibly others) to injury, and reduce the longevity ofthe equipment. Important Electrical InstructionsDo not operate equipment on deeply padded, plushor shag carpet. Damage to both carpet and equipmentmay result. Before beginning this or any exercise program, consulta physician. This is especially important for personsover the age of 35 or persons with pre-existing healthconditions. Do not attempt to use your equipment for anypurpose other than for the purpose it is intended. Keep hands away from all moving parts. The pulse sensors are not medical devices. Theirpurpose is to provide you with an approximatemeasurement in relation to your target heart rate. Useof a chest transmitter strap (sold separately) is a muchmore accurate method of heart rate analysis .Variousfactors, including the user’s movement, may affect theaccuracy of heart rate readings. The pulse sensors areintended only as exercise aids in determining heart ratetrends in general. Wear proper shoes. High heels, dress shoes, sandals orbare feet are not suitable for use on your equipment.Quality athletic shoes are recommended to avoid legfatigue.Failure to follow all guidelines may compromise theeffectiveness of the exercise experience, expose yourselfWARNINGNEVER use a ground fault circuit interrupt (GFCI) walloutlet with this treadmill. As with any appliance witha large motor, the GFCI will trip often. Route the powercord away from any moving part of the treadmill includingthe elevation mechanism and transport wheels.NEVER remove any cover without first disconnecting ACpower. If voltage varies by ten percent (10%)or more, the performance of your treadmill may be affected.Such conditions are not covered under your warranty. Ifyou suspect the voltage is low, contact your local powercompany or a licensed electrician for proper testing.NEVER expose this treadmill to rain or moisture. Thisproduct is NOT designed for use outdoors, near a poolor spa, or in any other high humidity environment. Theoperating temperature specification is 40 to 120 degreesFahrenheit, and humidity is 95% non-condensing (no waterdrops forming on surfaces).5
Circuit Breakers: Some circuit breakers used in homes are not rated for high inrush currents that can occur when atreadmill is first turned on or even during use. If your treadmill is tripping the house circuit breaker (even though it isthe proper current rating) but the circuit breaker on the treadmill itself does not trip, you will need to replace the homebreaker with a high inrush type. This is not a warranty defect. This is a condition we as a manufacture have no ability tocontrol. This part is available through most electrical supply stores. Examples: Grainger part # 1D237, or available online atwww.squared.com part #QO120HM.The electrical outlet used should have a dedicated 15 amp circuit breaker.Grounding InstructionsThis product must be grounded. If the your equipment should malfunction or breakdown, grounding provides a pathof least resistance for electric current, reducing the risk of electric shock. This product is equipped with a cord having anequipment-grounding plug. The plug must be plugged into an appropriate outlet that is properly installed and grounded inaccordance with all local codes and ordinances.DANGER - Improper connection of the equipment-grounding conductor can result in a risk of electric shock. Check with aqualified electrician or serviceman if you are in doubt as to whether the product is properly grounded. Do not modify the plugprovided with the product if it will not fit the outlet; have a proper outlet installed by a qualified electrician.This product is for use on a nominal 110-volt/15 amp dedicated circuit, and has a grounding plug that looks like the plugillustrated below. A temporary adapter that looks like the adapter illustrated below may be used to connect this plug to a2-pole receptacle as shown below if a properly grounded outlet is not available. The temporary adapter should be usedonly until a properly grounded outlet, (shown below) canbe installed by a qualified electrician. The green coloredrigid ear-lug, or the like, extending from the adapter, mustbe connected to a permanent ground such as a properlygrounded outlet box cover. Whenever the adapter is used, itmust be held in place by a metal screw.6
Important Operation Instructions NEVER operate this treadmill without reading and completely understanding the results of any operational change yourequest from the computer.Understand that changes in speed and incline do not occur immediately. Set your desired work level on the computerconsole and release the adjustment key. The computer will obey the command gradually.NEVER use your treadmill during an electrical storm. Surges may occur in your household power supply that coulddamage treadmill components. Unplug the treadmill during an electrical storm as a precaution.Use caution while participating in other activities while walking on your treadmill; such as watching television, reading,etc. These distractions may cause you to lose balance which may result in serious injury.Do not use excessive pressure on console control keys. They are precision set to function properly with little fingerpressureSafety Tether CordA safety tether cord is provided with this unit. It is a simple magnetic design that should be used at all times. It is for yoursafety should you fall or move too far back on the tread-belt. Pulling this safety tether cord will stop tread-belt movement.To Use:1.2.Place the magnet into position on the round metal portion of the console control head. Your treadmill will not startand operate without this. Removing the magnet also secures the treadmill from unauthorized use.Fasten the plastic clip onto your clothing securely to assure good holding power. Note: The magnet has strong enoughpower to minimize accidental, unexpected stopping. The clip should be attached securely to make certain it does notcome off. Be familiar with its function and limitations. The treadmill will stop, depending on speed, with a one to twostep coast anytime the magnet is pulled off the console. Use the Stop / Pause switch in normal operation.7
Record Your Serial NumberSerial Number LocationPlease record the serial number of this fitness product in the space providedbelow.Serial Number:Register Your PurchaseThe self-addressed product registration card must be completedin full and returned to Spirit Fitness. You can also go to egistration.html under the Support tab to register online.8
XT185 PRE ASSEMBLYUNPACKING1. Cut the straps, then lift the box over the unit and unpack.2. Carefully remove all parts from the carton and inspect for any damageor missing parts. If parts are damaged or missing, contact your dealerimmediately.3. Locate the hardware package. Remove the tools first. Remove thehardware for each step as needed to avoid confusion. The numbers inthe instructions that are in parenthesis (#) are the item number from theassembly drawing for reference.TOOLS INCLUDED: Phillips Head Screwdriver M6 L Allen Wrench Combination M5 Allen Wrench& Phillips Head Screw DriverPARTS INCLUDED: 1 Main Frame 2 Uprights 2 Frame Base Covers 2 Console Mast Covers 1 Console Assembly 1 Deck 1 Power Cord 1 Lubricant 1 Hardware Kit9
CONSOLECONSOLE FANUPRIGHTSHANDLESMOTOR COVERBELTSIDE RAILSEND CAPS10
XT185 STEP ONEHARDWARE FOR STEP 1PARTTYPEDESCRIPTIONQTY132NUT CLIPM561. Gather HARDWARE FOR STEP 1.2. Take 6 Speed NUT CLIPS (132) and attach them atthe front and each side of the unit as shown left.3. Guide the right upright through FRAME BASECOVER RIGHT (43) and CONSOLE MASTCOVER RIGHT (100).4. Next take the RIGHT UPRIGHT (4) and attachthe MIDDLE COMPUTER CABLE (38) to theLOWER COMPUTER CABLE (39). Be carefulnot to pinch the cable or damage may occur to thesystem.5. Slide the right upright (4) to sit into the frame base.6. Repeat from step 3 on the left.11
XT185 STEP TWOHARDWARE FOR STEP 2PARTTYPEDESCRIPTIONQTY93BOLTS5/16” X UNC18 X 15L81. Gather HARDWARE FOR STEP 2.2. Having inserted RIGHT AND LEFT UPRIGHTS (4, 5) into the FRAME BASE(2), use the COMBINATION M5 ALLENWRENCH AND PHILLIPS HEAD SCREWDRIVER (96) to tighten 8 BUTTON HEADSOCKET BOLTS (93) securing the uprightsto the frame base.12
XT185 STEP THREEHARDWARE FOR STEP 4PARTTYPEDESCRIPTIONQTY88TAPPING SCREWS5” X 16MM61. Gather HARDWARE FOR STEP 4.2. Install FRAME BASE COVER RIGHT ANDLEFT (42, 33) onto the FRAME BASE (2)using 6 Tapping Screws (88). Tighten with thePHILIPS HEAD SCREW DRIVER (122).13
XT185 STEP FOURHARDWARE FOR STEP 4PARTTYPEDESCRIPTIONQTY90BOLTS482SPLIT WASHER3/8” X 1-3/4”Ø10 2.0T41. Gather HARDWARE FOR STEP 42. Connect the MIDDLE COMPUTER CABLE(38) to the UPPER COMPUTER CABLE(37). Be careful not to pinch the cables.3. Insert the CONSOLE ASSEMBLY (40)onto the RIGHT AND LEFT UPRIGHTS(4, 5) and secure with 4 BUTTON HEADSOCKET BOLTS (90) and 4 SPLITWASHERS (82). Use the ALLEN WRENCH(97) to tighten.14
XT185 STEP FIVEHARDWARE FOR STEP 5PARTTYPEDESCRIPTIONQTY142SHEET METAL SCREWSØ3.5 16L81. Gather HARDWARE FOR STEP 5.2. Slide CONSOLE MAST COVER RIGHTAND LEFT (100, 99) up the uprights. Securethem with 8 SHEET METAL SCREWS(142) using the PHILLIPS HEAD SCREWDRIVER (122).15
XT185 CONSOLE OPERATIONLarge LCD withscrolling feedbackand scrollingmessage centerSwivel Fan tokeep you coolSelect ControlSpeed & Incline16Six programs offer avariety of work-outsEasy-TouchControl Keys
Select Speed & Incline ButtonsYou are able to set your speed and incline settings quickly by using the select keys on the console. Justpress either Speed or Incline, then select 2 digits, then press Enter and the treadmill will automaticallyadjust to that value. This saves time because you don’t have to press and hold or hold a button downuntil reaching the desired value. The maximum value you may input for speed is 9.9 mph or KPH andincline level 9.5. Speed values can be entered in 0.1 mph increments and Incline in .5 level increments.Examples:Press the Select Incline button, then 1, 0 Incline Level 1.0 Press the Select Incline button, then 3, 5 Incline Level 3.5 Press the Select Speed button, then 8, 0 8.0 mph or KPH Press the Select Speedbutton, then 0, 8 0.8 mph or KPHConsoleThe console will display Pace, Calories burned, Time (elapsed or countdown), Distance traveled, Pulse,Speed, Incline, Program Name, number of Laps completed, and Segment Time. There is also a Speed &Incline profile graph that lets you see how hard you have worked and how challenging the upcomingsegments will be.17
Getting StartedPower the treadmill on by plugging it into an appropriate wall outlet, then turn on the power switchlocated at the front of the treadmill below the motor cover. Ensure that the safety key is installed, as thetreadmill will not power on without it.When the power is turned on, all the lights on the display will light for a short time.Then the Time andDistance windows will display Odometer readings for a short time.The Time window will show howmany hours the treadmill has been in use and the Distance window will show how many miles (orKilometers if the treadmill is set to metric readings) the treadmill has gone. Then a message will scrollacross the Message Center showing the current software version.The treadmill will then enter idlemode, which is the starting point for operation.Quick Start/ Manual Operation181. Press and release the Start key to wake display up (if not already on).Note: Installing the tether key will also wake up the console.2. Press and release the Start key to begin belt movement, at 0.5 mph, then adjust to the desiredspeed using the Speed / - or Fast/Slow keys (console or hand rail).You may also use the SelectSpeed key, then 0 through 9 to adjust the speed.3. To adjust the speed, press and hold Speed Up / Down keys (console or handgrip keys) to achievedesired speed. You may also adjust to the desired speed by pressing Select Speed and then 0through 9.4. To adjust the Incline level, press and hold the Incline Up / Down keys (console or handgrip keys) toachieve desired gradient. You may also adjust to the desired incline by pressing the Select Incline key
and then 0 through 9.5. To stop the tread-belt press and release the Stop key.Pause/Stop/Preset1. When the treadmill is running the pause feature may be utilized by pressing the red Stop key once.This will slowly decelerate the tread-belt to a stop. The incline will go to zero percent. The Time,Distance and Calorie readings will hold while the unit is in the pause mode. After 5 minutes thedisplay will reset and return to the start up screen.2. To resume your exercise, when in Pause mode, press the Start key. The speed and incline will returnto their previous settings. Pause is executed when the Stop button is pressed once. If the Stop key is pressed a second time, the program will endand a workout summary will be displayed. If the Stop button is pressed a third time, the console will return to the idlemode (start up) screen. If the Stop button is held down for more than 3 seconds the console will resetIncline1. Incline may be adjusted anytime after belt movement.2. Press and hold the Incline Up / Down keys to achieve desired gradient. You may also choose amore rapid increase / decrease by selecting the Select Incline key, then 0 through 9. The display will indicate incline percent in increments of 0.5 as adjustments are made. The incline will return to zero unless the main power switch or safety key are turned off whileincline is at a higher setting.Dot Matrix Center DisplayTwenty columns of boxes (10 high) indicate each segment of a workout. The boxes only show an19
approximate level (resistance) of effort. They do not necessarily indicate a specific value - only anapproximate percent to compare levels of intensity. In Manual Operation the resistance dot matrixwindow will build a profile “picture” as values are changed during a workout.1/4 Mile TrackThe 1/4-mile track (one lap) will be displayed around the dot matrix window. The flashing segmentindicates your progress. Once the 1/4-mile (Metric - 0.4k) is complete this feature will begin again. TheLap track will move in a counterclockwise direction There is a lap counter in the message window formonitoring your distance.Pulse Grip FeatureThe Pulse (Heart Rate) window will display your current heart rate in beats per minute during theworkout. You must use both stainless steel sensors on the stationary grips or the heart rate transmitterchest strap to display your pulse. Pulse value displays anytime the upper display is receiving a Pulsesignal. You may not use the Pulse Grip feature while in Heart Rate Programs.Note: Refer to Important Safety Instructions (page 4) concerning Pulse Grip operation.Calorie DisplayDisplays the cumulative calories burned at any given time during your workout.Note: This is only a rough guide used for comparison of different exercise sessions, and is not to be used for medicalpurposes.20
To Turn Treadmill Off1.2.3.Display will automatically turn off (go to sleep) after 30 minutes (no key operations).The treadmill will draw very littlecurrent in display mode (about as much as your screen when it is turned off).Remove the tether cord.Turn off the main switch on the front of the treadmill, below the motor cover.Program KeysThe program keys are used to preview each program. When you first turn the console on you maypress each program key to preview what the program profile looks like. If you decide that you wantto try a program, press the corresponding program key and then press the Enter key to select theprogram and enter into the data-setting mode.The treadmill has a built in heart rate monitoring system. Simply grasping the hand pulse sensors on thestationary handle bars or wearing the heart rate transmitter (see Using Heart Rate Transmitter section)will start the Heart Icon blinking (this may take a few seconds). The Pulse Display Window will displayyour heart rate, or Pulse in beats per minute.The console includes a built-in fan to help keep you cool. To turn the fan on, press the key on the leftside of the console.Programming The ConsoleEach of the programs can be customized with your personal information and changed to suit yourneeds. Some of the information is necessary to ensure the readouts are correct. You will be asked for21
your Age and Weight. Entering your Age is necessary during the Heart Rate programs to ensure thecorrect predicted target heart rate zone. Entering your Weight aides in calculating a more correctCalorie reading. Although we cannot provide an exact calorie count, we do want to be as close aspossible.CALORIE NOTE: Calorie readings on every piece of exercise equipment, whether it is in a gym or at home, are only anestimate and tend to vary widely. They are meant only as a guide to monitor your progress from workout to workout.Entering A Program And Changing SettingsWhen you enter a program, by pressing a program key, then Enter key, you have the option of enteringyour own personal settings. If you want to workout without entering new settings, then just press theStart key. This will bypass the programming of data and take you directly to the start of your workout.If you want to change the personal settings then just follow the instructions in the Message Center. Ifyou start a program without changing the settings, the default or saved settings will be used.NOTE: Age and Weight default settings will change when you enter a new number. So the last Age and Weight entered willbe saved as the new default settings. If you enter your Age and Weight the first time you use the treadmill, you will not haveto enter it every time you work out unless either your Age or Weight changes, or someone else enters a different Age andWeight.Each preset program has a maximum Speed and Incline level that is displayed when a desired workoutis chosen. The maximum Speed and Incline that the particular program will achieve will be displayed inthe Message Center.To Select and Start A Preset Program221. Press the desired program (Hill, Fat Burn, Cardio, Strength, or Interval) key. Press Enter to
select the program. The display will prompt you through the programming or you can just pressStart to begin the program with default values.2. If Enter was pressed, the Message Center will now be blinking a value, indicating your Age (defaultis 35). Entering your correct age affects the heart rate Bar Graph Display and the Heart Rateprograms. Use the / - keys to adjust, then press Enter. Your age determines your recommendedmaximum heart rate. Since the Bar Graph Display and the Heart Rate features are based on apercentage of your maximum heart rate, it is important to enter the correct age for these featuresto work properly.3. The Message Center will now be blinking a value, indicating your Body Weight (default is 150 lbs.).Entering the correct body weight will affect the calorie count. Use the / - keys to adjust, thenpress Enter.A note about the Calorie display: No exercise machine can give you an exact calorie count because there are too manyfactors which determine exact calorie burn for a particular person. Even if someone is the exact same body weight, ageand height, their calorie burn may be very different than yours. The Calorie display is to be used as a reference only tomonitor improvement from workout to workout.4. The Message Center will be blinking a value, indicating Time (the default value is 20 minutes).Youmay use any of the / - keys to adjust the time. After adjusting, or to accept the default, pressEnter. (Note: You may press Start at any time during the programming to start the program).5. The Message Center will now be blinking the preset top speed of the selected program (3.0 MPH).Use the Speed / - keys to adjust, then press Enter. Each program has various speed changesthroughout; this allows you to limit the highest speed the program can reach.6. The Message Center will be blinking the preset top incline of the selected program. Use the Incline / - keys to adjust, then press Enter.You are now done programming data and may press Start to begin your workout or Enter to goback one level to change data entered in the programming phase.23
Preset ProgramsThe treadmill has five different programs that have been designed for a variety of workouts. These fiveprograms have factory preset work level profiles for achieving different goals.HILLThis program follows a triangle or pyramid type of gradual progression from approximately 10% of maximum effort (thelevel that you chose before starting this program) up to a maximum effort which lasts for 10% of the total workout time,then a gradual regression of resistance back to approximately10% of maximum effortIncline: The deck elevation is a more gradual and sustainedprogression. Maximum elevation is in the middle of theworkout and lasts for 10% of the duration.FAT BURNThis program follows a quick progression up to the maximum resistance level (default or user input level) that is sustainedfor 2/3 of the workout. This program will challenge your abilityto sustain your energy output for an extended period of time.Incline: The deck elevation is a quick and sustained progressionup to the maximum value (default or user input) for 90% ofthe workout duration.CARDIO24This program presents a quick progression up to near maximum resistance level (default or user input level). It has slightfluctuations up and down to allow your heart rate to elevate, and then recover repeatedly, before beginning a quick cool
down. This will build up your heart muscle and increase bloodflow and lung capacityIncline: The elevation in this program is moderate. There areseveral elevation spikes at different points of the workout.Segments 15 are maximum elevation for this program.STRENGTHThis program has a gradual progression of resistance up to 100% of maximum effort that is sustained for 25% of workoutduration. This will help build strength and muscular endurancein the lower body and glutes. A brief cool down follows.Incline: There is a quick climb to a moderate, sustainedelevation that lasts the majority of the workout length.INTERVALThis program takes you through high levels of intensity followed by recovery periods of low intensity. This program utilizesand develops your “Fast Twitch” muscle fibers which are used when performing tasks that are intense and short in duration.These deplete your oxygen level and spike your heart rate, followed by periods of recovery and heart rate drop toreplenish oxygen. Your cardiovascular system gets programmed to use oxygen more efficiently.Incline: This program will spike similar to the speed profile, but in different segments (columns); this means thatall of your lower extremity muscles will be equally challenged throughout this program. The incline alternatesbetween 25 & 65 % of maximum elevation25
General MaintenanceDirt, dust, and hair can block air inlets and accumulate on the running belt. Please vacuum underneathyour treadmill on a monthly basis to prevent excess build-up of dirt that can get sucked up and get intothe inner workings under the motor cover. Every other month, you should remove the motor coverand carefully vacuum out dirt and hair that may accumulate.UNPLUG THE POWER CORD BEFORE THIS TASK.(Please keep a record of your maintenance)Belt AdjustmentsTread-belt Tension Adjustment - Belt tension is not critical for most users. It is very important thoughfor joggers and runners in order to provide a smooth, steady running surface.Adjustment must be made from the rear roller with the 6mm Allen wrench provided in the partspackage. The adjustment bolts are located at the end of the step rails as shown in the diagram below.Tighten the rear roller only enough to prevent slippage at the front roller. Turn the tread-belt tensionadjusting bolts 1/4 turn each and inspect for proper tension by walking on the belt and making sure itis not slipping or hesitating with each step. When an adjustment is made to the belt tension, you mustbe sure to turn the bolts on both sides evenly or the belt could start tracking to one side instead ofrunning in the middle of the deck.26DO NOT OVERTIGHTEN – Over tightening will cause belt damage and premature bearing failure.If you tighten the belt a lot and it still slips, the problem could actually be the drive belt - located underthe motor cover - that connects the motor to the front roller. If that belt is loose it feels similar to the
walking belt being loose. Tightening the motor belt should be done by a trained service person.Tread belt Tracking AdjustmentThe treadmill is designed so that the tread-belt remains reasonably centered while in use. It is normalfor some belts to drift near one side while in use, depending on a user’s gait and if they favor one leg.But if during use the belt continues to move toward one side, adjustments are necessary.Setting Tread-belt TrackingA 6mm Allen wrench is provided for this adjustment. Make tracking adjustments on the left side bolt.Set belt speed at 3 mph. Be aware that a small adjustment can make a dramatic difference which maynot be apparent right away. If the belt is too close to the left side, then turn the bolt only a 1/4 turn tothe right (clockwise) and wait a few minutes for the belt to adjust itself. Continue to make 1/4 turnsuntil the belt stabilizes in the center of the running deck.If the belt is too close to the right side, turn the bolt counter-clockwise. The belt may require periodictracking adjustment depending on use and walking/running characteristics. Some users may affecttracking differently. Expect to make adjustments as required to center the tread-belt. Ad
NEVER use your treadmill during an electrical storm. Surges may occur in your household power supply that could damage treadmill components. Unplug the treadmill during an electrical storm as a precaution. Use caution while participating in other activities while walking on your treadmill; such as watching television, reading, etc.