Transcription
CT5.1TREADMILL OWNER’S MANUALMANUEL D’UTILISATION DU TAPIS ROULANTRead the treadmill guide before using this owner’s manual.Lire le GUIDE DU TAPIS ROULANT avant de se servir du présent MANUEL D’UTILISATION.
3212ENGLISHFrançais
ASSEMBLYWARNINGThere are several areas during the assembly process that special attention must be paid. It is very important to follow the assemblyinstructions correctly and to make sure all parts are firmly tightened. If the assembly instructions are not followed correctly, thetreadmill could have parts that are not tightened and will seem loose and may cause irritating noises. To prevent damage to thetreadmill, the assembly instructions must be reviewed and corrective actions should be taken.Before proceeding, find your treadmill’s serial number located near the on/offpower switch and power cord and enter it in the space provided below.ENTER YOUR SERIAL NUMBER IN THE BOX BELOW:SERIAL NUMBER:MODEL NAME:Horizon CT5.1 TREADMILL» Refer to the SERIAL NUMBER and MODEL NAME when calling for service.» Be sure to enter both the SERIAL NUMBER and MODEL NAME on your warranty card.3
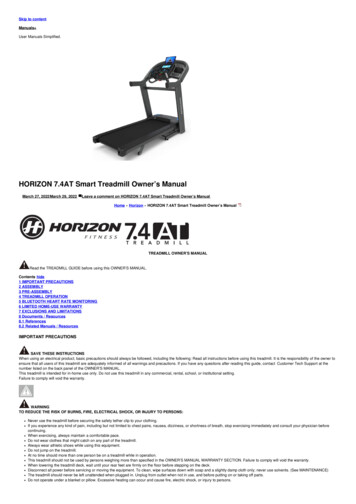
READING RACKSUPPORT BARTOUCH PAD PANEL AND DISPLAY WINDOWSSPEAKERSCONSOLEWATER BOTTLE HOLDERIPOD/MP3 PLAYER POCKETGRIP PULSE HANDRAILSSAFETY KEY PLACEMENTON/OFF SWITCHCIRCUIT BREAKERCONSOLE MASTFOOT LOCK LATCH (UNDERNEATH DECK)MOTOR COVERPOWER CORDSIDE RAILTRANSPORT WHEELROLLER END CAPRUNNING BELT / RUNNING DECK4REAR ROLLERADJUSTMENT BOLTS
TOOLS INCLUDED:FFFFFFFFScrewdriver6 mm T-Wrench5 mm L-Wrench4 mm L-WrenchPARTS INCLUDED:FFFFFFFFFFFFFFFF1 Console Assembly2 Console Masts1 Support Bar2 Bottom Console Covers5 Hardware Bags1 Safety Key1 Audio Adapter Cable1 Bottle of Silicone Lubricant(for 2 applications)PRE ASSEMBLYUNPACKINGPlace the treadmill carton on a level flat surface. It is recommended that you place aprotective covering on your floor. Take CAUTION when handling and transporting thisunit. Never open box when it is on its side. Once the banding straps have been removed,do not lift or transport this unit unless it is fully assembled and in the upright foldedposition, with the lock latch secure. Unpack the unit where it will be used. The enclosedtreadmill is equipped with high-pressure shocks and may spring open if mishandled.Never grab hold of any portion of the incline frame and attempt to lift or move the treadmill.WARNINGDO NOT ATTEMPT TO LIFT THE TREADMILL! Do not move or lift treadmillfrom packaging until specified to do so in the assembly instructions. You mayremove the plastic wrap from console masts.WARNINGNEED HELP?If you have questions or ifthere are any missing parts,contact Customer TechSupport. Contact informationis located on the back panelof this manual.FAILURE TO FOLLOW THESE INSTRUCTIONS COULD RESULT IN INJURY!NOTE: During assembly, do not completely tighten any screws or bolts until step 4 iscomplete!NOTE: A light application of grease may aid in the installation of hardware. Any grease,such as lithium bike grease is recommended.5
ASSEMBLY STEP 1HARDWARE BAG 1 CONTENTS :BOLT (A)20 mmQty: 4SPRING WASHER (B)15 mmQty: 4RUNNING DECKCut the yellow banding straps and lift therunning deck upward until the footlatch locks. Remove all contents fromunderneath the running deck.BOpen hardware bag 1.CWith the running deck in the raisedposition, attach the left console mastto the base frame using 4 bolts (a),4 spring washers (b) and 4 flatwashers (c).FLAT WASHER (C)15 mmQty: 4Note: Do not completely tighten anyscrews or bolts until step 4 is complete!LEFTCONSOLEMASTFOOT LATCHBASE FRAMEFLAT WASHERS (C)SPRING WASHERS (B)BOLTS (A)6A
ASSEMBLY STEP 2HARDWARE BAG 2 CONTENTS :BOLT (A)20 mmQty: 4SPRING WASHER (B)15 mmQty: 4FLAT WASHER (C)15 mmQty: 4LEAD WIRERUNNING DECKCONSOLE CABLEAOpen hardware bag 2.BPull lead wire through right consolemast. After pulling the lead wire through themast, the top of the console cable shouldbe located at the top of the mast. Detach anddiscard the lead wire.CWith the running deck in the raisedposition, attach the right consolemast to the base frame using 4 bolts(a), 4 spring washers (b) and 4 flatwashers (c).Note: Do not completely tighten anyscrews or bolts until step 4 is complete!RIGHT CONSOLE MASTBOLTS (A)SPRING WASHERS (B)Note: Be careful not to pinch any wireswhile assembling the right console mast.FLAT WASHERS (C)BASE FRAME7
ASSEMBLY STEP 3HARDWARE BAG 3 CONTENTS :BOLT (D)25 mmQty: 2FLAT WASHER (E)16 mmQty: 2CONSOLE CABLESASSEMBLELEFT SIDEFIRSTDisengage the deck lock latch with yourfoot to lower the running deck.BOpen hardware bag 3.CGently place the console on top of theconsole masts. Attach the left side firstusing 1 bolt (d) and 1 flat washer (e).DConnect the console cables, carefullytucking wires in masts to avoid damage.EAttach the right side of the consoleusing 1 bolt (d) and 1 flat washer (e).Note: Do not completely tighten anyscrews or bolts until step 4 is complete!CONSOLEFLAT WASHER (E)BOLT (D)CONSOLE MAST8ANote: Be careful not to pinch any wireswhile assembling the masts.
ASSEMBLY STEP 4HARDWARE BAG 4 CONTENTS :BOLT (H)15 mmQty: 4AOpen hardware bag 4.BAlign support bar with holes in consolemasts.CInsert bolts (h) into all 4 holes of thesupport bar.Note: look into holes in the right mast beforeinserting bolts to avoid pinching cables.DTighten all bolts completely.CONSOLEBOLTS (H)SUPPORT BARCONSOLE MAST9
ASSEMBLY STEP 5HARDWARE BAG 5 CONTENTS :SCREW (G)15 mmQty: 4CONSOLEBOTTOM CONSOLE COVERSCREWS (G)CONSOLE MASTAOpen hardware bag 5.BSlide right bottom console cover upconsole mast and align screw holes. Attachbottom console cover to consoleusing 2 screws (g).CRepeat on other side.DConnect power plug to a power outlet. The on/off switch is located next to the power cord.Flip this switch to the ‘ON’ position, so thatthe switch is lit. You will hear a beep and theconsole will turn on.EBefore the first use, lubricate the treadmilldeck by following the instructions in themaintenance section in the treadmillguide.YOU ARE FINISHED!10
TREADMILL OPERATIONThis section explains how to use your treadmill’s console and programming. The BASIC OPERATION section in thetreadmill guide has instructions for the following: LOCATION OF THE TREADMILL Using the SAFETY KEY FOLDING the treadmill MOVING the treadmill LEVELING the treadmill TENSIONING THE RUNNING BELT CENTERING THE RUNNING BELT Using the HEART RATE function11
TIMEDISTANCEABCALORIESHEART RATEINCLINESPEEDC% INGMyKEYS Press and hold a MyKEY for three seconds to setkey to current incline.THRMyKEYS LOWMEDOHIGHSLOWMEDFASTPress and hold a MyKEY for three seconds to setkey to current speed.PINCL INEMEUP12SAVEDMANUALTSP EEDFLJS KGIN
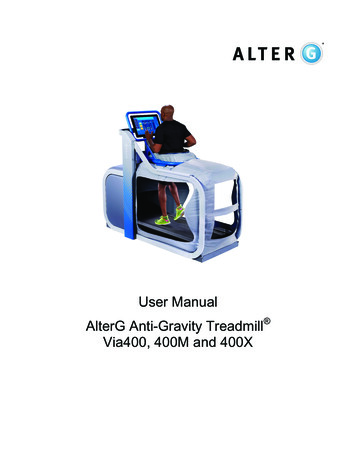
CONSOLE OPERATIONNote: There is a thin protective sheet of clear plastic on the overlay of the console that should be removed before use.A) Large LED windows: time & distance.B) LCD window: calories, heart rate, incline, speed, % complete, and scan.C) Feedback LEDs: indicate what workout feedback is currently being displayed in the lcd window.D) Program LEDs: indicate what program is currently selected.E)Saved program LEDs: indicate what saved program is currently selected.F)Start: press start to begin exercising, starts your workout, or resume exercising after pause.G) Stop: press to pause/end your workout. Hold for 3 seconds to reset the console.H) Incline/keys: used to adjust incline in small increments (0.5% Increments).I)Speed / - keys: used to adjust speed in small increments (0.1 Mph increments).J)Enter: used to select programs and confirm settings. Press to change display feedback during workout. To enter scanmode, press enter until scan led is illuminated.K) Select workout key: used to scroll through programs.L)Save workout key: after your workout, press to save a workout for future use.M) Incline mykeys : used to reach desired incline more quickly. See next page for details.N) Speed mykeys : used to reach desired speed more quickly. See next page for details.O) MP3 player pocket: used to store your mp3 player.P) Speakers: music plays through speakers when your cd / mp3 player is connected to the console.Q) Audio in jack: plug your cd / mp3 player into the console using the included audio adaptor cable.R) Audio out / headphone jack: plug your headphones into this jack to listen to your music through the headphones.Note: when headphones are plugged into the headphone jack the sound will no longer come out through the speakers.S) Safety key position: enables treadmill when safety key is inserted.T)Water bottle pockets: holds personal workout equipment.U) Reading rack: holds reading material.13
MYKEYS key operationYou can program the MyKeys to your desired speed or incline values.The speed MyKeys defaults are:The incline MyKeys defaults are:Slow 1 mphLow 0%Med 3 mphMed 3%Fast 5 mphHigh 6%To change the default value of any MyKEY, while in a program, first select the speed or incline level you would like to save, thenpress and hold the MyKEY you wish to change for 3 seconds. The current speed or incline level will flash on the console and beepthree times indicating that the new level has been saved successfully. To use a Speed MyKEY during a workout, it is necessary topress ENTER after pressing the MyKEY to confirm the speed. This is only necessary for the Speed MyKEYs and not the InclineMyKEYs.NOTE: Slow/Low cannot be set higher than Med and Med cannot be set higher than Fast/High. The console will beep once if thevalues are incorrect and the value will not be saved.To reset consoleClear current selectionHold stop key for 3 seconds.To clear the current program selection or screen, hold the stopbutton for 4-5 seconds.Finishing your workoutWhen your workout is complete, the monitor display will flashand beep. Your workout information will stay displayed on theconsole for 30 seconds and then reset.14
PROGRAMSManual: Allows “on the fly” manual speed and incline changes. Time-based goal.INTERVALS: Improves your strength, speed and endurance by increasing and decreasing the speed throughout yourworkout to involve your heart and other muscles.Weight loss: Promotes weight loss by increasing and decreasing the speed, while keeping you in your fat burning zone.HILLS: Simulates running up and down hills to improve stamina.ROLLING: A less-intense version of the HILLS program.GETTING STARTED1) Check to make sure no objects are placed on thebelt that will hinder the movement of the treadmill.2) Plug in the power cord and turn the treadmill ON.3) Stand on the side rails of the treadmill.4) Attach the safety key clip to part of your clothingmaking sure that it is secure and will not becomedetached during operation.5) Insert the safety key into the safety keyhole in theconsole.6) Simply press the start key to begin working outor select a program.Selecting a program1) Press SELECT WORKOUT to scroll through programs.2) Press ENTER to select a program.3) Use the / - keys to set maximum speed or incline.4) Press ENTER to confirm selection.5) Use the / - keys to set minimum speed or incline.6) Press ENTER to confirm selection.7) Use the / - keys to set program duration.8) Press the START button to begin program.15
Saving a workoutIf you had an especially challenging workout, you may want to save that one for the future.1) At the end of your workout, the console will prompt you if you would like to save your completed workout byscrolling save workout.2) If you would like to save the workout, press the save workout key. If not, either press the STOP key or stopusing the treadmill until the console resets itself.3) The LED will flash next to the type of program you used. For example, if you used the INTERVALS program, theSAVED INTERVALS LED will flash.4) Press and hold the save workout key for 5 seconds to save the workout for future use.5) If you would like to save over a previous workout, press and hold the SAVE WORKOUT KEY for 5 seconds.NOTE: When using a saved workout, changes to speed or incline will not be saved.16
LIMITED HOME-USE WARRANTY17
EXCLUSIONS AND LIMITATIONSWEIGHT CAPACITY 300 lbs (136 kilograms).Who IS covered:FRAME LIFETIME The original owner and is not transferable.Horizon Fitness warrants the frame against defects inworkmanship and materials for the lifetime of the owner, solong as the device remains in the possession of the originalowner. (The frame is defined as the welded metal base of theunit and does not include any parts that can be removed.)What IS covered:DRIVE MOTOR/ELEVATION LIFETIMEHorizon Fitness warrants the motor against defects inworkmanship and materials for the lifetime of the owner, solong as the device remains in the possession of the originalowner.ELECTRONICS & PARTS 1 yearHorizon Fitness warrants the electronic components, finishand all original parts for a period of one year from the dateof original purchase, so long as the device remains in thepossession of the original owner.LABOR 1 YEARHorizon Fitness shall cover the labor cost for the repair of thedevice for a period of one year from the date of the originalpurchase, so long as the device remains in the possession ofthe original owner.18 Repair or replacement of a defective motor, electroniccomponent, or defective part and is the sole remedy of thewarranty.What IS NOT covered: Normal wear and tear, improper assembly or maintenance,or installation of parts or accessories not originallyintended or compatible with the equipment as sold. Damage or failure due to accident, abuse, corrosion,discoloration of paint or plastic, neglect, theft, vandalism,fire, flood, wind, lightning, freezing, or other naturaldisasters of any kind, power reduction, fluctuation or failurefrom whatever cause, unusual atmospheric conditions,collision, introduction of foreign objects into the coveredunit, or modifications that are unauthorized or notrecommended by Horizon Fitness. Incidental or consequential damages. Horizon Fitnessis not responsible or liable for indirect, special orconsequential damages, economic loss, loss of property,or profits, loss of enjoyment or use, or other consequentialdamages of whatsoever nature in connection with thepurchase, use, repair or maintenance of the equipment.
SERVICE/RETURNS Equipment used for commercial purposes or any use otherthan a single family or Household, unless endorsed byHorizon Fitness for coverage. Equipment owned or operated outside the US andCanada. Delivery, assembly, installation, setup for original orreplacement units or labor or other costs associated withremoval or replacement of the covered unit. Any attempt to repair this equipment creates a risk ofinjury. Horizon Fitness is not responsible or liable for anydamage, loss or liability arising from any personal injuryincurred during the course of, or as a result of any repair orattempted repair of your fitness equipment by other thanan authorized service technician. All repairs attempted byyou on your fitness equipment are undertaken AT YOUROWN RISK and Horizon Fitness shall have no liabilityfor any injury to the person or property arising from suchrepairs. In-home service is available within 150 miles of the nearestauthorized repair center (Mileage beyond 150 miles froman authorized service center is the responsibility of theconsumer). All returns must be pre-authorized by Horizon Fitness. Horizon Fitness’ obligation under this warranty is limitedto replacing or repairing, at Horizon Fitness’ option, thesame or comparable model at one of its authorized servicecenters. A Horizon Fitness authorized service center must receiveall equipment for which a warranty claim is made. Thisequipment must be received with all freight and othertransportation charges prepaid, accompanied by sufficientproof of purchase. Replacement units, parts and electronic componentsreconditioned to As-new Condition by Horizon Fitnessor its vendors may sometimes be supplied as warrantyreplacement and constitute fulfillment of warranty terms. This warranty gives you specific legal rights, and yourrights may vary from state to state.19
20
ASSEMBLAGEAVERTISSEMENTLe processus de montage comporte certaines étapes au cours desquelles il faut faire particulièrement attention. Il importede suivre les instructions de montage à la lettre et de s’assurer que toutes les pièces sont bien serrées. Si on ne suit pascorrectement les instructions de montage, certaines parties du cadre du tapis roulant pourraient être mal serrées et bouger etelles pourraient causer des bruits irritants. Pour éviter les dommages au tapis roulant, relire les instructions d’assemblage etprendre les mesures correctives qui s’imposent.Avant de continuer, rechercher le numéro de série du tapis roulant indiqué près de l’interrupteurde marche/arrêt et du cordon d’alimentation et l’inscrire dans l’espace réservé ci-dessous.INSCRIRE LE NUMÉRO DE SÉRIE DANS LA CASE CI-DESSOUS :NUMÉRO DE SÉRIE :MODÈLE :TAPIS ROULANT Horizon CT5.1» Indiquer le NUMÉRO DE SÉRIE et le MODÈLE lors de tout appel de service.» Veiller à inscrire tant le NUMÉRO DE SÉRIE que le MODÈLE du tapis roulant sur la carte de garantie de l’appareil.21
SUPPORT DE LECTUREBARRE DE SOUTIENCLAVIER TACTILE ET FENÊTRES NT D’UN IPOD/BALADEUR MP3MAINS COURANTES COUPE-CIRCUITCORDOND’ALIMENTATIONEMPLACEMENT DE LA CLÉ DE SÉCURITÉMONTANT DE CONSOLEPÉDALE DE VERROUILLAGE(SOUS LA PLATE-FORME)COUVERCLE DU MOTEURRAIL LATÉRALROULETTE DE TRANSPORTCHAPEAU D’EXTRÉMITÉDE ROULEAUBANDE/PLATE-FORME22BOULONS DE RÉGLAGEDU ROULEAU ARRIÈRE
OUTILS INCLUS :FFFFFFFFTournevisClé à manche en T, de 6 mmClé à manche en L, de 5 mmClé à manche en L, de 4 mmPIÈCES INCLUSES :FFFFFFFFFFFFFFFF1 ensemble console2 montants de console1 barre de soutien2 attaches inférieures de console5 sacs de visserie1 clé de sécurité1 câble adaptateur audio1 bouteille de lubrifiant auxsilicones (pour 2 applications)BESOIN D’AIDE ?En cas de questions ou s’ilmanque des pièces, s’adresserau service de soutien techniqueà la clientèle. Les informationspour communiquer avec ceservice figurent au verso duprésent manuel.PRÉ-ASSEMBLAGEDÉBALLAGEPoser l’emballage du tapis roulant sur une surface plane. Il est conseillé de placer unetoile de protection sur le sol. Prendre des PRÉCAUTIONS pour le maniement et letransport de cette unité. Ne jamais ouvrir l’emballage d’expédition s’il repose sur le flanc.Après avoir retiré les bandes de cerclage, ne pas soulever ni transporter l’unité tantqu’elle n’a pas été complètement assemblée en position verticale, repliée et verrouillée.Déballer l’unité là où elle sera mise en service. Le tapis roulant emballé est équipéd’amortisseurs haute pression; il peut se déployer soudainement en cas de manutentiondéfectueuse. Ne jamais saisir une partie quelconque du cadre d’inclinaison ni tenter desoulever ou de déplacer le tapis roulant.AVERTISSEMENTNE PAS ESSAYER DE SOULEVER LE TAPIS ROULANT. Ne pas déplacer le tapisroulant ou le sortir de son emballage avant que ce ne soit spécifié dans les instructionsd’assemblage. On peut enlever l’emballage plastique des montants de console.AVERTISSEMENTL’INOBSERVATION DE CES INSTRUCTIONS PEUT ÊTRE CAUSE DE BLESSURES.A NOTER : Pendant l’installation, ne serrez pas à fond les vis ni les boulons avant quel’étape 4 est complète.A NOTER : Une légère application de graisse peut faciliter l’installation de la quincaillerie.Toute graisse, comme la graisse au lithium pour vélos est recommandée.23
ÉTAPE 1 DE L’ASSEMBLAGECONTENU DU SACHET DE VISSERIE 1 :BOULON (A)20 mmQuantité : 4RONDELLEÉLASTIQUE (B)15 mmQuantité : 4PLATE-FORMECouper les bandes de cerclage jaunes etrelever la plate-forme jusqu’à ce que lapédale de verrouillage s’enclenche.Enlever tout objet qui se trouve sousla plate-forme.BOuvrir le sachet de visserie 1.CLa plate-forme relevée, fixer le montantde console gauche au bâti avec 4boulons (a), 4 rondelles élastiques(b) et 4 rondelles plates (c).RONDELLEPLATE (C)15 mmQuantité : 4A NOTER : Ne serrer à fond aucune visni aucun boulon avant d’avoir exécutél’étape 4.MONTANT DECONSOLEGAUCHEPÉDALE DE VERROUILLAGEBÂTIRONDELLES PLATES (C)RONDELLES ÉLASTIQUES (B)BOULONS (A)24A
ÉTAPE 2 DE L’ASSEMBLAGECONTENU DU SACHET DE VISSERIE 2 :BOULON (A)20 mmQuantité : 4RONDELLEÉLASTIQUE (B)15 mmQuantité : 4RONDELLEPLATE (C)15 mmQuantité : 4FIL DE GUIDAGEPLATE-FORMECÂBLES DE LA CONSOLEMONTANT DECONSOLE DROITAOuvrir le sachet de visserie 2.BPasser le fil de guidage dans lemontant de console droit. Cela fait, lebout des câbles de la console doit setrouver en haut du montant. Détacher le fil deguidage et le mettre au rebut.CLa plate-forme relevée, fixer lemontant de console droit au bâtiavec 4 boulons (a), 4 rondellesélastiques (b) et 4 rondellesplates (c).A NOTER : Ne serrer à fond aucune visni aucun boulon avant d’avoir exécutél’étape 4.BOULONS (A)RONDELLES ÉLASTIQUES (B)RONDELLES PLATES (C)A NOTER : Veiller à ne pincer aucun descâbles lors de l’assemblage du montantde console droit.BÂTI25
ÉTAPE 3 DE L’ASSEMBLAGECONTENU DU SACHET DE VISSERIE 3 :BOULON (D)25 mmQuantité : 2RONDELLE PLATE (E)16 mmQuantité : 2AAvec le pied, désenclencher la pédale deverrouillage pour abaisser la plateforme.BOuvrir le sachet de visserie 3.CPlacer délicatement la console sur lesmontants de console. Fixer d’abordle côté gauche avec 1 boulon (d) et1 rondelle plate (e).DConnecter les câbles de la console, enles tirant délicatement dans les montants pouréviter tout dommage.EFixer le côté droit de la console avec1 boulon (d) et 1 rondelle plate (e).CÂBLES DELA CONSOLEASSEMBLERD’ABORD LECÔTÉ GAUCHECONSOLERONDELLE PLATE (E)BOULON (D)MONTANT DE CONSOLEA NOTER : Ne serrer à fond aucune visni aucun boulon avant d’avoir exécutél’étape 4.A NOTER : Veiller à ne pincer aucundes câbles lors de l’assemblage desmontants.26
ÉTAPE 4 DE L’ASSEMBLAGECONTENU DU SACHET DE VISSERIE 4 :BOULON (H)15 mmQuantité : 4CONSOLEAOuvrir le sachet de visserie 4.BAligner la barre de soutien avec les trousdes montants de console.CInsérer un boulon (h) dans chacun des4 trous de la barre de soutien.Remarque : Regarder dans les trous du montantdroit avant d’insérer les boulons, pour éviter depincer les câbles.DSerrez toutes les vis complètemen.BOULONS (H)BARRE DE SOUTIENMONTANT DECONSOLE27
ÉTAPE 5 DE L’ASSEMBLAGECONTENU DU SACHET DE VISSERIE 4 :VIS (G)15 mmQuantité : 4CONSOLEATTACHE INFÉRIEUREDE CONSOLEVIS (G)MONTANT DE CONSOLEAOuvrir le sachet de visserie 5.BFaire glisser l’attache inférieure deconsole droite vers le haut du montantde console et aligner les trous de vis. Fixercette attache à la console avec 2 vis (g).CRépéter de l’autre côté.DConnecter la fiche d’alimentation du tapisroulant à une prise de courant. L’interrupteurest situé près du cordon d’alimentation.Mettre l’interrupteur sur ON (marche) afin quel’interrupteur s’allume. Un bip retentit et laconsole s’éclaire.EAvant d’utiliser le tapis roulant pour la premièrefois, en lubrifier la plate-forme conformément auxinstructions énoncées à la section Entretiendu guide du tapis roulant.TRAVAIL TERMINÉ.28
FONCTIONNEMENT DUTAPIS ROULANTLa présente section explique comment utiliser et programmer la console du tapis roulant. La section FONCTIONNEMENTDE BASE du guide du tapis roulant comporte des instructions relatives à ce qui suit : POSITIONNEMENT DU TAPIS ROULANT Utilisation de la CLÉ DE SÉCURITÉ PLIAGE du tapis roulant DÉPLACEMENT du tapis roulant MISE À NIVEAU du tapis roulant TENSIONNEMENT DE LA BANDE CENTRAGE DE LA BANDE Utilisation du CARDIO-FRÉQUENCEMÈTRE29
TIMEDISTANCEABCALORIESHEART RATEINCLINESPEEDC% INGMyKEYS Press and hold a MyKEY for three seconds to setkey to current incline.THRMyKEYS LOWMEDOHIGHSLOWMEDFASTPress and hold a MyKEY for three seconds to setkey to current speed.PINCL INEMEUP30SAVEDMANUALTSP EEDFLJS KGIN
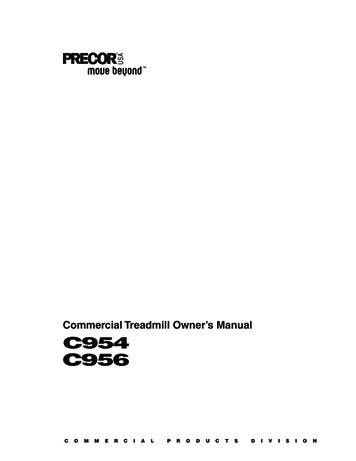
FONCTIONNEMENT DE LA CONSOLERemarque : Avant d’utiliser la console, il faut enlever la fine pellicule protectrice en plastique qui la recouvre.A) Grandes fenêtres à DEL : Time (durée) etdistance.B) Fenêtre ACL : Calories, Heart rate (fréquencecardiaque), Incline (inclinaison), Speed (vitesse),% Complete (pourcentage d’exécution), et Scan(balayage).C) DEL de paramètres : Indiquent quel paramètred’exercice est présentement affiché dans la fenêtre ACL.D) DEL de programme : Indiquent quel programmeest présentement choisi.E) DEL de programme enregistré : Indiquentquel programme enregistré est présentement choisi.F) Start : Appuyer sur cette touche pour commencer às’exercer, lancer une séance d’exercices, ou reprendreles exercices après une pause.G) Stop : Appuyer sur cette touche pour faire une pause/terminer une séance d’exercices. La tenir pendant3 secondes pour réinitialiser la console.H) Touches de réglage de l’inclinaisonc / B : servent à régler l’inclinaison par petits incrémentsde 0,5 %.I) Touches d’augmentation ou deréduction – de la vitesse : servent à régler lavitesse par petits incréments de 0,1 mi/h.J) Enter : sert à choisir les programmes et à confirmerles réglages. Appuyer sur cette touche pour changer lesparamètres d’affichage en cours d’exercice. Pour passeren mode balayage, appuyer sur la touche ENTER jusqu’àce que la DEL de balayage soit allumée.K) SELECT WORKOUT (Touche de choix d’uneséance d’exercices) : sert à faire défiler lesprogrammes.L)M)N)O)P)Q)R)S)T)U)SAVE WORKOUT (Enregistrement d’uneséance d’exercices) : après une séanced’exercices, appuyer sur cette touche pour enregistrer laséance pour un usage ultérieur.Mykeys d’inclinaison : sert à atteindre plusrapidement l’inclinaison voulue. Pour plus ampleinformation, voir page suivante.Mykeys de vitesse : sert à atteindre plusrapidement la vitesse voulue. Pour plus ampleinformation, voir page suivante.Logement d’un baladeur MP3 : sert à rangerun baladeur MP3.Haut-parleurs : Diffusent la musique quandun lecteur de CD / baladeur MP3 est connecté à laconsole.Prise d’entrée audio : brancher un lecteurde CD / baladeur MP3 à la console avec le câbleadaptateur audio inclus.Prise de sortie audio / Prise pourcasque d’écoute : Utilisée pour entendrela musique par le casque d’écoute. Remarque :Lorsque le casque d’écoute est enfiché dans la prisecorrespondante, le son n’est plus envoyé aux hautparleurs.Position de la clé de sécurité : Permet autapis roulant de fonctionner lorsque la clé de sécuritéest insérée.Poches pour bouteille d’eau : Contient lematériel d’exercice.Support de lecture : Pour poser un magazineou un livre.31
Fonctionnement des touches MyKEYS On peut programmer les MyKeys aux valeurs de vitesse ou d’inclinaison voulues.Les valeurs implicites des MyKeys devitesse sont les suivantes :Les valeurs implicites des MyKeysd’inclinaison sont les suivantes :Slow / Lente 1 mi/hLow / Basse 0 %Med / Moyenne 3 mi/hMed / Moyenne 3 %Fast / Rapide 5 mi/hHigh / Haute 6 %Pour changer la valeur implicite d’une MyKEY, au cours d’un programme, commencer par choisir le niveau de vitesse oud’inclinaison que l’on veut enregistrer, puis appuyer sur la MyKEY dont on veut changer la valeur, et la tenir pendant 3 secondes.Le niveau de vitesse ou d’inclinaison clignote sur la console et trois bips retentissent, ce qui indique que le nouveau niveau a étécorrectement enregistré. Pour utiliser une MyKEY de vitesse pendant une séance d’exercices, il est nécessaire d’appuyer sur latouche ENTER après avoir appuyé sur la touche MyKEY pour confirmer la vitesse. Cela n’est nécessaire que pour les MyKEYs devitesse, pas pour les MyKEYs d’inclinaison.REMARQUE : Lente/Basse ne peuvent être réglées plus haut que Moyenne, et Moyenne ne peut être réglée plus haut que Rapide/Haute. La console émet un bip si les valeurs sont incorrectes et la valeur n’est pas enregistrée.Pour réinitialiser la consoleAnnulation de la sélection actuelleAppuyer sur la touche STOP et la tenir pendant 3 secondes.Pour annuler la sélection du programme ou l’écran actuel,appuyer sur la touche stop pendant 4-5 secondes.Fin de la séance D’EXERCICESLorsque la séance d’exercices est terminée, l’affichage clignoteet émet un bip. L’information sur la séance d’exercices demeureaffichée sur la console pendant 30 secondes, puis la consolese réinitialise.32
PROGRAMMESWeight loss (Perte de poids) : Favorise laperte de poids en élevant et en réduisant la vitesse, touten maintenant dans la zone où l’on brûle les graisses.Manual (MANUEL): Permet des changementsmanuels de la vitesse et de l’inclinaison en coursd’exercice. Objectif de durée.INTERVALS (INTERVALLES) : Accroît la force, lavitesse et l’endurance en élevant et en réduisant lavitesse tout au long de la séance d’exercices, pour fairetravailler tant le cœur que les muscles.POUR COMMENCERHILLS (COLLINES) : Donne une impression demontée et de descente, pour accroître l’endurance.ROLLING (RÉSISTANCE VARIABLE) : Versionmoins intensive du programme COLLINES.Sélection d’un programme1) S’assurer qu’aucun objet susceptible d’entraverle déplacement du tapis roulant ne se trouve surla bande.1) Appuyer sur la touche SELECT WORKOUT pour faire défilerles programmes.2) Brancher le cordon d’alimentation et mettre letapis roulant sous tension.3) Utiliser les touches d’augmentation ou de réduction –pour régler la vitesse ou l’inclinaison maximales.3) Se tenir sur les rails latéraux du tapis roulant.4) Fixer l’attache de la clé de sécurité à un de sesvêtements et s’assurer qu’elle ne se détache pasdu vêtement pendant la séance d’exercice.5) Insérer la clé de sécurité dans la serrure de laconsole.6) Il suffit d’appuyer sur la touche START pourcommencer une séance d’exercice ou choisirun programme.2) Appuyer sur la touche ENTER pour choisir un programme.4) Appuyer sur la touche ENTER pour confirmer un choix.5) Utiliser les touches d
TREADMILL OPERATION This section explains how to use your treadmill's console and programming. The BASIC OPERATION section in the TREADMILL gUIDE has instructions for the following: LoCATion oF THE TrEADMiLL USinG THE SAFETY KEY FoLDinG THE TrEADMiLL MoVinG THE TrEADMiLL LEVELinG THE TrEADMiLL TEnSioninG THE rUnninG BELT