Transcription
Document Number: 690-086-001Rev. B2018-08Cabling Mixed-Speed Enclosure ChainsThis procedure describes how to connect 6 Gb and 12 Gb enclosures in the same chain. You can combine mixed-speed enclosures in onechain in the following configurations: Chains with 12-drive and 24-drive enclosures: SC200, SC220, SC400, SC420, and SC420F expansion enclosures. Chains with 80-drive and 60-drive enclosures: SC280 and SC460 expansion enclosures.NOTE: You cannot combine 12-and 24-drive enclosures with 60-and 80-drive enclosures in the same chain.Topics: SAS Enclosures Add an Enclosure to a 2U Chain Add an Enclosure to a 4U/5U Chain Manage Unassigned DisksSAS EnclosuresThe enclosure speeds and model numbers described in this procedure are: 6 Gb SAS (2U) – SC200 and SC220 12 Gb SAS (2U) – SC400, SC420, and SC420F 6 Gb SAS (5U) – SC280 12 Gb SAS (4U) – SC460Cables Required for Adding Enclosures into Mixed ChainsStorage ControllerEnclosure Enclosure CablesEnclosure Controller CablesTotal cablesSC4020(2) Mini SAS HD to Mini SAS(2) Mini SAS HD to Mini SAS(4) Mini SAS HD to Mini SAS(2) Mini SAS HD to Mini SAS(2) Mini SAS HD to Mini SASHD*(2) Mini SAS HD to Mini SAS,plus(Adding 12 Gb to 6 Gb chain)SC8000(Adding 12 Gb to 6 Gb chain)(2) Mini SAS HD to Mini SAS HDSCv3000 series, SC5020 series,SC7020 series, and SC9000(2) Mini SAS HD to Mini SAS(2) Mini SAS HD to Mini SAS(4) Mini SAS HD to Mini SAS(Adding 6 Gb to 12Gb chain)* If the SAS I/O Card in the SC8000 is an LSI SAS 9201, two mini SAS to Mini SAS HD cables are needed instead.Cabling Mixed-Speed Enclosure Chains1
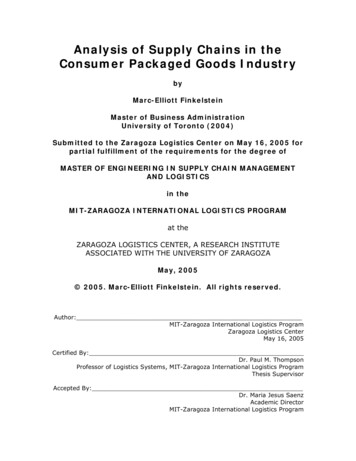
Add an Enclosure to a 2U ChainThis section describes how to add a 6 Gb or 12 Gb 2U enclosure into an existing chain. Adding a 12 Gb SAS Enclosure to a 6 Gb Chain Adding a 6 Gb SAS Enclosure to a 12 Gb ChainCheck the Disk Count before Adding an EnclosureUse the Storage Manager Client to determine the number of drives that are currently accessible to the Storage Center.1Connect to the Storage Center using the Storage Manager Client.2Select the Storage tab.3In the Storage tab navigation pane, select the Disks node.4On the Disks tab, record the number of drives that are accessible by the Storage Center.Compare this value to the number of drives accessible by the Storage Center after adding an enclosure to the controller.Adding a 12 Gb SAS Enclosure to a 6 Gb SAS ChainFollow this procedure to add an SC400 series expansion enclosure to a system that has 6 Gb SC200 series expansion enclosures.Add the 12 Gb Expansion Enclosure to the A-SideConnect the expansion enclosure to one-side of the chain at a time to maintain drive availability.PrerequisiteInstall the new expansion enclosure in the rack as described in the SC400, SC420, and SC420F Getting Started Guide.About this taskNOTE: In an SC4020 storage system, the top storage controller is storage controller 1 and the bottom storage controller isstorage controller 2.Steps1Remove the A side SAS cable (shown by dashed orange line) between the last expansion enclosure in the chain and storage controller2. The B-side SAS cables continues to carry I/O while the A-side is disconnected.2Cabling Mixed-Speed Enclosure Chains
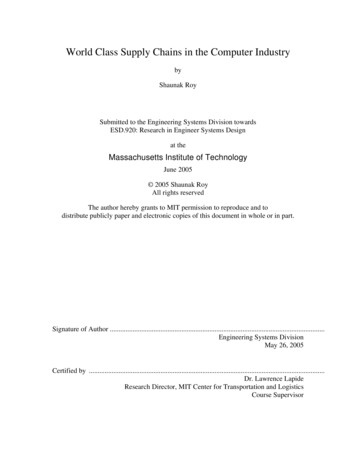
Figure 1. Disconnect the A-Side Chain1Expansion enclosure 1 (SC2x0)3Remove SAS cable connected to storage controller 22Expansion enclosure 2 (SC4x0)2Connect a SAS cable (Mini SAS Mini SAS HD) from expansion enclosure 1, top EMM, port B to expansion enclosure 2, top EMMport 1.3Connect a SAS cable from expansion enclosure 2, top EMM, port 2 to the port on storage controller 2 from which the original cablewas removed. Use a Mini SAS HD Mini SAS cable to connect to an SC4020 storage controller Use a Mini SAS HD Mini SAS HD cable to connect to an SC8000 storage controllerFigure 2. Connect the A-Side-Chain1Expansion enclosure 1 (SC2x0)2Expansion enclosure 2 (SC4x0)3Add new SAS cable between the expansion enclosures4Add new SAS cable between the expansion enclosureand storage controller 2Cabling Mixed-Speed Enclosure Chains3
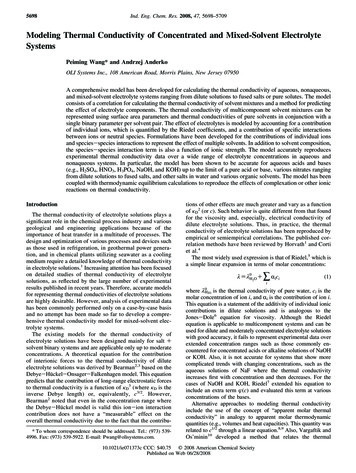
Add the 12 Gb Expansion Enclosure to the B-SideConnect the expansion enclosures to one side of the chain at a time to maintain drive availability.About this taskNOTE: In an SC4020 storage system, the top storage controller is storage controller 1 and the bottom storage controller isstorage controller 2.Steps1Remove the A-side cable (shown by dashed blue line) between the last expansion enclosure in the chain and storage controller 1. TheA-side cable continues to carry I/O while the B-side is disconnected.Figure 3. Disconnect the B-Side Chain1Expansion enclosure 1 (SC2x0)3Remove the SAS cable connected to storage controller 12Expansion enclosure 2 (SC4x0)2Connect a SAS cable (Mini SAS Mini SAS HD) from expansion enclosure 1, bottom EMM, port B to expansion enclosure 2, bottomEMM port 1.3Connect a cable from expansion enclosure 2, bottom EMM, port 2 to the port on storage controller 1 from which the original cable wasremoved. Use a Mini SAS HD Mini SAS cable to connect to an SC4020 storage controller Use a Mini SAS HD Mini SAS HD cable to connect to an SC8000 storage controller4Cabling Mixed-Speed Enclosure Chains
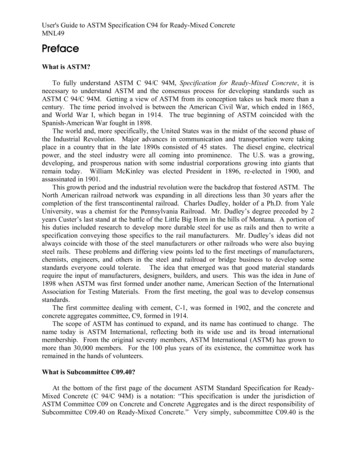
Figure 4. Connect the B-Side Chain41Expansion enclosure 1 (SC2x0)2Expansion enclosure 2 (SC4x0)3Add new SAS cable between the expansion enclosures4Add new SAS cable between the expansion enclosureand storage controller 1Manage the disks in the new enclosure as described in Manage Unassigned Disks.Cabling Mixed-Speed Enclosure Chains5
Adding a 6 Gb SAS Enclosure to a 12 Gb SAS ChainFollow this procedure to add an SC200 series expansion enclosure to a system that has 12Gb SC400 series expansion enclosures.Add the 6 Gb Expansion Enclosure to the A-SideConnect the expansion enclosure to one-side of the chain at a time to maintain drive availability.PrerequisiteInstall the 6 Gb expansion enclosure in the rack as described in the SC200/SC220 Getting Started Guide.About this taskNOTE: In an SCv3000 series, SC5020 series, and SC7020 series storage system, the top storage controller is storage controller 1and the bottom storage controller is storage controller 2.Steps1Remove the A side SAS cable (shown by dashed orange line) between the last expansion enclosure in the chain and storage controller2. The B-side SAS cables continues to carry I/O while the A-side is disconnected.Figure 5. Disconnect the A-Side Chain1Expansion enclosure 1 (SC4x0)3Remove SAS cable connected to storage controller 22Expansion enclosure 2 (SC2x0)2Connect a SAS cable (Mini SAS HD Mini SAS ) from expansion enclosure 1, top EMM, port 2 to expansion enclosure 2, top EMMport A.3Connect a SAS cable (Mini SAS Mini SAS HD) from expansion enclosure 2, top EMM, port B to the port on storage controller 2from which the original cable was removed.6Cabling Mixed-Speed Enclosure Chains
Figure 6. Connect the A-Side-Chain1Expansion enclosure 1 (SC4x0)2Expansion enclosure 2 (SC2x0)3Add new SAS cable between the expansion enclosures4Add new SAS cable between the expansion enclosureand storage controller 2Add the 6 Gb Expansion Enclosure to the B-SideConnect the expansion enclosures to one side of the chain at a time to maintain drive availability.About this taskNOTE: In an SCv3000 series, SC5020 series, and SC7020 series storage system, the top storage controller is storage controller 1and the bottom storage controller is storage controller 2.Steps1Remove the A-side cable (shown by dashed blue line) between the last expansion enclosure in the chain and storage controller 1. TheA-side cable continues to carry I/O while the B-side is disconnected.Figure 7. Disconnect the B-Side Chain1Expansion enclosure 1 (SC4x0)2Expansion enclosure 2 (SC2x0)Cabling Mixed-Speed Enclosure Chains7
3Remove the SAS cable connected to storage controller 12Connect a SAS cable (Mini SAS HD Mini SAS) from expansion enclosure 1, bottom EMM, port 2 to expansion enclosure 2, bottomEMM port A.3Connect a SAS cable (Mini SAS Mini SAS HD) from expansion enclosure 2, bottom EMM, port B to the port on storage controller 1from which the original cable was removed.Figure 8. Connect the B-Side Chain41Expansion enclosure 1 (SC4x0)2Expansion enclosure 2 (SC2x0)3Add new SAS cable between the expansion enclosures4Add new SAS cable between the expansion enclosureand storage controller 1Manage the disks in the new enclosure as described in Manage Unassigned Disks.8Cabling Mixed-Speed Enclosure Chains
Add an Enclosure to a 4U/5U ChainThis section describes how to add a 6 Gb (5U) or 12 Gb (4U) enclosure into an existing chain. A Storage Center supports two enclosurescontaining 60 or more disks. Adding a 12 Gb SAS Enclosure to a 6 Gb SAS Chain (4U/5U) Adding a 6 Gb SAS Enclosure to a 12 Gb SAS Chain (4U/5U)Check the Disk Count before Adding an EnclosureUse the Storage Manager Client to determine the number of drives that are currently accessible to the Storage Center.1Connect to the Storage Center using the Storage Manager Client.2Select the Storage tab.3In the Storage tab navigation pane, select the Disks node.4On the Disks tab, record the number of drives that are accessible by the Storage Center.Compare this value to the number of drives accessible by the Storage Center after adding an enclosure to the controller.Adding a 12 Gb SAS Enclosure to a 6 Gb SAS ChainFollow this procedure to add an SC460 expansion enclosure to a system that has one 6 Gb SC280 expansion enclosure.Add the 12 Gb Expansion Enclosure to the A-SideConnect the expansion enclosure to one side of the chain at a time to maintain drive availability.PrerequisiteInstall the new expansion enclosure in the rack as described in the SC460 Getting Started Guide.About this taskNOTE: In an SC4020 storage system, the top storage controller is storage controller 1 and the bottom storage controller isstorage controller 2.Steps1Remove the A side SAS cable connected between the SC280 left EMM port B and controller 2. The B-side SAS cables continue tocarry I/O while the A-side is disconnected.Cabling Mixed-Speed Enclosure Chains9
Figure 9. Disconnecting the A-Side Chain21Expansion enclosure 1 (SC280)3Remove cable connected to controller2Expansion enclosure 2 (SC460)Connect a SAS cable (Mini SAS Mini SAS HD) from the SC460 left EMM port1 3 to the SC280 left EMM port B. Use a Mini SAS HD Mini SAS cable to connect to an SC4020 storage controller Use a Mini SAS HD Mini SAS HD cable to connect to an SC8000 storage controller10Cabling Mixed-Speed Enclosure Chains
Figure 10. Connect the A-Side Chain1Expansion enclosure 1 (SC280)3Connect SAS cable from SC280 to SC4602Expansion enclosure 2 (SC460)Add the 12 Gb Expansion Enclosure to the B-SideConnect the expansion enclosures to one side of the chain at a time to maintain drive availability.About this taskNOTE: In an SC4020 storage system, the top storage controller is storage controller 1 and the bottom storage controller isstorage controller 2.Steps1Remove the B-side cable connected between the SC280 left EMM port B and controller 1. The A-side cable continues to carry I/Owhile the B-side is disconnected.Cabling Mixed-Speed Enclosure Chains11
Figure 11. Disconnect the B-Side Chain1Expansion enclosure 1 (SC280)3Remove the SAS cable connected between port B andthe controller2Expansion enclosure 2 (SC460 )2Connect a SAS cable (Mini SAS Mini SAS HD) from the SC280 right EMM port A to the SC460 right EMM port 1.3Connect a SAS cable from the SC460 right EMM port 3 to controller 1 port 2 (or port B). Use a Mini SAS HD Mini SAS cable to connect to an SC4020 storage controller Use a Mini SAS HD Mini SAS HD cable to connect to an SC8000 storage controller12Cabling Mixed-Speed Enclosure Chains
Figure 12. Connect the B-Side Chain41Expansion enclosure 1 (SC280)2Expansion enclosure 2 (SC460)3Connect SAS cable from SC280 to SC4604Connect SAS cable from SC460 to controller 1Manage the disks in the new enclosure as described in Manage Unassigned Disks.Adding a 6 Gb SAS Enclosure to a 12 Gb SAS ChainFollow this procedure to add an SC280 expansion enclosure to a system that has one 12Gb SC460 expansion enclosure.Add the 6 Gb Expansion Enclosure to the A-SideConnect the expansion enclosure to one side of the chain at a time to maintain drive availability.PrerequisiteInstall the 6 Gb expansion enclosure in the rack as described in the SC280 Getting Started Guide.About this taskNOTE: In an SCv3000 series, SC5020 series, and SC7020 series storage system, the top storage controller is storage controller 1and the bottom storage controller is storage controller 2.Steps1Remove the A side SAS cable (shown by dashed orange line) between the SC460 left EMM port 3 enclosure and storage controller 2.The B-side SAS cables continues to carry I/O while the A-side is disconnected.Cabling Mixed-Speed Enclosure Chains13
Figure 13. Disconnect the A-Side Chain21Expansion enclosure 1 (SC460)3Remove SAS cable connected to storage controller 22Expansion enclosure 2 (SC280)Connect a SAS cable (Mini SAS Mini SAS HD) from the SC460 left EMM port 3 to the SC280 left EMM port AFigure 14. Connect the A-Side-Chain1Expansion enclosure 1 (SC460)3Add new SAS cable between the expansion enclosures2Expansion enclosure 2 (SC280)Add the 6 Gb Expansion Enclosure to the B-SideConnect the expansion enclosures to one side of the chain at a time to maintain drive availability.About this taskNOTE: In an SCv3000 series, SC5020 series, and SC7020 series storage system, the top storage controller is storage controller 1and the bottom storage controller is storage controller 2.14Cabling Mixed-Speed Enclosure Chains
Steps1Remove the B-side cable (shown by dashed blue line) between the SC460 right EMM port 3 and storage controller 1. The A-side cablecontinues to carry I/O while the B-side is disconnected.Figure 15. Disconnect the B-Side Chain1Expansion enclosure 1 (SC460)3Remove the SAS cable connected to storage controller 12Expansion enclosure 2 (SC2x0)2Connect a SAS cable (Mini S
NOTE: In an SC4020 storage system, the top storage controller is storage controller 1 and the bottom storage controller is storage controller 2. Steps 1 Remove the A