Transcription
Table of ContentsIntroduction1.1Installation1.2How the Internet works1.3Introduction to command line1.4Python installation1.5Code editor1.6Introduction to Python1.7What is Django?1.8Django installation1.9Your first Django project!1.10Django models1.11Django admin1.12Deploy!1.13Django urls1.14Django views - time to create!1.15Introduction to HTML1.16Django ORM (Querysets)1.17Dynamic data in templates1.18Django templates1.19CSS - make it pretty1.20Template extending1.21Extend your application1.22Django Forms1.23What's next?1.242
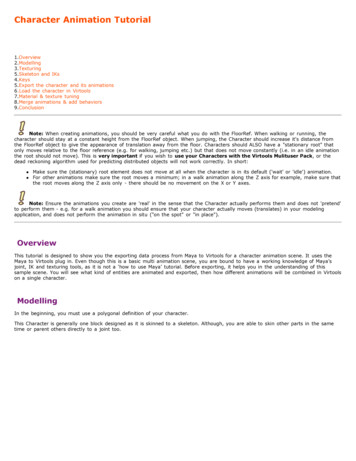
IntroductionDjango Girls TutorialThis work is licensed under the Creative Commons Attribution-ShareAlike 4.0 International License. To view a copyof this license, visit roductionHave you ever felt that the world is more and more about technology and you are somehow left behind? Have you everwondered how to create a website but have never had enough motivation to start? Have you ever thought that the softwareworld is too complicated for you to even try doing something on your own?Well, we have good news for you! Programming is not as hard as it seems and we want to show you how fun it can be.This tutorial will not magically turn you into a programmer. If you want to be good at it, you need months or even years oflearning and practice. But we want to show you that programming or creating websites is not as complicated as it seems.We will try to explain different bits and pieces as well as we can, so you will not feel intimidated by technology.We hope that we'll be able to make you love technology as much as we do!What will you learn during the tutorial?Once you've finished the tutorial, you will have a simple, working web application: your own blog. We will show you how toput it online, so others will see your work!It will (more or less) look like this:3
IntroductionIf you work with the tutorial on your own and don't have a coach who will help you in case of any problem, we have achat system for you:. We asked our coaches and previous attendees to be there from time to timeand help others with the tutorial! Don't be afraid to ask your question there!OK, let's start at the beginning Following the tutorial at homeIt is amazing to take part in a Django Girls workshop, but we are aware that it is not always possible to attend one. This iswhy we encourage you to try following this tutorial at home. For readers at home we are currently preparing videos that willmake it easier to follow the tutorial on your own. It is still a work in progress, but more and more things will be covered soonat the Coding is for girls YouTube channel.In every chapter already covered, there is a link that points to the correct video.About and contributingThis tutorial is maintained by DjangoGirls. If you find any mistakes or want to update the tutorial please follow thecontributing guidelines.Would you like to help us translate the tutorial to otherlanguages?4
IntroductionCurrently, translations are being kept on crowdin.com platform alIf your language is not listed on crowdin, please open a new issue informing us of the language so we can add it.5
InstallationIf you're doing the tutorial at homeIf you're doing the tutorial at home, not at one of the Django Girls events, you can completely skip this chapter now and gostraight to the How the Internet works? chapter.This is because we cover these things in the whole tutorial anyway, and this is just an additional page that gathers all of theinstallation instructions in one place. The Django Girls event includes one "Installation evening" where we install everythingso we don't need to bother with it during the workshop, so this is useful for us.If you find it useful, you can follow through this chapter too. But if you want to start learning things before installing a bunchof stuff on your computer, skip this chapter and we will explain the installation part to you later on.Good luck!InstallationIn the workshop you will be building a blog, and there are a few setup tasks in the tutorial which would be good to workthrough beforehand so that you are ready to start coding on the day.Chromebook setup (if you're using one)You can skip right over this section if you're not using a Chromebook. If you are, your installation experience will be a littledifferent. You can ignore the rest of the installation instructions.Cloud 9Cloud 9 is a tool that gives you a code editor and access to a computer running on the internet where you can install, write,and run software. For the duration of the tutorial, Cloud 9 will act as your local machine. You'll still be running commands ina terminal interface just like your classmates on OS X, Ubuntu, or Windows, but your terminal will be connected to acomputer running somewhere else that Cloud 9 sets up for you.1. Install Cloud 9 from the Chrome web store2. Go to c9.io3. Sign up for an account4. Click Create a New Workspace5. Name it django-girls6. Select the Blank (second from the right on the bottom row with orange logo)Now you should see an interface with a sidebar, a big main window with some text, and a small window at the bottom thatlooks something like:Cloud 9yourusername: /workspace This bottom area is your terminal, where you will give the computer Cloud 9 has prepared for you instructions. You canresize that window to make it a bit bigger.Virtual Environment6
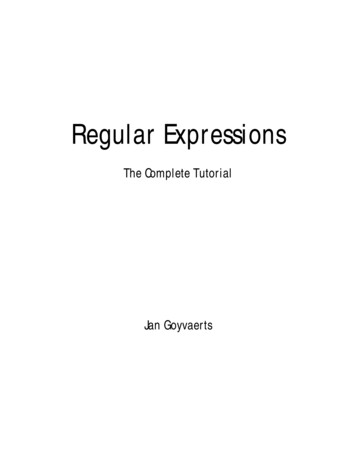
InstallationA virtual environment (also called a virtualenv) is like a private box we can stuff useful computer code into for a projectwe're working on. We use them to keep the various bits of code we want for our various projects separate so things don'tget mixed up between projects.In your terminal at the bottom of the Cloud 9 interface, run the following:Cloud 9sudo apt install python3.5-venvIf this still doesn't work, ask your coach for some help.Next, run:Cloud 9mkdir djangogirlscd djangogirlspython3.5 -mvenv myvenvsource myvenv/bin/activatepip install django 1.9.0(note that on the last line we use a tilde followed by an equal sign: ).GithubMake a Github account.PythonAnywhereThe Django Girls tutorial includes a section on what is called Deployment, which is the process of taking the code thatpowers your new web application and moving it to a publicly accessible computer (called a server) so other people can seeyour work.This part is a little odd when doing the tutorial on a Chromebook since we're already using a computer that is on theinternet (as opposed to, say, a laptop). However, it's still useful, as we can think of our Cloud 9 workspace as a place or our"in progress" work and Python Anywhere as a place to show off our stuff as it becomes more complete.Thus, sign up for a new Python Anywhere account at www.pythonanywhere.com.Install PythonFor readers at home: this chapter is covered in the Installing Python & Code Editor video.This section is based on a tutorial by Geek Girls Carrots o is written in Python. We need Python to do anything in Django. Let's start by installing it! We want you to installPython 3.5, so if you have any earlier version, you will need to upgrade it.WindowsYou can download Python for Windows from the website 1/. Afterdownloading the *.msi file, you should run it (double-click on it) and follow the instructions there. It is important to rememberthe path (the directory) where you installed Python. It will be needed later!One thing to watch out for: on the second screen of the installation wizard, marked "Customize", make sure you scroll downto the "Add python.exe to the Path" option and select "Will be installed on local hard drive", as shown here:7
InstallationIn upcoming steps, you'll be using the Windows Command Line (which we'll also tell you about). For now, if you need totype in some commands, go to Start menu All Programs Accessories Command Prompt. (On newer versions ofWindows, you might have to search for "Command Prompt" since it's sometimes hidden.)LinuxIt is very likely that you already have Python installed out of the box. To check if you have it installed (and which version itis), open a console and type the following command:command-line python3 --versionPython 3.5.1If you have a different 'micro version' of Python installed, e.g. 3.5.0, then you don't have to upgrade. If you don't havePython installed, or if you want a different version, you can install it as follows:Debian or UbuntuType this command into your console:command-line sudo apt-get install python3.5Fedora (up to 21)Use this command in your console:command-line8
Installation sudo yum install python3Fedora (22 )Use this command in your console:command-line sudo dnf install python3openSUSEUse this command in your console:command-line sudo zypper install python3OS XBefore you install Python on OS X, you should ensure your Mac settings allow installing packages that aren't fromthe App Store. Go to System Preferences (it's in the Applications folder), click "Security & Privacy," and then the"General" tab. If your "Allow apps downloaded from:" is set to "Mac App Store," change it to "Mac App Store andidentified developers."You need to go to the website 1/ and download the Python installer:Download the Mac OS X 64-bit/32-bit installer file,Double click python-3.5.1-macosx10.6.pkg to run the installer.Verify the installation was successful by opening the Terminal application and running thepython3command:command-line python3 --versionPython 3.5.1If you have any doubts, or if something went wrong and you have no idea what to do next, please ask your coach!Sometimes things don't go smoothly and it's better to ask for help from someone with more experience.Set up virtualenv and install DjangoPart of this section is based on tutorials by Geek Girls Carrots (https://github.com/ggcarrots/django-carrots).Part of this section is based on the django-marcador tutorial licensed under the Creative Commons AttributionShareAlike 4.0 International License. The django-marcador tutorial is copyrighted by Markus Zapke-Gründemann etal.Virtual environment9
InstallationBefore we install Django we will get you to install an extremely useful tool to help keep your coding environment tidy onyour computer. It's possible to skip this step, but it's highly recommended. Starting with the best possible setup will saveyou a lot of trouble in the future!So, let's create a virtual environment (also called a virtualenv). Virtualenv will isolate your Python/Django setup on a perproject basis. This means that any changes you make to one website won't affect any others you're also developing. Neat,right?All you need to do is find a directory in which you want to create theWindows it might look likeC:\Users\Name\(whereNamevirtualenv; your home directory, for example. Onis the name of your login).NOTE: On Windows, make sure that this directory does not contain accented or special characters; if your usernamecontains accented characters, use a different directory, for exampleFor this tutorial we will be using a new directorydjangogirlsC:\djangogirls.from your home directory:command-line mkdir djangogirls cd djangogirlsWe will make a virtualenv calledmyvenv. The general command will be in the format:command-line python3 -m venv myvenvWindowsTo create a newrunvirtualenv, you need to open the console (we told you about that a few chapters ago – remember?) andC:\Python35\python -m venv myvenv. It will look like this:command-lineC:\Users\Name\djangogirls C:\Python35\python -m venv myvenvwhereC:\Python35\pythonvirtualenvis the directory in which you previously installed Python andmyvenvis the name of your. You can use any other name, but stick to lowercase and use no spaces, accents or special characters. It isalso good idea to keep the name short – you'll be referencing it a lot!Linux and OS XCreating avirtualenvon both Linux and OS X is as simple as runningpython3 -m venv myvenv. It will look like this:command-line python3 -m venv myvenvmyvenvis the name of yourvirtualenv. You can use any other name, but stick to lowercase and use no spaces. It is alsogood idea to keep the name short as you'll be referencing it a lot!10
InstallationNOTE: On some versions of Debian/Ubuntu you may receive the following error:command-lineThe virtual environment was not created successfully because ensurepip is not available.On Debian/Ubuntu systems, you need to install the python3-venv package using the following command.apt-get install python3-venvYou may need to use sudo with that command.After installing the python3-venv package, recreate your virtualenvironment.In this case, follow the instructions above and install thepython3-venvpackage:command-line sudo apt-get install python3-venvNOTE: On some versions of Debian/Ubuntu initiating the virtual environment like this currently gives the followingerror:command-lineError: Command '['/home/eddie/Slask/tmp/venv/bin/python3', '-Im', 'ensurepip', '--upgrade', '--default-pip']'returned non-zero exit status 1To get around this, use thevirtualenvcommand instead.command-line sudo apt-get install python-virtualenv virtualenv --python python3.5 myvenvNOTE: If you get an error likecommand-lineE: Unable to locate package python3-venvthen instead run:command-linesudo apt install python3.5-venvWorking with virtualenvThe command above will create a directory calledmyvenv(or whatever name you chose) that contains our virtualenvironment (basically a bunch of directory and files).WindowsStart your virtual environment by running:command-lineC:\Users\Name\djangogirls myvenv\Scripts\activate11
InstallationNOTE: on Windows 10 you might get an error in the Windows PowerShell saysthis systemexecution of scripts is disabled on. In those cases open another Windows PowerShell and Run as Administrator try doing th
The Django Girls tutorial includes a section on what is called Deployment, which is the process of taking the code that powers your new web application and moving it to a publicly accessible computer (called a server) so other people can see your work. This part is a little odd when doing the tutorial on a Chromebook since we're already using a computer that is on the internet (as opposed to .


![Unreal Engine 4 Tutorial Blueprint Tutorial [1] Basic .](/img/5/ue4-blueprints-tutorial-2018.jpg)