Transcription
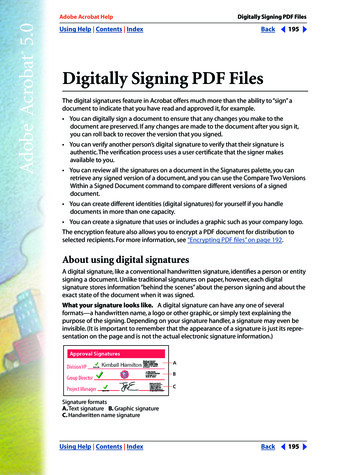
Adobe Acrobat HelpDigitally Signing PDF FilesUsing Help Contents IndexBack195Digitally Signing PDF FilesThe digital signatures feature in Acrobat offers much more than the ability to “sign” adocument to indicate that you have read and approved it, for example. You can digitally sign a document to ensure that any changes you make to thedocument are preserved. If any changes are made to the document after you sign it,you can roll back to recover the version that you signed. You can verify another person’s digital signature to verify that their signature isauthentic.The verification process uses a user certificate that the signer makesavailable to you. You can review all the signatures on a document in the Signatures palette, you canretrieve any signed version of a document, and you can use the Compare Two VersionsWithin a Signed Document command to compare different versions of a signeddocument. You can create different identities (digital signatures) for yourself if you handledocuments in more than one capacity. You can create a signature that uses or includes a graphic such as your company logo.The encryption feature also allows you to encrypt a PDF document for distribution toselected recipients. For more information, see “Encrypting PDF files” on page 192.About using digital signaturesA digital signature, like a conventional handwritten signature, identifies a person or entitysigning a document. Unlike traditional signatures on paper, however, each digitalsignature stores information “behind the scenes” about the person signing and about theexact state of the document when it was signed.What your signature looks like. A digital signature can have any one of severalformats—a handwritten name, a logo or other graphic, or simply text explaining thepurpose of the signing. Depending on your signature handler, a signature may even beinvisible. (It is important to remember that the appearance of a signature is just its representation on the page and is not the actual electronic signature information.)ABCSignature formatsA. Text signature B. Graphic signatureC. Handwritten name signatureUsing Help Contents IndexBack195
Adobe Acrobat HelpUsing Help Contents IndexDigitally Signing PDF FilesBack196Signing a document. Before you can digitally sign a document for the first time, youmust choose a signature handler (if you have more than one installed). If you haven’tinstalled any additional signature handlers, Acrobat Self-Sign Security will be used as thedefault signature handler. If Acrobat Self-Sign Security is your signature handler, you mustalso create a password-protected profile within the signature handler before you can sign.Verifying someone else’s signature. When you receive a document signed by a thirdparty, you should verify the signature to ensure that the document was indeed signed bythat person and has not been altered since it was signed.To verify the signature of a thirdparty, you need to import their user certificate.They can e-mail you their user certificate,or they can store it in a shared folder from which you can copy it. Similarly, if you send asigned document to a third party, you should e-mail them a copy of your certificate so thatthey can verify your signature. Alternatively, you can put a copy of your certificate in ashared folder.Checking a document for changes made since it was signed. Once a document issigned, any changes made since the signing are recorded in the Signatures palette.Youcan track changes made between signings using the Signatures palette or by comparingsigned versions of the document.Comparing versions of signed documents. You can easily see changes made betweentwo signed versions of a document using the Compare Two Versions Within a SignedDocument command. Acrobat will display the pages of the document side-by-side andhighlight the differences between the two documents.Selecting a signature handlerThe digital signatures feature in Acrobat uses a signature handler plug-in.You add, verify,and manage your signatures using commands and tools in the Acrobat interface, but thesignature handler plug-in determines the nature of the signatures—their appearance onthe page, the exact information stored in them, and the attributes and method used fortheir verification.The flexibility of this structure allows you to use whichever signingmethod your company or regulations require, with Acrobat providing a consistent andconvenient front end.Acrobat comes with the default signature handler Acrobat Self-Sign Security for basicsigning purposes. Self-Sign Security is included in the default Acrobat installation.Thirdparty signature handlers are available on the Acrobat CD for custom installation(Windows). For information on compatible handlers from third-party vendors, see theSecurity folder on the Acrobat CD and the Adobe Web site (www.adobe.com).Setting a default signature handlerYou set your default signature handler in the Digital Signatures Preferences dialog box.To set your default signature handler:1 Choose Edit Preferences General. Click Digital Signatures in the left pane of thePreferences dialog box.2 Choose a default signature handler.The pop-up menu lists all handlers installed in yourAcrobat Plug-ins folder (the default is Acrobat Self-Sign Security).3 Select Verify Signatures When Document Is Opened to determine if signatures will beverified automatically when a document is opened.Using Help Contents IndexBack196
Adobe Acrobat HelpUsing Help Contents IndexDigitally Signing PDF FilesBack1974 Click OK.About Acrobat Self-Sign SecurityAcrobat Self-Sign Security, the default Acrobat signature handler, provides a quick andeasy method of signing documents using a private/public key (PPK) system to verify theauthenticity of signatures and the integrity of signed document versions. (This is a directtrust system.) You can also use Acrobat Self-Sign Security to encrypt PDF files, as describedin “Encrypting PDF files” on page 192.In Acrobat Self-Sign Security, each signature is associated with a profile that containsunique security data—a private key and a public key.The private key is a passwordprotected numerical value that allows the user to sign a document.The public key isembedded in the digital signature and is used to mathematically verify digital signatureswhen the signatures are verified.The private key encrypts a checksum that is stored with asignature when you sign; the public key decrypts the checksum when you verify. (AcrobatSelf-Sign Security uses the RSA algorithm for generating private/public key pairs and theX.509 standard for certificates.)Because other users must have access to your public key to verify your signature, yourpublic key is contained in a certificate that can be shared. (See “Managing user certificates”on page 205.) This system of sharing certificates used by Acrobat Self-Sign Security isreferred to as direct-trust, which means that you share directly with other users rather thangoing through a third-party agent.Note: Acrobat Self-Sign Security does not include a public-key infrastructure with thirdparty certification and is not intended to serve all signing purposes. See the Security folderon the Acrobat CD or the Adobe Web site (www.adobe.com) for information on signaturehandlers with more advanced features.Setting up profiles in Acrobat Self-Sign SecurityBefore you can sign documents with Acrobat Self-Sign Security, you must set up aprofile—a password-protected file—containing your name, your password, and otherbasic attributes.You may want to create more than one profile if you sign documents indifferent roles.Creating profilesYour profile file stores your private key (encrypted), your public key (wrapped in a certificate), your list of trusted certificates (certificates of other users), and a time-out valuerepresenting when a password is required for signing.The name of the file is the profilename you provide, plus the extension .apf.Important: Always make a backup copy of your profile file. If your profile file is lost orcorrupted, or if you forget your password, you cannot add or verify signatures with thatprofile. (See “Backing up your profiles” on page 198.)To create a profile:1 Assuming you are not already logged in to a profile, do one of the following: Choose Tools Self-Sign Security Log In. Choose Tools Digital Signatures Sign Document. Click OK in the Digital SignaturesAlert dialog box, and drag on the page to create a signature box.Using Help Contents IndexBack197
Adobe Acrobat HelpDigitally Signing PDF FilesUsing Help Contents Index Back198Select the digital signature tool, and drag to create a signature box.2 In the Log In dialog box, click New User Profile.3 In the Create New User dialog box, enter a name for your user profile. Do not useaccented characters or any of the following characters: ! @ # % & *, double quotationmarks, and \ ; . When you add a signature to a document, this user profile name isthe name you’ll see in the Signatures palette. It is also the name that will appear in thesignature field.4 Enter a password containing at least six characters.You need to enter the samepassword in both the User Password and Confirm Password text boxes.5 Click OK.6 Click Save.The default location for saving your profile file is the Acrobat Preferencesfolder (Windows) or the Adobe Acrobat 5.0 folder (Mac OS).7 Do one of the following: Click OK to end the profile creation process. Click User Settings to change the profile’s password, and password options, to set theappearance of your signature, to configure picture appearances, or to add certificatesto your list of trusted certificates.Backing up your profilesAcrobat Self-Sign Security does not automatically back up your profiles.You should createa backup file whenever you create a new profile.To back up your profile:1 Choose Tools Self-Sign Security User Settings. (You must be logged into yourprofile.)2 In the User Settings dialog box, select User Information in the left panel.3 For Profile File, click Backup. Browse to select a location for your backup file, and clickOK (Windows) or Backup (Mac OS).4 Click Close.Adding graphics to signaturesYou can use a picture or a combination of graphics and words as your digital signature.You might want to include your company logo or use an image of your handwrittensignature.The amount and type of information that can be contained in a digital signaturealso means that it can meet legal requirements.You can also write text on a Palm organizer, store the text as a picture, and then use thepicture in a digital signature. Most often, the text is a handwritten signature, but you canalso use this feature to create a short handwritten message or a freehand drawing toappear with digital signatures. Acrobat provides an application to use for writing text onyour Palm organizer. For information, see the Adobe Web site (www.adobe.com).To add a picture to a signature:1 Create or import a picture from any authoring application, place the graphic on a pageby itself, and convert the file to PDF.Using Help Contents IndexBack198
Adobe Acrobat HelpDigitally Signing PDF FilesUsing Help Contents IndexBack199When you use the picture in a signature, Acrobat Self-Sign Security copies only the pictureout of the page, not the white space around it. Self-Sign Security crops and scales thepicture to fit in the signature field.2 Log in to Acrobat Self-Sign Security as described in “Logging in to a profile” onpage 201, and choose Tools Self-Sign Security User Settings.3 Select Signature Appearance in the left pane of the User Settings dialog box, and clickNew.4 In the Configure Signature Appearance dialog box, enter a title for the picture.Yourcurrent signature is shown in the preview box.Note: When you sign a document later, you’ll select the picture by its title, so use a shorttitle that describes the image accurately.5 For Configure Graphic, select Imported Graphic and click PDF File.6 In the Select Picture dialog box, click Browse to locate the file. (Your picture file must bein PDF format.) Click OK (Windows) or Open (Mac OS).Note: The Palm Organizer button will be grayed out unless Acrobat Self-Sign SecuritySecurity detects that Palm Organizer files are present. For information on importinggraphics created on Palm Organizers, see the Adobe Web site (www.adobe.com).7 In the Configure Text panel, select any text items you want to appear with the pictureon document pages: Distinguished Name to show the user attributes defined in the profile, which mayinclude common name, organization, and country. Labels to display labels such as Signed by, Date, and Reason with any text in thesignature appearance.8 Click OK in Configure Signature Appearance, and click Close in User Settings.To edit or delete a picture:1 Log in to Acrobat Self-Sign Security as described in “Logging in to a profile” onpage 201, and choose Tools Self-Sign Security User Settings.2 Select Signature Appearance in the left pane of the User Settings dialog box.3 Do one of the following: To edit a picture, select the appropriate name in the right pane, and click Edit.You canchange the title, select a different graphic, or change the text items, as described in theprocedure for configuring a new picture. To delete a picture from the configuration file, select the name of the picture in theright pane, and click Delete.Changing your password optionsYou can change both your profile password and how and when Acrobat Self-Sign Securityprompts for a password.Changing your passwordYou can change the password for your user profile at any time. Changing your passworddoes not change your signature.Using Help Contents IndexBack199
Adobe Acrobat HelpUsing Help Contents IndexDigitally Signing PDF FilesBack200To change your password:1 Log in to Acrobat Self-Sign Security as described in “Logging in to a profile” onpage 201, and choose Tools Self-Sign Security User Settings.2 In the User Setting dialog box, select Change Password in the left pane.3 Enter your current password in the old password text box.4 Enter your new password in the New Password and Confirm Password text boxes, andclick Apply.Your password must contain at least six characters and may not contain thefollowing characters: ! @ # % & *, double quotation marks, and \ ; . You must enterthe same password in both boxes.5 Click Apply, and click OK in the alert that appears.6 Click Close.Changing your password time-out optionsBy default, your profile is preset to prompt for a password every time you sign adocument.You can change it to prompt only after a certain period of time has elapsed orto never prompt for a password.To change password time-out options:1 Log in to Acrobat Self-Sign Security as described in “Logging in to a profile” onpage 201, and choose Tools Self-Sign Security User Settings.2 In the User Settings dialog box, select Password Timeout in the left pane.To change when a password should be required, choose a value from the pop-up menu,and enter your password in the text box. Click Apply, and click OK in the alert that appears.The periods of time in the menu give the amount of time that has passed since you lastentered a password while logged in to Acrobat Self-Sign Security in the current session.Working with signaturesA document in Acrobat can be signed more than once and by more than one person.Thefirst time a document is signed, it is saved in an append-only form of Adobe PDF that canbe appended to but not altered. Every time the document is signed after that, the newsignature and any changes made since the preceding version are appended to the file.When you view a document with more than one signature, you’re viewing the most recentversion, but you can open an earlier version in a separate file and compare the twoversions to see changes between them.In Acrobat 5.0, the digital signatures feature enables your signature handler to add digitalsignatures to PDF files, supports the Signature navigation pane, gives access to all thesignatures in a document, and supports the Compare commands.Important: Because a document is saved in append-only form the first time it is signed,you can only append changes to the file (using Save As); you cannot do a full save (usingSave). A full save will invalidate all signatures.Using Help Contents IndexBack200
Adobe Acrobat HelpUsing Help Contents IndexDigitally Signing PDF FilesBack201Logging in to a profileYou need to be logged in to your profile before you can sign documents or verify signatures. If you sign a document using the digital signatures feature or the digital signaturetool, you will be prompted to log in to your profile (if you have not already done so) beforeyou can sign the document.To log in to a profile:1 Choose Tools Self-Sign Security Log In. (If you are already logged in to a profile, thiscommand changes to Log In As Different User. If you have multiple profiles, use thiscommand to log in to one of your other profiles.)2 Choose a profile.The pop-up menu lists the most recently opened or created profiles.Or click Find Your Profile File, and browse to find a profile.3 Enter your password, and click Log In.4 If an alert appears confirming that you are logged in, click OK.Your Acrobat Self-SignSecurity preference settings determine whether this alert appears.To log out of a profile:Choose Tools Self-Sign Security Log Out profile name .About signature fieldsWhen you sign a document, your signature and the related information are stored in asignature field embedded on the page. A signature field is an Acrobat form field.You can add a signature field to a page as you sign, or you can use the form tooltocreate an empty signature field that can be signed later. When you create a signature fieldwith the form tool, you can have Acrobat execute a script or lock all fields in the documentwhen it is signed.You can also customize the field in several other ways. For informationon creating empty signature fields with the form tool, see “Creating signature fields” onpage 150.Note: If you’re signing an existing field, be aware that the document author may have putduplicates of the field on other document pages. For example, sometimes a field is copiedto the same place on every page. You need to sign the field only once, and your signaturewill appear in all occurrences of the field. This is sometimes done to allow quick initialingof every page in a document.Adding signatures to a documentYou can sign a document in several ways, both visibly and invisibly. Invisible signatures donot appear in the document, but they are visible in the Signatures palette. (In Acrobat 5.0,invisible signatures are added to the page of the document currently being viewed whenthe signature is added; in Acrobat 4.0, invisible signatures were added only to the firstpage of a document.)Note: If you delete a page that carries a signature, visible or invisible, the signature isdeleted also.When you add a signature with Acrobat Self-Sign Security as your signature handler, yoursignature is verified automatically. Adding a signature does not affect the verificationstatus of existing signatures in the document. For more information on the appearance orstatus of digital signatures in Acrobat Self-Sign Security, see “Verifying signatures” onpage 203.Using Help Contents IndexBack201
Adobe Acrobat HelpDigitally Signing PDF FilesUsing Help Contents IndexBack202To sign a document:1 If you are not already logged in to a profile, choose Tools Self-Sign Security Log In.2 In the Log In dialog box, choose your profile from the pop-up menu, or click Find YourProfile File and use the browser to find a profile.Then enter your password for the profile,click Log Inn and click OK.3 If you are logged in to a digital signatures profile, do one of the following: To fill in an existing signature field, click the unsigned field in the document pane, orselect the unsigned field in the Signatures palette and choose Sign Signature Field fromthe Signatures palette menu. Right-click (Windows) or Control-click (Mac OS) the existing signature field in thepalette or document, and choose Sign Signature Field from the context menu. Choose Tools Digital Signatures Sign Document, and click OK. To add a new signature field and sign at the same time, select the signature tooland drag to draw the field. To sign the document invisibly, choose Tools Digital Signatures Invisibly SignDocument.4 In the Sign Document dialog box, enter your password in the Confirm Password textbox. (You determine how often your password is required in the User Settings dialog box;the default is to require your password every time you sign.) Click Show Options to enter areason for signing the document.You can either type a reason or choose one from thepop-up menu. Additionally, you can enter a location for the signature, such as your city,state, or country, or the hostname of your computer, and you can add contact informationfor validation purposes.5 Choose a signature appearance. Standard Text displays the icon with the distinguishedname defined in the profile, the date and time of the signing, and the reason for signing. Ifyou have defined a personalized signature, choose it from the pop-up menu.To create anew signature appearance, click New and follow the steps in “Adding graphics to signatures” on page 198. To preview your signature before signing the document, click Preview.6 Click Save.To save the file under a different name, click Save As, enter a filename, specifya location for the file, and click Save.Note: Except in your file system (Windows Explorer, for example) you will not have anotheropportunity to use Save As on the document (because Save As invalidates existing signatures), so you may want to use a name that is not based on a date or a particular version.The new signature appears as the last item in the Signatures palette.Adding signatures to a document in a browserSigning a document in a browser as opposed to in Acrobat is slightly different. When yousign a document in a browser, only the incremental portion of the file is saved to your harddrive. (You will notice that there is a Sign rather than a Save or Save As button when yousign the document.) To save a copy of the signed document, you must save the copy in thebrowser to your hard drive.To sign a document in a browser:1 Select the digital signature tool and drag to draw a rectangle on the document.Using Help Contents IndexBack202
Adobe Acrobat HelpUsing Help Contents IndexDigitally Signing PDF FilesBack2032 If you are not logged in to a profile, in the Log In dialog box, choose your profile, enteryour password, and click Log In. For information on creating a new profile, see “Creatingprofiles” on page 197.3 If you are already logged in to a profile, click Show Options to enter a reason for signingthe document.You can either type a reason or choose one from the pop-up menu.Additionally, you can enter a location for the signature, such as your city, state, or country,or the hostname of your computer, and you can add contact information.4 Click Sign, and click Save in the Save As dialog box.5 To retain a copy of the signed document, click the Save a Copy of the File button on thetoolbar, browse to select a location in which to save the file, and enter a name for the file.You must save the file in this way to retain a copy.Verifying signaturesWhen you verify a signature that was added with Acrobat Self-Sign Security, Acrobat canconfirm the authenticity of the signature in two ways: Acrobat checks to see that the document and the signature have not been altered sincethe signing. If you are logged in to a profile and have the signer’s user certificate in your profile’s listof trusted certificates, Acrobat compares information in the signature against the certificate to verify the identity of the signer.You can view a signature’s verification status on the document page and in the Signaturespalette.To verify a signature:1 In an open document, do one of the following: Click the signature in the document pane. A dialog box indicates the status of thesignature. Click Properties to access the Signature Properties dialog box. Click VerifyIdentity to check fingerprint information. Right-click (Windows) or Control-click (Mac OS) on the signature, and click ValidateSignature. In the Validation Status dialog box, on Windows click Verify Identity (if youare logged in) or Log In (if you are not logged in, and follow the login process); on MacOS click Properties and click Verify Identity in the Signature Properties dialog box.2 In the Verify Identity dialog box, follow the on-screen instructions for verifying fingerprint information. Click Add to List when you are sure that this is a valid user certificate.(Click Details to see information about the signer.)3 Click OK in the Alert dialog box, and click Close in the Validation Status dialog box toverify the signature.Deleting signatures and clearing signature fieldsYou can remove a signature totally or you can clear a signature field (that is, delete thesignature but leave the empty signature field). As with other edits you make to a signeddocument, this adds another version to the document without altering earlier versions.Another user can roll back to an earlier version to see the original signature.To remove a signature or clear a signature field:1 Do one of the following:Using Help Contents IndexBack203
Adobe Acrobat HelpDigitally Signing PDF FilesUsing Help Contents IndexBack204 To remove a signature, select the signature in the Signatures palette, and choose DeleteSignature Field from the Signatures palette menu. (Shift-click to add more signatures tothe selection.) Or right-click (Windows) or Control-click (Mac OS) the signature in thepalette or document pane, and choose Delete Signature Field from the context menu.The signature is removed, and the Signatures palette notes that the document wasmodified. To remove a signature and leave the empty signature field, select the signature in theSignatures palette, and choose Clear Signature Field from the Signatures palette menu.(Shift-click to add more signatures to the selection.) Or right-click (Windows) orControl-click (Mac OS) the signature in the palette or document pane, and choose ClearSignature Field from the context menu.The signature is removed, and the Signaturespalette notes that the document was altered after the last signing.The digital signatureiconin the Signatures palette indicates the presence of the empty signature field. To clear all signature fields in a document, choose Tools Digital Signatures Clear AllSignature Fields.Tracking digital signatures in the Signatures paletteThe Signatures palette lists all the signatures in the current document (with their status), inthe order they were added.You can collapse a signature to see only a name, date, andstatus, or you can expand it to see more information.To show the Signatures palette:Choose Window Signatures, or click the security key iconin the status bar andchoose Show Signatures from the security key pop-up menu.The security key menu isavailable only when a document has signatures or other security properties.To expand or collapse a signature in the palette:Click the plus sign (Windows) or triangle (Mac OS) to the left of the signature to expand it.Click the minus sign (Windows) or the rotated triangle (Mac OS) to the left of the signatureto collapse it.Expanded signatureEach signature in the palette has an icon identifying its current verification status. For anexplanation of these icons, see “Verifying signatures” on page 203.If you edit a signed document, the question mark icon indicates that the document hasbeen modified with the signature in the Signatures palette.Using Help Contents IndexBack204
Adobe Acrobat HelpDigitally Signing PDF FilesUsing Help Contents IndexBack205Getting information on signaturesYou can open a dialog box to view an explanation of a signature’s verification status, thedocument version the signature applies to, and information such as date and time of thesigning.This dialog box is not editable, but you can copy text from it and click buttons towork with the signature.To get information on a signature:1 Select the signature in the Signatures palette, and choose Properties from the Signatures palette menu. Or right-click (Windows) or Control-click (Mac OS) the signature in thepalette or document pane, and choose Properties from the context menu.2 In the Signature Properties dialog box, do any of the following: To verify the signature, click Verify Signature.This also updates information in the dialogbox. To view user attributes, verification parameters, and other information on thesignature’s certificate, click Show Certificate. (See “Getting information on certificates”on page 206.) This button is available only if the signature has been verified.3 Click Close.Viewing earlier versions of a signed documentIf a document is signed more than once, Acrobat maintains all of the signed versions in asingle Adobe PDF file. After the first time a document is signed, and each time thedocument is signed, a version is saved as append-only to ensure that it will not be altered.All signatures and the versions of the document corresponding to those signatures arelisted in the Signatures palette.To open an earlier signed version:Select the signature in the Signatures palette, and choose View Signed Version from theSignatures palette menu. Or right-click (Windows) or Control-click (Mac OS) the signaturein the palette or document pane, and choose View Signed Version from the context menu.The earlier version opens in a new Adobe PDF file, with the version information and thename of the signer in the title bar.To compare two versions of a signed document:For information on comparing t
Adobe Acrobat Help Digitally Signing PDF Files Using Help Contents Index Back 196 Signing a document. Before you can digitally sign a document for the first time, you must choose a signature handler (if you have more than one installed). If you haven't installed any additional signature handlers, Acrobat Self-Sign Security will be used .