Transcription
Using ODI for Teradata Dual-LoadsPurposeThis tutorial walks you through the steps that are needed to create Oracle Data Integrator (ODI) EL-T interfacesand packages that will simultaneously load two independent Teradata RDBMS systems configured as dual-active.The source for the data loads is an Oracle database.Time to Complete: Approximately 120 minutesTopicsThis tutorial covers the following topics:1.2.3.4.5.6.7.8.9.10.11.OverviewTeradata Dual-Load Architecture using ODIInstallation & Setup PrerequisitesSetup the ODI EnvironmentSetup the Source and Destination DatabasesCreate Oracle to Flat File InterfaceCreate Interfaces for Scenario 1Create Interfaces for Scenario 2Execute Tests for Scenario 1Execute Tests for Scenario 2SummaryNote: The screenshots will not reflect the specific environment that you are using. They are provided to give youan idea of where to locate specific functionality in Oracle Data Integrator.1. OverviewA Teradata dual-active system is recommended for high availability of Teradata systems and guaranteesbusiness continuity by having the data always available in a secondary system when the primary becomesunavailable.One method of loading a dual-active Teradata system is by using a dual-load approach. Dual-loads performmassive data loads and transforms from the same source into two separate Teradata systems, one of which isdesignated as Primary and the other as Secondary. Dual-loads can be performed using multiple scenarios, butthe two most popular scenarios are: Scenario 1 - Parallel Loads and Transforms on Primary and SecondaryScenario 2 - Load and Transform on Primary and Replicate to SecondaryThe first scenario is recommended when it is expected that the frequency of updates on the source system will beless and the data volumes involved in synchronization is high. This scenario will provide the best loadingperformance while guaranteeing the least overhead.The second scenario eliminates the need to run transformations on the secondary system since the data will beloaded and transformed on the primary and then only the changed (and transformed) data will be pushed to thesecondary system.This tutorial will cover both scenarios. For more information on the architecture of Teradata dual-loads using ODI,refer to the whitepaper “Enabling Teradata Dual Active using Oracle Data Integrator”.2. Teradata Dual-Load Architecture using ODIThe dual-load process deals with loading two systems in parallel with the same data. . The loading solution musttake into account the fact that either system may be down at any point in time and miss one or several 2010 Oracle CorporationUsing ODI for Teradata Dual-LoadsPg. 1
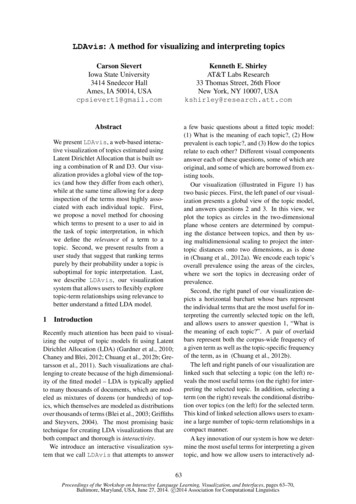
Using ODI for Teradata Dual-Loadsloading/synchronization cycles. The loads should be smart enough to catch-up once the system becomesavailable.2.1.Scenario 1 - Parallel Loads and Transforms on Primary and Secondary:In this scenario, a first job will extract data from the source Oracle system. Then, two separate processes willload each of the target Teradata systems. Transformations will be performed in parallel on both systems, andexecution can be monitored independently on each of the target system.Figure 1: Scenario 1 – Parallel Loads and Transforms on Primary and Secondary2.1.1.ExtractThe extraction is performed only once since reading twice from the source system would becounterproductive. But as the extraction is performed, one of the target systems (or both) could bedown. To guarantee the delivery of information, extracted data must first be staged in flat files. Each fileextract is numbered with a Batch ID to enable recovery when needed. Each set of extracted files isstored in a directory which is named after the Batch ID. Each table dump will be stored as a file in thisdirectory.The next run creates a new directory where the new files will be created. As soon as both systems haveloaded a given sets of files, the files can be discarded and the directory can be deleted or archived.The Extract can be smart enough to implement change data capture from the source system. There aremultiple ways of enabling changed data capture using ODI, but for the purpose of this tutorial, we willuse a simple timestamp method using which we will stamp a Date/Time field on the rows that areinserted or modified on the source table. The extract process will then store the highest processedtimestamp in a variable, and use its value to determine the rows that will be extracted in the next run.2.1.2.LoadThe Load operation will be exactly the same on both systems: we have to perform a traditional ELToperation, using which the files are bulk loaded into a staging area on the target system (using 2010 Oracle CorporationUsing ODI for Teradata Dual-LoadsPg. 2
Using ODI for Teradata Dual-LoadsTPT/FastLoad) and then transformed to guarantee the best possible performance. As the same loadprocess runs on both the Primary and Secondary systems, the transformation process will bedeveloped only once and executed against multiple systems. ODI provides several mechanisms thatcan be leveraged to run the same job on different physical environments, via the notion of contexts.Contexts define different physical environments for the same logical processing units. Variables canalso be used here as an alternative to contexts to access the different systems dynamically.When loads are not processed because one of the system is non-operational, the scenario must ensurerecovery of failed jobs. The solution here is simply to run the process and increment the Batch ID untilall available files have been processed.2.1.3.TransformA simple transformation during the load process will be demonstrated in this tutorial. By using contextsor variables, the transformations can be developed once and executed on both systems.2.1.4.CleanupThe staging files after being loaded to both Teradata systems would need to be cleaned up to savespace. This process can be very easily built using ODI and is not discussed in this tutorial.2.2.Scenario 2 - Load and Transform on Primary and Replicate to Secondary:This scenario will perform loads on the Primary Teradata system from the Oracle database using the stepsand packages created in scenario 1. Once the data is loaded into the Primary Teradata system, the scenario2 will replicate the data from the Primary system to the Secondary Teradata system, instead of the secondarysystem getting loaded from the Oracle database like scenario 1.The extract and transformations processes created in scenario 1 will be used in this process to load into thePrimary Teradata system. One the data is in the primary system, there will be a Replicate package that willreplicate the data loaded from the primary system to the secondary system. The method of capturing changesin the Replicate package is to utilize a simple timestamp based mechanism that identifies theinserted/updated rows in the Primary system. The replicate package will pull these rows based on thistimestamp, and the last run of the Replicate package.The benefit of scenario 2 is that the transformations will be performed only once, on the Primary Teradatasystem, as opposed to scenario 1, which will run transformations on the Primary and the Secondary Teradatasystems. 2010 Oracle CorporationUsing ODI for Teradata Dual-LoadsPg. 3
Using ODI for Teradata Dual-LoadsFigure 2: Scenario 2 - Load and Transform on Primary and Replicate to Secondary3. Installation and Setup PrerequisitesBefore you start the tasks, make sure that the following requirements have been met: The system should include the following installed products:oooooOracle Database (10g, 11g or 10gXE)Oracle Data Integrator 10g (10.1.3.5)Primary Teradata systemSecondary Teradata systemOracle Data Integrator 10g (10.1.3.5) Agent installations on primary Teradata You should have successfully completed the Oracle by Example (OBE) titled “Creating and Connectingto ODI Master and Work Repositories” before attempting this tutorial. Click here to access this OBE. You should have downloaded the zip file that contains the ODI seed projects and models used in thistutorial. Click here to download the required files.Note 1: Before proceeding further, start the services and components to start the Oracle Database, both theTeradata systems, and Oracle Data Integrator 10g (10.1.3.5) Agent on the Teradata primary system.Note 2: For the purposes of this tutorial, the ODI software and the source Oracle Database are installed on thesame machine. Also, we will be using one ODI Agent to service both Teradata systems.4. Setup the ODI Environment4.1.Configure ODI TopologyThe ODI Topology must be configured to access the Teradata systems, Oracle sources, Flat file sources andthe ODI Agents. The ODI Topology defines the Physical Architecture, the Logical Architecture as well asthe Contexts that associate a logical architecture with the physical. 2010 Oracle CorporationUsing ODI for Teradata Dual-LoadsPg. 4
Using ODI for Teradata Dual-LoadsThe following sections provide the steps necessary to modify the Topology.4.1.1.Login to the Repository using Topology ManagerClick on “Start - All Programs - Oracle - Oracle Data Integrator - Topology Manager” from theStart Menu.Login to the repository using the “SUPERVISOR” account.4.1.2.Create ContextsFor the purpose of this lab, we will create two contexts identifying the primary and secondary Teradatasystems. All loads that run on the primary Teradata system will run under the “Primary” context andthe ones for secondary Teradata system will run under the “Secondary” context. The extracts from theOracle source will run under the “Global” context.4.1.2.1. Create the Primary Context: This context will be associated with the primaryTeradata system - TD1.Click on the “Contexts” tab from the Topology Manger window. Click on the “InsertContext”icon to get the dialog-box to enter the new context.Note: If the Insert Context icon is not visible, then from the Topology Manager, click on“Windows - Show View - Contexts”Click on the “Definition” tab and enter the name for the new context as “Primary”. Leave allother items as default.Click “OK” to create the primary context.4.1.2.2. Create the Secondary Context: This context will be associated with the secondaryTeradata system - TD2. 2010 Oracle CorporationUsing ODI for Teradata Dual-LoadsPg. 5
Using ODI for Teradata Dual-LoadsClick on the “Insert Context” iconagain to get the dialog-box to enter the new context.Then click on the “Definition” tab. Enter the name as “Secondary”. Leave all other items asdefault. Click “OK” to create the Secondary Context.The Context pane should look similar to the one below:4.1.3.Configure ODI Agents in the TopologyNote: Make sure the ODI Agent is started on the primary Teradata system before proceedingwith this step.4.1.3.1. Click on “Physical Architecture” tab, right-click on “Agents” and select “InsertAgent”.4.1.3.2.Enter the below information for the Agent.NameTD1 AgentHost Teradata Host Where Teradata Host is the hostname or IP Address of theprimary Teradata system. Leave all other information as default. 2010 Oracle CorporationUsing ODI for Teradata Dual-LoadsPg. 6
Using ODI for Teradata Dual-LoadsClick “Apply” and then click “Test” and you should see the below message:Click “OK” to close the message, and “OK” to close the Agent configuration window.You should end up with the below Agent in the Physical Architecture tab.Note: In this tutorial, we will be configuring only one ODI Agent on the primary Teradata systemonly. The same agent will handle execution of jobs on the secondary system.Note: The source Oracle database runs on the same system as the ODI software, there is noneed to configure an Agent for the source.4.1.3.3. Click on the “Logical Architecture” tab and right-click “Agents” and select “InsertLogical Agent”.4.1.3.4.Enter “TD Agent” as the name.Associate “TD1 Agent” to the Primary and the Secondary contexts. Click “OK”.4.1.3.5. 2010 Oracle CorporationYou should end-up with one Logical Agent as shown below:Using ODI for Teradata Dual-LoadsPg. 7
Using ODI for Teradata Dual-Loads4.1.4.Setup and configure the Teradata systems in the ODI Topology.4.1.4.1.Configure the primary Teradata system.Select the “Physical Architecture” tab and expand the “Technologies” folder, right-click on“Teradata” and select “Insert Data Server”.4.1.4.2. In the Data Server New window, click on the “Definition” tab and enter the belowinformation. 2010 Oracle CorporationUsing ODI for Teradata Dual-LoadsPg. 8
Using ODI for Teradata Dual-LoadsNameTD1Server (Data Server) Teradata Server UserDBCPasswordDbcWhere Teradata Server is the hostname or IP Address of the Primary Teradatasystem.4.1.4.3. Click the “JDBC” tab. Click the ellipses ( ) to enter the JDBC Driver information.Select the “NCR Teradata JDBC Driver” from the drop-down.Click “OK” on the Drivers dialog box.Important Note: Make sure that you copy the NCR Teradata JDBC Drivers (mainly theterajdbc4.jar, tdgssconfig.jar and tdgssjava.jar files) to the ODI HOME/oracledi/driversdirectory. ODI needs the drivers placed in this location in order to connect to Teradata viaJDBC.4.1.4.4.Enter the JDBC URL.The URL is of the form “jdbc:teradata:// host : port / server ”, where host is thehostname of the Teradata system, port the port it’s configured to listen on, and server isthe server name. The below example assumes that the staging tables are created in the“financial” schema.Note: If you do not have the “financial” Schema created in the Teradata environments, thenyou should create it prior to proceeding with the rest of the steps. Alternatively, you couldreplace the financial schema referenced in this tutorial with the schema of your choice. 2010 Oracle CorporationUsing ODI for Teradata Dual-LoadsPg. 9
Using ODI for Teradata Dual-LoadsClick on “Test” to test the connection.Select the “TD1 Agent” from the drop-down. Click “Test” again. You should get a successfulconnection message like the one below.Click “OK”, then click “OK” again to close the Data Server New window. This will add the newTeradata server “TD1” to the Physical Architecture.4.1.4.5.Set the physical schema and the work schema for the TD1 connection.In the Properties box that opens, select “financial” from the “Schema (Schema)” drop-downand “financial” from the “Schema (Work Schema)” drop-down. 2010 Oracle CorporationUsing ODI for Teradata Dual-LoadsPg. 10
Using ODI for Teradata Dual-LoadsClick “OK”. Click “OK” again when prompted for “No Context specified for this Schema”.We will create the context in the later steps.4.1.4.6.Configure the Secondary Teradata System.Repeat Steps 4.1.4.1 through 4.1.4.5 in order to configure the secondary Teradata system.Modify the hostname or the IP address of the secondary system as appropriate. Also note thatwe will be using TD1 Agent to connect to this system.Note: If you wish to configure the secondary Teradata system on a different schema on theprimary Teradata system, then replace the “financial” schema identified in steps 4.1.4.1through 4.1.4.5 with the schema of your choice.NameTD2Server (Data Server) Teradata Server UserDBCPasswordDbcWhere Teradata Server is the hostname or IP Address of the PrimaryTeradata system.4.1.4.7.Create the Teradata Logical Schema.Click on the “Logical Architecture” tab and expand “Technologies - Teradata”. Right-clickon “Teradata” and select “Insert Logical Schema”. 2010 Oracle CorporationUsing ODI for Teradata Dual-LoadsPg. 11
Using ODI for Teradata Dual-Loads4.1.4.8. Enter “TD” as the name. Select “TD1.financial” physical schema for the Primarycontext and “TD2.financial” physical schema for the Secondary context. Leave otherselections as default.Click “OK”. The logical schema TD should be created as shown below.4.1.5.Configure the Oracle Data source Physical and Logical Schemas.4.1.5.1. Create the Oracle schema for storing the source tables. This tutorial will use thesales history (SH) schema that comes pre-installed with the Oracle example schemas.SQL create user SH identified by password default tablespace USERS temporary tablespace TEMP;SQL grant connect, resource to SH;4.1.5.2. Select the “Physical Architecture” tab and expand the “Technologies” folder,right-click on “Oracle” and select “Insert Data Server”.In the Data Server New window, click on the “Definition” tab and enter the below information.Name 2010 Oracle Corporation Oracle SID Using ODI for Teradata Dual-LoadsPg. 12
Using ODI for Teradata Dual-LoadsServer (Data Server) host UserSHPassword password Where Oracle SID is the SID of the source Oracle system, host isthe hostname or IP Address of the Oracle system, password is thepassword for SH user.4.1.5.3. Click the JDBC tab. Click the ellipses ( ) to enter the JDBC Driver information.Select the “Oracle JDBC Driver” from the drop-down.Click “OK” on the Drivers dialog box.4.1.5.4.Enter the JDBC URL.Click the ellipses ( ) besides the JDBC URL to enter the JDBC URL information.Select the “jdbc:oracle:thin@ host : port : sid ” from the drop-down. Where host isthe server running the Oracle database, port is the listener port, and sid is the DatabaseSID.Enter the JDBC URL that is appropriate for your environment. The URL used for this tutorial is“jdbc:oracle:thin:@xpobi-1-vm:1521:ORCL”. This means that the Oracle database server isrunning on xpobi-1-vm, the listener is configured on the default 1521 port, and ORCL is thedatabase SID. 2010 Oracle CorporationUsing ODI for Teradata Dual-LoadsPg. 13
Using ODI for Teradata Dual-LoadsClick on “Test” to test the connection.Select the “Local (No Agent)” from the drop-down. Click “Test” again. You should get aSuccessful connection window like the one below.Click “OK”, then click “OK” again to close the Data Server New window. This will add the newOracle server “ORCL” to the Physical Architecture.4.1.5.5.Set the Physical Schema and the Work Schema for the ORCL connection.In the Properties box that opens, select “SH” from the “Schema (Schema)” drop-down and“SH” from the “Schema (Work Schema)” drop-down. 2010 Oracle CorporationUsing ODI for Teradata Dual-LoadsPg. 14
Using ODI for Teradata Dual-LoadsClick “OK” and click “OK” again when prompted for “No Context specified for thisSchema”. We will create the context in the later steps.4.1.5.6.Create the Oracle Logical Schema.Click on the “Logical Architecture” tab, expand “Technologies - Oracle”. Right-click on“Oracle” and select “Insert Logical Schema”.Enter “ORCL SH” as the name. Select “ORCL.SH” as the Physical Schema for “Global”,“Primary” and the “Secondary” contexts.Click “OK”. The logical schema ORCL should be created as shown below. 2010 Oracle CorporationUsing ODI for Teradata Dual-LoadsPg. 15
Using ODI for Teradata Dual-Loads4.1.6.Configure the Physical and Logical Schemas for the Flat File Source.In this step, we will be modifying the existing FILE GENERIC source that comes pre-installed in theODI Topology.Note: If you do not see a FILE GENERIC source in your tree then add one. For instructions on addingFile sources in ODI, refer to Oracle by example “Creating ODI Project and Interface: ExportingRelational Table to Flat file”. Click here to access this OBE.4.1.6.1.Configure the Flat File Physical Source.Select the “Physical Architecture” tab and expand the “Technologies - File” folder, anddouble-click on the “FILE GENERIC” source.4.1.6.2. In the Data Server New window, click on the “Definition” tab and enter the belowinformation.NameFILE GENERICServer (Data Server) host Where host is the hostname or IP Address of the Host that will store the files.4.1.6.3. Click on the JDBC tab and make sure that the “JDBC Driver” and “JDBC URL” isselected as shown below. 2010 Oracle CorporationUsing ODI for Teradata Dual-LoadsPg. 16
Using ODI for Teradata Dual-LoadsClick on “Test” and select “Local (No Agent)” for the test. You should get a “SuccessfulConnection” message displayed. Click “OK” to clear the message.Click “OK” to save the File Physical Source.4.1.6.4.Set the physical schema and the work schema for the FILE GENERIC connection.Double-click on the “FILE GENERIC ./demo/file” Physical Schema under theFILE GENERIC source.In the Properties box that opens, enter “/tmp” for the “Schema (Schema)” and the “Schema(Work Schema)” fields. Leave all other fields as defaults. 2010 Oracle CorporationUsing ODI for Teradata Dual-LoadsPg. 17
Using ODI for Teradata Dual-LoadsClick “OK” to save your changes.4.1.6.5.Create the Flat File Logical Source.Click on the “Logical Architecture” tab, expand “Technologies - File”. Double-click on“FILE DEMO SRC”.Note: If you do not see a “FILE DEMO SRC” in your Topology then create one. Refer to theOBE “Exporting a flat file to a relational table” for more details on creating file sources.4.1.6.6. Select “FILE GENERIC ./tmp” as the Physical Schemas for “Global”, “Primary”and the “Secondary” contexts.Click “OK” to save your changes.4.2.Setup the ODI Designer environment.4.2.1. Login to the Repository using ODI Designer. Click on “Start - All Programs - Oracle - Oracle Data Integrator - Designer” from the Start Menu.Login to the repository using the “SUPERVISOR” account.4.2.2.Import the seed Project supplied in the zip file.The seed project “PROJ TD Dual Load.xml” has the following pre-created items: The required Teradata Knowledge Modules for dual-loadVariables required by the dual-load examples 2010 Oracle CorporationUsing ODI for Teradata Dual-LoadsPg. 18
Using ODI for Teradata Dual-Loads Procedures to create the Oracle Table SRC SALES PERSON which is the source tableProcedures to create the Teradata table TD SALES PERSON & TD REPL SALES PERSONwhich are the destination tables in Teradata SystemsPackages to initialize the Variables that are needed for the ELTPackages to incrementally load into the Source tableProcedure to get the max Batch ID that the source extract is currently usingRight-click on the blank area in the Projects pane of ODI Designer and select “Import Project”.Alternatively you can click on the Import Project iconas well.4.2.3. Click on ellipses ( ) to select the “Projects” directory from the supplied zip file. Select the“TD Dual Load” as the project file to import.Click “OK” to import. After the import the TD Dual Load Project tree should expand like shown below. 2010 Oracle CorporationUsing ODI for Teradata Dual-LoadsPg. 19
Using ODI for Teradata Dual-Loads4.2.4.Import the Teradata, Oracle and File models.The supplied Teradata, Flat File and Oracle models contains the below objects: SRC SALES PERSON: This is the source table for the dual-load and resides in the OracleDatabase. The table contains a DATE UPDATED column that will be used as the basis of theChanged Data Capture process.DL VARIABLES: This table stores the value of the latest “Batch ID” that is associated withthe Oracle extract. The purpose of this is to pass the variable values between different ODIcontexts.TD SALES PERSON: This is the destination table that exists in the Primary and SecondaryTeradata Systems. This table contains a derived column – FULL NAME that is not present inthe Source and a simple ETL map will derive this value. 2010 Oracle CorporationUsing ODI for Teradata Dual-LoadsPg. 20
Using ODI for Teradata Dual-Loads TD REPL SALES PERSON: This is the destination table that exists in Secondary TeradataSystem. This table will be replicated from the Primary Teradata TD SALES PERSON tablewhen performing dual-loads using scenario 2.File Demo Src: This is the intermediary Flat File that will be created to store the Oraclesource table SRC SALES PERSON.Click on the Models tab of ODI Designer. Right-click on the blank area in the Models pane and select“Import Model Folder”. Alternatively you can click on the Import Model Folder iconas well.4.2.5. Click on ellipses ( ) to select the “Models” directory from the supplied zip file. Select the “FlatFiles”, “Oracle” and “Teradata” as the models to import holding the CTRL key.Click “OK” to start the import. After the import is done, the model pane should expand as shown below. 2010 Oracle CorporationUsing ODI for Teradata Dual-LoadsPg. 21
Using ODI for Teradata Dual-Loads5. Setup the Source and Destination DatabasesIn this step, we will create the source and the destination Database tables using the supplied ODI Procedures.We will also run the ODI Procedures that will populate the source table with initial data. We also need to run ODIPackages to initialize the variables used by ODI Interfaces and Packages.5.1.Create Oracle tables and populate with seed data.The procedure “Create Oracle Tables” has been supplied with the seed project to create and populate theOracle schema. Follow the below steps to execute the supplied procedure.5.1.1. In the ODI Designer “Projects” pane, expand “TD Dual Load - 1. Setup - Procedures”.Right-click on “Create Oracle Tables” and select “Execute”. 2010 Oracle CorporationUsing ODI for Teradata Dual-LoadsPg. 22
Using ODI for Teradata Dual-LoadsSelect the “Global” context, and “Local (No Agent)” agent. Click “OK” to execute the procedure. TheOracle physical schema “ORCL SH” has been associated with the Global context.You should see a Session started message. Click “OK” to acknowledge the message.5.1.2. Verify the execution using ODI Operator. Click on the “Operator” iconmenu.from ODI DesignerIn the Session List pane, expand “Date - Today” and you should see a successful execution of the“Create Oracle Tables” procedure. 2010 Oracle CorporationUsing ODI for Teradata Dual-LoadsPg. 23
Using ODI for Teradata Dual-Loads5.2.Create Teradata tables.The procedure “Create Teradata Tables” has been supplied with the seed project to create the Teradataschema. Follow the below steps to execute the supplied procedure.5.2.1. In the ODI Designer “Projects” pane, expand “TD Dual Load - 1. Setup - Procedures”.Right-click on “Create Teradata Tables” and select “Execute”.Select the “Primary” context, and “TD Agent” agent. Click “OK” to execute the procedure. Theprimary Teradata physical schema “TD1” has been associated with the Primary context.You should see a Session started message. Click “OK” to acknowledge the message.5.2.2. Execute the “Create Teradata Tables” procedure again. And this time select the“Secondary” context and “TD Agent” agent to create the Teradata schema on the secondaryTeradata system TD2. 2010 Oracle CorporationUsing ODI for Teradata Dual-LoadsPg. 24
Using ODI for Teradata Dual-LoadsClick “OK” to execute the procedure. The secondary Teradata physical schema “TD2” has beenassociated with the Secondary context.Click “OK” to acknowledge the Session Started message.5.2.3. Verify the execution using ODI Operator. Click on the “Operator” iconmenu.from ODI DesignerIn the Session List pane, expand “Date - Today” and you should see two successful executions ofthe “Create Teradata Tables” procedures.5.3.Initialize Variables used by ODI.Execute the Package “Initialize Variables” to initialize variables used by ODI mappings. The ODI Interfacesand Packages will depend upon seed values of these variables and skipping this step will lead to errorsduring execution of Interfaces and Packages later.5.3.1. In the ODI Designer “Projects” pane, expand “TD Dual Load - 1. Setup - Package”.Right-click on “Initialize Variables” and select “Execute”. 2010 Oracle CorporationUsing ODI for Teradata Dual-LoadsPg. 25
Using ODI for Teradata Dual-LoadsSelect the “Global” context and “Local (No Agent)” agent. Click “OK”. This will execute the package“Initialize Variables” against the Oracle SH Schema. Click “OK” to acknowledge the SessionStarted message.You need to repeat this step and execute the same package against the primary and secondaryTeradata sources. This you would do by repeating the previous step for each “Primary” and“Secondary” contexts and execute the package against the “TD Agent” agent.5.3.2.Verify the execution using ODI Operator.Expand “Date - Today” and you should three successful executions of the “Initialize Variables”package. 2010 Oracle CorporationUsing ODI for Teradata Dual-LoadsPg. 26
Using ODI for Teradata Dual-Loads6. Create Oracle to Flat File InterfaceIn this section, we will create ODI Interfaces and Packages that will extract the data out of the Oracle source andinto a flat file. This step is common for both the Teradata dual-load scenarios.The flat file is staged in a directory that is created when the extract process runs, and is identified uniquely by theBatch ID of the extract process. This mechanism allows us to run the extracts independently of the Teradataimport process hence making the extract process completely asynchronous with the loads.The extracts out of the Oracle SRC SALES PERSON table looks at the new rows inserted or modified since thetime the last extract was run. The changed data capture mechanism is accomplished by using theDATE UPDATED column on the SRC SALES PERSON table. The column is updated at every inserts orupdates at the source database.At the end of the Extract process, there will be three files created in the directory – “SRC SALES PERSON.txt”which is the text dump of SRC SALES PERSON table, the “Primary.txt” and “Secondary.txt” files which areused as a flags to indicate whether or not the dump file was loaded into the Primary or the Secondary TeradataSystems respectively. These files are deleted after the dump is successfully loaded into its respective destination. 2010 Oracle CorporationUsing ODI for Teradata Dual-LoadsPg. 27
Using ODI for Teradata Dual-Loads6.1.Create a New Folder for the Extract process.6.1.1. In the ODI Designer “Projects” pane, right-click on “TD Dual Load” and select “InsertFolder”.6.1.2.6.2.Enter “2. Extract” as the name and click “OK”.Create an Oracle Table to Flat file Interface.6.2.1. Expand the newly created “2. Extract” folder and ri
Teradata systems, and Oracle Data Integrator 10g (10.1.3.5) Agent on the Teradata primary system. Note 2: For the purposes of this tutorial, the ODI software and the source Oracle Database are installed on the same machine. Also, we will be using one ODI Agent to service both Teradata systems. 4. Setup the ODI Environment 4.1. Configure ODI .