Transcription
Model 791XV Owner’sGuide
limited lifetime consumer warrantyDirected Electronics, Inc. ("Directed") promises to the original purchaser to repair orreplace with a comparable reconditioned model any Directed unit (hereafter the "unit"),excluding without limitation the siren, the remote transmitters, the associated sensors andaccessories, which proves to be defective in workmanship or material under reasonable useduring the lifetime of the vehicle provided the following conditions are met: the unit wasprofessionally installed and serviced by an authorized Directed dealer; the unit will be professionally reinstalled in the vehicle in which it was originally installed by an authorizedDirected dealer; and the unit is returned to Directed, shipping prepaid with a legible copyof the bill of sale or other dated proof of purchase bearing the following information: consumer's name, telephone number and address; the authorized dealers name, telephonenumber and address; complete product description, including accessories; the year, makeand model of the vehicle; vehicle license number and vehicle identification number. Allcomponents other than the unit, including without limitation the siren, the remote transmitters and the associated sensors and accessories, carry a one-year warranty from the dateof purchase of the same. This warranty is non-transferable and is automatically void if: theoriginal purchaser has not completed the warranty card and mailed it within ten (10) daysof the date of purchase to the address listed on the card; the unit's date code or serial number is defaced, missing or altered; the unit has been modified or used in a manner contrary to its intended purpose; the unit has been damaged by accident, unreasonable use,neglect, improper service, installation or other causes not arising out of defects in materials or construction. The warranty does not cover damage to the unit caused by installation or removal of the unit. Directed, in its sole discretion, will determine what constitutes excessive damage and may refuse the return of any unit with excessive damage. TOTHE MAXIMUM EXTENT ALLOWED BY LAW, ALL WARRANTIES, INCLUDING BUT NOT LIMITED TO EXPRESS WARRANTY, IMPLIED WARRANTY,WARRANTY OF MERCHANTABILITY, FITNESS FOR PARTICULAR PURPOSEAND WARRANTY OF NON-INFRINGEMENT OF INTELLECTUAL PROPERTY,ARE EXPRESSLY EXCLUDED; AND DIRECTED NEITHER ASSUMES NORAUTHORIZES ANY PERSON OR ENTITY TO ASSUME FOR IT ANY DUTY,OBLIGATION OR LIABILITY IN CONNECTION WITH ITS PRODUCTS.DIRECTED DISCLAIMS AND HAS ABSOLUTELY NO LIABILITY FOR ANYAND ALL ACTS OF THIRD PARTIES INCLUDING ITS AUTHORIZED DEALERS OR INSTALLERS. DIRECTED SECURITY SYSTEMS, INCLUDING THISUNIT, ARE DETERRENTS AGAINST POSSIBLE THEFT. DIRECTED IS NOTOFFERING A GUARANTEE OR INSURANCE AGAINST VANDALISM, DAMAGE OR THEFT OF THE AUTOMOBILE, ITS PARTS OR CONTENTS; ANDHEREBY EXPRESSLY DISCLAIMS ANY LIABILITY WHATSOEVER, INCLUDING WITHOUT LIMITATION, LIABILITY FOR THEFT, DAMAGE AND/ORVANDALISM. THIS WARRANTY DOES NOT COVER LABOR COSTS FORMAINTENANCE, REMOVAL OR REINSTALLATION OF THE UNIT OR ANY 2003 directed electronics, inc.i
CONSEQUENTIAL DAMAGES OF ANY KIND. IN THE EVENT OF A CLAIMOR A DISPUTE INVOLVING DIRECTED OR ITS SUBSIDIARY, THE PROPERVENUE SHALL BE SAN DIEGO COUNTY IN THE STATE OF CALIFORNIA.CALIFORNIA STATE LAWS AND APPLICABLE FEDERAL LAWS SHALL APPLYAND GOVERN THE DISPUTE. THE MAXIMUM RECOVERY UNDER ANYCLAIM AGAINST DIRECTED SHALL BE STRICTLY LIMITED TO THEAUTHORIZED DIRECTED DEALER'S PURCHASE PRICE OF THE UNIT.DIRECTED SHALL NOT BE RESPONSIBLE FOR ANY DAMAGES WHATSOEVER, INCLUDING BUT NOT LIMITED TO, ANY CONSEQUENTIAL DAMAGES,INCIDENTAL DAMAGES, DAMAGES FOR THE LOSS OF TIME, LOSS OFEARNINGS, COMMERCIAL LOSS, LOSS OF ECONOMIC OPPORTUNITYAND THE LIKE. NOTWITHSTANDING THE ABOVE, THE MANUFACTURERDOES OFFER A LIMITED WARRANTY TO REPLACE OR REPAIR THE CONTROL MODULE AS DESCRIBED ABOVE. Some states do not allow limitations onhow long an implied warranty will last or the exclusion or limitation of incidental or consequential damages. This warranty gives you specific legal rights and you may also haveother rights that vary from State to State.This product may be covered by a Guaranteed Protection Plan ("GPP"). See your authorized Directed dealer for details of the plan or call Directed Customer Service at 1-800876-0800. Directed security systems, including this unit, are deterrents against possibletheft. Directed is not offering a guarantee or insurance against vandalism, damage or theftof the automobile, its parts or contents; and hereby expressly disclaims any liability whatsoever, including without limitation, liability for theft, damage and/or vandalism.Directed does not and has not authorized any person or entity to create for it any otherobligation, promise, duty or obligation in connection with this security system.Make sure you have all of the following information from your dealer:A clear copy of the sales receipt, showing the following: iiDate of purchaseYour full name and addressAuthorized dealer's company name and addressType of alarm installedYear, make, model and color of the automobileAutomobile license numberVehicle identification numberAll security options installed on automobileInstallation receipts 2003 directed electronics, inc.
table of contentslimited lifetime consumer warranty . . . . . . . . . . . . . . . . . . . . . . . . . . . . . . . . . . . . . . . . . istandard transmitter configuration . . . . . . . . . . . . . . . . . . . . . . . . . . . . . . . . . . . . . . . . . 3what is included . . . . . . . . . . . . . . . . . . . . . . . . . . . . . . . . . . . . . . . . . . . . . . . . . . . . . . . 4important information . . . . . . . . . . . . . . . . . . . . . . . . . . . . . . . . . . . . . . . . . . . . . . . . . . 4your warranty . . . . . . . . . . . . . . . . . . . . . . . . . . . . . . . . . . . . . . . . . . . . . . . . . . . . 5fcc/id notice . . . . . . . . . . . . . . . . . . . . . . . . . . . . . . . . . . . . . . . . . . . . . . . . . . . . . 5caution . . . . . . . . . . . . . . . . . . . . . . . . . . . . . . . . . . . . . . . . . . . . . . . . . . . . . . . . . 5remote control diagram . . . . . . . . . . . . . . . . . . . . . . . . . . . . . . . . . . . . . . . . . . . . . . . . . . 6standard remote configuration . . . . . . . . . . . . . . . . . . . . . . . . . . . . . . . . . . . . . . . . . . . . 7system maintenance . . . . . . . . . . . . . . . . . . . . . . . . . . . . . . . . . . . . . . . . . . . . . . . . . . . . 8transmitter functions . . . . . . . . . . . . . . . . . . . . . . . . . . . . . . . . . . . . . . . . . . . . . . . . . . . . 9standard configuration . . . . . . . . . . . . . . . . . . . . . . . . . . . . . . . . . . . . . . . . . . . . . 9standard icon configurations . . . . . . . . . . . . . . . . . . . . . . . . . . . . . . . . . . . . . . . . 10remote operation and programming instructions . . . . . . . . . . . . . . . . . . . . . . . . . . . . . 14system signal paging features. . . . . . . . . . . . . . . . . . . . . . . . . . . . . . . . . . . . . . . . 14programmable remote control features . . . . . . . . . . . . . . . . . . . . . . . . . . . . . . . . 16using your system . . . . . . . . . . . . . . . . . . . . . . . . . . . . . . . . . . . . . . . . . . . . . . . . . . . . 17warning! safety first . . . . . . . . . . . . . . . . . . . . . . . . . . . . . . . . . . . . . . . . . . . . . . . 17active arming . . . . . . . . . . . . . . . . . . . . . . . . . . . . . . . . . . . . . . . . . . . . . . . . . . . 20passive arming. . . . . . . . . . . . . . . . . . . . . . . . . . . . . . . . . . . . . . . . . . . . . . . . . . . 20multi-level security arming . . . . . . . . . . . . . . . . . . . . . . . . . . . . . . . . . . . . . . . . . 22arming while driving. . . . . . . . . . . . . . . . . . . . . . . . . . . . . . . . . . . . . . . . . . . . . . 23disarming . . . . . . . . . . . . . . . . . . . . . . . . . . . . . . . . . . . . . . . . . . . . . . . . . . . . . . 23high security disarm . . . . . . . . . . . . . . . . . . . . . . . . . . . . . . . . . . . . . . . . . . . . . . 23disarming without a transmitter . . . . . . . . . . . . . . . . . . . . . . . . . . . . . . . . . . . . . 24silent mode . . . . . . . . . . . . . . . . . . . . . . . . . . . . . . . . . . . . . . . . . . . . . . . . . . . . . 25panic mode . . . . . . . . . . . . . . . . . . . . . . . . . . . . . . . . . . . . . . . . . . . . . . . . . . . . . 25valet mode . . . . . . . . . . . . . . . . . . . . . . . . . . . . . . . . . . . . . . . . . . . . . . . . . . . . . 26remote start. . . . . . . . . . . . . . . . . . . . . . . . . . . . . . . . . . . . . . . . . . . . . . . . . . . . . 26valet take-over . . . . . . . . . . . . . . . . . . . . . . . . . . . . . . . . . . . . . . . . . . . . . . . . . . . 28short-run/turbo. . . . . . . . . . . . . . . . . . . . . . . . . . . . . . . . . . . . . . . . . . . . . . . . . . 29timer mode . . . . . . . . . . . . . . . . . . . . . . . . . . . . . . . . . . . . . . . . . . . . . . . . . . . . . 30safety features . . . . . . . . . . . . . . . . . . . . . . . . . . . . . . . . . . . . . . . . . . . . . . . . . . . . . . . . 31starter anti-grind circuitry . . . . . . . . . . . . . . . . . . . . . . . . . . . . . . . . . . . . . . . . . . 31disabling the remote start system . . . . . . . . . . . . . . . . . . . . . . . . . . . . . . . . . . . . 32over and under rev protection . . . . . . . . . . . . . . . . . . . . . . . . . . . . . . . . . . . . . . . 32shut down inputs . . . . . . . . . . . . . . . . . . . . . . . . . . . . . . . . . . . . . . . . . . . . . . . . 32nuisance prevention circuitry . . . . . . . . . . . . . . . . . . . . . . . . . . . . . . . . . . . . . . . 33diagnostics . . . . . . . . . . . . . . . . . . . . . . . . . . . . . . . . . . . . . . . . . . . . . . . . . . . . . . . . . . 34arming diagnostics . . . . . . . . . . . . . . . . . . . . . . . . . . . . . . . . . . . . . . . . . . . . . . . 34 2003 directed electronics, inc.1
disarming diagnostics . . . . . . . . . . . . . . . . . . . . . . . . . . . . . . . . . . . . . . . . . . . . 35system status chirps . . . . . . . . . . . . . . . . . . . . . . . . . . . . . . . . . . . . . . . . . . . . . . 36table of zones . . . . . . . . . . . . . . . . . . . . . . . . . . . . . . . . . . . . . . . . . . . . . . . . . . 37interpreting zone diagnostics . . . . . . . . . . . . . . . . . . . . . . . . . . . . . . . . . . . . . . . 37code hopping . . . . . . . . . . . . . . . . . . . . . . . . . . . . . . . . . . . . . . . . . . . . . . . . . . . . . . . 38high frequency . . . . . . . . . . . . . . . . . . . . . . . . . . . . . . . . . . . . . . . . . . . . . . . . . . . . . . 39owner recognition . . . . . . . . . . . . . . . . . . . . . . . . . . . . . . . . . . . . . . . . . . . . . . . . . . . 39rapid resume logic . . . . . . . . . . . . . . . . . . . . . . . . . . . . . . . . . . . . . . . . . . . . . . . . . . . . 40power saver mode . . . . . . . . . . . . . . . . . . . . . . . . . . . . . . . . . . . . . . . . . . . . . . . . . . . . 40programming options . . . . . . . . . . . . . . . . . . . . . . . . . . . . . . . . . . . . . . . . . . . . . . . . . 41security & convenience expansions . . . . . . . . . . . . . . . . . . . . . . . . . . . . . . . . . . . . . . . 44glossary of terms . . . . . . . . . . . . . . . . . . . . . . . . . . . . . . . . . . . . . . . . . . . . . . . . . . . . . 462 2003 directed electronics, inc.
standard transmitter configurationcontrols the Arm and Panic On/Off function.controls the Disarm and Panic Off function.controls Silent Mode and Auxiliary channel 2 output.controls the Remote Start function.andpressed together control the Timer mode.andpressed together control Turbo/Short Run.andpressed together control channel 4 output.andpressed together control channel 5 output 2003 directed electronics, inc.3
what is included A control module An XHF2 receiver/antenna One four-button transmitters A Stinger DoubleGuard two-stage shock sensor A Revenger Soft Chirp six-tone programmable siren A red status LED indicator light A push-button Valet switch Your warranty registration A shut-down toggle switchimportant informationCongratulations on the purchase of your combination remotestart alarm system. Due to the complexity of this system, it mustbe installed by an authorized dealer only. Installation of thisproduct by anyone other than an authorized dealer voids thewarranty. All dealers are provided with a preprinted dealer certificate to verify authorization.By carefully reading this Owner's Guide prior to using yoursystem, you will maximize the use of this system and its features.You can print additional or replacement copies of this manual byaccessing our web site at www.directed.com.4 2003 directed electronics, inc.
your warrantyYour warranty registration must be completely filled out andreturned within 10 days of purchase. Your product warrantywill not be validated if your warranty registration is not returned.Make sure you receive the warranty registration from your dealer.It is also necessary to keep your proof of purchase, which reflectsthat the product was installed by an authorized dealer. fcc/id noticeThis device complies with Part 15 of FCC rules. Operation issubject to the following two conditions: (1) This device may notcause harmful interference, and (2) This device must accept anyinterference received, including interference that may causeundesirable operation.Changes or modifications not expressly approved by the partyresponsible for compliance could void the user's authority tooperate this device. cautionThis product is designed for fuel injected, automatic transmission vehicles only. Use of this product in a standard transmissionvehicle is dangerous and contrary the product's intended use. 2003 directed electronics, inc.5
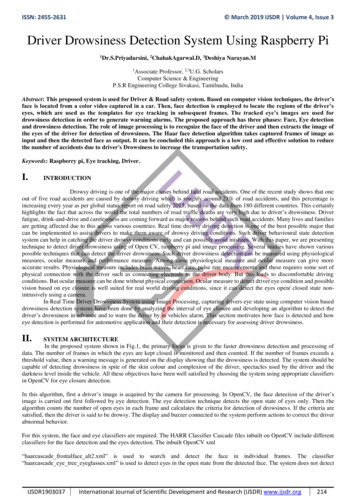
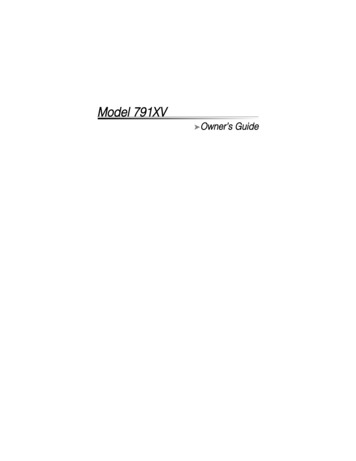
remote control diagram6 2003 directed electronics, inc.
standard remote configuration1. Auxiliary Channel Out2. Receive Indicator3. Signal Indicator4. Transmit Indicator5. Lock Status Indicator6. Unlock Status Indicator7. Arming Status Indicator8. Disarming Status Indicator9. Door Switch Input Indicator10. Warn Away Response Indicator11. Siren Status Indicator12. Battery Level Indicator13. Trigger Response Indicator14. Hood Switch Input Indicator15. Ignition Switch Input Indicator16. Sensor Response Indicator17. Sensor 1 Indicator—Full Trigger and Warn Away 18. Sensor 2 Indicator—Full Trigger and Warn Away 19. Trunk Switch Input Indicator20. Vibrate Mode Indicator21. Remote Start Indicator22. Disarm Button23. Remote Start Button24. Auxiliary Button25. Arm Button 2003 directed electronics, inc.7
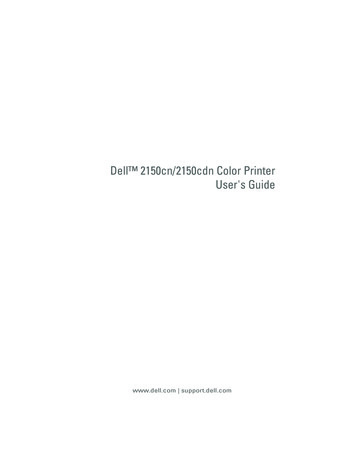
system maintenanceThis system needs no specific maintenance beyond remotecontrol battery replacement. The remote is powered by a 1.5VAAA battery.The Battery Level indicator has four level indicators that serve asa visual indication of battery charge. When the battery reaches alow charge level that requires replacement, the remote controlwill generate a single notification chirp, and the Battery Levelindicator will flash continuously.FULLREPLACEEMPTYBattery ReplacementGently pull the end of the battery door away from the top of theremote control then slide the door up to expose the battery andremove the expired battery. Place the new battery into the remotecontrol observing the correct polarity. When power is returnedthe remote control will light all icons in the LCD and generate allbeeper tones once.8 2003 directed electronics, inc.
transmitter functionsThe receiver uses a computer-based Learn Routine to learn thetransmitter buttons. This makes it possible to assign any remotetransmitter button to any receiver function. The transmitterinitially comes programmed with Standard Configuration, butmay also be customized by an authorized dealer. The buttons inall of the instructions in this manual correspond to a StandardConfiguration transmitter. standard configurationButtonThe arming function is controlled by pressing this button for onesecond. Pressing and holding this button for more than 3 secondswill trigger the panic mode.ButtonThe disarming function is controlled by pressing this button forone second. Pressing this button during panic mode will turn offthe panic mode.ButtonSilent Mode and an optional auxiliary function are controlledby this button. (Silent Mode works by pressing this button forless than one second before arming or disarming. An optionalauxiliary function, such as trunk release, can be controlled bypressing this button for 1.5 seconds.)The auxiliary output controls . 2003 directed electronics, inc.9
ButtonThe remote start feature is turned On/Off by pressing this buttontwice.andButtonsThe remote start timer mode function of the system is controlledby pressing these buttons simultaneously.andButtonsThe Turbo/Short Run feature is controlled by these buttons (referto the Turbo/Short Run section for additional details).andButtonsAn optional auxiliary convenience or expansion function thatyou have added to your system can be activated by pressing thesebuttons simultaneously.The auxiliary output controls .andButtonsAn optional auxiliary convenience or expansion function thatyou have added to your system can be activated by pressing thesebuttons simultaneously.The auxiliary output controls . standard icon configurationsIconThe transmit icon will be displayed while the remote control istransmitting a command to the vehicle.10 2003 directed electronics, inc.
IconThe receive icon will be displayed while the remote control isreceiving a page from the vehicle.IconThe signal icon will be displayed if a command is transmitted tothe vehicle but a command page is not received.IconThe armed status icon will be displayed when the system is lockedand armed.IconThe disarmed status icon will be displayed when the system isunlocked and disarmed.IconThe disarm icon will flash while the system is disarmingIconThe arm icon will flash while the system is arming.IconThe door icon will be displayed to indicate that a door is openwhen arming the system (Bypass Notification) or opened whenthe system is armed (Tamper Alert).IconThe warn icon will be displayed if the Warn Away response hasbeen triggered while the system is armed. 2003 directed electronics, inc.11
IconThe siren icon will be displayed as an indicator that the siren issounding.IconThe alarm icon will be displayed if the system has been violated,and will continue to be displayed until the 60-second siren cycleis complete.IconThe vibrate icon will be displayed when the Vibrate Mode is on.IconThe battery level icon is always displayed as an indicator ofBattery charge.IconThe start icon will be displayed while the vehicle is remote started.note: If Page Mode has been turned off, the start icon willremain when performing key take over until a button onthe transmitter has been pressed.IconThe trunk icon will be displayed to indicate that the trunk isopen when arming the system (Bypass Notification) or openedwhen the system is armed (Tamper Alert).IconThe Sensor 1 icon will be displayed if the Dual-Stage shocksensor has been triggered as a full-triggered or Warn Away sequence.12 2003 directed electronics, inc.
IconThe Sensor 2 icon will be displayed if an additional Dual-Stagesensor has been triggered as a full-triggered or Warn Away sequence.IconThe hammer icon will flash when either Sensor 1 or 2 has beentriggered as either a Warn Away response or triggered sequence.IconThe ignition icon will be displayed to indicate that the ignition ison when arming the system (Bypass Notification) or turned onwhen the system is armed (Tamper Alert).IconThe hood icon will be displayed to indicate that the hood is openwhen arming the system or (Bypass Notification) opened whenthe system is armed (Tamper Alert).Number IconsWhen either of the channel 2, 4 or 5 outputs is activated theappropriate icon will be displayed for five seconds. 2003 directed electronics, inc.13
remote operation and programminginstructionsThe remote start system operates at 434 MHz and incorporatesDirected’s proprietary XHF2 out-board Responder Technologyremote control. The high frequency combined with Binary Datacommunication achieves superior range with two-way communication. system signal paging featuresA page is the signal the control module sends to the remotecontrol as confirmation of receipt of a command or alarm systemstatus.When the remote control receives a page it will generate a pagenotification to the user (notifications are audible beeps or remotevibration) and the LCD Icons will display the current systemstatus.Command PageWhen a command (arm/disarm, remote start, or auxiliarychannel) from the remote control is sent and received, the systemwill send a command page back to confirm receipt.note: When the system is in Valet mode, the remote control will show the lock (5) and unlock (6) icons, but willnot generate a command page.14 2003 directed electronics, inc.
Alarm PageIf the alarm system is triggered while armed, an Alarm Page willbe sent to the remote control. After receipt of an Alarm Page, theLCD icons will display the alarm system status information andthe remote control will generate Alarm Page alerts.An Alarm Page alert is a single beep or vibration from the remotecontrol every 60 seconds to alert the user that the alarm systemwas triggered and will continue until the alarm page is cleared.note: If the transmitter is paged with an Alarm Page andthe WarnAway is triggered before the Alarm Page isrelieved the transmitter will report the WarnAway onlyuntil the system is disarmed.Page Recognition ModeThe remote control will leave a zone icon illuminated when ithas received a triggered response and will wait for you to recognize the violation. Press any button on the remote control, theLCD information and Alarm Page alerts will be cleared.note: The remote control buttons will not send a command to the system until the alarm page is cleared. 2003 directed electronics, inc.15
programmable remote control featuresTo enter programming modePress and hold all four remote control buttons simultaneously untilone long beep is heard. Programming Mode has now been entered.Page NotificationThe remote control can be programmed to notify the user of apage by audibly beeping or remote vibration.Beep ModeBeep Mode includes alarm arm/disarm diagnostic beeps anddistinctive two-tone remote start beeps.Vibrate ModeVibrate Mode makes page notification silent but does not includediagnostic information or distinctive remote start notification.IlluminationIllumination for the LCD display can be programmed on or off.When programmed on the LCD will illuminate every time theremote control receives a page or transmits a command.Programming illumination on will decrease the life expectancy ofthe battery.Beep/Vibrate ModeWithin five seconds of entering Programming Mode, press.The remote control will beep once for on, twice for off. Thevibrate icon (13) will also turn on/off with each press.Illumination On/Off16 2003 directed electronics, inc.
Within five seconds of entering Programming Mode, press.The remote will beep once for on, twice for off and the light willturn on/off with each press.Page Mode On/OffAfter entering Programming Mode, presswithin fiveseconds to toggle on and off. When the Page Mode is on, theremote control will wake up periodically to check for messagesfrom the security module. It will also wake up when any buttonis pushed. When Page Mode is off, the remote control “sleeps”until a button is pushed, extending the life of the battery.To Exit Programming ModeTo exit Programming Mode, take no action for five seconds. Theremote control will generate two beeps to indicate programmingmode has been exited.using your system warning! safety firstThe following safety warnings must be observed at all times: Due to the complexity of this system, installation of thisproduct must only be performed by an authorized Directeddealer. When properly installed, this system can start the vehicle viaa command signal from the remote control transmitter. 2003 directed electronics, inc.17
Therefore, never operate the system in an enclosed area orpartially enclosed area without ventilation (such as a garage).When parking in an enclosed or partially enclosed area orwhen having the vehicle serviced, the remote start systemmust be disabled using the installed toggle switch. It is theuser's sole responsibility to properly handle and keep out ofreach from children all remote control transmitters to assurethat the system does not unintentionally remote start thevehicle. THE USER MUST INSTALL A CARBONMONOXIDE DETECTOR IN OR ABOUT THELIVING AREA ADJACENT TO THE VEHICLE. ALLDOORS LEADING FROM ADJACENT LIVING AREASTO THE ENCLOSED OR PARTIALLY ENCLOSEDVEHICLE STORAGE AREA MUST AT ALL TIMESREMAIN CLOSED. These precautions are the sole responsibility of the user. Use of this product in a manner contrary to its intendedmode of operation may result in property damage, personalinjury, or death. (1) Never remotely start the vehicle with thevehicle in gear, and (2) Never remotely start the vehicle withthe keys in the ignition. The user must also have the neutralsafety feature of the vehicle periodically checked, wherein thevehicle must not remotely start while the car is in gear. Thistesting should be performed by an authorized Directed dealerin accordance with the Safety Check outlined in the productinstallation guide. If the vehicle starts in gear, cease remotestart operation immediately and consult with the authorized18 2003 directed electronics, inc.
Directed dealer to fix the problem. After the remote start module has been installed, contactyour authorized dealer to have him or her test the remotestart module by performing the Safety Check outlined in theproduct installation guide. If the vehicle starts whenperforming the Neutral Safety Shutdown Circuit test, theremote start unit has not been properly installed. The remotestart module must be removed or the installer must properlyreinstall the remote start system so that the vehicle does notstart in gear. All installations must be performed by an authorized Directed dealer. OPERATION OF THE REMOTESTART MODULE IF THE VEHICLE STARTS IN GEARIS CONTRARY TO ITS INTENDED MODE OF OPERATION. OPERATING THE REMOTE START SYSTEMUNDER THESE CONDITIONS MAY RESULT INPROPERTY DAMAGE OR PERSONAL INJURY. YOUMUST IMMEDIATELY CEASE THE USE OF THEUNIT AND SEEK THE ASSISTANCE OF AN AUTHORIZED DIRECTED D E A L E R T O R E P A I R O RDISCONNECT THE INSTALLED REMOTE STARTMODULE. DIRECTED WILL NOT BE HELDRESPONSIBLE OR PAY FOR INSTALLATION ORREINSTALLATION COSTS. 2003 directed electronics, inc.19
active armingYou can arm the system by pressingof your transmitter forone second. When the system arms, you will hear a short sirensound, or chirp, and see the parking lights flash once. If thepower door locks are controlled by the system, the doors will alsolock. While the system is armed, the status LED will flashapproximately once per second, indicating that the system isactively protecting your vehicle. If you hear a second chirp afterarming and note that the status LED is flashing in groups, see theDiagnostics Section of this guide. This extra chirp is called BypassNotification. passive armingThe system can be programmed to arm itself automatically (calledpassive arming). If the system is programmed for passive arming, itwill automatically arm 30 seconds after the ignition is turned offand the system detects that you have left the vehicle by opening andclosing a door. Whenever the system is in its 30-second passivearming countdown, the status LED will flash twice as fast as it doeswhen the system is armed. At the 20-second point of the countdown, the siren will chirp to indicate that the system is about toarm. At the 30-second point, the parking lights will flash to indicatethat the system is armed.20 2003 directed electronics, inc.
note: If any protected entry point (such as a door or aswitch-protected trunk or hood) is open, the system willnot passively arm (unless forced passive arming is programmed on. See Programming Options section.) Additionally, each time a sensor is triggered during the armingcountdown, the 30-second countdown starts over.When armed your vehicle is protected as follows: Light impacts trigger the Warn Away signal. When triggered, the siren chirps and the parking lights flash for a fewseconds.Heavy impacts trip a Triggered Sequence. The sequenceconsists of the siren sounding continuously and the parkinglights flashing for a pre-programmed period, which can rangein duration from 1 to 180 seconds.If a door is opened, the system will immediately startchirping the siren and flashing the parking lights. Threeseconds later, the siren output changes to a continuous blast.This progressive response gives you time to disarm the systemwith your transmitter if you inadvertently open the doorwhile the system is armed, while still providing instant response (even if the door is immediately closed).Turning on the ignition key will trip the same progressive response as opening a door.The optional starter kill prevents the vehicle’s starter fromcranking. 2003 directed electronics, inc.21
multi-level security armingMulti-Level Security Arming allows you to select which of thesystem's inputs or sensors will be active and which will bebypassed when the system is armed. (See Table of Zones section ofthis guide.) Pressing(only in Standard Configuration) againwithin five seconds of arming the system will activate the MultiLevel Security feature. Each timeis pressed again, a differentsecurity level is selected. The different security levels are selectedas follows:
Model 791XV Owner's Guide . installation or other causes not arising out of defects in materi-als or construction. The warranty does not cover damage to the unit caused by installa- . all of the instructions in this manual correspond to a Standard Configuration transmitter. standard configuration