Transcription
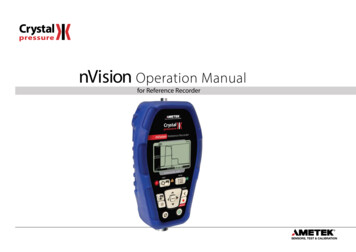
Instructions to create a nVision Report Book in PeopleSoftThe Report Book allows many report requests to be run at one time. The Report Book can bescheduled to run on a reoccurring basis and also be configured to email selected financialreports.To create a Report Book, navigate to the Define Report Book menu.Navigation: Main Menu Reporting Tools PS/nVision Define Report Request1. To create a new Report Book, click on the “Add a New Value” tab.2. Enter a name of the Run Control ID that describes the purpose of the Report Book e.g.“Monthly-Financial-Reports.”3. Click Add.Page 1
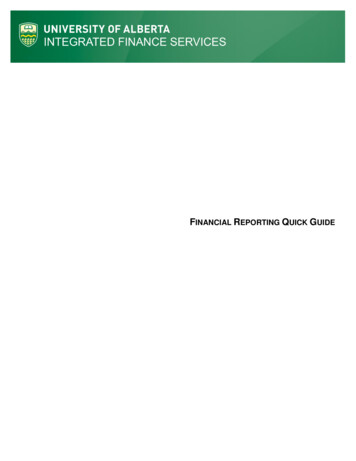
A User may create more than one nVision Report Book. If Report Books are already created, click on the“Find and Existing Value” tab to search for Report Books available and select the Report Book you wantto use.To create a Report Book that will generate reports and make them available for access in theReport Manager, select which reports you would like to run.1.2.3.4.5.6.7.8.Select “Specify.”Enter the report date.Select “Use As of Reporting Date.”Enter the number of days to retain the reports.Enter the Council Business Unit.Select the report(s) to include in the Report Book.Click on “Save” to hold these settings.Click on “Run” to process the reports.Page 2
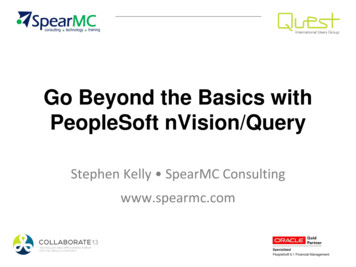
1. Select the PSNT server.2. Check the box next to nVision Report Book.3. Click on “OK” to process the reports.Click on the Process Monitor link to verify that the Report Book was run successfully andposted.Page 3
Click on the “Go back to Report Book Definition” link to access the Report Manager menu.Click on the “Report Manager” link to access the reports.Page 4
1. Click on the Administration Tab to view the reports.2. Click on the report link to view the report in Excel.Instructions to create a Report Book that will generate and send reports by email.Page 5
Navigation: Main Menu Reporting Tools PS/nVision Define Report Request1. To create a new Report Book, click on the “Add a New Value” tab.2. Enter a name of the Run Control ID that describes the purpose of the Report Book e.g.“Monthly-Financial-Reports.”3. Click Add.A User may create more than one nVision Report Book. If Report Books are already created, click on the“Find and Existing Value” tab to search for Report Books available and select the Report Book you wantto use.Page 6
To create a Report Book that will generate reports and make them available for access in theReport Manager, select which reports you would like to run.1.2.3.4.5.6.7.8.Select “Specify.”Enter the report date.Select “Use As of Reporting Date.”Enter the number of days to retain the reports.Enter the Council Business Unit.Select the report(s) to include in the Report Book.Click on “Save” to hold these settings.Click on “Run” to process the reports.Page 7
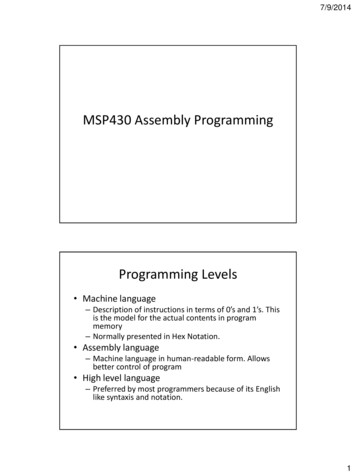
1. Select the PSNT server.2. Check the box next to nVision Report Book.3. Select Email from the drop down list under the Type column.4. Click on “Distribution” then complete the information on the following screen as needed.Page 8
Once the information is entered, click OK to return to the Process Scheduler Menu.Click OK to email the report.Page 9
Click on the Process Monitor link to verify that the Report Book was run successfully andposted.Multiple reports will produce one email for each report from P91FSB@att.com. The reports willbe produced and distributed as an Excel file attachment to the email.Page 10
1325 West Walnut Hill LaneSUM-219P.O. Box 152079Irving, Texas 75015-2079972-580-2554972-580-2486 FAXwww.scouting.org/financeimpact
To create a Report Book, navigate to the Define Report Book menu. Navigation: Main Menu Reporting Tools PS/nVision Define Report Request 1. To create a new Report Book, click on the "Add a New Value" tab. 2. Enter a name of the Run Control ID that describes the purpose of the Report Book e.g. "Monthly-Financial-Reports." 3.