Transcription
Java PathFinder: a tool to detect bugs in Java codeFranck van BreugelJanuary 1, 2019
c 2019 Franck van Breugel2
AbstractIt is well known that software contains bugs. Since Java is among the most popular programming languages, it isessential to have tools that can detect bugs in Java code. Although testing is the most used technique to detect bugs, ithas its limitations, especially for nondeterministic code. Concurrency and randomization are the two main sources ofnondeterminism. To find bugs in nondeterministic code, testing needs to be complemented with other techniques suchas model checking. Java PathFinder (JPF) is the most popular model checker for Java code. In this book, we describehow to install, configure, run and extend JPF.3
4
PrefaceAccording to a 2002 study commissioned by the US Department of Commerce’s National Institute of Standards andTechnology, “estimates of the economic costs of faulty software in the US range in the tens of billions of dollarsper year and have been estimated to represent approximately just under one percent of the nation’s gross domesticproduct.” Since software development has not changed drastically in the last decade, but the footprint of softwarein our society has increased considerably, it seems reasonable to assume that this number has increased as well andranges in the hundreds of billions of dollars per year on a world wide scale. This was confirmed by a recent study[BJC 13] which included that “wages-only estimated cost of debugging is US 312 billion per year” Hence, tools todetect bugs in software can impact the software industry and even the world economy. The topic of this book is sucha tool.The TIOBE programming community index1 , the transparent language popularity index2 , the popularity of programming language index3 , the RedMonk programming language rankings4 , and Trendy Skills5 , all rank Java amongthe most popular programming languages. Popularity of the language and impact of a tool to detect bugs of softwarewritten in that language go hand in hand. Therefore, we focus on a popular language in this book, namely Java.Testing is the most commonly used method to detect bugs. However, for nondeterministic code testing may beless effective. Code is called nondeterministic if it gives rise to different executions even when all input to the code isfixed. Randomization and concurrency both give rise to nondeterminism. Since concurrency is generally consideredmore intricate than randomization, our examples will predominantly focus on the latter. Chapter ? will concentrateon concurrency. To illustrate the limitations of testing when it comes to nondeterministic code, let us consider thefollowing Java application.1import java.util.Random;2345678public class Example {public static void main(String[] args) {Random random new e above application may result in ten different executions, since it prints a randomly chosen integer in the interval[0, 9]. Now, let us replace line 6 withSystem.out.print(1 / random.nextInt(9));In 80% of the cases, the application prints zero, in 10% it prints one, and in the remaining 10% it crashes because of anuncaught exception due to a division by zero. Of course, it may take more than ten executions before we encounter theexception. In case we choose an integer in the interval [0, 999999] it may take many executions before encountering1 www.tiobe.com2 lang-index.sourceforge.net3 pypl.github.io/PYPL.html4 -18/5 trendyskills.com5
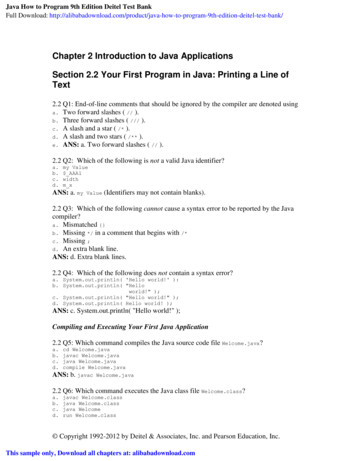
system under testJPFreportsconfiguration filesFigure 1: Overview of JPF.the exception. If we execute the application one million times, there is still a 37% chance that we do not encounter theexception.6In the presence of nondeterminism, testing does not guarantee that all different executions are checked. Furthermore, if a test detects a bug in nondeterministic code, it may be difficult to reproduce. Therefore, in that case methodswhich complement testing are needed. Model checking is such an alternative. It aims to check all potential executionsof nondeterministic code in a systematic way.We will not discuss model checking in much detail. Instead, we refer the interested reader to textbooks such as[BK08], [CGK 18] and [BBF 01]. In this book, we introduce the reader to a model checker, a tool that implementsmodel checking. In particular, we focus on a model checker for Java.Although there are several model checkers for Java, including Bandera [CDH 00] and Bogor [RDH03] to namea few, Java PathFinder (JPF) is the most popular one. Its popularity is reflected by several statistics. For example,the conference paper [VHBP00] and its extended journal version [VHB 03] have been cited more than 1700 timesaccording to Google scholar, making it the most cited work on a Java model checker. In this book, we focus on JPF.Although JPF can do much more than detect bugs, we concentrate on that functionality.Overview of JPFIn Figure 1 we provide a high level overview of JPF. It takes as input a system under test and configuration files andproduces reports as output. The system under test is the application, a Java class with a main method, we want tocheck for bugs. JPF not only checks that main method but also all other code that is used by that main method. JPFcan only check a closed system, that is, a system for which all input is provided, be it obtained from the keyboard,the mouse, a file, a URL, et cetera. Handling such input can be far from trivial and we will come back to this inChapter ?.JPF can be configured in two different ways: by command line arguments or in configuration files. We willconcentrate on the second option. There are three different types of configuration file. We will discuss them inChapter 3.The reports that JPF produces can take different forms. For example, a report can be written to the console or to afile, and it can be text or XML. In the configuration files one can specify what type of reports should be produced byJPF. We will discuss this in more detail in Chapter ?.Overview of the BookThis book has been written for both students and developers who are interested in tools that can help them withdetecting bugs in their Java code. In Chapter 1 we discuss how to install JPF. How to run JPF is the topic of Chapter 2.116 The probability of choosing zero is. The probability of not choosing zero is 1 1000000 100000099999 1000000zero one million times in a row is ( 1000000) 0.37.699999.1000000The probability of not choosing
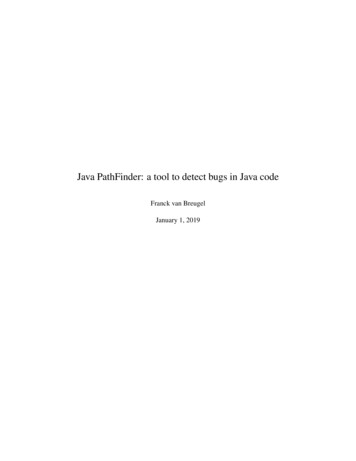
Chapter 1Installing JPFAs we have already discussed in the preface, JPF is a tool to detect bugs in Java code. Since the reader is interestedin JPF, we feel that it is safe to assume that the reader is familiar with Java and has installed the Java development kit(JDK). The JDK should be at least version 8. JPF can be installed in several different ways on a variety of operatingsystems. A road map for Section 1.1–1.8 can be found in Figure 1.1.Since changes are made to JPF on a regular basis, it is best to obtain its souces from JPF’s GitHub repository.GitHub a web-based hosting service for version control. Information about GitHub can be found at github.com. Wedescribe three different ways to install (and update) the sources of JPF’s GitHub repository: au naturel, within Eclipse,and within NetBeans, in Section 1.1 (and 1.2), 1.3 (and 1.4), and 1.6 (and 1.7), respectively. For those using Eclipseor NetBeans, the latter two options are more convenient. Also, there are JPF plugins for Eclipse or NetBeans. Howto install those is discussed in Section 1.5 and 1.8, respectively. How to use these plugins to run JPF is discussed inChapter 2.Use Eclipse?yesnoUse NetBeans?yesnoRead Section 1.1–1.2Read Section 1.3–1.5Read Section 1.6–1.8Figure 1.1: Road map for Section 1.1–1.8.As we already mentioned in the preface, JPF is easily extensible. Therefore, it should come as no surprise thatthere are numerous extensions of JPF. In Section 1.9 we will discuss how to install such an extension.1.1Installing Sources with GitHow to install Git is beyond the scope of this book. We refer the reader to git-scm.com. We assume that the path to thegit command is already part of the system environment variable PATH (see Section 1.1.3). To install the JPF sourceswith Git, follow the seven steps below.1. Create a directory named jpf.7
2. To get the JPF sources with Git, open a shell (Linux and OS X) or command prompt (Windows), go to the jpfdirectory and typegit clone https://github.com/javapathfinder/jpf-core.gitThis results in output similar to the following.Cloning into ’jpf-core’.remote: Enumerating objects: 2784, done.remote: Total 2784 (delta 0), reused 0 (delta 0), pack-reused 2784Receiving objects: 100% (2784/2784), 1.86 MiB 12.19 MiB/s, done.Resolving deltas: 100% (1324/1324), done.3. Set the user environment variable JAVA HOME as described in Section 1.1.1.4. Run Gradle as described in Section 1.1.2.5. Set the user environment variable JPF HOME to the path of jpf-core. For example, if the jpf directory, created in step 1, has path /cs/home/franck/jpf, then the path of jpf-core is /cs/home/franck/jpf/jpf-core. Similarly, if the jpf directory has path C:\Users\ franck\jpf, then the path of jpf-coreis C:\Users\franck\jpf\jpf-core.6. Add the path of the jpf command to the system environment variable PATH as described in Section 1.1.3.7. Create the site.properties file as described in Section 1.1.4.Once the above steps have been successfully completed, the reader can move on to Chapter 2 and run JPF.1.1.1Setting User Environment Variable JAVA HOMELinux1. Locate the directory of the JDK. Unless the install path for the JDK was changed during installation, it willbe a subdirectory of /usr/java. Inside that directory will be one or more subdirectories whose name startswith jdk, such as jdk1.8.0 181. Choose the latest version. For example, if the directory contains bothjdk1.6.0 37 and jdk1.8.0 181, then the JDK install path is /usr/java/jdk1.8.0 181.2. Set the user environment variable named JAVA HOME to the directory of the JDK by using the set or setenvcommand in a startup script. For more details, do a web search for how to set an environment variable in Linux.Windows1. Locate the directory of the JDK. Unless the install path for the JDK was changed during installation, it will be asubdirectory of C:\Program Files\Java. Inside that directory will be one or more subdirectories whosename starts with jdk, such as jdk1.8.0 181. Choose the latest version. For example, if the directory contains both jdk1.6.0 37 and jdk1.8.0 181, then the JDK install path is C:\Program Files\Java\jdk1.8.0 181.2. Set the user environment variable named JAVA HOME to the directory of the JDK. For more details, do a websearch for how to set an environment variable in Windows.8
OS X1. Locate the directory of the JDK. Unless the install path for the JDK was changed during installation, it willbe a subdirectory of /Library/Java/JavaVirtualMachines. Inside that directory will be one ormore subdirectories whose name starts with jdk, such as jdk1.8.0 181. Choose the latest version. Forexample, if the directory contains both jdk1.6.0 37 and jdk1.8.0 181, then the JDK install path is/Library/Java/JavaVirtualMachines/jdk1.8.0 181.jdk/Contents/Home.2. Set the user environment variable named JAVA HOME to the directory of the JDK by using the set or setenvcommand in a startup script. For more details, do a web search for how to set an environment variable in OS X.1.1.2Running GradleHow to install Gradle is beyond the scope of this book. We refer the reader to gradle.org. We assume that the path tothe gradle command is already part of the system environment variable PATH (see Section 1.1.3).LinuxIn a shell, go to the subdirectory jpf-core of the created directory jpf. The directory jpf-core contains the filegradlew. To run this Gradle script, type ./gradlew. This results in a lot of output, including something similarto the following. Task :compileJava. Task :compileClassesJava. Task :compilePeersJava. Task :compileTestJava.BUILD SUCCESSFUL in 41s15 actionable tasks: 15 executedWindowsIn a command prompt, go to the subdirectory jpf-core of the created directory jpf. The directory jpf-corecontains the file gradlew.bat. To run this Gradle script, type gradlew. This results in a lot of output, includingsomething similar to the following. Task :compileJava. Task :compileClassesJava. Task :compilePeersJava. Task :compileTestJava.9
BUILD SUCCESSFUL in 53s15 actionable tasks: 15 executedOS X1.1.3Adding to the System Environment Variable PATHThe system environment variable PATH consists of a list of directories in which programs are located. Below, wediscuss how to add the directory containing the jpf command can be added to PATH.LinuxAdd to the system environment variable named PATH the directory of the jpf command by changing the set orsetenv command for PATH in a startup script. If the jpf directory has path /cs/home/franck/jpf, then add/cs/home/franck/jpf/jpf-core/bin to the system environment variable PATH. For more details, do a websearch for how to change an environment variable in Linux.WindowsIn Windows, environment variables are not case sensitive. Hence, the system environment variable PATH can also benamed, for example, Path or path. If the jpf directory has path C:\Users\franck\jpf, then add C:\Users\franck\jpf\jpf-core\bin to the system environment variable PATH. For more details, do a web search forhow to change an environment variable in Windows.OS XIf the jpf directory has path /Users/franck/jpf, then add /Users/franck/jpf/ jpf-core/bin to thesystem environment variable PATH. For more details, do a web search for how to change an environment variable inOS X.1.1.4Creating the site.properties File1. Find the value of the standard Java system property user.home by running the following Java application.public class PrintUserHome {public static void main(String[] args) {System.out.println("user.home " System.getProperty("user.home"));}}2. Create a directory named .jpf within the directory user.home1 .3. Create in the directory user.home/.jpf a file named site.properties2 . Assuming, for example, thatjpf-core is a subdirectory of user.home/jpf, the file site.properties has the following content.# JPF site configurationjpf-core {user.home}/jpf/jpf-coreextensions {jpf-core}Next, we provide a few examples.1 To create a directory named .jpf in Windows Explorer, use .jpf. as its name. The dot at the end is necessary, and will be removed byWindows Explorer.2 To create a file named site.properties in Window Explorer, configure Windows Explorer so that file extensions are visible, create a textfile named site.txt with the above content, and rename the file to site.properties. For more details, do a web search for how to changea file extension in Windows.10
LinuxAssume that the jpf directory has path /cs/home/franck/jpf and user.home is /cs/home/ franck. Thensite.properties is located in the directory /cs/home/franck/.jpf and its content is# JPF site configurationjpf-core {user.home}/jpf/jpf-coreextensions {jpf-core}If the jpf directory has path /cs/packages/jpf and user.home is /cs/home/franck, then site.propertiesis located in the directory /cs/home/franck/.jpf and its content is# JPF site configurationjpf-core /cs/packages/jpf/jpf-coreextensions {jpf-core}WindowsAssume that the jpf directory has path C:\Users\franck\jpf and user.home is C:\Users\ franck. Thensite.properties is located in the directory C:\Users\franck\.jpf and its content is# JPF site configurationjpf-core {user.home}/jpf/jpf-coreextensions {jpf-core}Note that we use / instead of \ in the path. If the jpf directory has path C:\Program Files\jpf and user.homeis C:\Users\franck, then site.properties is located in the directory C:\Users\franck\.jpf and itscontent is# JPF site configurationjpf-core C:/Program Files/jpf/jpf-coreextensions {jpf-core}OS XAssume that the jpf directory has path /Users/franck/jpf and user.home is /Users/franck. Then site.propertiesis located in the directory /Users/franck/.jpf and its content is# JPF site configurationjpf-core {user.home}/jpf/jpf-coreextensions {jpf-core}If the jpf directory has path /System/Library/jpf and user.home is /Users/franck, then site.propertiesis located in the directory /Users/franck/.jpf and its content is# JPF site configurationjpf-core /System/Library/jpf/jpf-coreextensions {jpf-core}1.2Updating Sources with GitSince the sources of JPF change regularly, one should update JPF regularly as well. This can be done as follows.1. Open a shell (Linux and OS X) or command prompt (Windows), go to the jpf-core directory and typegit pull11
We distinguish two cases. If the above command results in output similar to the following, then the sources ofJPF have not changed and, hence, we are done.Already up to date.Otherwise, the above command results in output similar to the following, which indicates that the source of JPFhave changed and, therefore, we continue with the next step.remote: Enumerating objects: 48, done.remote: Counting objects: 100% (48/48), done.remote: Compressing objects: 100% (19/19), done.remote: Total 48 (delta 29), reused 42 (delta 23), pack-reused 0Unpacking objects: 100% (48/48), done.From c42e4fc master - origin/masterUpdating 28c066f.c42e4fcFast-forwardbuild.gradle 24 -./gov/nasa/jpf/vm/JPF java lang Runtime.java 8 ./gov/nasa/jpf/test/java/lang/RuntimeTest.java 16 5 files changed, 191 insertions( ), 7 deletions(-)2. Run Gradle as described in Section 1.1.2.1.3Installing Sources with Git within EclipseHow to install Eclipse, Git and Gradle is beyond the scope of this book. We refer the reader to eclipe.org, git-scm.comand gradle.org, respectively. We assume that Eclipse, Git and Gradle have been installed. Eclipse should at least beversion 4.6 and it should use at least Java version 8. We assume that the paths to the git and gradle commands arealready part of the system environment variable PATH (see Section 1.1.3). To install the JPF sources with Git withinEclipse, follow the ten steps below.1. In Eclipse, select File from the menu and select Import.2. In the Select window, select Projects from Git, and press Next.12
3. In the Select Repository Source window, select Clone URI, and press Next.4. In the Source Git Repository window, enter https://github.com/javapathfinder/jpf-core.gitin the URI field, and press Next. The fields Host and Repository path are populated automatically.13
5. In the Branch Selection window, select master, and press Next.6. In the Location Destination window, modify the Directory to C:\Users\franck\jpf\jpf-core, that is,replace git with jpf, and press Next.14
7. In the wizard selection window, select Import as general project, and press Next.8. In the Imports window, click Finish.15
9. Run Gradle as described in Section 1.1.2.10. Create the site.properties file as described in Section 1.1.4. Assuming that the jpf-core directory has path C:\Users\franck\jpf\jpf-core and user.home is C:\Users\franck, the contentof site.properties is# JPF site configurationjpf-core {user.home}/jpf/jpf-coreextensions {jpf-core}1.4Updating Sources with Git within EclipseTo update the sources with Git within Eclipse, follow the three steps below.1. Right click on the jpf-core project in the Package Explorer and select Team and subsequently select Pull.16
2. In the Pull Result window, click Close.3. Run Gradle as described in Section 1.1.2.1.5Installing JPF Plugin for EclipseAs we will discuss in Chapter 2, the JPF plugin can be used to run JPF within Eclipse.Linux1. Locate the directory of Eclipse. Unless the install path for Eclipse was changed during installation, it will be/usr/local. This directory contains a directory named dropins. In this directory dropins, create adirectory named plugins.2. Download the file eclipse-jpf 1.0.7.jar from www.eecs.yorku.ca/ franck/jpf. Save the jar file in thecreated plugins directory.Windows1. Locate the directory of Eclipse. Unless the install path for Eclipse was changed during installation, it will beC:\Program Files\eclipse. This directory contains a directory named dropins. In this directorydropins, create a directory named plugins.17
2. Download the file eclipse-jpf 1.0.7.jar from www.eecs.yorku.ca/ franck/jpf. Save the jar file in thecreated plugins directory.OS X1.6Installing Sources with Git within NetBeansHow to install NetBeans and Git is beyond the scope of this book. We refer the reader to netbeans.org and git-scm.com,respectively. We assume that NetBeans and Git have been installed. NetBeans should at least be version 8.0 and itshould use at least Java version 8. To install the JPF sources with Git within NetBeans, follow the ten steps below.1. In NetBeans, select Team from the menu and select Clone.2. In the Clone Repository window, enter the Repository URL https://github.com/javapathfinder/jpf-core.git, set Clone into to C:\Users\franck\jpf, and press Next.3. In the Clone Repository window, select the master branch, and press Next.18
4. In the Clone Repository window, press Finish.5. In the Clone Completed window, press Close.6. Download the file netbeans.zip from www.eecs.yorku.ca/ franck/jpf. Save the file in the directory C:\Users\franck\jpf\jpf-core. Extract all the files from netbeans.zip.7. In NetBeans, select File from the menu and select Open Project.19
8. In the Open Project window, select the jpf-core project in the C:\\Users\franck\jpf directory, andpress Open Project.9. Right click on the jpf-core project and select Build.10. Create the site.properties file as described in Section 1.1.4. Assuming that the jpf-core project haspath C:\Users\franck\jpf and user.home is C:\Users\franck, the content of site.propertiesis# JPF site configurationjpf-core {user.home}/jpf/jpf-coreextensions {jpf-core}1.7Updating Sources with Git within NetBeansTo update the sources with Git within NetBeans, follow the two steps below.1. Right click on the jpf-core project, select Git, Checkout, and Checkout Files.20
2. Right click on the jpf-core project and select Build.1.8Installing JPF Plugin for NetBeansAs we will discuss in Chapter 2, the JPF plugin can be used to run JPF within NetBeans. This plugin can be installedas follows.1. Download the file v-nasa-jpf-netbeans-runjpf.nbm.2. In NetBeans, select Tools from the menu and the select Plugins.3. Select the Downloaded tab. Press on Add Plugins.21
4. Select the gov-nasa-jpf-netbeans-runjpf.nbm file that was downloaded in step 1, and press Open.5. In the Plugins window, press Install.22
6. In the NetBeans IDE Installer window, press Next.7. In the NetBeans IDE Installer window, accept the license agreement, and press Install.23
8. Restart NetBeans.1.9Installing an Extension of JPFAs running example, we consider the extension jpf-shell. This extension provides a graphical user interface forJPF. We assume that the reader has already successfully installed jpf-core.1.9.1Installing Sources with MercurialHow to install Mercurial is beyond the scope of this book. We refer the reader to www.mercurial-scm.org. We assumethat the path to the hg command is already part of the system environment variable PATH (see Section 1.1.3). Toinstall the JPF sources with Mercurial, follow the three steps below.1. To get the jpf-shell sources with Mercurial, open a shell (Linux and OS X) or command prompt (Windows),go to the jpf directory, assumed here to be C:\Users\franck\jpf, and typehg clone https://jpf.byu.edu/hg/jpf-shellThis results in output similar to the following.destination directory: jpf-shellrequesting all changesadding changesetsadding manifestsadding file changesadded 194 changesets with 953 changes to 232 files ( 1 heads)new changesets f3ac7d4188ec:c785dfae0b01updating to branch default131 files updated, 0 files merged, 0 files removed, 0 files unresolved2. Run ant as described in Section 1.9.2.3. Update the site.properties file as described in Section 1.9.3.24
1.9.2Running AntAnt is a Java library and command-line tool that can be used to compile the sources of JPF and its extensions, test them,generate jar files, et cetera. For more information about Ant, we refer the reader to ant.apache.org. We assume that thereader has already installed Ant (see ant.apache.org for installation instructions) and has added the ant command tothe PATH environment variable (see Section 1.1.3).For example, to install the JPF extension jpf-shell, open a shell (Linux and OS X) or command prompt(Windows) and go to the subdirectory jpf-shell of the directory jpf. The directory jpf-shell contains thefile build.xml. To run ant, type ant test. This results in a lot of output, the beginning and end of which aresimilar to the following.Buildfile: r] Created dir: C:\Users\franck\jpf\jpf-shell\build.-min:[jar] Building jar: jarbuild:BUILD SUCCESSFULTotal time: 13 seconds1.9.3Updating the site.properties FileWhenever we install an extension of JPF, we need to update the site.properties file.LinuxAssume that the jpf directory has path /cs/home/franck/jpf and user.home is /cs/home/ franck. Thensite.properties is located in the directory /cs/home/franck/.jpf and its content is# JPF site configurationjpf-core {user.home}/jpf/jpf-corejpf-shell {user.home}/jpf/jpf-shellextensions {jpf-core}If the jpf directory has path /cs/packages/jpf and user.home is /cs/home/franck, then site.propertiesis located in the directory /cs/home/franck/.jpf and its content is# JPF site configurationjpf-core /cs/packages/jpf/jpf-corejpf-shell /cs/packages/jpf/jpf-shellextensions {jpf-core}WindowsAssume that the jpf directory has path C:\Users\franck\jpf and user.home is C:\Users\ franck. Thensite.properties is located in the directory C:\Users\franck\.jpf and its content is25
# JPF site configurationjpf-core {user.home}/jpf/jpf-corejpf-shell {user.home}/jpf/jpf-shellextensions {jpf-core}Note that we use / instead of \ in the path. If the jpf directory has path C:\Program Files\jpf and user.homeis C:\Users\franck, then site.properties is located in the directory C:\Users\franck\.jpf and itscontent is# JPF site configurationjpf-core C:/Program Files/jpf/jpf-corejpf-shell C:/Program Files/jpf/jpf-shellextensions {jpf-core}OS XAssume that the jpf directory has path /Users/franck/jpf and user.home is /Users/franck. Then site.propertiesis located in the directory /Users/franck/.jpf and its content is# JPF site configurationjpf-core {user.home}/jpf/jpf-corejpf-shell {user.home}/jpf/jpf-shellextensions {jpf-core}If the jpf directory has path /System/Library/jpf and user.home is /Users/franck, then site.propertiesis located in the directory /Users/franck/.jpf and its content is# JPF site configurationjpf-core /System/Library/jpf/jpf-corejpf-shell /System/Library/jpf/jpf-shellextensions {jpf-core}1.9.4Updating Sources with MercurialTo update the sources with Mercurial, follow the two steps below.1. Open a shell (Linux and OS X) or command prompt (Windows), go to the jpf-shell directory and typehg pull -uWe distinguish two cases. If the above command results in output similar to the following, then the sources ofjpf-shell have not changed and, hence, we are done.pulling from https://jpf.byu.edu/hg/jpf-shellsearching for changesno changes foundOtherwise, the above command results in output similar to the following, which indicates that the source ofjpf-shell have changed and, therefore, we continue with the next step.pulling from https://jpf.byu.edu/hg/jpf-shellsearching for changesadding changesetsadding manifestsadding file changesadded 4 changesets with 23 changes to 7 files7 files updated, 0 files merged, 1 files removed, 0 files unresolved2. Run ant as described in Section 1.9.2.26
1.9.5Installing Sources with Mercurial within EclipseHow to install Mercurial is beyond the scope of this book. We refer the reader to www.mercurialscm.org. We assumethat the path to the hg command is already part of the system environment variable PATH (see Section 1.1.3). Toinstall the JPF extension jpf-shell within Eclipse with Mercurial, follow the 11 steps below.1. In Eclipse, select Help from then menu item and then select Eclipse Marketplace .2. In the Eclipse Marketplace window, enter mercurial in the Find textbox, hit enter, and press Install.3. In the Review Licences window, press Finish.27
4. In the Security Warning window, press Install anyway.5. After Eclipse restarts, in the Preferences window, check that the path to the Mercurial Executable is correct andpress Apply and Close.6. In Eclipse, select File from the menu item and then select Import.28
7. In the Import window, select Mercurial and Clone Existing Mercurial Repository, and press Next.8. In the Clone repository window, enter URL https://jpf.byu.edu/hg/jpf-shell, and press Next.29
9. In the Select working directory revision, check that the default revision is selected, and press Next.10. In the Import projects window, press Finish.30
11. Update the site.properties file as described in Section 1.9.3.1.9.6Updating Sources with Mercurial within EclipseSimply build the project jpf-shell: select Project from the menu and then select Build Project.1.9.7Installing Sources with Mercurial within NetBeansHow to install Mercurial is beyond the scope of this book. We refer the reader to www.mercurial-scm.org. We assumethat the path to the hg command is already part of the system environment variable PATH (see Section 1.1.3). Toinstall the JPF extension jpf-shell within NetBeans with Mercurial, follow the eight steps bel
As we have already discussed in the preface, JPF is a tool to detect bugs in Java code. Since the reader is interested in JPF, we feel that it is safe to assume that the reader is familiar with Java and has installed the Java development kit (JDK). The JDK should be at least version 8. JPF can be installed in several different ways on a variety .