Transcription
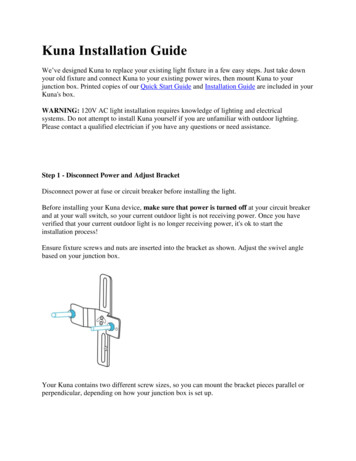
Kuna Installation GuideWe’ve designed Kuna to replace your existing light fixture in a few easy steps. Just take downyour old fixture and connect Kuna to your existing power wires, then mount Kuna to yourjunction box. Printed copies of our Quick Start Guide and Installation Guide are included in yourKuna's box.WARNING: 120V AC light installation requires knowledge of lighting and electricalsystems. Do not attempt to install Kuna yourself if you are unfamiliar with outdoor lighting.Please contact a qualified electrician if you have any questions or need assistance.Step 1 - Disconnect Power and Adjust BracketDisconnect power at fuse or circuit breaker before installing the light.Before installing your Kuna device, make sure that power is turned off at your circuit breakerand at your wall switch, so your current outdoor light is not receiving power. Once you haveverified that your current outdoor light is no longer receiving power, it's ok to start theinstallation process!Ensure fixture screws and nuts are inserted into the bracket as shown. Adjust the swivel anglebased on your junction box.Your Kuna contains two different screw sizes, so you can mount the bracket pieces parallel orperpendicular, depending on how your junction box is set up.
Step 2 - Fasten Bracket to Junction BoxTighten middle screws in the bracket so it’s firm and doesn’t wobble.Fasten bracket to junction box using two junction box screws. Choose short or long pair asneeded.Step 3 - Adjust and Tighten ScrewsUse the fixture screws length indicator to adjust the length of the two screws from the wall, thentighten the two nuts.Step 4 - Suspend Light with Holding HookUse holding hook to suspend the light and free your hands for wiring.
4a.4b.Connect the bottom of the hook (square) to the right screw pole (4a), then hand the top of thehook (triangle) on the mounting bracket (4b).Step 5 - Connect the WiresUse wire nuts to connect Black to Black wires. Insert both wires all the way into the nut andtwist until secure. Then repeat for the white wires and for the ground wires.
Wall wire colors may vary.Recommended: Use a voltage detector to confirm the power is off.Step 6 - Align Fixture ScrewsHolding the light fixture with both hands, align the two fixture-long screws into the light fixturescrew posts.Step 7 - Install Bulb and Reconnect PowerMount the light fixture to the long screws as shown, then install both decorate nuts. Install a lightbulb (maximum 100W). Kuna recommends an A-15 LED or CFL light bulb for best results.
Apply silicone sealant between the wall and light fixture (optional).Reconnect power at fuse or circuit breaker after installing the light.Step 8 - Finish Setup with the Kuna AppOnce your Kuna is fully installed, you're ready to connect your device to the Kuna app. Click here if you're setting up a full Kuna.Click here if you're setting up a companion light.Step 9 - Adjust Camera (Full Security Light Only)Adjust the camera lens angle. Use two fingers to loosen up the locking ring by turning it counterclockwise. Then, lock it up by turning the ring clockwise. Before making final adjustments,check the video feed on your device after downloading the Kuna app and setting up Wi-Fi.
Setting Up Your New Smart Security LightTo setup your new Smart Security Light, please make sure it's successfully installed, and thatstatus LED on the bottom left-hand side of your light is flashing red.This flashing red status LED means that your Smart Security Light is ready to be paired to yourKuna account! If your Smart Security Light has not been installed yet, please refer toour installation instructions.Step 1 - Download the Kuna AppFirst, download the free Kuna app from the Apple App Store (for iOS) or the Google Play Store(for Android).You will need to create an account specifically for the Kuna app, even if you have created aseparate account for the online store. If you already have a Kuna app account, you can skip toStep 3.Step 2 - Create an AccountWhen you open the Kuna app for the first time, you will see the login page. Click the "GetStarted" button to create a new Kuna account.
Once you click Get Started, you'll be prompted to add your name, your email address, and tochoose a password for your Kuna account.
As soon as you have re-entered your password, click Next on the top right-hand corner of thescreen. Then confirm that you would like to use that email address for your Kuna account, andyou'll be all set. Your Kuna account has now been created, and you can skip to Step 4!Step 3 - Log In To Your Kuna AccountIf you already have an account, you will log into the Kuna app using your Kuna account emailand password. First, click the Log In button on the Welcome screen.
Once you click Log In, you'll be prompted to log in using your Kuna account email address andpassword. If you don't remember your password, click the Forgot Your Password? option to resetyour Kuna account password.
After entering your Kuna account email address and password, click NEXT on the top right-handcorner of your screen. You're now signed into your Kuna account!Step 4 - Pair Your Smart Security Light to Your AccountOnce you log in to your Kuna account, you will see the Devices tab. If you have not yet pairedany devices or if you do not have shared access to any devices, you will see the Welcome screenbelow. To pair a device from the Welcome screen, click the Add Device button.
If you already have shared access or a paired device, you will see a thumbnail of all the devicesyou currently have access to – like the screen shot below. In this case, you'll click the DevicePlus button on the top, right-hand side of the screen.
Once you have clicked either the Device Plus button or the Add Device button, you will beprompted to choose the type of device you would like to pair with your account. In thiswalkthrough, we'll be setting up a Smart Security Light, so choose that option by tapping on thepicture of the Smart Security Light.
To find out more about pairing a Kuna Companion, click here. To set up a Toucan camera, clickhere.Because this process uses the Bluetooth on your mobile device, you will need to be close to yourSmart Security Light. We recommend holding your mobile device no more than 5 feet awayfrom your light during this initial pairing process.If there are multiple Smart Security Lights in the area, like in the screen shot below, the mobileapp will tell you which one is the closest. The one that you are pairing should have the strongestBluetooth signal, so make sure that you're standing close to it. If the app displays multipledevices, the one you're setting up should have the strongest Bluetooth signal. Make sure you'restanding close to it.
Once you have identified the closest Smart Security Light, tap that device's name to continue thesetup process. If there is only one device in the area, then you can choose that one. In the screenshot below, we will choose New Device 1.
Please Note: If you are setting up multiple Smart Security Lights, you will need to go throughthis set-up process for each new Smart Security Light, starting at Step 4. This allows you to setdifferent locations and Wi-Fi networks for each Smart Security Light, if you wish.Step 5 - Choose a Name for Your DeviceAfter selecting the Smart Security Light that you would like to pair, the mobile app will promptyou to choose a name for this new light. The mobile app automatically suggests a few of themost popular names, but you can also choose a custom name.In the screen shot below, we will choose the name "Front Door" for our device.
Step 6 - Connect Your Smart Security Light to Wi-FiNow that you have chosen a name for your Smart Security Light, it's time to connect it to yourhome's Wi-Fi network. The mobile app displays all of the Wi-Fi networks that it is able to find inthe area. Make sure that your home's Wi-Fi network displays at least two bars in the mobile app.If your Wi-Fi network shows less than two bars, or is not displayed in this section, move yourwireless router closer to your Smart Security Light.Once you have located your home's Wi-Fi network, tap on the network name to select it andmove to the next section. In the screen shot below, we will select the Wi-Fi network "kuna".
Once you have selected the network for your Smart Security Light, click into the WiFi passwordsection and enter your home network's WiFi password. We suggest using the Show Passwordfunction, to ensure that your password is entered correctly.
Once your WiFi password is entered correctly, click the Connect button in the top right-handcorner.
Your Smart Security Light will now connect to your home's WiFi network!Step 7 - Select Your Timezone and LocationYour Smart Security Light will use the timezone to determine sunrise and sunset times for yourlocation. The mobile app will automatically suggest the timezone your mobile device is set to,but you can also select a different timezone. In the screen shot below, we'll choose the timezone"America/Los Angeles".
After you set your timezone, we'll choose the city that your Smart Security Light is setup in. Thecity information is used for the sunrise and sunset times for your light schedule. The Kuna appuses your approximate location to make your light schedule more accurate. You DO NOT needto provide your full address.
If you have setup any previous devices, the mobile app will suggest a city for you. Otherwise,you can click "Enter new location" to choose a new or different city for your device.Step 8 - Select a Detection SoundYour device can play a pre-recorded message when motion is detected, as a way to greet or alertvisitors. To use the default Chime sound, select "Yes - Use Defaults".
To change the sound, or turn the sound off, select "No - Change Greetings". Then, select a newsound, or "Off", and tap the arrow in the top lefthand corner to go back to the setup process.
Step 9 - Set Up Your Light ScheduleThe mobile app will suggest using the default settings – turning the light on at dusk and off atdawn. If you would like to keep the default settings, click "Yes – Finish Setup". If you wouldlike to change the default settings, click "No – Change light schedule".To learn more about the light schedule options, click here. You can also change your lightschedule at any time after you finish setting up your device.
Once you click "Yes – Finish setup", you're done and ready to start using your new SmartSecurity Light! If you need to set up any other devices, simply click the "Set up more devices"button.
Please Note: Many of your Kuna App features will not work correctly until your firmware is upto date. You can wait for it to update automatically, or update it manually by tapping the UpdateFirmware button in your Camera Settings. To learn more about updating your firmware, clickhere.Below are some additional Help Center articles to get you started with your new device:Adjust the Motion Detection SensitivitySet Alerts for Individual Security LightsImprove Your Wi-Fi SignalWhat to Do if Your Device Goes OfflineIf you run into any issues, or if you have any additional questions, click the Contact Us buttonbelow. We would be happy to help!
If you have an older version of the mobile app, click here to view the appropriate article.I'm Getting False Detections or MissedDetectionsIf your Kuna is detecting too much or too little, you can adjust the sensitivity yourself. Forcomplete instructions, check out this article.First, go to the Cameras tab and tap on the small gear icon on the preview thumbnail for the lightyou want to adjust. Next, scroll to the bottom of the camera settings view to the MotionSensitivity slider. 100 is most sensitive, 0 is least sensitive.If you're getting a lot of false alarms, we recommend trying a value between 50 and 75 to start.You may have to try a few different settings to find the one that works best for your uniquesetup.If you're having trouble finding the perfect setting, we can help! Click the Contact Us buttonbelow.
Recommended: Use a voltage detector to confirm the power is off. Step 6 - Align Fixture Screws Holding the light fixture with both hands, align the two fixture-long screws into the light fixture screw posts. Step 7 - Install Bulb and Reconnect Power Mount the light fixture to the long screws as shown, then install both decorate nuts. Install a .


