Transcription
02SUPER 100 FAÇADE SCAFFOLDING SYSTEMSUPER 100FAÇADE SCAFFOLDING SYSTEMINSTRUCTIONS FORASSEMBLY AND USE (AVA)IAVA FAÇADE SCAFFOLDING SYSTEMSUPER 100 2020-07-EN–VN-1.1SMARTDETAILSGREATSOLUTIONS!
02SCAFOM-RUX FAÇADE SCAFFOLDING SYSTEMT 49 (0) 2331 4709-180 · INFO@SCAFOM-RUX.DESUPER 1002Status:07/2020Status:07/20203
02SUPER 100 INSTRUCTIONS FOR ASSEMBLY AND USET 49 (0) 2331 4709-180 · INFO@SCAFOM-RUX.DELIST OF CONTENTSSUPER 100INSTRUCTIONS FOR ASSEMBLY AND USEScaffolding system:BERA-RUX rapid-erection scaffolding SUPER 100Working and protective scaffold of load classes 4 to 6DIN EN 12810 / DIN EN 12811Manufacturer:RUX GmbH, g EN 12810 - 6D - SW09/200 - H2 - B - LSScaffolding EN 12810 - 5D - SW09/250 - H2 - B - LSScaffolding EN 12810 - 4D - SW09/300 - H2 - B - LSLoad-bearing capacity: 3.00 kN/m² to 6.00 kN/m²Scaffolding bay length: maximum 3.00 m4Status:07/20201Preliminary remarks82General93General .24.4.34.4.3.14.4.44.4.54.4.5.14.4.5.2Assembling the scaffoldingDetermining the intended installation pointsErecting the first scaffold bayLoad-distributing base structureBase jacks, base transoms, decking transomsHeight compensationVertical frames and passage framesLongitudinal ledger, principal guardrailVertical diagonalsTransverse diagonalsSystem decksAlignmentErecting additional scaffold bays at the first levelNormal baysBracingCorner structuresSystem-independent components in scaffolding levelsErecting additional scaffolding levelsSecure against topplingProtection against fallsVertical transport of scaffolding componentsConstruction liftsManual transportErecting the scaffoldingResult of the risk assessment: mounting safety guardrailResult of the risk assessment: mounting safety guardrail inascent bay /personal protective equipmentBracingAnchorageAnchor arrangement and anchor forcesShort tie barsV-shaped tie barsAnchorage at cornersDeviation from the intended position of the tie barsDiversion of anchor forces into the anchor base materialLoad testsTopmost level of the tus:07/20205
026SUPER 100 INSTRUCTIONS FOR ASSEMBLY AND USET 49 (0) 2331 4709-180 · INFO@SCAFOM-RUX.DE4.64.7Completion of the side protectionSystem-independent components as side .45.55.65.75.85.95.10Alternative designs and fitting of supplementary componentsGeneralAccess to workplaces on scaffoldsFront stairway ascentFront ladder ascentInner ladder ascentExtension bracketsInner extension bracketsOuter extension bracketsPassage framesBridging girdersProtective roofProtective wallFree-standing scaffolding levels above the uppermost 465666Dismantling the scaffolding677Usage688Safety .2.3.109.2.3.119.2.3.12Standard design overviewComponent elements of the standard designStandard design configurationsPreliminary remarksOverview of configurationsRepresentation of configurationsLoad class 4 basic configurationLoad class 4 bracket configuration 1 (with inner brackets)Load class 4 bracket configuration 2 (with inner and outer brackets)Load class 4 net-clad, basic versionLoad class 4 net-clad, bracket configuration 1 (with inner brackets)Load class 4 with net, bracket configuration 2 (with inner and outer brackets)Load class 4 tarpaulin-clad, bracket configuration 1 (with inner brackets)Load class 4 with tarpaulin, bracket configuration 2 (with inner and outer brackets)Load class 5 and 6 basic configurationLoad class 5 and 6 bracket configuration 1 (with inner brackets)Load class 5 and 6 net-clad, basic configurationLoad class 5 and 6 net-clad, bracket configuration 1 (with inner 69.2.3.379.2.3.389.2.3.399.3Load class 5 and 6 with tarpaulin, bracket configuration 1 (with inner brackets)Protective wall basic configurationProtective wall bracket configuration 1 (with inner brackets)Protective wall bracket configuration 2 (with inner and outer brackets)Protective wall net-clad, basic configurationProtective wall net-clad, bracket configuration 1 (with inner brackets)Protective wall net-clad, bracket configuration 2 (with inner and outer brackets)Protective wall tarpaulin-clad, bracket configuration 1 (with inner brackets)Protective wall with tarp., bracket configuration 2 (with inner and outer brackets)Protective wall load class 5 and 6, basic configurationProtective wall load class 5 and 6, bracket configuration 1 (with inner brackets)Protective wall load class 5 and 6, net-clad, basic configurationProtective wall load class 5 and 6, net-clad, bracket config. 1 (with inner brackets)Protective wall load class 5 and 6, tarp., bracket config. 1 (with inner brackets)Protective roof basic configurationProtective roof bracket configuration 1 (with inner brackets)Protective roof bracket configuration 2 (with inner and outer brackets)Protective roof load class 5 and 6, basic configurationProtective roof load class 5 and 6, bracket configuration 1 (with inner brackets)Passage frames basic configurationPassage frames bracket configuration 1 (only inner brackets)Passage frames bracket configuration 2 (with inner and outer brackets)Bridging basic configurationBridging bracket configuration 1 (with inner brackets)Bridging bracket configuration 2 (with inner and outer brackets)Single-flight stairway ascentTopmost level not anchoredAnchor forces and foundation 1151161171191211231251271291301321010.1Additional technical informationExample of an anchorage protocol13813811Notes139Status:07/20207
02SUPER 100 INSTRUCTIONS FOR ASSEMBLY AND USE1Preliminary remarks1.1These Instructions for Assembly and Use are valid for the erection, modification anddismantling of the SUPER 100 scaffolding system and its use is exclusively aimed atprofessionals.RUX GmbH, Neue Straße 7, D-58135 HagenTelefon: 02331 - 4709 - 0 Telefax: 02331 - 4709 - 202Mail: info@scafom-rux.de1.2The scaffolding system SUPER 100 has general type approval on the basis of the approvalNo. Z-8.1-185.2.Subject to technical modifications and revision. In the case of any omissions or doubt, therespective provisions valid at any one time are to be consulted.1.3The standard design detailed in these Instructions corresponds to the approval No. Z-8.1185.2. It is described in section 9 of these Instructions. Other details can be taken from theapproval mentioned above.1.4The technical solutions described in these Instructions for Assembly and Use shall not bedeemed as excluding any other technically-proven and equally-suitable solutions.1.5Besides the rules contained in these Instructions, the general regulations pertaining to thescaffolding trade and to users of the scaffolds are to be observed, for example:- General type approval No. Z-8.1-185.2- DIN EN 12811-1: Temporary Structures for Buildings - Part 1: Working Scaffolds- DIN 4420-1: Working and Protective Scaffolds - Part 1: Protective Scaffolds- The Occupational Health and Safety Act (ArbSchG)- Industrial Safety Regulation (BetrSichV) in its currently valid version- Accident Prevention Requirement “Construction Work” (BGV C22)- Technical Rules for Operational Safety (TRBS 1111, 2121)- Instruction Manual for Handling Working and Protective Scaffolds (BGI 663)- Scaffolding Work (BGI 5101)- Technical Regulations for Scaffolding – Stand Framing as Facade or Modular Systemout of Prefabricated Components1.68T 49 (0) 2331 4709-180 · INFO@SCAFOM-RUX.DEThese Instructions only apply in conjunction with the use of original SUPER 100components that are marked in accordance with approval Z-8.1-185.2 and which areindicated in the component part list in section 9.1.1.7The component parts of SUPER 100 may not be modified.1.8Scaffold components have to be adequately and responsibly checked for damage by thescaffolder/scaffold builder prior to erecting. Damaged components may not be used.1.9Persons may not access the scaffolding if they have not clearly satisfied the requirementsof the medical check-up (G41 – working at heights with a risk of falling).Status:07/20201.10 The publisher of these Instructions for Assembly and Use is:2General2.1The SUPER 100 scaffolding system is approved as a working and protective scaffold of loadclasses 4 to 6 according to DIN EN 12811-1:2004-3.Table 1: ClassificationClassificationScaffold EN 12810 - 6D - SW09/200 - H2 - B - LSScaffold EN 12810 - 5D - SW09/250 - H2 - B - LSScaffold EN 12810 - 4D - SW09/300 - H2 - B - LSLoad class654Bay length 2.0 m 2.5 m 3.0 mLoad capacity6.0 kN/m24.5 kN/m23.0 kN/m22.2The stability as well as the usability shall be deemed as verified and evidenced for thestandard design described in these Instructions on account of the general type approvalissued by the DIBt. Any deviations to this standard design are permissible when, inindividual cases, the stability and usability are evidenced in writing in line with thetechnical building requirements and the findings detailed in the approval Z-8.1-185.2(supplementary technical information in this respect has been compiled in section 10).2.3The stability may also be evidenced with the help of measurement tables or calculationaids which have been prepared on the basis of the technical building requirements.2.4Deviations to these Instructions are possible when, in individual cases, the safety of theerecting processes has been verified in writing (for example: against falling, stability inintermediate states).2.5The erecting, modification and dismantling of the system scaffolding may only be carriedout under the supervision of a qualified person (supervising official) by suitably qualifiedstaff after having been instructed specifically on the site itself and on the results of therisk assessment. Qualified staff may be master scaffolders, persons successfully qualifiedas scaffolders, certified senior scaffold fitters, certified scaffold group leaders, peoplewith comparable expertise and construction trade training as well as adequate practicalprofessional experience in the scaffolding business.Status:07/20209
022.62.72.82.9SUPER 100 INSTRUCTIONS FOR ASSEMBLY AND USEThese Instructions for Assembly and Use and the above-mentioned approval have tobe available on the site for the supervising official and the staff throughout the entireerection and disassembly process.T 49 (0) 2331 4709-180 · INFO@SCAFOM-RUX.DE3Scaffolding components must be visually inspected for damage before fitting. Damagedscaffold components may not be used.The erection and disassembly of the scaffolding may only take place below wind force 5.When a higher wind force is experienced, the scaffolding is to be immediately securedand cleared. By way of orientation: there is a noticeable restriction that is felt when simplywalking when the wind force is above 6.The scaffold is to be erected in the sequence indicated in the following sections.During erection, the stability of the scaffolding must always be guaranteed - even inintermediate states.Depending upon the complexity, a plan will need to be prepared for the erection,modification and disassembly work (assembly instructions) by the contractor responsiblefor the erection and the scaffolding work or have this prepared by a designated qualifiedperson. In this respect these Instructions for Assembly and Use may be supplemented bydetailed information pertaining to the respective implementation.Personal protective equipment must be worn during all assembly work. This includessuitable clothing, safety shoes, gloves and safety helmet with chin strap as per EN 397.Depending on requirements, additional gear such as safety goggles, ear protection, safetyvest or other personal protective equipment may need to be used.Unfinished scaffolds or scaffold areas have to be marked with warning signs clearly statingthat “Unauthorised access is prohibited”. Access to such areas will need to be appropriatelyblocked off.2.10 After completion, the scaffolder/scaffold builder has to have the scaffold checked for thecorrect build and secure function. This inspection has to be carried out by a qualifiedperson and may be conducted by the supervising official.General requirementsSee sections 4.4.2 to 4.4.5. for the use of personal protective equipment (PSAgA) againstfalls from a height.4Assembling the scaffolding4.1Determining the intended installation pointsBefore the actual assembly work begins, the intended installation points need to bedetermined on site in accordance with the site-specific installation plan.2.11 After completion and testing, the scaffolding will need to be marked. This marking has toinclude details about the scaffolder/scaffold builder, the type of scaffolding and the loadand width classes and should also contain general safety instructions. Such marking is to belocated at a clearly visible position on the scaffold e.g. at the access points to the ascents.The gap between the decking and the wall to be scaffolded is – depending on the workto be carried out – to be kept as small as possible and may only have a maximum width of30 cm (see also section 4.4.2). If this gap cannot be maintained locally and the fall heightis greater than 2 m, three-part side protection (principal guardrail, intermediate guardrailand toe board) has also to be fitted on the inside of the scaffold.2.12 When the scaffold builder/scaffolding company is convinced of the proper and orderlycondition of the scaffold, it may then be passed over to the user. It is recommended that thetransfer is carried out together with the user and documented e.g. in an inspection report.2.13 The results of the inspection are to be documented in an inspection report and kept for areasonable period – generally 3 months after the scaffold has been disassembled again.4.22.14 During the entire period of use of the scaffold, these Instructions for Assembly and Usehave to be available on site to the user.Erecting the first scaffold bayThe erection of the scaffold is to commence with a scaffold bay in which vertical diagonalshave been envisaged. In the standard design described here, vertical diagonals may onlybe installed in scaffold bays that are at least 2.00 m long.2.15 Please contact the publisher if you have any queries about these Instructions, assemblyprocedures or the risk assessment:RUX GmbH, Neue Straße 7, D-58135 HagenTelefon: 02331 - 4709 - 0 Telefax: 02331 - 4709 - 202Mail: info@scafom-rux.de10Status:07/2020Status:07/202011
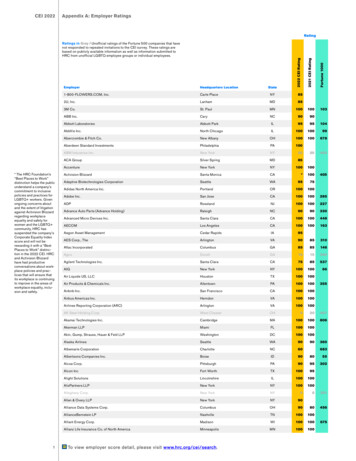
02SUPER 100 INSTRUCTIONS FOR ASSEMBLY AND USET 49 (0) 2331 4709-180 · INFO@SCAFOM-RUX.DE4.2.1 LOAD-DISTRIBUTING BASE STRUCTURE4.2.2 BASE JACKS, BASE TRANSOMS, DECKING TRANSOMSThe scaffolding may only be erected on sufficiently firm ground capable of bearing loads.At the pre-determined positions for the vertical frames, two base jacks are to be placed in pairs atthe centre of the base structure (see Figure 1) and screwed out to the desired extension length:The ground is generally seen as capable of load-bearing if a car can be driven over it withoutleaving tracks: for example, on paved, asphalted or concreted and, generally-speaking, ongravelled areas.Extension length of the base jacks lower edge of base plate to lower edge of vertical frame.If the ground is not of sufficiently load-bearing nature, load-distributing base structures willneed to be used (see Figure 1).29.5 cm for scaffolding without extension brackets25.0 cm for scaffolding with extension bracketsFor the standard design described here, the permissible extension length of the base jacks is:For longer extension lengths, the stability of the scaffolding must be verified for each individual case.Base jacks must always have full-surface contact with the supporting surface. In scaffold bayswhere vertical diagonals are envisaged, base or decking transoms are to be placed on thespindles (see Figure 3).Figure 1: Load-distributing base structure with scaffold planksOn inclined ground, the base structure has to be designed in such a way that it is reliablysecured against slippage and that a horizontal support surface for the scaffold is created (forexample by installing wedges). For inclinations of more than 5 , local load transmission will needto be verified and, if necessary, suitable measures taken to provide the required degree of safety.Figure 3: Base jacks with base or decking transomsWhen installing a transom, ensure that the gravity pin is in the correct position!In scaffolding bays where ladder access is envisaged, decking transoms are to be fittedon the spindles (see Figure 4). System decks are then placed on these transoms(see Section 4.2.8).Figure 2: Load-distributing base structure on an inclined surfaceAn inclination of 5 corresponds to an inclination of 8.5%, which means a differenceof 8.5 cm in height over a 100-cm length.Figure 4: System decks on decking transomsThese system decks can no longer be fitted after the lowermost vertical frames havebeen installed in this bay.12Status:07/2020Status:07/202013
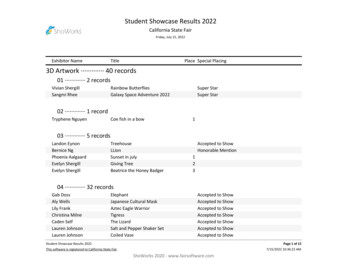
02SUPER 100 INSTRUCTIONS FOR ASSEMBLY AND USE4.2.3 HEIGHT COMPENSATIONIf the ground has different heights at the various erection points or if certain scaffold levelheights are to be reached, compensation frames with a height of 0.50 m or 1.00 m need to befitted (see Figure 5).T 49 (0) 2331 4709-180 · INFO@SCAFOM-RUX.DE4.2.4 VERTICAL FRAMES AND PASSAGE FRAMESThe vertical frames and passage frames are to be placed vertically on the base jacks and securedagainst toppling over.Figure 5: Compensation frame with 0.50 m or 1.00 m heightCompensation frames may only be fitted directly above the jacks or base transoms.When vertical diagonals are to be fitted into a bay, a scaffold tube (Ø 48.3 x 3.2) needs to beconnected with swivel couplers (see section 5.10) between the compensation frames as adiagonal. In this case, an additional longitudinal ledger needs to be mounted directly above thebase jacks (see Figure 5).14Status:07/2020Figure 6: Assembly of the first scaffold bay – vertical framesStatus:07/202015
02SUPER 100 INSTRUCTIONS FOR ASSEMBLY AND USE4.2.5 LONGITUDINAL LEDGER, PRINCIPAL GUARDRAILA longitudinal ledger needs to be fitted on the transoms between the vertical frames (see Figure 7).T 49 (0) 2331 4709-180 · INFO@SCAFOM-RUX.DEFitting of gravity lock guardrails:Figure 7: Assembly of the first scaffold bay - longitudinal ledgerThere are holes at the ends of the longitudinal ledgers, guardrails and diagonals which arepushed over the gravity locks on the vertical frames. The gravity lock pins must then be closedimmediately.Mounting of diagonals:Figure 10: Open gravity lockFigure 11: Closed gravity lockSlide the principal guardrail over the gravitylock after setting the pin in its horizontalposition.The pin on the gravity lock must hangvertically downwards and the mountedcomponents secured against loosening.Fitting of toggle railings:Figure 8: Open gravity lockFigure 9: Closed gravity lockSlide the diagonal over the gravity lock aftersetting the pin in its horizontal position.The pin on the gravity lock must hangvertically downwards and the mountedcomponents secured against loosening.Figure 12: Toggle rail insertion and locking(Figure on right: view from outside)Set the locking bolt of the toggle rail in its horizontal position and push through the lug of theguardrail from the decking side and then turn the locking bolt downwards. The locking boltthen has to point downwards in a vertical position and the railing secured against loosening.Principal and intermediate guardrails have to be fitted so that their flattened ends restagainst a vertical scaffolding element for safety purposes when a person is leaning againstthe principal or intermediate guardrails. Gravity locks are suitable for attaching principaland intermediate guardrails when they point towards the scaffold decking, i.e. the inside ofthe scaffold. Gravity locks which point towards the outside of the scaffold are not suitable,e.g. diagonal gravity locks. Toggle railings and intermediate guardrails are always to bemounted from the scaffold decking side, i.e. from the inside of the scaffold against theguardrail lugs, not from the outside of the scaffold.16Status:07/2020Status:07/202017
02SUPER 100 INSTRUCTIONS FOR ASSEMBLY AND USE4.2.6 VERTICAL DIAGONALSA vertical diagonal brace has to be fitted between the vertical frames on the outside of thescaffold (see Figure 13).T 49 (0) 2331 4709-180 · INFO@SCAFOM-RUX.DE4.2.7 TRANSVERSE DIAGONALSSome configurations require transverse diagonals in the lowermost vertical frames (see Figure 14and section 9.2). In this case, scaffolding tubes (Ø 48.3 x 3.2) are to be used that are connected tothe standards of the vertical frames by means of swivel couplers (see section 5.10).There are holes at the ends of the vertical diagonals which fit over the gravity locks of thetransoms or vertical frames (see Figures 8 and 9). Diagonals are provided with a double hole atone end. When mounting the diagonals, the outer hole located at the end of the diagonal has tobe used. The gravity locks then have to be closed immediately (see section 4.2.5).Figure 14: Vertical frame with transverse diagonalFigure 13: Assembly of the first scaffold bay - vertical diagonalSome configurations also require vertical diagonal braces on the inside of the scaffold (seesection 9.2). In this case, scaffolding tubes (Ø 48.3 x 3.2) are to be used that are connected to thestandards of the vertical frames directly at the nodes by means of swivel couplers (see section5.10).Triangles are stable - squares for themselves are not!18Status:07/2020Status:07/202019
02SUPER 100 INSTRUCTIONS FOR ASSEMBLY AND USET 49 (0) 2331 4709-180 · INFO@SCAFOM-RUX.DE4.2.8 SYSTEM DECKSIn scaffold bays where ladder access is envisaged, the following ladder frames will needto be used:Only the system decks mentioned in section 9.1 may be used.Table 3: Ladder framesThe holes at the ends of the decks are passed over the pins on the decking ledgers of thevertical frames, brackets, transoms or similar and the decks are then fitted.Decking elementAluminium ladder frame with ladder,building veneer plywood BFU 100GAluminium ladder frame with ladder,entirely out of aluminiumAluminium ladder frame with ladder,entirely out of aluminium (surfaceout of extruded profiles)Approval,Annex A,Page35Number perscaffoldingbay13632Width 2.0 mLoad class2.5 m3.0 m0.57 m– 4 310.57 m--- 4 310.58 m 5 4 3Pay careful attention to the permissible load classes of the ladder frames! Install a frontascent solution if need be!Figure 15: System decks hooked onto the pinsLadder access frames may only be installed in the level at 2 m height if the bay directly abovethe base jacks is fitted with system decks on transoms (see section 4.2.2).The number of decks to be fitted in each bay is indicated in the following tables.Table 2: Decking elementsDecking elementWooden plankProfiled wooden plankAluminium deckAluminium floor panelSteel deckSolid wood plank, 45 mmSolid wood plank, 48 mmAluminium deck, 45 mmApproval,Annex A,Page1012141516686970Number perscaffoldingbay3331 ( 1)3333Width0.29 m0.29 m0.29 m0.59 m0.29 m0.29 m0.29 m0.29 mLoad class 2.0 m2.5 m3.0 m 5 5 6 5 6 4 5 6 4 5 6 5 5– 4 4– 4 5 4 4--––The decking reinforces the scaffolding parallel and at right angles to the facade.Each scaffolding level needs to be fully covered with decking.20Status:07/2020Status:07/202021
02SUPER 100 INSTRUCTIONS FOR ASSEMBLY AND USE4.2.9 ALIGNMENTThe first scaffold bay must be aligned so that the vertical frames are vertical, the system decks are horizontal and the maximum permissible wall distance of 30 cm is not exceeded (see section 4.1).T 49 (0) 2331 4709-180 · INFO@SCAFOM-RUX.DE4.3 ERECTING ADDITIONAL SCAFFOLD BAYS ON THE FIRST LEVEL4.3.1 NORMAL BAYSFurther scaffold bays are erected in the same way as described for the first one in the previoussection.Base or decking transoms are to be fitted onto the base jacks in scaffold bays in which verticaldiagonals are envisaged (see Figure 3).Decking transoms are to be fitted onto the base jacks in scaffolding bays where ladder access isenvisaged (see Figure 3).When installing a transom, ensure that the gravity lock is in its correct position! Fit system decks onto the decking transoms (see section 4.2.8).These system decks can no longer be fitted if the lowermost positioning frames havealready been attached in this bay. The vertical frames are to be fitted on the base jacks and aligned vertically. Decks are to be fitted in each bay across the scaffold’s entire width (see section 4.2.8)and aligned horizontally.Figure 16: Fully assembled first scaffold bayFigure 17: Further scaffold baysWhen inner extension brackets are envisaged for the first scaffolding level: Attach extension brackets on the inside (see section 5.3.1) Fit decks on the inner extension brackets and secure them against lifting (see section 4.2.8)All other scaffolding bays have to be aligned so that the vertical frames are vertical, the system decks are horizontal and the maximum permissible wall distance of 30 cm is not exceeded (see section 4.1).22Status:07/2020Status:07/202023
02SUPER 100 INSTRUCTIONS FOR ASSEMBLY AND USE4.3.2 BRACINGThe vertical diagonals are to be installed according to the configuration shown in section 9.2(see section 4.2.6). The following points have to be observed: At least one vertical diagonal brace needs to be installed at each scaffoldinglevel (see section 4.2.6) One vertical diagonal may be allocated to:- a maximum of five scaffold bays in structures without extension brackets and- a maximum of four scaffold bays in structures with extension brackets The direction of inclination of the vertical diagonals may be freely selected Longitudinal ledgers always need to be fitted in addition in bays with vertical diagonalbraces under the lowest scaffolding level (see section 4.2.5)T 49 (0) 2331 4709-180 · INFO@SCAFOM-RUX.DE4.3.3 CORNER STRUCTURESAt the corners of the building, two vertical frames are connected with each other using twoswivel couplers. One swivel coupler is fitted directly under the corner struts of the verticalframes. The other swivel coupler is attached in the lower area of the vertical frames (see Figure18 and Figure 19).Some system configurations require transverse diagonals in the lowest vertical frames (seesection 9.2). For this purpose, scaffold tubes (Ø 48.3 x 3.2) are used which are connected to thestandards of the vertical frames by means of swivel couplers (see section 5.10 and Figure 14).Figure 18: Corner structure with two vertical framesFigure 19: Corner structure with three vertical frames24Status:07/2020Status:07/202025
02SUPER 100 INSTRUCTIONS FOR ASSEMBLY AND USE4.3.4 SYSTEM-INDEPENDENT COMPONENTS IN SCAFFOLDING LEVELSThe scaffolding levels are to be completed with system-independent components if need be.In this respect the load-bearing capacity of the system-independent components must be takeninto account regarding load and the required span width.A gap between two scaffold decks may not exceed 2.5 cm.T 49 (0) 2331 4709-180 · INFO@SCAFOM-RUX.DE4.4 ERECTING ADDITIONAL SCAFFOLDING LEVELS4.4.1 SECURE AGAINST TOPPLINGThere is the danger of a scaffolding toppling over when being erected or dismantled if thescaffold is not adequately anchored. For Instance, in the bay on the first level where verticaltransport is carried out. This can be remedied e.g. by temporary supports at the level of thedecking at a height of 2 m (see Figure 20).A gap between a main scaffold deck and a deck on an inner bracket may not exceed 8 cm.A gap between a scaffold deck and an adjacent building or another structure with sufficientload-bearing capacity may not exceed 30 cm.The decking surfaces of safety scaffolds may not have any gaps.Decked surfaces on protective roofing must be tightly closed-gap right up to the building.Figure 20: Example of a temporary anti-topple system for the first scaffolding level4.4.2 PROTECTION AGAINST FALLSThere is a danger of falling when assembling additional scaffolding levels. The erection workhas to be carried out in such a way that the danger of falling is prevented as far as possible andthat the remaining risk is kept to an absolute minimum. The scaffolder/scaffold builders have todetermine suitable measures for averting danger on the basis of their risk assessment from caseto case and for the respective job. Possible measures for averting danger could include: Use of the SUPER 100 mounting safety guardrail “MSG” (see Figure 30) Use of suitable personal protective equipment “PSAgA” (see Figure 35) A combination of the above safety measuresAs soon as work is carried out with personal protective equipment, a height rescue concept hasto be provided at the construction site.Only components that have been approved for the mounting safety guardrail as per approvalZ-8.1-185.2 may be used for this purpose.26Status:07/2020Status:07/202027
02SUPER 100 INSTRUCTIONS FOR ASSEMBLY AND USET 49 (0) 2331 4709-180 · INFO@SCAFOM-RUX.DEOnly systems whose suitability for scaffolding work has been demonstrated may be used aspersonal protective equipment against falls from a height.Only the approved areas on the vertical frames and guardrail posts with transoms or protectivemesh supports may be used as personal protective equipment anchorage points (see Fig. 21and Fig. 22). The approved anchorage points for personal prot
4.7 System-independent components as side protection 46 5 Alternative designs and fitting of supplementary components 47 5.1 General47 5.2 Access to workplaces on scaffolds 47 5.2.1 Front stairway ascent 48 5.2.2 Front ladder ascent 50 5.2.3 Inner ladder ascent 52 5.3 Extension brackets 54 5.3.1 Inner extension brackets 54