Transcription
User ManualExStik EC500pH / Conductivity / TDS / Salinity / Temperature Meter
IntroductionCongratulations on your purchase of the ExStik EC500 pH/Conductivity/Total Dissolved Solids(TDS) / Salinity meter. With the EC500’s dynamic cell-constant technology it is possible to measurea wide range of Conductivity, TDS, and Salinity with the same electrode. Careful use andmaintenance will provide years of reliable service.Powering the ExStik The ExStik uses four (4) CR2032 Lithium Ion Batteries (included). If the batteries are weak, the ‘BAT’indicator appears on the LCD. Press the ON/OFF key to turn the ExStik on or off. The auto poweroff feature shuts the ExStik off automatically after 10 minutes of inactivity to preserve battery life.Getting Started Remove the cap from the bottom of the ExStik to expose the pH electrode, reference junctionand conductivity electrodes.Before the first use or after storage, soak the electrode in tap water or pH 4 buffer solution forabout 10 minutes.White KCL crystals may be present in the cap or on the electrode. This is to be expecteddepending on the length of time in storage. These crystals will dissolve while soaking theelectrode or they can be rinsed away with tap water.For best results calibrate with pH 7 buffer solution first, then calibrate with the buffer solutionclosest to the expected pH value of the solution or material to be tested.To preserve the pH electrode life, keep the sponge in the protective cap soaked with tap wateror pH 4 buffer solution.For best results, calibrate for conductivity with a standard in the expected range of the sample.For maximum accuracy calibrate from low conductivity value standards to high value standards.2EC500-en-US v3.0 03/22
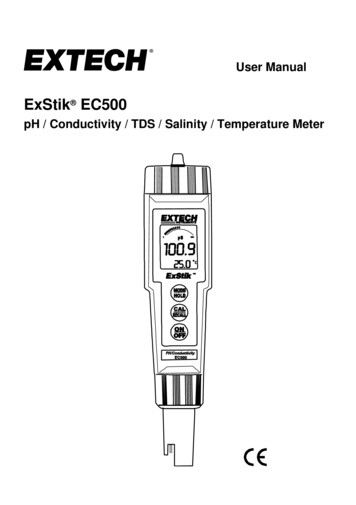
Meter DescriptionFront Panel Description1. Battery compartment cover2. LCD Display3. MODE/HOLD button4. CAL/RECALL button5. ON/OFF button6. Electrode Collar7. pH/Conductivity Electrode(Note: The Electrode cap is not shown)LCD Display1. Bargraph display2. Measurement units3. Main display4. Range calibration andlow battery indicators5. Temperature display6. Renew indicator7. Reading hold indicator3EC500-en-US v3.0 03/22
Measurement ProcedureSample Preparation:1.For Conductivity, TDS or Salinity place the test sample in a samplecup with enough depth (2.5cm minimum) to cover the electrode. Stirthe solution to remove any air bubbles.2.For pH, place the tip of the electrode in the sample or make contactwith a wet surface.Measurement:1.Press the ON button. (and then “SELF CAL” will appear in thedisplay during the turn-on diagnostics)2.Depress and hold the MODE/HOLD key to scroll to the desiredmeasurement mode.3.Insert the electrode into the sample making sure that the electrodes arecompletely submersed.4.Slowly stir the solution with the electrode to remove air bubbles if in theConductivity, TDS or Salinity mode.5.If in the Conductivity, TDS or Salinity modes, the meter will auto-rangeto the proper range and then display the reading.4EC500-en-US v3.0 03/22
Changing Measurement FunctionThe meter can be set to measure pH, Conductivity, TDS or Salinity.To change the mode:1. Press and Hold the MODE/HOLD button for 2 seconds and the display will begin to scrollthrough the units.µS (Conductivity); pH; ppm S (Salinity); ppm (TDS); mg/l (TDS);Note: The “HOLD” function cannot be on when changing the measurement function. If “HOLD” isdisplayed in the lower left corner of the display, briefly press the MODE/HOLD button to turn it off.2. When the desired units are displayed, release the MODE/HOLD button.TDS Compensation RatioThe TDS value is determined by multiplying a conductivity reading by a known ratio factor. Themeter allows for selecting a conversion ratio in the range of 0.4 to 1.0. The ratio varies with theapplication, but is typically set between 0.5 and 0.7.Note: The stored ratio will briefly appear in the lower temperature display when the meter is firstturned on, or when changing measurement function to TDS.Note: In the Salinity mode the ratio is 0.4 to 0.6 autoTo change the ratio, while in the TDS measurement mode (ppm or mg/l):1. Press and release the CAL/RECALL button twice in succession. The storedratio will appear in the display.2. Press the MODE/HOLD button to increase the ratio value in steps of 0.1.3. When the desired ratio is displayed, press and release the CAL/RECALLbutton to store the value and return to the normal mode.4. If no buttons are pressed for 5 seconds, the meter returns to measure mode.Storing Readings1. Press the MODE/HOLD button to store a reading. The storage locationnumber will be displayed on the lower display, while the main display showsthe stored reading. The meter will enter the HOLD mode and the “HOLD”indicator will appear.2. Press the MODE/HOLD button again to exit the HOLD mode and return tonormal operation.3. If more than 25 readings are stored, previously stored readings (starting withnumber 1) will be overwritten.5EC500-en-US v3.0 03/22
Recalling Stored Readings1. Press the CAL/RECALL button and then press the MODE/HOLD button. A location number (1through 25) will briefly appear and then the value stored in that location will appear. Thedisplayed units will flash, indicating that the storage recall mode is active.2. The last stored reading will be displayed first. Pressing and releasing the MODE/HOLD buttonwill scroll through the stored readings one at a time. The location number is displayed first,followed by the reading stored in that location.3. To exit the storage mode, press the CAL/RECALL button and the meter will return to normaloperation, after displaying “End”.Clear Stored MemoryWith the unit on, press and hold ON/OFF for 4 seconds. “clr” will be briefly displayed when thememory is cleared.Changing Temperature UnitsTo change the displayed temperature units (oC or oF):1. With the unit OFF, press and hold down the CAL/RECALL button.2. With the CAL/RECALL button depressed momentarily press the ON/OFF button. When “SELFCAL” appears in the display release the CAL/RECALL button. The unit will power on withtemperature displayed in the new units.Data Hold ModePress the MODE/HOLD button to hold (freeze) a reading in the display. The meter will enter theHOLD mode and the “HOLD” indicator will appear.Note: This also stores the reading.Press the MODE/HOLD button again to return to normal operation.Auto Power OFFThe auto power off feature automatically shuts the meter off 10 minutes after the most recent buttonpress.Auto Power OFF DisableTo disable the Auto Power Off feature:1. Turn the unit on2. Press CAL/RECALL once (Quickly)3. Immediately and simultaneously press the MODE/HOLD and ON/OFF buttons forapproximately 2 seconds, until “oFF” is briefly displayedTo disengage this feature, turn the unit off with the ON/OFF button. The next time the unit ispowered up, Auto Power OFF mode will be engaged again.Low Battery IndicationWhen the batteries become weak the “BAT” icon will appear in the display. Refer to theMaintenance section for battery replacement information.6EC500-en-US v3.0 03/22
Calibration - pH (1, 2, or 3 points)1.2.3.4.5.6.7.Place the electrode into a buffer solution (4, 7, or 10). Press and hold the CAL/RECALL keyuntil “CAL” appears in the lower (temp.) display. When doing a 2 or 3 point calibration, calibratewith pH 7 buffer first, then follow with pH 4 then the pH 10 buffer.The ExStik automatically recognizes the solution and calibrates itself to that value (the circlednumber on the LCD will match the solution). Note that if the solution is more than 1 pH unit offfrom the L (4), M (7), or H (10) pH buffer, or if the electrode slope is low, the ExStik willassume an error and abort the calibration (‘End’ will be displayed, and the unit will return tomeasure mode.)During calibration, the pH reading flashes on the main display.When calibration is complete, the ExStik automatically displays “SA”, then “End” and returnsto normal operation mode.The appropriate circled indicator (L, M, or H) appears on the LCD when a particular calibrationor series of calibrations has been completed within one power on cycle. When the ExStik isturned off, the circled indicator configuration and the calibration data will be retained.For a two or three-point calibration, repeat steps 1-4.See Reset Calibration Data to clear all calibration data from the meter.CAL Reminder DisplayWhen in pH measurement mode, a “CAL” icon will appear after 15 on/off cycles of the meter withoutperforming a calibration. The CAL display is simply a reminder to calibrate pH, and will turn off whenthe pH electrode is recalibrated. The reminder does not affect function in any way.RENEW DisplayA flashing ‘RENEW’ warning indicates that the probe is not performing to expected specifications. Ifcleaning and recalibration does not cause the RENEW icon to disappear, replace the probe (seeoptional accessories on the last page of this manual). The RENEW display appears as a result ofthe pH electrode slope falling below 70% of a nominal slope.Measurement and Display Considerations If the unit appears to be locked (display frozen). It is possible that the Data Hold mode hasbeen inadvertently accessed by pressing the MODE/HOLD button. (“HOLD” will be displayedin the bottom left of the LCD.) Simply press the MODE/HOLD button again or turn the meter offand then on.For maximum accuracy, allow sufficient time for the temperature of the probe to reach thetemperature of the sample before calibrating. This will be indicated by a stable temperaturereading on the display.Reset Calibration DataFollow this procedure to clear all calibration data from the meter. Resetting the calibration data maybe necessary when new calibration solutions are used or accuracy of measurements is in question.1.Turn off the meter.2.Press and Hold the Cal/Recall and Mode/Hold buttons.3. Momentarily press the On/Off button, as soon as the display comes on, release all 3buttons.4. The display will show “dFLt rSt” (default reset) and all of the calibration data will be erased.If “dFLt rSt” does not appear, retry the procedure.5. Proceed to the calibration routine for pH and Conductivity.7EC500-en-US v3.0 03/22
Calibration - ConductivityMeter accuracy verification should be performed on a periodic basis. Once per month is therecommended cycle for normal use. If calibration is required, a conductivity standardizing solutionmust be obtained. The meter can be calibrated in any or all of the three ranges. Standardizingsolutions of 84µS/cm, 1413µS/cm or 12.88mS/cm (12,880µS/cm) are used for the automaticcalibration recognition procedure. No other calibration values are permitted.Calibration is always done in conductivity mode. Since salinity and TDS values are calculated fromconductivity values, this procedure also calibrates the salinity and TDS ranges.1.2.3.4.5.Fill a sample cup with the standardizing solution.Turn the meter ON and insert the electrode into the solution. Tap or move the electrode in thesample to dislodge any air bubbles.Press and hold the CAL/RECALL button (approximately 2 seconds) until “CAL” appears inthe lower (temp) display. The main display will start flashing.The meter will automatically recognize and calibrate to the standardizing solution. The displaywill briefly indicate “SA”, End and then return to the measurement mode after a calibration.Note: The “SA” will not appear if the calibration fails.The “range calibrated” symbol will appear in the display for each range that is calibratedduring that power on cycle.Low range, 84µS/cmMedium range, 1413µS/cmHigh range, 12.88mS/cm (12,880µS/cm)Note: Each time the calibration mode is entered all calibration symbols on the display are cleared,but only the calibration data for the currently calibrated range is replaced. The other two rangeskeep the existing calibration data, just the symbols are removed. Calibration of all three ranges mustbe performed during one power on period for all three range calibration symbols to appear.See Reset Calibration Data to clear all calibration data from the meter.Note: The meter allows for a 1, 2 or 3 point calibration. If calibration is done for more than one pointthe lowest value standard should be done first to obtain the best accuracy.Considerations and Techniques Do not touch the inner surfaces of the conductivity electrodes. Touching the surface of theplatinized electodes may damage and reduce the life of the probe.Store the electrode in the wetting cap with the sponge moistened with pH 4.01 buffer solution.Always rinse the electrode in de-ionized water between measurements to avoid crosscontamination of the sample. Double rinsing is recommended when high accuracy is required.Periodically, accumulated salt deposits from the reference electrode may build up in thestorage cap, and should be rinsed away. These deposits could affect measured values of lowconductivity samples.When measuring low conductivity samples, extra care is recommended in rinsing the probe toavoid contamination of the sample with electrolyte from the pH reference electrode. This willonly be a factor when measuring in the low range, and can be further minimized by increasingthe volume of the sample. (Example: Try a 200 to 500 mL sample.)If the 20mL sample cup is to be used, then the electrode should not be allowed to sit in thesample for any longer than necessary, to avoid pH electrolyte leakage into the sample, raisingthe conductivity value.8EC500-en-US v3.0 03/22
Operational MatrixFunction /Resulting ActionPowerStatusModeSettingRequired Key Press SequenceOn/OffOn orOffOnAnyMomentary press of the ON/OFF keypH orConductivityPress & hold CAL/RECALL key for 2seconds, until it enters CAL functionAnymeasuremodeWhile InHold ModeMomentary press of the MODE/HOLD keyCalibrationStore ReadingOnHold ReleaseOnEnter MemoryRetrievalOnAnymeasuremodeMomentary press of the CAL/RECALL keyfollowed by a momentary press of theMODE/HOLD key (Within 4 seconds)Scroll StoredReadingsOnMemoryRecallMomentary press of the MODE/HOLD key(Displays “last in first out”)Exit MemoryRetrievalOnMemoryRecallMomentary press of the CAL/RECALL keyClear StoredMemoryOnPress and hold the ON/OFF key for 4seconds, until “clr” is Enter Cond/TDSRatioOnTDS (ppm ormg/l)Press and release the CAL/RECALL keytwice in quick successionChange Cond/TDSRatioOnTDS ratioMomentary press of the MODE/HOLD key(each key press increases the ratio by 0.1,the value cycles from 0.4 - 1.0)Exit Cond/TDSRatioOnTDS ratioMomentary press of the CAL/RECALL keyChangeTemperature UnitsOffn/a (offmode)Press and hold the CAL/RECALL key thenmomentarily press the On/Off key.Release the CAL/RECALL key after the"SELF CAL" lightsOverride AutoPower OffOnAnymeasuremodeMomentarily press the CAL/RECALL keythen simultaneously press and hold theON/OFF & MODE/HOLD key forapproximately 2 seconds, until “oFF” isdisplayedDefault ResetOFFn/aSimultaneously press ON/OFF,CAL/RECALL and MODE/HOLDmomentarily. “dFLt” will be displayed.Momentary press of the MODE/HOLD keyPress and hold the MODE/HOLD key forat least 2 seconds (the modes will scrollby until the key is released)9EC500-en-US v3.0 03/22
SpecificationsDisplay2000 count LCD with BargraphpH Range0.00 to 14.00pH Accuracy 0.01 pH typicalpH ATC Range32 F to 194oF (0 C to 90oC)pH Reference JunctionPermanent gel, non-refillableConductivity ranges0 to 199.9µS/cm200 to 1999µS/cm2.00 to 19.99mS/cmTDS ranges0 to 99.9ppm or mg/L(Variable ratio)100 to 999ppm or mg/L1.00 to 9.99ppt or g/LSalinity range0 to 99.9ppm100 to 999ppm1.00 to 9.99pptTDS Ratio0.4 to 1.0 adjustableSalinity Ratio0.4 to 0.6 autoConductivity ATC2.0% per oCConductivity ATC Range32.0 F to 140oF (0.0 C to 60.0oC)Temperature Range23.0 F to 194oF (-5.0 C to 90.0oC)Temperature Resolution0.1 up to 99.9, 1 100Temperature Accuracy 1.8 F; 1 C (from 23 to 122 F;-5 to 50 C) 5.4 F; 3 C (from122 to 194 F; 50 to 90 C)AccuracyConductivity: 2% full scaleTDS: 2% full scaleSalinity: 2% full scaleMeasurement Memory25 tagged (numbered) readingsLow battery indication‘BAT’ appears on the LCDPowerFour (4) CR2032 Lithium Ion BatteriesAuto power offAfter 10 minutes (override available)Operating conditions23 F to 122oF (-5 C to 50oC)Dimensions1.6 x 7.9 x 1.6” (40 x 200 x 40 mm)Weight3.3 oz (93 g)10EC500-en-US v3.0 03/22
MaintenanceBattery Replacement1.Twist off the battery compartment cap2.Holding the battery housing in place with a finger, pull out the battery carrier using the twosmall tabs.Replace the four (4) CR2032 batteries observing polarity.Replace the battery compartment cap3.4.Safety: Please dispose of batteries responsibly; never dispose of batteries in a fire, batteriesmay explode or leak. If the meter is not to be used for 60 days or more, remove the batteryand store separatelyElectrode Replacement1.To remove an electrode, unscrew and completely remove the electrode collar (turn the collarcounter-clockwise to remove).2.Gently rock the electrode from side to side, pulling it downwards, until it disconnects from themeter.3.To attach an electrode, carefully plug the electrode into the meter socket (note that theelectrode connector is keyed, ensuring proper connection).4.Tighten the electrode collar firmly enough to make a good seal (a rubber gasket seals theelectrode with the meter).11EC500-en-US v3.0 03/22
Cleaning RecommendationsWhen cleaning the probe, take care not to scratch or damage the sensing surface or the platinizedelectrode surfaces.ContaminantCleaning SolutionInstructionsWater soluble substancesDeionized waterSoak or scrub with a softbrush. Recondition in 4 or 7buffer for 1 hour.Grease & OilWarm water and householddetergentSoak or scrub with a softbrush, maximum of 10minutes. Rinse thoroughlywith DI water, recondition in 4or 7 buffer for 1 hour.Heavy grease & OilAlcoholMaximum of 5 minute soak,scrub with a soft brush. Rinsethoroughly with DI water,recondition in 4 or 7 buffer for1 hour.Lime and hydroxide coatings10% acetic acidSoak until coating dissolved,maximum of 5 minutes. Rinsethoroughly with DI water,recondition in 4 or 7 buffer for1 hour.Please Note: Since the EC500 does not have a refillable pH reference electrolyte chamber, it isimportant not to soak the electrode in the above solutions for more than the recommended times. Todo so may cause a reference potential shift, which will cause degradation in performance or failure.12EC500-en-US v3.0 03/22
TroubleshootingProblemPossible CauseActionReading is frozenUnit is in “HOLD” modePress MODE/HOLD key toexit “HOLD” mode“BAT” messageBatteries are lowReplace batteriesUnit will not calibrate in pHLow pH slopeReplace electrode, seereorder informationUnit will not calibrate in pHClogged or contaminatedreference junctionClean junction (seecleaning instructions)Unit will not calibrate in pHDamaged or worn outsensing membraneReplace electrode, seereorder informationUnit will not calibrate in pHContaminated pH buffersUse fresh buffersUnit will not calibrate inconductivity modeContaminated conductivitystandardsUse fresh standardsUnit will not calibrate inconductivity modeDirty probeClean conductivity probe(See cleaning instructions)Unit will not calibrate inconductivity modeDamaged conductivity probeReplace electrode, seereorder informationUnit will not calibrate inconductivity modeTrapped air bubblesTap or stir to release airbubblesUnit will not turn onBatteries are low or deadReplace batteriesUnit will not turn onBatteries installed withincorrect polarityReplace batteries,observe polarity“RENEW” messagepH sensor needsrecalibrationRecalibrate unit“RENEW” messagepH sensor slope has fallenbelow acceptable limitsReplace electrode, seereorder informationUnit will not respond to anykey pressesInternal faultPerform hard reboot:Remove batteries, holdON/OFF switch down for 5seconds, replace batteries13Use fresh buffersEC500-en-US v3.0 03/22
Two-year WarrantyFLIR Systems, Inc. warrants this Extech brand instrument to be free of defects in parts and workmanship fortwo years from date of shipment (a six-month limited warranty applies to sensors and cables). To view the fullwarranty text please visit: on and Repair ServicesFLIR Systems, Inc. offers calibration and repair services for the Extech brand products we sell. Weoffer NIST traceable calibration for most of our products. Contact us for information on calibrationand repair availability, refer to the contact information below. Annual calibrations should beperformed to verify meter performance and accuracy. Product specifications are subject to changewithout notice. Please visit our website for the most up-to-date product information:www.extech.com.Contact Customer SupportCustomer Support Telephone List: https://support.flir.com/contactCalibration, Repair, and Returns: repair@extech.comTechnical Support: https://support.flir.comCopyright 2022 FLIR Systems, Inc.All rights reserved including the right of reproduction in whole or in part in any formwww.extech.com14EC500-en-US v3.0 03/22
4 EC500-en-US_v3. 03/22 Measurement Procedure Sample Preparation: 1. For Conductivity, TDS or Salinity place the test sample in a sample cup with enough depth (2.5cm minimum) to cover the electrode. Stir the solution to remove any air bubbles. 2.