Transcription
Motorola CT610Corded TelephoneUser Guide
Safety informationFollow these safety precautions when using your phone to reduce the risk offire, electric shock, and injury to persons or property: Do not set the phone on a heating register or over a radiator. Ensure thatproper ventilation is provided at the installation site. Do not use while wet or while standing in water. Do not use this product near water (for example, near a bath tub, kitchensink, or swimming pool). Do not disassemble this product. If service or repair work is required,contact the customer service helpline found in this User’s Guide. Avoid using during an electrical storm. Use a surge protector to protect theequipment.Installation Guidelines Read and understand all instructions and save them for future reference. Follow all warnings and instructions marked on the product. Do not install this product near a bath tub, sink, or shower. Do not place this product on an unstable cart, stand, or table. This productmay fall, causing serious damage to the product. Adjust only those controls that are covered by the operating instructions.Improper adjustment of other controls may result in damage and will oftenrequire extensive work to restore the product to normal operation.Save these instructionsImportantTo reduce the risk of fire, use only the supplied AC power adaptor.Unplug this corded phone immediately from anoutlet if: The power cord or plug is damaged or frayed. Liquid has been spilled on the product. The product has been exposed to rain or water. Do not retrieve the handsetor base until after you have unplugged the power and phone from the wall.Then retrieve the unit by the unplugged cords. The product has been dropped or the cabinet has been damaged. The product exhibits a distinct change in performance.Save these instructions
Welcome.to your new Motorola CT610 Corded Telephone! One-touch Call Blocking button. Block up to 1000 numbers. Answer machine with up to 30 minutes digital recording time. Phone will work even when the power fails.1 Hearing aid compatible. 200 name and number phone book. Hands-free speaker phone. Mute your caller so you can have a private conversation with someonenearby. Redial from the call list. Flash for network functions. Tone dialing. Time and date facility. Caller ID shows you the number of who is calling and stores the number ofat last 30 callers in the call last.2 Call Timer display the duration of external calls.Need help?If you have any problems setting up or using your CT610, please contactCustomer Services on 1-833-468-1468.Alternatively, you may find the answer in the ‘Help’ section at the back ofthis guide.1You’ll still be able to make and receive calls if the power fails, but otherfunctions such as call blocking and the answer machine won’t work.2You must subscribe to your network provider’s Caller ID or Call Waitingservice for these features to work. A subscription fee may be payable.
This user guide provides you with all the informationyou need to get the most from your phone.To set up your phone, follow the simple instructionsin ‘Getting Started’, on the next few pages.ImportantOnly use the telephone line cord supplied.Got everything? Corded handset Curly cord Corded base Telephone line cord AC Power adaptor / DC7.5V 300mA User guideFor a better tomorrowWe make every effort through our design, research, engineering and supplychain management to make better products for everyone, focusing on bothsocial and environmental responsibility. Eco friendly packaging with a minimum 20% post consumer recycledcontent. Phone housing is built with a minimum of 25% post consumer recycledcontent plastic.
1.2.3.Getting started. 7Getting to know your phone. 10Using the phone. ore a name and number.15View or dial an entry.15Edit a name and number.16Block a contact.16Unblock a contact.16Delete an entry.16Delete all contacts.17Memory status.17Call 1.1Make a call .143.1.2Pre-dial.143.1.3End a call .143.1.4Receive a call.14Mute.14Record your Announce message.18The Block button.18How do you accept, block or send a call to the answer phone?.19Change the Call blocking modes?.19Switch Call blocking on/off. 20Add a number to the Blocked list. 20Add a number to the Allow list.21Deleting your Blocked and Allowed lists.21To block numbers by area code.21Caller ID and calls list.226.16.2Caller ID.22Call list.226.2.1View the call list.226.2.2Dial a number in the call list.226.2.3Copy a call list number to the phonebook.226.2.4 Block a contact.226.2.5Unblock a contact.236.2.6 Delete an entry.236.2.7Delete the entire call list.235
7.Date and time. 247.17.28.Base t the date and time.24Set the time format.24Ringer tone.25Ringer volume.25Key tones.25Confirmation tones.25Display contrast.26Language.26Area code.26Software version.26Change system PIN.26Reset.26Default settings.27Using your answering machine.289.19.29.39.49.59.69.79.8Switch the answering machine on / off .28Listening to your messages .28Outgoing announcments (OGAs).289.3.1Answer and record.289.3.2Answer only.289.3.3Record your own outgoing announcement.289.3.4 Play the current outgoing announcement.299.3.5Reinstate the pre-recorded outgoing message.299.5.6 Answer mode.29Record a memo.29Answer delay.29Incoming message length. 30Message alert. 30Remote access. 309.8.1Set the remote access PIN for the first time. 309.8.2 Change the remote access PIN.319.8.3 Turn remote access on or off.319.8.4 Remote access the answering machine.3110. Technical Specifications.3211. Help.3312. General information. 346
1.Getting startedLocationImportantDo not place your CT610 in the bathroom or other humid areas.Place your CT610 base within reach of the AC power outlet and telephone walljack. The socket-outlet should be installed near the equipment and should beeasily accessible.Connecting the handset and base1.Plug the telephone line cord into the socket markedon the underside ofthe base and the other end of the line cord into the telephone line wall jack.2. Plug the AC power jack into the socket markedon the underside of thebase and plug the AC adaptor into the AC power outlet. Switch on the ACpower.3. Plug the curly cord into the socket markedon the underside of the baseand the other end of the curly cord into the handset.Getting started7
Setting up your CT6101.Once connected to the AC power the set-up wizard will then begin. Followthe prompts to finish set-up. To select OK, press the left soft key below thedisplay.Set the time and date2. Use the keypad to enter the time. The default time format setting is 12hours, but you can change this to 24 hours under Time format in the Time& Date menu.3. Press Next, then enter the date, in the format MM/DD/YYYY.4. Press Save.Finish set-up5. If you want to carry on using the set-up wizard, select Yes. If you don’t,select No and you can start using your phone straight away. You canchange the settings in the menu later.Turn on Call blocking6. The set-up wizard will ask you to turn Call blocking on or off. When on, youcan block unwanted calls. For more about this, see page 16.7.To switch it on, press the left soft key button. To leave it off, select the rightsoft key button . You can turn it on later in the main menu.NoteWhen Call blocking is switched on, you’ll see it on the top right hand of thedisplay.You need to have a Caller Display service from your network provider to useall the features available e.g. Call blocking, Calls List and other Caller Displayenabled features. Charges may apply.Adding contacts8. Select Yes to add contacts now (or press the right option button to skip tothe next step).9. Use the number buttons on the keypad to enter the name of a new contact.To select the correct letter, press the number button it appears on e.g.for Emma, press twice and do the same thing to complete the rest of thename.10. When you’ve finished the name you want to save, press Next.NoteIf you make a mistake, go back a digit by selecting Clear.11. Then use the keypad to enter the telephone number and press Save.12. To add another, select Yes and then repeat steps 9 to 11.8Getting started
NoteIf you have important numbers that will always need to get through e.g.Doctors surgery, National Floodline, Carer Line numbers etc, make sure you’veadded them to your Contacts or Allowed list.13. If you don’t want to add more contacts now, select No to finish the set-upwizard. You can now start using your phone. To find out how to use themost popular features of your CT610, please read the rest of this userguide.NotePlease note that if you have any other telephones connected to your telephoneline, they may still ring, before the CT610 intercepts the call.Getting started9
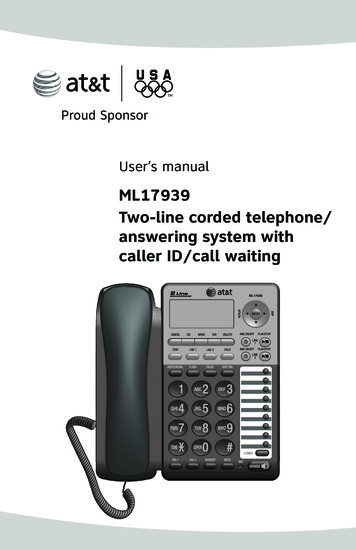
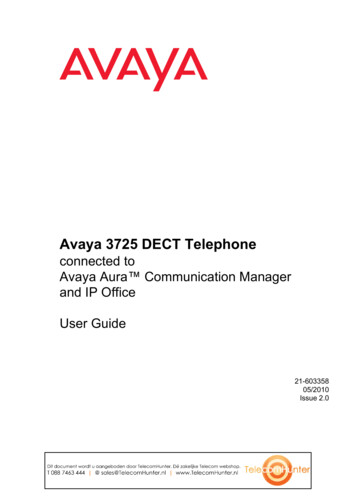
2.Getting to know your phoneOverview of the handsetABCA EarpieceTo listen to your caller.BMicrophoneTo speak to your caller.CCurly cord socketWhere you plug in your curly cord.10Getting to know your phone
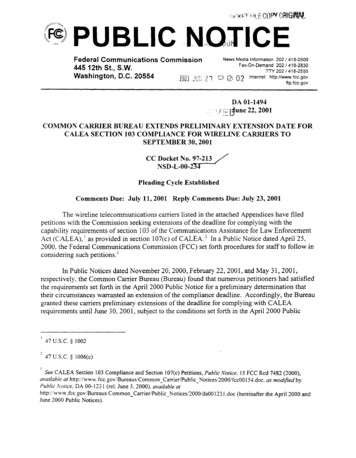
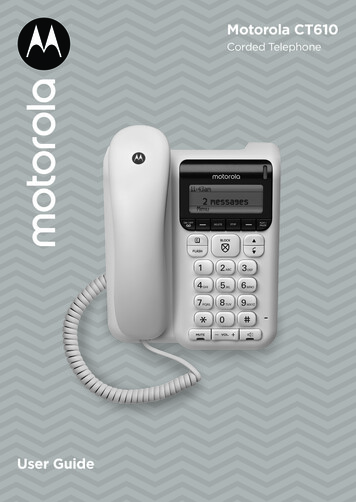
Overview of the baseA Delete answer phone messagesPress to exit the menu and return to standby.Delete answer phone messages.BLeft soft key / Skip backPress to open the Menu.Skip backwards when playing messages on the answer phone.CAnswer machine On/OffSwitches the answering machine on/off.D PhonebookPress to open the phonebook.EFlashUse flash (F) functions.FCall BlockOne touch call blocking and access to the call blocking features.G MuteDuring a call, press to turn mute on / off.H Ringer LEDRed light flashes to indicate an incoming call.Getting to know your phone11
IDisplayJStopPress to stop message playback.KRight soft key / Back / Skip forwardGo back to previous Menu level.Skip forwards when playing messages on the answer phone.LPlay / PausePress to play recorded messagesPress again to pause message playback.M UpPress to scroll up through the Menu.Down / Call listPress to scroll up through the Menu.Press d to enter the Call list.N Hands-free volume upActivate and deactivate hands-free during a call.O Volume up / Volume downIncrease and decrease the volume.12Getting to know your phone
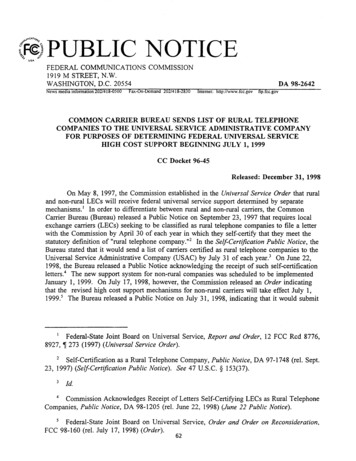
Menu mapAnswer PhoneTime & DateOutgoing messageSet time & dateRecord memoTime formatAnswer modeSettingsAnswer settingsRinger tone Answer & recordRinger volume Answer onlyKeypad tones Remote accessConfirmation tonesCall blockingDisplay contrastOn/OffLanguageBlocking modeArea code AnnounceSoftware version Answer phoneChange system PINAnnounce messageReset Record name Play message Use default messageBlock numbers Add number Area codes Delete allAllow numbers Add number Delete allGetting to know your phone13
3.Using the phone3.1Calls3.1.1Make a callLift the handset, when you hear the dial tone, dial the number.3.1.21.Pre-dialEnter the phone number. If you make a mistake pressentries. Lift the handset to dial the number.to clear the2. Press s to dial the phone number over hands-free.3.1.3End a call1. Place the handset back on the base.Or:2. Press s to end a hands-free call.3.1.4Receive a callWhen you receive a call the phone will ring and the incoming call LED will flash1. Lift the handset to answer the call.Or:2. Press s to answer the call in hands-free.NoteIf during a call you want to activate hands-free, press s and hang up thehandset. You can adjust the volume of a hands-free during the call, pressv, there are 5 levels to choose from.3.2MuteYou can mute your handset so that you can talk to someone nearby withoutyour caller hearing.1. During a call, press MUTE. The LED will light up.2. Press MUTE again to resume your call.14Using the phone
4.PhonebookYou can store up to 200 names and numbers in the phonebook. Names can beup to 14 characters long and numbers up to 24 digits.4.1Store a name and numberIf the CT610 is connected to a switchboard, you may need to enter a pause in astored number. This gives the switchboard time to find an outside line. A pauseis normally stored after the switchboard access code (e.g. 9). When storinga number, press and hold 0 key, the display shows P. You can then continueentering the phone number.If you have subscribed to Caller ID Service and wish to display the name ofyour caller instead of the number, save the full telephone number including thearea code to your phonebook.1.Press p, then press Options. Add new contact is displayed. Press OK.2. The display shows Name:.3. Enter the name using the keypad and press Next.4. The display shows Number.5. Enter the number using the keypad and press Save.6. Press Back to return to standby.Entering namesUse the keypad letters to enter names, e.g. to store Tom:Press 8 once to enter T.Press 6 three times to enter o.Press 6 once to enter m.Writing tipsPress the Clear to delete the last character or digit.Press 0 to insert a space.Press 1 repeatedly to insert & . , ‘ ? ! @ 1.Press # to change from upper to lower case and from characters to digits.4.21.View or dial an entryPress p.2. Scroll u or d to the entry you want.OREnter the first letter of the name to search alphabetically.The first name that starts with this letter will be displayed.3. Lift the handset to dial the number, h to dial the number over hands-free.NoteIf there are no entries containing the search character and then return to thecontact which was previously displayed when the search was initiated.Phonebook15
4.31.Edit a name and numberPress p. The first entry will be displayed. Scrollwant to edit.u or d to the entry you2. Press Options, the display shows Add new contact, scroll d to Edit contact.Press OK.3. The name is displayed, delete the name if required, then enter the newname and press Next.4. The existing number is displayed, delete the number if required, then enterthe new number and press Save, the entry is saved.5. Press Back to return to standby.4.41.Block a contactPress p. The first entry will be displayed. Scrollwant to block.u or d to the entry you2. Press Options, the display shows Add new contact, scroll d to Block contact.Press OK.3. The display shows Block calls from this contact?.4. Press Yes to confirm.5. Press Back to return to standby.4.51.Unblock a contactPress p. The first entry will be displayed. Scrollwant to unblock.u or d to the entry you2. Press Options, the display shows Add new contact, scroll d to Unblock contact.Press OK.3. The display shows Allow calls from this contact?.4. Press Yes to confirm.5. Press Back to return to standby.4.61.Delete an entryPress p. The first entry will be displayed. Scrollwant to delete.u or d to the entry you2. Press Options, the display shows Add new contact, scroll d to Delete contact.Press OK.3. The display shows Are You Sure?.4. Press Yes to confirm.5. Press Back to return to standby.16Phonebook
4.71.Delete all contactsPress p. The first entry will be displayed.2. Press Options, the display shows Add new contact, scroll d to Delete allcontacts. Press OK.3. The display shows Are You Sure?.4. Press Yes to confirm.5. Press Back to return to standby.4.81.Memory statusPress p. The first entry will be displayed.2. Press Options, the display shows Add new contact, scroll d to Memory status.Press OK.3. The number of contacts stored is displayed.4. Press Back to return to standby.Phonebook17
5.Call blockingThe best way to stop unwanted calls is to know who’s at the other end of thephone before you decide if you want to take it.NoteYou need Caller Display This will help you get the most out of your Callblocking feature. You can get this from your phone service provider.Your CT610 has two call blocking modes to help you easily manage yourincoming calls in different ways. When set to: Announce (all calls not in your Contacts or Allowed list must say their name.Those on your Blocked list hear, “Callers to this number are being screenedby Call Blocking, the person you are calling is not accepting your call.Please hang up”. Answer phone (all calls not in your Contacts or Allowed list are sent straightto the Answer phone, including those on your Blocked list).In Announce mode (default setting), the CT610 will filter all first time calls fromnumbers that are not yet saved in your contacts, or already on your allowedlist. By doing this, you gradually build up your lists of allowed and blockednumbers and your CT610 will know how to deal with the call the next time itcomes in.5.1Record your Announce messageYou can personalise the Call blocking greeting, by adding your name to theAnnounce message.1.Press Menu, scroll d to Call blocking and press OK.2. Scroll d to Announce messages, press OK.3. Record name is displayed. Press OK and follow the voice prompt and pressSave.4. Your recording will then be played back to you. If you aren’t happy with it,you can press Delete while it’s playing.5.2The Block buttonYou can use your block call button in three ways.In idle modePress as a shortcut to the Call blocking menu.Incoming callWhen you have an incoming call, before answering, look at the display to seewho’s calling.If you know you want to block the call, press18b.Call blocking
The number will be blocked and added to the blocked calls list if Caller ID isdisplayed. For calls with no caller number, withheld or unavailable you canalso use the Block button to reject the call. The caller will hear, “Calls to thisnumber are being screened by Call blocking, the person you are calling is notaccepting your call. Please hang up.”During a callIf you have already answered the call and then decide you want to block thenumber, press b. If the number is displayed in the Caller ID, the display willgive you the option to select Yes and the number will be added to the blockednumbers list and end the call, or select No to go back to the caller.5.3 How do you accept, block or send a call to the answerphone?1.Call blocking answers a call for you and asks the caller to say (“announce”)who they are.2. Your CT610 then rings with the Announced call on the display and tells youthe caller’s name when you pick up. (e.g. “You have a call from Mark”).3. You now choose to: accept the call, press 1 always accept their calls, press 2 block their calls, press 3, or send this call to the answer phone, press 4 ignore the call, just hang up (this call won’t be added to your blocked list)bNoteWhen a call starts ringing, you can block it straight away by pressing the bbutton. That number will then be added to your blocked list.5.4Change the Call blocking modes?Your CT610 has two Call blocking settings, Announce and Answer phone. Announce – All calls not in your Contacts or Allow list must say their name.Those on your Blocked list hear, “Calls to this number are being screenedby Call blocking, the person you are calling is not accepting your call.Please hang up”. Answer Phone – All calls not in your Contacts or Allowed list are sentstraight to the Answer Phone including those on your Blocked list.1.In idle mode, press b.2. Scroll d to Blocking mode and then select the mode you want to use andpress OK.Call blocking19
5.5Switch Call blocking on/offWhen Call blocking is set to On, it is On for whichever mode you’re using (e.g.Announce mode). If you turn Call blocking Off, all calls will be allowed through,even if they are already on your blocked list.1.In idle mode, press b.2. On/Off is displayed. Press OK and then scrollOff and press Save.u or d to select either On orNoteWhen you receive a call with Call blocking switched on you will hear themessage, ‘You have a call from xxxx. To accept the call press 1. To alwaysaccept their call, press 2. To block their call, press 3. To send the call to answerphone, press 4. To hear these options again, press *’.What happens when you allow a number (caller)When you get an allowed call, you’ll see the caller’s number (if available). If youdon’t answer a call from an allowed number, it will go through to your answerphone (if it’s on) or eventually it will hang up if unanswered.What happens when you block a number (caller)A caller calling from a blocked number will hear a message telling them thattheir call has been blocked.NoteThe caller will hear, “Calls to this number are being screened by Call blocking,the person you are calling is not accepting your call. Please hang up”.Calls that are always allowedRingback and operator calls are always allowed and cannot be blocked usingCall blocking.How to add numbers straight to your Blocked and Allow listsAside from adding numbers to your Block and Allow list as calls come through,you can also add numbers directly to the lists via your Call blocking menu.5.61.Add a number to the Blocked listIn idle mode, press b.2. Scroll u or d to Block numbers and press OK.3. Add number is displayed, press OK.4. Enter the telephone number you want to block (make sure you enter thefull dialling code) and press Save.20Call blocking
5.71.Add a number to the Allow listIn idle mode, press b.2. Scroll u or d to Allow numbers and press OK.3. Add number is displayed, press OK.4. Enter the telephone number you want to allow (make sure you enter thefull dialling code) and press Save.5.8Deleting your Blocked and Allowed listsWhen in the Block and Allow number menus, you also have the choice todelete the whole list. Remember, if you do this, all calls previously blocked andallowed, will now be able to contact you.5.9To block numbers by area codeYou can also block numbers by area code. This means that any calls beginningwith that code, will be blocked.1.In idle mode, press b.2. Scroll u or d to Block numbers and press OK.3. Scroll u or d to Area Codes and press OK.4. On first use, you will see Add code? Select Yes.5. Add the area code (eg 02) and press Save.Call blocking21
6.Caller ID and calls listImportantTo use Caller ID, you must first subscribe to the service from your networkprovider. A subscription fee may be payable.To ensure that the caller’s name is displayed, make sure you have stored thefull telephone number, including the area code in the phonebook.6.1Caller ID6.2Call list6.2.1View the call listIf subscribed to Caller ID, the caller’s number will be displayed (provided it isnot withheld) prior to answering the call.The call list stores details of the last 30 received calls, missed and dialled calls,including the phone number and date of the call.1.Press d to open the calls list. If there are no calls in the list, the displayshows List Empty.2. Pressu or d to scroll through the list. When you reach the end of the list the display will show ----End---6.2.21.Dial a number in the call listPress d to open the calls list.2. Scroll1.6.2.31.u or d to the entry you want.Lift the handset to dial the number, or press s to dial the number overhands-free.Copy a call list number to the phonebookPress d to open the call list.2. Scrollu or d to the entry you want.3. Press Options, Save Number is displayed.4. Press OK. The display shows Name:.5. Enter the name and press Next. The number is displayed.6. Press Save to confirm.See ‘Entering names’ and ‘Writing tips’ on page 15.6.2.41.Block a contactPress d to open the call list.2. Scrollu or d to the entry you want block.3. Press Options. Scroll d to Block number. Press OK.4. The display shows Block calls from this number?.22Caller ID and calls list
5. Press Yes to confirm.6. Press Back to return to standby.NoteIf the number is stored in the phonebook the display will refer to the Contactname not the Number.6.2.51.Unblock a contactPress d to open the call list.2. Scrollu or d to the entry you want unblock.3. Press Options. Scroll d to Allow number. Press OK.4. The display shows Allow calls from this number?5. Press Yes to confirm.6. Press Back to return to standby.NoteIf the number is stored in the phonebook the display will refer to the Contactnot the Number.6.2.61.Delete an entryPress d to open the call list.2. Scrollu or d to the entry you want to delete.3. Press Options. Scroll d to Delete call and press OK.4. Press Back to return to standby.6.2.71.Delete the entire call listPress d to open the call list.2. Press Options. Scroll d to Delete all calls and press OK.3. The display shows Are You Sure?.4. Press Yes to confirm.5. Press Back to return to standby.Caller ID and calls list23
7.Date and timeIf you have subscribed to Caller ID Service, the date and time is setautomatically when you receive
1. Plug the telephone line cord into the socket marked on the underside of the base and the other end of the line cord into the telephone line wall jack. 2. Plug the AC power jack into the socket marked on the underside of the base and plug the AC adaptor into the AC power outlet. Switch on the AC power. 3.