Transcription
User manual
Table of contentsFeatures1Camera1Security1Expandable storage1Night mode1Getting started2Galaxy A10e3Assemble your device4Charge the battery5Start using your device6Use the Setup Wizard6Transfer data from an old device6Lock or unlock your device7Accounts8Set up voicemail9Navigation10Navigation bar15Customize your home screen17iATT A102U EN UM TN SFG 070319 FINAL
Table of contentsBixby23Digital wellbeing24Flexible security25Multi window27Enter text28Emergency mode31Apps33Using apps34Uninstall or disable apps34Search for apps34Sort apps34Create and use folders35App settings35Samsung apps37Galaxy Essentials37Galaxy Store37Samsung Members37Samsung Notes38Calculator40ii
Table of Gallery60Internet64Messages67My Files69Phone71Google tos80Play Movies & TV80iii
Table of contentsPlay Music80Play Store80YouTube80Carrier apps81Call Protect81AT&T ProTech81AT&T Smart Wi-Fi81Device Help81DIRECTV NOW81DriveMode81Mobile Security81myAT&T82Secure Family82Setup & Transfer82Visual Voicemail82Additional apps83Amazon Shopping83Facebook83iv
Table of contentsSettings84Access Settings85Search for Settings85Connections85Wi-Fi85Bluetooth87Airplane mode88Mobile networks89Data usage89Mobile hotspot90Tethering92Nearby device scanning92Connect to a printer93Virtual Private Networks93Private DNS94Ethernet94Sounds and vibration95Sound mode95Vibrations95v
Table of contentsVolume96Ringtone97Notification sounds97System sounds97Dolby Atmos98Equalizer98Adapt sound98Notifications99Manage notifications99Customize app notifications99Smart alert99Display100Screen brightness100Night mode100Font size and style100Screen zoom101Full screen apps101Screen timeout101Touch sensitivity101vi
Table of contentsScreen saver101Reduce animations102Smart stay102One-handed mode102Device maintenance103Quick ge and input105Date and time108Troubleshooting108Lock screen and security111Screen lock types111Google Play Protect113Find My Mobile113Security update114Install unknown apps114Secure Folder114vii
Table of contentsEncrypt SD card114Factory data reset password115Set up SIM card lock115View passwords115Security update service116Device administration116Credential storage116Strong Protection116Advanced security settings117Location117App permissions118Send diagnostic data118Accounts119Add an account119Account settings119Remove an account119Backup and restore120Samsung Cloud121Google settings121viii
Table of contentsAccessibility121Screen Reader121Visibility enhancements122Hearing enhancements123Interaction and dexterity124Advanced settings126Installed services126Other settings126Help126Dual Messenger127About phone127Learn more128Videos128Smart Simulator128Tips128Samsung Care128Talk to an agent128Legal information129Intellectual property130ix
Table of contentsOpen source software130Disclaimer of warranties; exclusion of liability131Modification of software131Notice from AT&T132Samsung Knox133Restricting children’s access to your mobile device133Samsung Electronics America, Inc.133x
FeaturesCameraThe camera on your device has several unique features. See Camera onpage 43.SecurityUse biometrics to unlock your device. See Flexible security on page 25.Expandable storageExpand storage with a supported microSD card. See Memory card on page 104.Night modeUse a darker theme to keep your eyes comfortable at night. See Night mode onpage 100.1
Getting startedGalaxy A10eAssemble your deviceStart using your device2
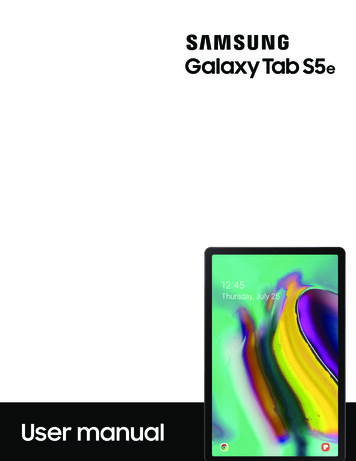
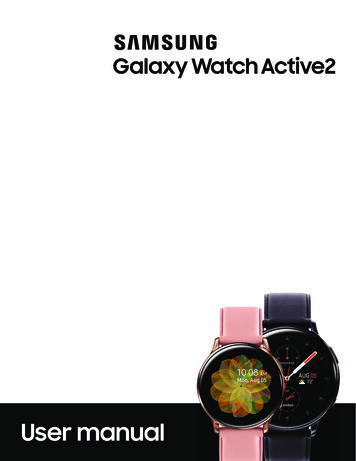
Getting startedGalaxy A10eRearcameraMicrophoneFlashFront cameraSIM/microSDcard trayVolume keyPower keyUSB charger/AccessoryportSpeakerHeadsetjackMicrophone3
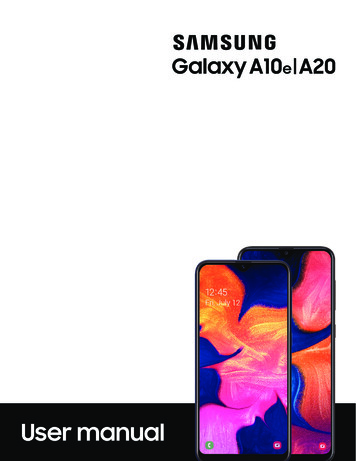
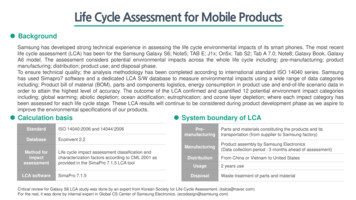
Getting startedAssemble your deviceYour device uses a nano-SIM card. A SIM card may be preinstalled, or you may be ableto use your previous SIM card. Contact your carrier for more details.Install SIM/microSD cardPlace the SIM card andoptional microSD card(sold separately) into thetray with the goldcontacts facing down.Charge your deviceBefore turning on yourdevice, charge it fully.Devices and software are constantly evolving — the illustrations you see here are for reference only.4
Getting startedCharge the batteryYour device is powered by a rechargeable battery. A charger (charging head and USBType-C cable) is included with the device for charging the battery from a poweroutlet.While charging, the device and the charger may become hot and stop charging.This usually does not affect the device’s lifespan or performance and is in the device’snormal range of operation.TIP Disconnect the charger from the device and wait for the device to cool down.For more information, visit samsung.com/us/support/answer/ANS00076952.5
Getting startedStart using your deviceUse the Power key to turn your device on or off. Do not use the device if the body iscracked or broken. Use the device only after it has been repaired. Press and hold the Power key. To turn the device off, press and hold the Power key, and tapConfirm when prompted.Power off. To restart your device, press and hold the Power key, and tapRestart.Use the Setup WizardThe first time you turn your device on, the Setup Wizard guides you through the basicsof setting up your device.Follow the prompts to choose a default language, connect to a Wi-Fi network, set upaccounts, choose location services, learn about your device’s features, and more.Transfer data from an old deviceUse Smart Switch to transfer contacts, photos, music, videos, messages, notes,calendars, and more from your old device. Smart Switch can transfer your data viaUSB cable, Wi-Fi, or computer.Visit samsung.com/us/support/owners/app/smart-switch to learn more.1. From Settings, tapAccounts and backup Smart Switch.2. Follow the prompts and select the content to transfer.Visit samsung.com/smartswitch for more information.6
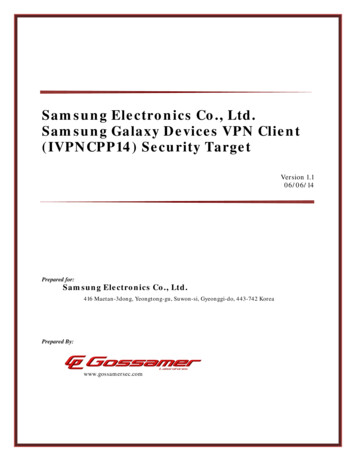
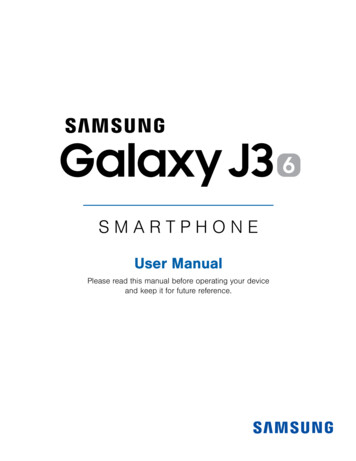
Getting startedLock or unlock your deviceUse your device’s screen lock features to secure your device. By default, the devicelocks automatically when the screen times out. For more information about screenlocks, see Lock screen and security on page 111.Power keyPress to lock.Press to turn on thescreen, and then swipethe screen to unlock it.Devices and software are constantly evolving — the illustrations you see here are for reference only.7
Getting startedAccountsSet up and manage your email accounts, your Google Account, and Samsung account.TIP Accounts may support email, calendars, contacts, and other features. Seeyour carrier for more information.Add a Google AccountSign in to your Google Account to access your Google cloud storage, apps installedfrom your account, and make full use of your device’s Android features.1. From Settings, tap2. TapAccounts and backup Accounts.Add account Google.NOTE When you sign in to a Google Account, Factory Reset Protection (FRP) isactivated. FRP requires your Google Account information when resetting tofactory settings. For more information, see Factory reset protection on page 110.Add a Samsung accountSign in to your Samsung account to access exclusive Samsung content and make fulluse of Samsung apps.1. From Settings, tap2. TapAccounts and backup Accounts.Add account Samsung account.TIP To quickly access your Samsung account, from Settings tapaccount.SamsungAdd an email accountSign in to one or more of your email accounts to view and manage email messages.1. From Settings, tap2. TapAccounts and backup Accounts.Add account Email.8
Getting startedSet up voicemailYou can set up your voicemail service when you access it for the first time. You canaccess voicemail through the Phone app.1. FromPhone, tapVoicemail.2. Follow the tutorial to create a password, record a greeting, and record yourname.9
Getting startedNavigationA touch screen responds best to a light touch from the pad of your finger or acapacitive stylus. Using excessive force or a metallic object on the touch screen maydamage the tempered glass surface and void the warranty.TapLightly touch items to select or launch them.lTap an item to select it.lDouble-tap an image to zoom in or out.Devices and software are constantly evolving — the illustrations you see here are for reference only.10
Getting startedSwipeLightly drag your finger across the screen.lSwipe the screen to unlock the device.lSwipe the screen to scroll through the Home screens or menu options.Devices and software are constantly evolving — the illustrations you see here are for reference only.11
Getting startedDrag and dropTouch and hold an item, and then move it to a new location.lDrag an app shortcut to add it to a Home screen.lDrag a widget to place it in a new location.Devices and software are constantly evolving — the illustrations you see here are for reference only.12
Getting startedZoom in and outBring your thumb and forefinger together or apart to zoom in and out.lBring your thumb and forefinger together on the screen to zoom out.lMove your thumb and forefinger apart on the screen to zoom in.Devices and software are constantly evolving — the illustrations you see here are for reference only.13
Getting startedTouch and holdTouch and hold items to activate them.lTouch and hold a field to display a pop-up menu of options.lTouch and hold a Home screen to customize the Home screen.Devices and software are constantly evolving — the illustrations you see here are for reference only.14
Getting startedNavigation barThe Navigation bar, at the bottom of the screen, displays the navigation keys.BackRecent appsHomeDevices and software are constantly evolving — the illustrations you see here are for reference only.15
Getting startedNavigation gesturesTo make more space on the screen, you can hide the navigation keys, and instead usegestures to navigate the device. Simply swipe up from the bottom of the screen tonavigate the device. From Settings, tapDisplay Navigation bar Full screen gestures. Tap Gesture hints to display lines at the bottom of the screen where gesturesmust be done for each navigation button.TIP You can also quickly switch between navigation gestures and navigationbuttons using the Quick settings menu.Button orderPersonalize your device by changing where the Recent apps and Back buttons displayon the Navigation bar. From Settings, tapDisplay Navigation bar, and tap an option under Buttonorder.16
Getting startedCustomize your home screenThe Home screen is the starting point for navigating your device. You can place yourfavorite apps and widgets here. You can set up additional Home screens, removescreens, change the order of screens, and choose a main Home screen.App iconsYou can use app icons to launch an app from any Home screen. From Apps, touch and hold an app icon, and tapAdd to Home.To remove an icon: Touch and hold an app icon, and tapRemove from Home.NOTE Removing an icon does not delete the app, it just removes the icon from aHome screen.Use foldersOrganize App shortcuts in folders on an Apps screen or Home screen.For more information, see Create and use folders on page 35.WallpapersYou can change the look of the Home and Lock screens by choosing a favorite pictureor preloaded wallpaper.1. From a Home screen, touch and hold the screen.2. TapWallpapers.3. Tap an image to choose it. Multi-pack wallpapers are applied to all screens. Tap the screen or screens to which you want to apply the wallpaper.4. Tap Set as wallpaper, and confirm when prompted.17
Getting startedThemesSet a theme to be applied to your Home and Lock screens, wallpapers, and app icons.1. From a Home screen, touch and hold the screen.2. TapThemes to customize.3. Tap View all to see downloaded themes.4. Tap a theme to preview and download it to My themes.5. Tap a theme, and then tap Apply to apply the selected theme.IconsApply different icon sets to replace the default icons.1. From a Home screen, touch and hold the screen.2. TapWallpapers Icons to customize.3. Tap View all to see downloaded icons.4. Tap an icon set to preview and download it to My icons.5. Tap an icon, and then tap Apply to apply the selected icon set.WidgetsAdd widgets to your home screens for quick access to info or apps.1. From a Home screen, touch and hold the screen.2. TapWidgets, and then touch and hold a widget, drag it to a Home screen, andrelease it.Customize WidgetsOnce you have added a widget, you can customize where it's located and how itfunctions. From a Home screen, touch and hold a widget, and tap an option: Remove from Home: Delete a widget from your screen. Widget settings: Customize the function or appearance of the widget. App info: Review the widget usage, permissions, and more.18
Getting startedHome screen settingsCustomize your Home and Apps screens.1. From a Home screen, touch and hold the screen.2. TapHome screen settings to customize: Home screen layout: Set your device to have separate Home and Appsscreens, or only a Home screen where all apps are located. Home screen grid: Choose a layout to determine how icons are arranged onthe Home screen. Apps screen grid: Choose a layout to determine how icons are arranged onthe Apps screen. Apps button: Add a button to the Home screen for easy access to the Appsscreen. App icon badges: Enable to show badges on apps with active notifications.You can also choose the badge style. Lock Home screen layout: Prevent items on the Home screen from beingremoved or repositioned. Add apps to Home screen: Automatically add newly-downloaded apps to theHome screen. Quick-open notification panel: Enable this feature to open the Notificationpanel by swiping down anywhere on the Home screen. Rotate to landscape mode: Rotate the Home screen automatically when yourdevice’s orientation is changed from portrait to landscape. Hide apps: Choose apps to hide from the Home and App screens. Return tothis screen to restore hidden apps. Hidden apps are still installed and canappear as results in Finder searches. About Home screen: View version information.19
Getting startedEasy modeThe Easy mode layout has larger text and icons, making for a more straightforwardvisual experience. Switch between the default screen layout and a simpler layout.Apps list1. From Settings, tapDisplay Easy mode.2. Tap Easy mode to enable this feature.3. Tap Apply to confirm.To disable Easy mode:1. From Settings, tapDisplay Easy mode Standard mode.2. Tap Apply to exit Easy mode.Devices and software are constantly evolving — the illustrations you see here are for reference only.20
Getting startedStatus barThe Status bar provides device information on the right side and notification alerts onthe left.Status iconsBattery fullBattery lowAirplane mode Bluetooth activeChargingMuteVibrateWi-Fi activeLocation activeAlarmNotification iconsMissed callsCall in progressCall on holdNew messageVoicemailNew emailDownloadUploadWi-Fi availableApp updateConfigure display options for the Status bar. From Quick settings, tap More options Status bar for the following options: Show notification icons: Choose how to display notification icons on theStatus bar. Show battery percentage: Display the battery charge percentage next to thebattery icon on the Status bar.21
Getting startedNotification panelFor quick access to notifications, settings, and more, simply open the Notificationpanel.Device settingsQuick settingsView allNotification cardsDevices and software are constantly evolving — the illustrations you see here are for reference only.22
Getting startedView the Notification panelYou can access the Notification panel from any screen.1. Drag the Status bar down to display the Notification panel.2. Swipe down the list to see notification details. To open an item, tap it. To clear a single notification, drag the notification left or right. To clear all notifications, tap Clear. To customize notifications, tap Notification settings.3. Drag upward from the bottom of the screen or tapNotification panel.Back to close theQuick settingsThe Notification panel also provides quick access to device functions using Quicksettings.1. Drag the Status bar down to display the Notification panel.2. DragView all downward. Tap a quick setting icon to turn it on or off. Touch and hold a quick setting icon to open the setting. TapSearch to search the device. TapSettings to quickly access the device's settings menu. Tap3. DragMore options to reorder Quick settings or to change the button layout.View all upward to close Quick settings.BixbyBixby is a virtual assistant that learns, evolves, and adapts to you. It learns yourroutines, helps you set up reminders based on time and location, and is built in to yourfavorite apps. Visit samsung.com/us/support/owners/app/Bixby for more information.The Bixby Home page displays customized content based on your interactions. Bixbylearns from your usage patterns and will suggest content you may like. From a Home screen, swipe right.23
Getting startedDigital wellbeingYou can monitor and manage your digital habits by getting a daily view of howfrequently you use apps, how many notifications you receive, and how often you checkyour device. You can also set your device to help you wind down before going to bed. From Settings, tapDigital wellbeing for the following features: Screen time: Tap the time value in the dashboard circle for details on howlong each app has been opened and used today. Times opened: Tap the Unlocks number to see how many times each app hasbeen opened today. Notifications received: Tap the Notifications number to see how manynotifications have been received from each app today. Dashboard: View all dashboard information shown above. Each app can havea timer set to limit usage throughout the day. Wind down: Enable to turn the screen to grayscale and limit notificationsbefore going to bed. Notifications: Configure notification settings for each app.24
Getting startedFlexible securityUse biometrics to securely unlock your device and log in to accounts.Face recognitionYou can enable Face Recognition to unlock your screen. Face recognition is less secure than Pattern, PIN, or Password. Your device couldbe unlocked by someone or something that looks like your image. Some conditions may affect face recognition, including wearing glasses, hats,beards, or heavy make-up. When registering your face, ensure that you are in a well-lit area and the cameralens is clean.1. From Settings, tapBiometrics and security Face recognition.2. Follow the prompts to register your face.TIP To use your face to unlock your device, you must set a pattern, PIN, orpassword.Face recognition managementCustomize how face recognition works. From Settings, tapBiometrics and security Face recognition. Remove face data: Delete existing faces. Face unlock: Enable or disable face recognition security. Stay on Lock screen: When you unlock your device with face recognition, stayon the Lock screen until you swipe the screen. Faster recognition: Turn on for faster face recognition. Turn off to increasesecurity and make it harder to unlock using an image or video of yourlikeness. Brighten screen: Increase the screen brightness temporarily so that your facecan be recognized in dark conditions.25
Getting startedBiometrics PreferencesConfigure your preferences for biometric security options. From Settings, tapBiometrics and security Biometrics preferences for thefollowing options: Screen transition effect: Show a transition effect when you use biometrics tounlock your device.26
Getting startedMulti windowMultitask by using multiple apps at the same time. Apps that support Multi window can be displayed together on a split screen. You can switch between the apps andadjust the size of their windows.Split screencontrol1. From any screen, tapRecent apps.2. Tap the app icon, and then tap Open in split screen view.3. Tap an app in the other window to add it to the split screen view. Drag the middle of the window border to adjust the window size.Devices and software are constantly evolving — the illustrations you see here are for reference only.27
Getting startedEnter textText can be entered using a keyboard or your voice.Expand toolbar Tap a field to display the Samsung keyboard. TapShow predictive text to view suggested words while you type. TapShow toolbar functions to view all keyboard options.Devices and software are constantly evolving — the illustrations you see here are for reference only.28
Getting startedToolbar functionsThe toolbar provides additional helpful functions. From the Samsung keyboard, tapExpand toolbar for the following options: Clipboard: Access the clipboard. Emojis: Insert an emoji. GIF keyboard: Add animated GIFs. Modes: Select a keyboard layout. Settings: Access keyboard settings. Stickers: Add illustrated stickers. Text editing: Use an editing panel to help pinpoint text that you want tocut, copy, and paste.Voice input: Use Google Voice typing.Configure the Samsung keyboardSet customized options for the Samsung keyboard. From the Samsung keyboard, tapSettings for the following options: Languages and types: Set the keyboard type and choose which languages areavailable on the keyboard.– To switch between languages, slide the Space bar sideways. Smart typing: Use predictive text and auto-correction features to preventcommon typing mistakes. Type by swiping between letters. Keyboard layout and feedback: Customize the appearance and function ofthe keyboard. Reset to default settings: Return keyboard to original settings and clearpersonalized data. About Samsung keyboard: View version and legal information for theSamsung keyboard.29
Getting startedUse Google Voice typingInstead of typing, enter text by speaking.Settings1. From the Samsung keyboard, tapVoice input.2. Tap the screen and speak your text.Devices and software are constantly evolving — the illustrations you see here are for reference only.30
Getting startedConfigure Google Voice typingSet customized options for Google Voice typing.1. From the Samsung keyboard, tap2. TapVoice input.Settings for options. Languages: Choose the language for the keyboard. Offline speech recognition: Download languages for offline Google Voicetyping. Hide offensive words: Hide potentially offensive words with asterisks.Emergency modeUse Emergency mode to access helpful emergency features and conserve yourdevice’s power during an emergency situation.To save battery power, Emergency mode: Restricts application usage to only essential applications and those you select. Turns off connectivity features and Mobile data when the screen is off.Activate Emergency modeTo activate Emergency mode:1. Press and hold the Power key.2. TapEmergency mode. When accessing for the first time, read and accept the terms and conditions.3. Tap Turn on.Emergency mode featuresWhile in Emergency mode, only the following apps and features are available on theHome screen:lFlashlight: Use the device’s flash as a steady source of light.lEmergency alarm: Sound an audible siren.31
Getting startedlShare my location: Send your location information to your emergency contacts.lPhone: Launch the call screen.lInternet: Launch the web browser.lAdd– Email: Launch the Email app.– Maps: Launch Google Maps .llllBattery charge: Displays estimated battery charge percentage.Estimated battery life: Displays estimated remaining battery charge time based oncurrent battery charge and usage.Emergency call: Dial the emergency telephone number (for example, 911). This kindof call can be made even without activated service.More options:– Turn off Emergency mode: Disable Emergency mode and return tostandard mode.– Remove apps: Choose apps to remove from the screen.– Manage emergency contacts: Manage your medical profile and ICE (In Case ofEmergency) group contacts.– Settings: Configure the available settings. Only a limited number of settings areenabled in Emergency mode.Turn off Emergency modeWhen emergency mode is turned off, the device returns to standard mode.1. Press and hold the Power key.2. TapEmergency mode.NOTE When Emergency mode is activated, Locating method is set to Batterysaving. After Emergency mode is turned off, you may need to adjust your locationsettings. For more information, see Location on page 117.32
AppsUsing appsSamsung appsGoogle appsCarrier appsAdditional apps33
AppsUsing appsThe Apps list displays all preloaded and downloaded apps. Apps can be downloadedfrom Galaxy Store and the Google Play store. From a Home screen, swipe the screen upward to access the Apps list.Uninstall or disable appsInstalled apps can be removed from your device. Some apps that are preloaded(available on your device by default) can only be disabled. Disabled apps are turnedoff and hidden from the Apps list. From Apps, touch and hold an app, and tap Uninstall/Disable.Search for appsIf you are not sure where to find an app or a setting, you can use the Search feature.1. From Apps, tap Finder search, and enter a word or words. As you type, matchingapps and settings appear as results on the screen.2. Tap a result to go to that app.TIP You can customize the search settings by tappingsettings.More options FinderSort appsApp shortcuts can be listed alphabetically or in your own custom order. From Apps, tap More options Sort for the following sorting options: Custom order: Arrange apps manually. Alphabetical order: Sort apps alphabetically.TIP When apps are arranged manually (Custom order), empty icon spaces can beremoved by tapping More options Clean up pages.34
AppsCreate and use foldersYou can make folders to organize App shortcuts on the Apps list.1. From Apps, touch and hold an app shortcut, and then drag it on top of anotherapp shortcut until it is highlighted.2. Release the app shortcut to create the folder. Enter folder name: Name the folder.Palette: Change the folder color. Add apps: Place more apps in the folder. Tap apps to select them, andthen tap Add.3. TapBack to close the folder.Copy a folder to a Home screenYou can copy a folder to a Home screen. From Apps, touch and hold a folder, and tapAdd to Home.Delete a folderWhen you delete a folder, the app shortcuts return to the Apps list.1. From Apps, touch and hold a folder to delete.2. TapDelete folder, and confirm when prompted.App settingsManage your downloaded and preloaded apps.1. From Settings, tapApps.2. TapMenu to set which apps to view, and then choose All, Enabled, orDisabled.3. TapMore options for the following options: Sort by name/size: Sort the apps alphabetically by first letter or file size. Default apps: Choose or change apps that are used by default for certainfeatures, like email or browsing the Internet.35
Apps App permissions: Control which apps have permissions to use certain featuresof your device. Show/Hide system apps: Show or hide system (background) apps. Special access: Select which apps can have special access permissions tofeatures on your device. Reset app preferences: Reset options that have been changed. Existing appdata is not deleted.4. Tap an app to view and update information about the app. The following optionsmay be displayed: Uninstall/Disable: Uninstall or disable the app. Some preloaded apps can onlybe disabled, not uninstalled. Force stop: Stop an app that is not working correctly. Mobile data: View mobile data usage. Battery: View battery usage since the last full charge. Storage: Manage the app’s storage usage. Memory: View memory usage. Notifications: Configure notifications from the app. Permissions: View permissions granted to the app for access to your device’sinformation. Set as default: Set the app as a default for a certain category of apps.NOTE Options vary by app.36
AppsSamsung appsThe following apps are either preloaded or downloaded over-the-air to your deviceduring setup.Galaxy EssentialsGalaxy Essentials is a collection of specially chosen applications available throughSamsung apps. You can access and download a collection of premium content. From Apps, tap More options Galaxy Essentials.Galaxy StoreFind and download premium apps that are exclusive to Galaxy devices. A Samsungaccount is required to download from Galaxy Store. From Apps, tapGalaxy Store.Samsung MembersGet more and do more from your Galaxy device. Enjoy DIY support tools and exclusiveexperiences and content — for Samsung members only. Samsung Members may bepreloaded on your device, or you can download and install it from Galaxy Store or theGoogle Play store.Visit samsung.com/us/support/owners/app/samsung-members to learn more. From Apps, tap Samsung folder Samsung Members.37
AppsSamsung NotesUse Samsung Notes to create notes containing text, images with footnotes, voicerecordings, and music. You can share your notes easily using social networkingservices.Visit samsung.com/us/support/owners/app/samsung-notes to learn more. From Apps, tapSamsung Notes Create.Access toolsAdd an attachmentAssign a categorySet text optionsDevices and software are constantly evolving — the illustrations you see here are for reference only.38
AppsEdit notesMake edits to notes you create.1. From2. TapSamsung Notes, tap a note to view it.Edit, and make changes. When you are finished, tap Save.Notes optionsYou can edit, share, or manage notes. FromSamsung Notes, tapMore options for the following options: Edit: Select notes to share, delete, or move. Sort: Change the way notes are organized. View: Switch between Grid, List, or Simple list.Notes menuYou can view your notes by category. FromSamsung Notes, tapMenu for the following options: All notes: View all notes. Frequently used: Quick access to commonly used notes. Shared notebooks: View notebooks shared with your contacts through yourSamsung account. Trash: View deleted notes. Categ
Sign in to your Google Account to access your Google cloud storage, apps installed from your account, and make full use of your device's Android features. 1. From Settings, tap Accounts and backup Accounts. 2. Tap Add account Google. NOTE When you sign in to a Google Account, Factory Reset Protection (FRP) is activated.