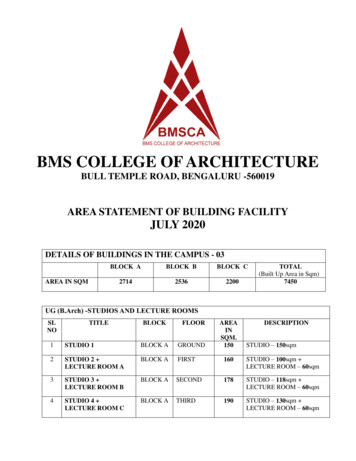
Transcription
Meeting Room ManagerAdministration GuideGetting Started . . 2Managing Resources . 3Managing Resource Types. . . 5Managing Bookings . . 6Adding A Booking . 9Editing and Deleting Bookings . 11Copying A Booking 12Sharing With Your Clients . . 15Copyright 2007 Cybergroup, Inc.1
Getting StartedWhat is the Meeting Room Manager?The Meeting Room Manager module is a powerful room scheduling application designed for booking andtracking not only meeting rooms but other equipment such as data projectors. Each of the items to be trackedis called a resource in the Meeting Room Manager. The module automates the entire scheduling process.Using their web browser, your staff can access the reservation system to view and book rooms or equipment,anytime, from anywhere. Additionally, your clients can view available room and request a booking.How do I get started?If you currently do not have The Meeting Room Manager on your incuTrack system, contact Cybergroup tobegin the implementation process. You will need to provide Cybergroup with the email address(es) of theMeeting Room Manager’s administrator(s). You also will need to schedule a training session for systemadministrators.Accessing the SystemTo access the Meeting Room Manager, login to your incuTrack account and click on the Meeting RoomManager administration link under Facility Modules.You will see the Meeting Room Manager administration menu. (figure 1)Figure 1Copyright 2007 Cybergroup, Inc.2
Managing ResourcesThe first step to system setup is defining your resources. You need to identify with rooms and equipment youwant to track with the Meeting Room Manager and create a record for each of these resources. You will needthe following information to create the resource records: Name of the resource (i.e.: Conference Room B, or Sony digital camera) Description (i.e.: 20x25, seats 24) Price/cost of room (This can be calculated, hourly, daily, or by your designated minimum billableincrement. If no charge, set all cost fields to zero.) The category or resource type (i.e.: Is it a room, or equipment) Image of resource* Any additional comments** OptionalFrom the admin menu, click on “Manage Resources”. You will see a grid with all of the current systemresources which have been included for demonstrative purposes. You may delete or edit an existing resourceby clicking on the proper link to the right of each resource. To add a new resource to the system click on “AddResource”. (figure 2)Figure 2Copyright 2007 Cybergroup, Inc.3
Now you will fill in the fields with the resource’s information. You also may add an image of the resource.(figure 3)Figure 3Title: Add the name of the resource. This will appear as a column heading on the calendar.Description: Add text describing the resource, for example, dimensions, seating, decor Price: If you will not charge for the booking of the resource enter 0 under daily and hourly and enter 0 forminimum billable increment. If you would like to see a calculated charge, enter the daily and hourly charge,and add the minimum billable increment in hours, for example 0.5 hours or 8 hours. When you add pricefigures here, you will see a calculated price for the room booking when you create a booking under thisresource. You can use that figure as a guideline for charging but you will be able to change the actual cost onthe booking to any figure you choose, including 0.Comments: Any additional information goes here. All of this information will be viewable to your clients whenthey access the system to check availability or make booking requests.Resource Type: Define the resource as a room or equipment. (If the resource does not fall into eithercategory, see Managing Resource Types on page 5)Image: You may add an image of the resource by clicking ‘Browse” next to the image field. You can choose a.gif or .jpeg to upload from your computer.Finally, click “Add Resource”.Copyright 2007 Cybergroup, Inc.4
Managing Resource TypesThe Meeting Room Manager comes with two predefined “resource types”. These are “Rooms” and“Equipment”. If you wish to track resources that do not fall into either of these categories, you will need tocreate a new resource type. In this example, we will add “People” as a third resource type. See figure 4.Figure 4To add a new resource type or to edit an existing resource type, click “Manage Resource Types” from theadministration menu. You will then see your resource types as shown in figure 4. To add a new resourceclick “Add Resource Type” and enter the name of the new type in the description field. Then click “Add NewResource Type” button.You may also edit or delete an existing resource type by selecting the corresponding edit/delete links on theright side of the desired resource type.Copyright 2007 Cybergroup, Inc.5
Managing BookingsThere are two ways you can create, view, edit, copy and delete bookings on the Meeting Room ManagerSystem. You may go through a daily calendar by clicking on the “calendar” link from the administration menuor you may access the bookings through a comprehensive grid by clicking the “manage bookings” link fromthe administration menu. Both the “Calendar” and “Manage Bookings” links will allow you administrativeaccess to create, view, edit, copy, or delete bookings. This user guide will detail these actions via thecalendar view, however you may choose either link to accomplish these administrative tasks.Calendar ViewTo access the daily calendar as an administrator from the admin menu click on “Calendar”. You will be shownthe calendar for the present date. If any of the resources have been booked for the day, you will see the timeof the booking blocked off under the resource. For example, in figure 5, below, you can see that the company,Advanced Systems, has booked conference room B from 8:00 am – 12:00 pm. As an administrator, you canclick on the booking to view or edit details of the booking.Figure 5Copyright 2007 Cybergroup, Inc.6
To navigate to a different date you may use the “next” and “previous” links at the top of the calendar. Youalso have the option of entering a new date in the “Go to:” date field or you may click on the calendar icon tochoose a new date. (figure 7)Figure 7Copyright 2007 Cybergroup, Inc.7
Adding a BookingOnce you are viewing your desired date, to add a booking, click and drag over the timeslot that you would liketo book below the desired resource. A new screen will appear where you will enter the details of the booking.See figure 8.Figure 8Title: This is what will appear on the calendar. It is recommended to use the name of the company as thetitle.Description: Additional descriptive language describing the booking can be placed here.Copyright 2007 Cybergroup, Inc.8
Resource: The room or equipment that is being booked will appear here. You may change the resource bymaking a new selection from the dropdown list.Start Date/End Date: Based on the block of time that clicked and dragged to begin the booking process, astart and end date and time will be assigned. If you need to modify the date(s) or time(s) you may modifythese by typing in a new date or time into the field, or you may use the calendar icon to modify the date(s)and/or time(s).Comments: Add any additional comments here.ClientCode: This field can be used to place a client id number, purchase order number, or any otheridentifying code that you need to track in the booking process.Company Name: Choose the company from the dropdown list. If the company does not appear on thedropdown list, choose “other” from the dropdown and then a field will appear where you can manually enterthe name of the company.Contact Name, Email, & Phone: Simply enter the contact information in these fields.Host: If you need to identify a host or additional contact person or company use this field.Reminder Email: If you will be sending out a reminder before the date of the booking, enter the emailaddress for this contact. Reminder emails are sent manually by a staff member.Food Service: If food service will be needed for this booking, check the box next to “Food Service”.Checking this box will provide you with a comments section where you can describe the food service detailsfor the booking.Calculated Rate: A figure will automatically be calculated and will appear here. This calculation is basedupon the duration of the booking and the Hourly, Daily and Minimum Billable Increment fields for eachresource in the “Manage Resources” section.Actual Rate: The calculated rate will automatically be populated into the Actual Rate field, however you mayhighlight this figure and type any amount, including 0 (zero) into this field.When you have completed the fields on the screen, click “Add Booking”.Copyright 2007 Cybergroup, Inc.9
Editing and Deleting BookingsEditing a BookingNow that booking will appear on the calendar. If you need to edit a booking, simply click on the bookingblock from the calendar. You will see a screen similar to the “Add Booking” screen. You may change any ofthe fields as desired and click “Update Booking” at the bottom of the screen. Your booking will beautomatically updated to reflect the changes you made. If the changes conflict with another booking, you willreceive a message that there is a conflict and your changes will not go into effect.Deleting a BookingIf you need to delete a booking, simply click on the booking block from the calendar. You will see a screensimilar to the “Add Booking” screen. At the bottom of the screen click “Delete Booking”.Copyright 2007 Cybergroup, Inc.10
Copying a BookingCopying a booking can be used when you want to create a booking that is similar to an existing booking.Rather than creating a new booking from scratch, you can click on the existing booking and at the bottom ofthe screen click on “Copy Booking”. Now an “Add Booking” screen will appear with all of the fields filled inwith the “model” booking’s information. Make the necessary changes, for example change the start and enddate or change the resource, then click “Add Booking”. Now you have added a new booking to the calendarwith minimal data entry.For example, let’s say that Advanced Systems has booked Conference Room B from 8:00 am – 12:00 pm.Then they call and ask if you have a data projector available for rent that they could use in that meeting. Youcan simply view the calendar to see their booking and at a glance you can see if a data projector is availableduring the time of their meeting. The simplest way to add the second booking would be to click on thebooking block for Advanced System’s meeting. Then at the bottom of the screen click on “Copy Booking”.Figure 9Copyright 2007 Cybergroup, Inc.11
Now the booking screen appears, and all of the fields are duplicated to match the original booking. Simplemake the needed change to this booking screen. In this case, we will change the resource from “ConferenceRoom B” to “Data Projector”. Then click “Update Booking”. (Figure 10)Figure 10Copyright 2007 Cybergroup, Inc.12
The same process can be used to create recurring bookings, only in that case you will copy the booking andthen change the dates of the booking rather than changing the resource, as we did in this example. Now wecan see both booking on the calendar view. (Figure 11)Figure 11Copyright 2007 Cybergroup, Inc.13
Sharing the Meeting Room Manager with your ClientsOnce you are comfortable with the system and you would like to give your clients access to the calendar viewyou can provide a web link to the client’s calendar view. This address can be found by clicking on “MeetingRoom Manager – Client View” from your incuTrack menu. After clicking that link, look in your web browser’saddress window for the correct URL. By sharing this link with your client’s they will be able to view thecalendar and see availability of the resources. They also will have the option of submitting an electronicbooking request. This will trigger an email to the Meeting Room Manager’s administrator(s). Theadministrator(s) are responsible for following up with the client regarding the request and creating the newbooking if necessary.Copyright 2007 Cybergroup, Inc.14
What is the Meeting Room Manager? The Meeting Room Manager module is a powerful room scheduling application designed for booking and tracking not only meeting rooms but other equipment such as data projectors. Each of the items to be tracked is called a resource in the Meeting Room Manager. The module automates the entire scheduling process.