Transcription
IONA Tivoli Integration GuideVersion 6.1, December 2003
IONA, IONA Technologies, the IONA logo, Orbix, Orbix/E, Orbacus, Artix, Orchestrator,Mobile Orchestrator, Enterprise Integrator, Adaptive Runtime Technology, TransparentEnterprise Deployment, and Total Business Integration are trademarks or registeredtrademarks of IONA Technologies PLC and/or its subsidiaries.Java and J2EE are trademarks or registered trademarks of Sun Microsystems, Inc. in theUnited States and other countries.CORBA is a trademark or registered trademark of the Object Management Group, Inc. inthe United States and other countries. All other trademarks that appear herein are theproperty of their respective owners.While the information in this publication is believed to be accurate, IONA Technologies PLC makes no warrantyof any kind to this material including, but not limited to, the implied warranties of merchantability and fitness fora particular purpose. IONA Technologies PLC shall not be liable for errors contained herein, or for incidental orconsequential damages in connection with the furnishing, performance or use of this material.COPYRIGHT NOTICENo part of this publication may be reproduced, stored in a retrieval system or transmitted, in any form or by anymeans, photocopying, recording or otherwise, without prior written consent of IONA Technologies PLC. No thirdparty intellectual property right liability is assumed with respect to the use of the information contained herein.IONA Technologies PLC assumes no responsibility for errors or omissions contained in this book. This publication and features described herein are subject to change without notice.Copyright 2003 IONA Technologies PLC. All rights reserved.All products or services mentioned in this manual are covered by the trademarks, service marks, or productnames as designated by the companies who market those products.M 3 1 2 6Updated: 21-May-2004
ContentsList of FiguresPrefaceWhat is covered in this bookWho should read this bookOrganization of this bookRelated documentationSuggested path for further readingAdditional resources for helpDocument ConventionsChapter 1 Integrating with IBM Tivoli IntroductionThe IONA Tivoli IntegrationChapter 2 Configuring your IONA ProductSetting up your Artix EnvironmentSetting up your Orbix EnvironmentChapter 3 Configuring your Tivoli EnvironmentCreating a Tivoli Installation BundleInstalling the Resource Model in the Tivoli ServerPushing the Resource Model out to your HostConfiguring the Resource Model for your EndpointChapter 4 Extending to a Production EnvironmentConfiguring an Artix Production EnvironmentConfiguring an Orbix Production EnvironmentChapter 5 Using the IONA Tivoli IntegrationDetecting Common Server ProblemsTracking Server Performance 313236414244iii
CONTENTSStopping, Starting, and Restarting ServersAppendix A IONA Tivoli Resource ModelThresholdsEventsParametersWBEM/CIM DefinitionIndexiv45474850515255
List of FiguresFigure 1: Overview of the IONA Tivoli Integration4Figure 2: Example IONA Tivoli Deployment7Figure 3: Deployment Bundle Wizard11Figure 4: Run Deployer Dialog12Figure 5: Orbix Configuration GUI14Figure 6: Selecting Tivoli Agent Configuration15Figure 7: Selecting Performance Logging16Figure 8: Tivoli Profile Manager23Figure 9: Edit Resource Model24Figure 10: Contents of the IONA Server Task Library27Figure 11: The configure provider Task33Figure 12: The configure provider Task38v
LIST OF FIGURESvi
PrefaceWhat is covered in this bookIONA’s products support integration with Enterprise Management Systemssuch as IBM Tivoli , HP OpenView , CA Unicenter , and BMC Patrol .This book explains how to integrate Orbix and Artix with IBM Tivoli.Who should read this bookThis book is aimed at system administrators using IBM Tivoli to managedistributed enterprise environments, and developers writing distributedenterprise applications. Administrators do not require detailed knowledge ofthe technology that is used to create distributed enterprise applications.This book assumes that you already have a good working knowledge of theIBM Tivoli Management Framework and IBM Tivoli Monitoring (formerlyknown as Distributed Monitoring).Organization of this bookThis book contains the following chapters: Chapter 1 introduces Enterprise Management Systems, and IONA’sintegration with IBM Tivoli. Chapter 2 describes how to configure your IONA product for integrationwith IBM Tivoli.vii
PREFACE Chapter 3 describes how to configure your IBM Tivoli environment forintegration with IONA products. Chapter 4 describes how to extend your integration from a testenvironment into a production environment. Chapter 5 explains how to perform common tasks such as trackingserver metrics or starting a server. Appendix A lists the contents of the IONA Tivoli Resource Model,describing its thresholds, events and parameters.Related documentationThe Orbix library includes the following related books: Orbix Management User’s GuideOrbix Administrator’s GuideOrbix Management Programmer’s GuideThe Artix library includes the following related books: Deploying and Managing Artix SolutionsDesigning Artix Solutions with Artix DesignerIONA BMC Patrol Integration GuideFor the latest versions of all IONA product documentation, see the IONAweb site:http://www.iona.com/support/docsSuggested path for further readingIf you are new to Orbix, you should read the documentation in the followingorder:1.First Northern Bank TutorialThis guide gives an overview of the Orbix product and how it can beused in a multi-platform business environment.2.Orbix Management User’s GuideThis guide explains how to use the IONA Administrator managementtool, and how to configure the Orbix management service forintegration with other management tools.viii
PREFACE3.Orbix Administrator’s GuideThis guide explains in detail how to configure and manage thecomponents of an Orbix environment.4.Orbix Management Programmer’s GuideThis guide explains how programmers can enable applications to bemanaged by IONA Administrator.Additional resources for helpThe IONA Knowledge Base(http://www.iona.com/support/knowledge base/index.xml) contains helpfularticles, written by IONA experts, about Artix and other products. You canaccess the knowledge base at the following location:The IONA Update Center tains the latest releases and patches for IONA products:If you need help with this or any other IONA products, contact IONA atsupport@iona.com. Comments on IONA documentation can be sent to.Document ConventionsThis book uses the following typographical and keying conventions.Typographical conventionsThis book uses the following typographical conventions:Constant widthConstant width (courier font) in normal textrepresents portions of code and literal names of itemssuch as classes, functions, variables, and datastructures. For example, text might refer to theCORBA::Object class.Constant width paragraphs represent code examplesor information a system displays on the screen. Forexample:#include stdio.h ix
PREFACEItalicItalic words in normal text represent emphasis andnew terms.Italic words or characters in code and commandsrepresent variable values you must supply, such asarguments to commands or path names for yourparticular system. For example:% cd /users/your nameNote: Some command examples may use anglebrackets to represent variable values you mustsupply. This is an older convention that is replacedwith italic words or characters.Keying conventionsThis book uses the following keying conventions:xNo promptWhen a command’s format is the same for multipleplatforms, a prompt is not used.%A percent sign represents the UNIX command shellprompt for a command that does not require rootprivileges.#A number sign represents the UNIX command shellprompt for a command that requires root privileges. The notation represents the DOS or Windowscommand prompt.Horizontal or vertical ellipses in format and syntaxdescriptions indicate that material has beeneliminated to simplify a discussion.[]Brackets enclose optional items in format and syntaxdescriptions.{}Braces enclose a list from which you must choose anitem in format and syntax descriptions. A vertical bar separates items in a list of choicesenclosed in { } (braces) in format and syntaxdescriptions.
CHAPTER 1Integrating withIBM Tivoli This introduces the integration of IONA products with the IBMTivoli Enterprise Management System (EMS).In this chapterThis chapter contains the following sections:Introductionpage 2The IONA Tivoli Integrationpage 51
CHAPTER 1 Integrating with IBM Tivoli IntroductionOverviewIONA’s products support integration with Enterprise Management Systemssuch as IBM Tivoli . This section includes the following: “The application life cycle”.“Enterprise Management Systems”.“IONA EMS integration”.“IONA Tivoli integration tasks”.“Integration overview”.The application life cycleMost enterprise applications go through a rigorous development and testingprocess before they are put into production. When applications are inproduction, developers would rarely expect to manage an application. Theywill move on to a new project while the day-to-day running of theapplication is managed by the production team. In some cases, theapplication is deployed in a data center that is owned by a third party, andthe team that monitors the application will belong to a differentorganization.Enterprise Management SystemsDifferent organizations have different approaches to managing theirproduction environment, but most will have at least one EnterpriseManagement System (EMS) to manage their production environment.The main Enterprise Management Systems are IBM Tivoli , HPOpenView , CA Unicenter , or BMC Patrol . These systems are popularbecause they give a top-to-bottom view of every part of the IT infrastructure.This means that if an application fails because the /tmp directory fills up ona particular host, for example, the disk space is reported as the fundamentalreason for the failure. The various application errors that arise will beinterpreted as symptoms of the underlying problem with disk space. This ismuch better than being swamped by an event storm of higher level failuresthat all originate from the same underlying problem. This is the fundamentalstrength of integrated management.2
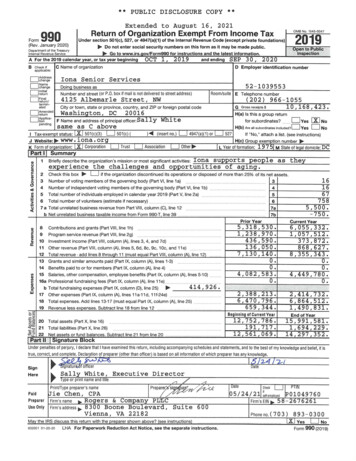
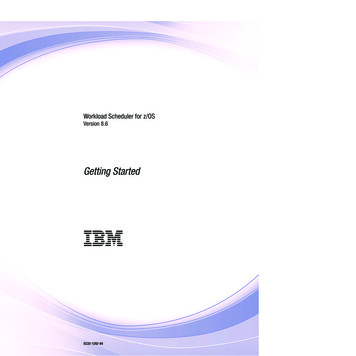
IntroductionIONA EMS integrationIONA's Orbix and Artix products are designed to integrate with EnterpriseManagement Systems. IONA's common management instrumentation layerprovides a base that can be used to integrate with any EMS.In addition, IONA provides packaged integrations that provide out-of-the-boxintegration with major EMS products. This guide describes IONA’sintegration with the IBM Tivoli products.IONA Tivoli integration tasksThe IONA Tivoli integration performs key enterprise management tasks (forexample, posting an event if a server dies). This enables automated recoveryactions to be taken.The IONA Tivoli integration also tracks key server metrics (for example,number of invocations received; and average, maximum and minimumresponse times). Events can be generated when any of these parameters goout of bounds.In addition, you can also perform an extensible set of actions on servers. Thedefault actions are start, stop and restart.Integration overviewIn the IONA Tivoli integration, these key server performance metrics arelogged by the IONA performance logging plugins. Log file interpretingutilities are then used to analyze the logged data. Figure 1 shows asimplified overview of the IONA Tivoli integration at work. In this example, arestart command is issued to an unresponsive server (for example, locator ornaming service).The IONA performance logging plugins collect data relating to serverresponse times and log it periodically in the performance logs. The IONAresource model executes periodically on each host and uses the IONA logfile interpreter to collect and summarize the logged data. It compares theresponse times and other values against user defined thresholds. If thesevalues exceed the threshold, an event is fired. This event can be used totrigger an option from the Tivoli task library to restart the unresponsiveserver.3
CHAPTER 1 Integrating with IBM Tivoli Figure 1: Overview of the IONA Tivoli Integration4
The IONA Tivoli IntegrationThe IONA Tivoli IntegrationOverviewThis section describes the requirements and main components of IONA'sTivoli integration.This section includes the following: IONA requirements“Tivoli requirements”.“Main components”.“IONA Tivoli resource model”.“IONA Tivoli task library”.“Integration and setup utilities”.“Example IONA Tivoli deployment”.IONA's Artix and Orbix products are fully integrated with IBM Tivoli. Youmust have at least one of the following installed: Tivoli requirements“IONA requirements”.Artix 2.0.1Orbix 6.1IONA's products are fully integrated with IBM Tivoli ManagementFramework and IBM Tivoli Monitoring.To use the IONA Tivoli integration, you must have at least the followingversions installed: Main componentsIBM Tivoli Management Framework 4.1 or higher.IBM Tivoli Monitoring 5.1.1 (Fix Pack 04) or higher.The IONA Tivoli integration contains three main parts: A Tivoli Monitoring resource model.A Tivoli task library.Integration and setup utilities.5
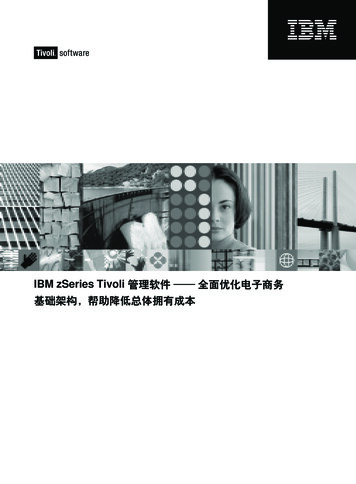
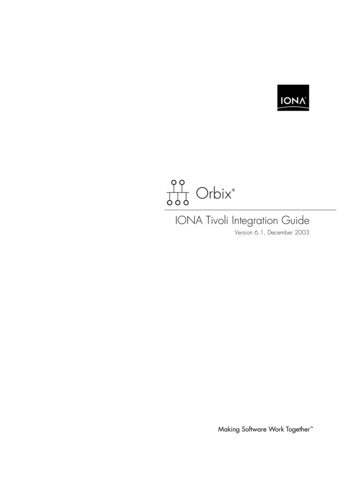
CHAPTER 1 Integrating with IBM Tivoli IONA Tivoli resource modelFor an introduction to Tivoli resource models, see the IBM Tivoli MonitoringUser Guide. The IONA Tivoli resource model enables Tivoli to track keyattributes of Artix services and customer-built servers that are based onArtix. These attributes include: Server liveness.Number of incoming invocations received by the server.Maximum, average, and minimum response times of the server.The resource model defines events that fire when a server's liveness cannotbe verified, or when any of the other attribute values go beyond thresholdsthat can be set by the user.The IONA Tivoli resource model is described in detail in Appendix A.IONA Tivoli task libraryThe IONA Tivoli task library contains a set of tasks that can be used toconfigure and perform self-checking on the configuration of the Tivoliintegration.This task library can also be used to start, stop, or restart monitored servers.It can also be extended to perform any number of actions on a monitoredserver. These actions can be performed automatically as a result of receivingan event. For example, if an event fires to indicate that a server is no longeralive, you can configure Tivoli to use the IONA Tivoli task library to issue arestart for that server.Integration and setup utilitiesBoth the IONA Tivoli resource model and task library must be installed andconfigured to work correctly. The IONA Tivoli Integration package contains anumber of setup utilities that help you achieve this task. These utilities aredescribed in detail in “Configuring your Tivoli Environment” on page 19.Example IONA Tivoli deploymentThe high-level overview in Figure 2 shows a typical deployment of an IONATivoli integration. This deployment is explained as follows:61.The IONA resource model and task library are installed on the Tivoliregion server.2.The administrator customizes a monitoring profile based on the IONATivoli resource model.
The IONA Tivoli Integration3.The profile is distributed through the gateways to each of the Tivoliendpoints (managed hosts). In this example, there are three Tivoliendpoints—two based on Windows, and one on Solaris.4.The profile will execute inside the Tivoli Monitoring Agent, periodicallychecking the status and response times of your IONA services andIONA-based applications.Figure 2: Example IONA Tivoli DeploymentThese steps are explained in more detail in “Configuring your TivoliEnvironment” on page 19 and “Extending to a Production Environment” onpage 31.7
CHAPTER 1 Integrating with IBM Tivoli 8
CHAPTER 2Configuring yourIONA ProductThis chapter explains the steps that you need to perform inArtix or Orbix so that they can be managed using IBM Tivoli.In this chapterThis chapter contains the following sections:Setting up your Artix Environmentpage 10Setting up your Orbix Environmentpage 149
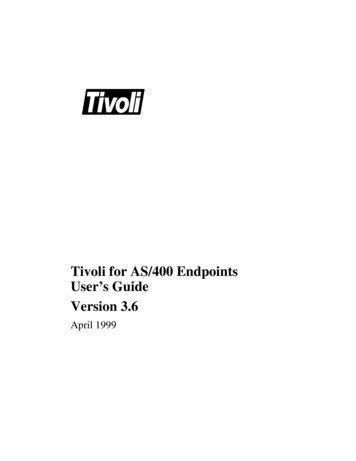
CHAPTER 2 Configuring your IONA ProductSetting up your Artix EnvironmentOverviewThe best way to learn how to use the IONA Tivoli integration is to start witha host that has both Tivoli and Artix installed. This section explains theconfiguration steps in your Artix environment. It includes the following: Enabling management“Enabling management”.“Generating your EMS configuration files”“The servers.conf file”.“The server commands.txt file”.“Stopping Artix applications on Windows”.“Further information”.You can use the Artix Designer GUI tool to enable management for yourArtix applications. To enable management, perform the following steps:1.Select Tools New Deployment Profile and follow the steps in thewizard. This creates a platform-specific deployment profile.Typically, you would have a separate profile for each deploymentmachine (for example, Windows or UNIX).2.Select Tools New Deployment Bundle, and follow the steps in thewizard. In the Bundle Details panel, select the Enable Managementcheckbox, as shown in Figure 3.You can create as many deployment bundles as you like, but they mustall be associated with one deployment profile.For more detailed information about deployment bundles and profiles, andusing the Artix Designer tool, see Designing Artix Solutions with ArtixDesigner.10
Setting up your Artix EnvironmentFigure 3: Deployment Bundle WizardGenerating your EMSconfiguration filesYou can use Artix Designer to generate EMS configuration files for your Artixapplications. To generate these files, perform the following steps:1.Select Tools Run Deployer.2.Select the Generate checkbox for Management Scripts, as shown inFigure 4.3.Select OK.11
CHAPTER 2 Configuring your IONA ProductFigure 4: Run Deployer DialogThe Artix Designer tool generates two files that are used to configure theTivoli integration. These files are as follows: servers.confserver commands.txtThese generated files are created in your Artix workspace etc directory.The servers.conf fileWhen you open the servers.conf file, you will see an entry such as thefollowing:myapplication, 1, /path/to/myproject/log/myapplication perf.logThis example entry instructs Tivoli to track the myapplication server.It reads performance data from the following log file:/path/to/myproject/log/myapplication perf.logThere will be one of these files for each application that you want tomonitor. The IONA resource model uses the servers.conf file to locatethese logs and then scans the logs for information about the server's keyperformance indicators.12
Setting up your Artix EnvironmentThe server commands.txt fileWhen you open the server commands.txt file, you will see entries like thefollowing:myapplication,start /path/to/myproject/bin/start myapplication.shmyapplication,stop /path/to/myproject/bin/stop myapplication.shmyapplication,restart /path/to/myproject/bin/restart myapplication.shEach entry in this file references a script that can be used to stop, start orrestart the myapplication server. For example, when the IONA Tivoli TaskLibrary receives an instruction to start myapplication, it will look up theserver commands.txt file, and execute the script referenced in this entry.Stopping Artix applications onWindowsOn Windows, stop scripts are not generated by default. While it isstraightforward to terminate a process on UNIX by sending it a kill signal,there is no straightforward equivalent on most Windows platforms.On Windows XP, you can use the taskkill command in your stop scripts.On older versions of Windows, you can write your own stop scripts based ona variety of methods. There are many options for implementing a stop scriptincluding adding a Web service interface to control the shutdown of yourserver, or simply making use of a utility such as pskill fromwww.sysinternals.com.See also, the following article on the Microsoft support pages:How to terminate an application cleanly in id kb;EN-US;q178893)Further informationFor details of how to manually configure servers to use the performancelogging, see “Configuring an Artix Production Environment” on page 32.For a complete explanation of performance logging configuration, see theOrbix Management User’s Guide.13
CHAPTER 2 Configuring your IONA ProductSetting up your Orbix EnvironmentOverviewThe best way to learn how to use the IONA Tivoli integration is to start withan Orbix installation on a host that is also a Tivoli endpoint. This sectionexplains the configuration steps in your Orbix environment. It includes thefollowing: Creating an Orbix configurationdomain“Creating an Orbix configuration domain”.“Generating Tivoli agent configuration”.“Configuring performance logging”.“Tivoli configuration files”.“The servers.conf file”.“The server commands.txt file”.You must first create the Orbix configuration domain that you want tomonitor using the Orbix Configuration GUI. To launch this tool, enteritconfigure on the command line. The GUI shown in Figure 5.Figure 5: Orbix Configuration GUI14
Setting up your Orbix EnvironmentGenerating Tivoli agentconfigurationTo generate Tivoli agent configuration files, perform the following steps:1.Select Expert in the Orbix Configuration GUI. This displays theDomain Settings screen, as shown in Figure 6.2.Select the Generate EMS Configuration Files checkbox. This willgenerate configuration files required for your Tivoli integration.Figure 6: Selecting Tivoli Agent Configuration15
CHAPTER 2 Configuring your IONA ProductConfiguring performance loggingTo configure performance logging, take the following steps:1.Click Defaults to launch the Default Settings dialog, shown inFigure 7.2.Select the Performance Logging option in the Other Properties box,shown in Figure 7. This ensures that, by default, all your selectedservices are configured for monitoring.If you want to enable Tivoli to start, stop, or restart your servers, alsoselect the Launch Service on Domain Startup option, in the ServiceLaunching box.Figure 7: Selecting Performance LoggingAlternatively, you can configure these settings separately for eachservice using the Services Settings screen (described in step 4).3.16Click Apply.
Setting up your Orbix Environment4.Click Next in the Orbix Configuration GUI. This displays the ServicesSettings screen.If you did not configure performance logging in the Default Settingsdialog, you can do so now using the Edit button for each selectedservice.5.Click Next to view a Summary of your selected configuration.6.Click Next to deploy your configuration.7.Click Finish to exit.Note: When configuring Tivoli integration, you must also configureperformance logging. This step is not optional. However, you can configureperformance logging without Tivoli integration. For full details, see theManagement User’s Guide.Tivoli configuration filesThe servers.conf fileWhen the domain is created, you can then start it like any other domain,using the start script in your install-dir/etc/bin directory. Selecting theperformance logging feature has enabled some extra configuration andlogging. In your install-dir /var/domain-name directory, you will find thefollowing Tivoli configuration files:servers.confUsed by the IONA Tivoli resource model.server commands.txtUsed by the IONA Tivoli task library.When you open the servers.conf file, you will see a number of entries inthe following form:servername, number, /path/to/a/log/fileFor example:mydomain locator myhost, 1,/opt/iona/var/mydomain/logs/locator myhost perf.log17
CHAPTER 2 Configuring your IONA ProductThe servers.conf file lists the servers that you want Tivoli to monitor on aparticular host. To begin with, assume that you are running all services inthe domain on one host. For example, assume your servers.conf has theabove entry. When you have started your domain, you should see a log filein the following location:/opt/iona/var/mydomain/logs/locator perf.logThere will be one of these files for each server that you want to monitor. TheIONA resource model uses the servers.conf file to locate these logs andthen scans the logs for information about the server's key performanceindicators.The server commands.txt fileWhen you open the server commands.txt file, you will see a number ofentries of the form:servername,action /path/to/scriptFor example:mydomain locator myhost,start /opt/iona/var/mydomain/locator myhost start.shEach entry in this file contains a pointer to a script that implements anaction on a particular server. In this example, the action is a start action forthe server mydomain locator myhost. When the IONA Tivoli Task Libraryreceives an instruction to start the locator in a domain named mydomain on ahost named myhost, it will look up the server commands.txt file on myhost,and execute the script pointed to in this entry.Further informationFor details of how to manually configure servers to use the performancelogging plugins, see “Extending to a Production Environment” on page 31.For a complete explanation of performance logging configuration, see theOrbix Management User’s Guide.18
CHAPTER 3Configuring yourTivoli EnvironmentThis chapter explains steps that you must perform in your IBMTivoli environment. It assumes that you already have a goodworking knowledge of the IBM Tivoli Management Frameworkand IBM Tivoli Monitoring (formerly known as DistributedMonitoring).In this chapterThis chapter contains the following sections:Creating a Tivoli Installation Bundlepage 20Installing the Resource Model in the Tivoli Serverpage 22Pushing the Resource Model out to your Hostpage 26Configuring the Resource Model for your Endpointpage 2819
CHAPTER 3 Configuring your Tivoli EnvironmentCreating a Tivoli Installation BundleOverviewYour Tivoli integration comes in a .tar file called tivoli integration.tar.This section explains how to create a Tivoli install bundle from thetivoli integration.tar file. You will create an install bundle namedtivoli install.tar.Creating an install bundleTo create a Tivoli install bundle, perform the following steps:1.Untar the tivoli integration.tar file into any directory on the hostthat you want to monitor, using the following command:tar xvf tivoli integration.tarThere should be three subdirectories:binresource-modeltask-library2.Go into the bin directory and run the create tivoli install bundleshell script.Note: This is a bash script. On Windows (with Tivoli installed), youmust use the bash environment that is installed with Tivoli. If youinvoke the script with no arguments, it prints out a page ofinstructions.20
Creating a Tivoli Installation BundleThe create tivoli install bundle script takes the followingarguments:Configuration directoryThe configuration directory where theservers.conf and server commands.txtfiles are located:ArtixYour Artix workspace etc directory (forexample, C:/Documents andSettings/user-name/etc).Orbix install-dir /var/domain-nameNote: On Windows, you must use aforward slash character (/) whenspecifying this location.Region nameThe name of the Tivoli administrativeregion that you want this host/applicationto be in.Profile managerThe name of the Tivoli profile manager thatyou want the IONA profile to be installedin.3.Decide which region to use in your Tivoli deployment, and whichprofile manager you want the IONA profile to be installed in.4.Run the create tivoli install bundle shell script with all threevalues specified. This results in a new tar file calledtivoli install.tar.21
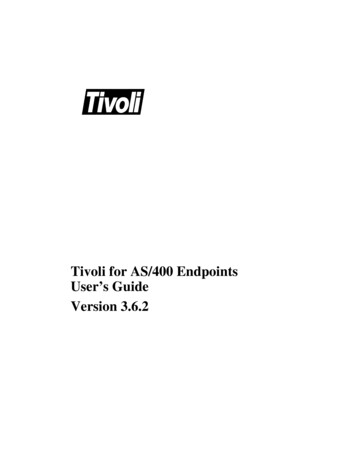
CHAPTER 3 Configuring your Tivoli EnvironmentInstalling the Resource Model in the TivoliServerOverviewThis section explains how to install the IONA Tivoli resource model from thetivoli install.tar file that you created.Installing the IONA resourcemodelTo install the IONA Tivoli resource model and task library into your Tivoliserver, perform the following steps:1.Transfer the tivoli install.tar file to your Tivoli region server, anduntar it to a temporary location, using the following command:tar xvf tivoli install.tar2.Start a Tivoli shell environment (see your Tivoli documentation fordetails). On Windows, type bash, to run in a bash shell. Change to yourtemporary location, and you will see a new directory structure startingwith a directory named iona.3.Change directory into iona/bin. This contains the following shellscripts:import tll.shcreate profile.sh224.Run the create profile.sh script. This adds the IONA Tivoli resourcemodel to the resource model database and creates a new profilenamed IONAProfile.5.Open the Tivoli Desktop and select the region that you specified whenyou created the install bundle, followed by the profile manager that youspecified. In the Profile Manager GUI, you will see a new profile calledIONAProfile, as shown in Figure 8.
Installing the Resource Model in the Tivoli ServerFigure 8: Tivoli Profile Manager23
CHAPTER 3 Configuring your Tivoli Environment6.Open the IONAProfile, and then open the resource model IONAServerMonitor. You will see a resource model with default thresholds andindications, as shown in Figure 9.Figure 9: Edit Resource Model24
Installing the Resource Model in the Tivoli ServerFigure 9 shows that the profile has been initialized with defaultthreshold values. Appendix A describes all these thresholds in detail,you do not need to be concerned with these now.7.If you want Tivoli to log historical data on the attributes of each server,click the Logging. button for the profile, and then check the boxmarked Enable Data Logging to put logging into effect. This will recordhistorical data for each attribute.8.Click Modify & Close.25
CHAPTER 3 Configuri
IBM Tivoli Management Framework and IBM Tivoli Monitoring (formerly known as Distributed Monitoring). Organization of this book This book contains the following chapters: Chapter 1 introduces Enterprise Management Systems, and IONA's integration with IBM Tivoli. Chapter 2 describes how to configure your IONA product for integration