Transcription
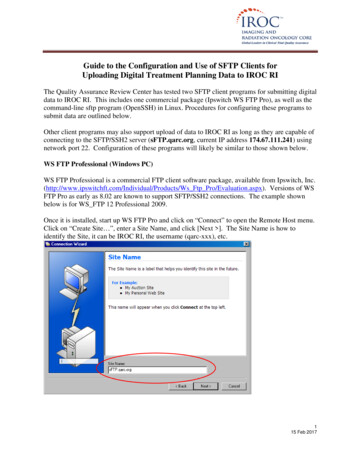
Editing Locally and Using SFTP: the FileZilla-Sublime-Terminal FlowMatthew Salim, 20 May 2016This guide focuses on effective and efficient offline editing on Sublime Text. The key is touse SFTP for Sublime Text, which allows you to edit files locally and upload them efficiently.Instead of relying on the traditional download-edit-upload-confirm upload-build-loop, allwe need to do is to save the file, and it’ll automatically upload the file to the Sharkmachines. Users have found it to be effective as the method is efficient and they can use thefull capabilities of Sublime Text.We will guide you in setting up your system as part of working towards Datalab. This shouldtake no more than 10 minutes to complete.This guide is applicable for Windows, Mac, and Ubuntu. We haven’t tested it on Atom(another editor), but it should work as well with its own SFTP plugin.Please note that both Sublime Text and the SFTP plugin are not free. They will nag you oncein a while, and you can simply click cancel to continue using both software, but please dosupport them if you enjoy using them!
First Run: Setting Up Your System through DatalabThings you’ll need to install: FileZilla (https://filezilla-project.org/) Sublime Text 3 (http://www.sublimetext.com/3) Terminalo On Windows: PuTTY (http://www.putty.org/), Remote Terminal (on WindowsStore), Linux Subsystem (Windows 10 Insider Preview)The steps are:1.Downloading assignment handout from Autolab2. Using FileZilla3. Copying to Shark4. Extracting assignment handout5. Setting up Sublime Text for SFTP6. Editing locally7. Save-build-run loop8. Downloading assignment handin from Shark9. Uploading assignment handin to Autolab1. Downloading Assignment HandoutDownload the Datalab assignment handout (.tar) from Autolab locally to your computer.Make sure to take note where you save your file locally, since we’ll need the location tocopy it to Shark in step 3. You can right click on the downloaded handout and click opencontaining folder to check its location.
2. Using FileZillaFileZilla provides a GUI for you to transfer files onto Shark. If you find scp to be moreefficient, feel free to skip steps 2 and 3. FileZilla will initially look like this:The left side reflects folders in your computer, and the right side reflects folders in theremote machine, which will be Shark. What we need to do is to fill in the host, username,password, and port fields on top of the window with the following details: Host: shark.ics.cs.cmu.edu Username: (your Andrew ID) Password: (your Andrew ID password) Port: 22Then, press Enter or click the Quickconnect button. If you allow FileZilla to remember yourpassword, you will be able to connect without entering your information again by clickingon the drop down arrow on the right of Quickconnect.
Now, you have a GUI to browse through your folders on Shark. Make sure that everythingrelated to 15-213 / 18-213 / 15-513 is in your private folder. Navigate into your private folder,and, if you prefer, create a 15213 / 18213 / 15513 folder and enter it.3. Copying to SharkOn FileZilla’s left column (or Windows Explorer, GNOME Files, or Mac OS X Finder), open thefolder where you’ve downloaded the assignment handout (based on step 1). Drag the fileinto your 15213 / 18213 / 15513 folder and drop it there.That’s all!4. Extracting assignment handoutWe now need to use the Terminal. Open your terminal and ssh to Shark:ssh hbovik@shark.ics.cs.cmu.eduEnter your password when prompted. Note that they will not show stars (*) for eachcharacter that you enter, but it is entered.Navigate to the folder that your handout is in—for example:cd private/15213You can use ls to list the files and folders in the current folder. Then, run the followingcommand—for instance, for Datalab, run:tar –xvf datalab-handout.tar
It will create a folder named datalab-handout that contains all the assignment materials.You can navigate into the directory (cd datalab-handout) to see what’s in it.Don’t close the terminal! We’ll need it in the next step.5. Setting Up Sublime Text for SFTPHere comes the fun! This will allow you to edit your files locally and upload them efficiently.First thing: open Sublime, and press Ctrl (Mac: Command ) to bring up the console.On a web browser, go to the Sublime Text Package Control webpage athttps://packagecontrol.io/installation. It should look like this:
Copy the entire string under the “Sublime Text 3” tab, paste it into the console, and pressEnter. It should take a while to install. Afterwards, close and restart Sublime Text.In Sublime Text, then, go to Tools Command Palette (Ctrl Shift P / Command Shift P). Type in “Install Package”, and click on “Package Control: Install Package”. Also—if youprefer the keyboard—instead of clicking, you can navigate using the arrow keys and enter.
Search for SFTP, then click on the one by wbond.net. This will install the SFTP plugin.After installation, you will see the text titled Package Control Messages which you canignore. Instead, browse to File SFTP/FTP Setup Server and you’ll get a page like this:We need to edit the host, user, port, and remote path fields. You can add the password sothat you won’t be prompted for your password every time you are accessing Shark, but thepassword is saved in plaintext. If you wish to do so, do so at your own risk. “host”: “shark.ics.cs.cmu.edu” “username”: “(your Andrew ID)”
“port”: “22” (uncomment this) “remote path”: see belowFor remote path, we need to figure out the absolute path (starting with /afs/ /private) toyour private folder. To do so, go back to your terminal, and type inpwdto show the absolute path in your current folder. For instance:I would put in “/afs/andrew.cmu.edu/usr16/msalim/private” for my remote path.Here is an example of a filled-in one.Afterwards, save the file, and when prompted, insert the title of the connection (e.g. “Shark”).Don’t change the folder—you should be given the correct folder when saving (sftp servers).
Assuming that you do not save your password, you will then be prompted to enter thepassword. You can do so immediately. The general way to log in to SFTP is to go to File SFTP / FTP Browse Server and click the connection you have just created.It will give you the password prompt. Given a correct password, you will be given a list offiles and folders that exists in the given remote path folder—you’re all set!6. Editing locallyYou can now edit your assignment file (e.g. bits.c) locally and efficiently. To do so, browse tothe folder that contains the file (e.g. datalab-handout), and click on the file and click Edit.You can enter folders by clicking on the folder name. (Of course, pointing and clicking can besubstituted with arrow keys Enter).Now, whenever you save the file, it will save it on Shark, given that it says success (insteadof failure) on the console.
If you want to save the file with another name (e.g. bits-old1.c for backup), you can do so byusing the Save As command, and the plugin will automatically upload the file onto Shark.Careful: the SFTP plugin saves without confirmation, which makes your workflow usingoffline editor way more efficient. However, it’s important to note that it will never ask youabout overwriting a file with the same name! Be careful when using the Save As command.Warning: the SFTP plugin does not do file autosaving, so you must save your file and makesure that the success notification appears before closing the tab or Sublime Text entirely.One note: the SFTP plugin may disconnect when the servers reboot, and it may disconnectafter you put your computer to sleep. If it happens, it will try to reconnect and prompt youto enter your password again. However, it is urged to not take any risk and to safe often!7. Save-build-run loopWe said that this workflow is effective—and it is! Here’s a typical use case which we call thesave-build-run loop: When we’re done editing the assignment, save the file. Try building the file on the Shark machine (make). If it fails to build, re-edit the file. If it builds successfully, run it. If it fails to run well, re-edit the file.Since we frequently do re-editing and re-building, it is nice to be able to save fast and buildfast. We can do so with two terminals with VIM, but we can also do that just as fast withSublime Text and one terminal. Here’s one way:1.Open both Sublime Text and terminal. Go to the directory the assignment files are in.2. When you’re done editing, press Ctrl S (or Command S).3. Type “make” in terminal (or press the up arrow key) and press enter.o If it doesn’t build, go back to step 2.4. If it works, run the test (e.g. ./driver.pl).o If it doesn’t run as expected, go back to step 2.
Typing Ctrl S and pressing the up arrow key (at most twice) is efficient—and for non-avidcommand line users, using Sublime for its GUI, desktop keyboard shortcut, and mouse-basednavigation may be more effective for productivity than using command line tools.An additional monitor will be helpful!8. Downloading assignment handin from SharkFollow the writeup for details on which file(s) to hand in! If you find scp to be more efficient,feel free to skip this step and go to step 9.On FileZilla’s right column, navigate to the folder that contains the file(s) you need to handin. Drag that file onto the left column’s bottom row and drop it—into a location in yourcomputer. You can navigate to your desired copy location in your computer on the leftcolumn’s top row, as shown in purple.Remember the local directory that contains the file for step 9.9. Uploading assignment handin to AutolabNow, all you need to do is to open Autolab, click the assignment, and submit the file.
That’s it for now!If you have any questions and/or suggestions regarding this writeup, feel free to post aquestion on Piazza, or email me directly at msalim@cmu.edu. Good luck with Datalab! Oh,and also: Read the writeup. Please read the writeup! Ask questions—on Piazza, in Office Hours, or through one-on-one video calls. Start early!-MatthewFrom http://9gag.com/gag/agNDXXr/if-frodo-is-a-hobbit
use SFTP for Sublime Text, which allows you to edit files locally and upload them efficiently. Instead of relying on the traditional download-edit-upload-confirm_upload-build-loop, all we need to do is to save the file, and it'll automatically upload the file to the Shark


