Transcription
User ManualWiFi ‐ GSM‐ APPSmart Home Security SystemTips:Please read through this user manual before installation so as to operate properly.Please keep well of the user manual for further reference.Please get around understanding of this manual for properly operation.
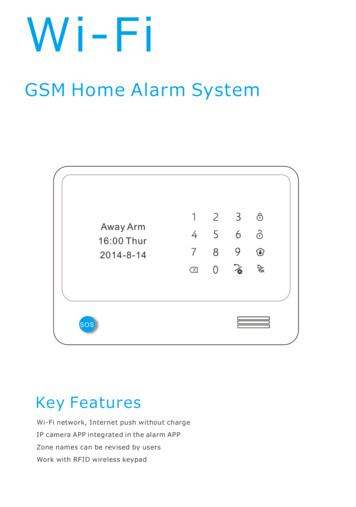
ContentsFeaturesContent of Package1.1 Kit2. Preparation before Using2.1 Control Panel and sensors2.1.1 Control Panel: Front2.1.2 Control Panel: Back2.2 Insert SIM card2.3 Turn ON System3. Adding Users on APP3.1 Download App and Installation3.2 Adding Users3.2.1 Adding Householder3.2.2 Adding Users4. APP Introduction4.1 Emergency Call Interface4.2 Main Interface4.3 Control Panel Management Interface4.4 Setting Interface4.4.1 Changing Languages4.4.2 Modifying Time4.4.3 Adding Wireless Sensors4.4.4 Setting SMS and phone call numbers4.4.5 Modifying Master Password for ControlPanel4.4.6 Modifying Installation Place4.4.7 Changing More Settings4.4.8 Setting Home Stay Zone4.4.9 Changing Zone Name4.4.10 How To Distinguish Detector Status4.4.11 How To Check Alarm Message4.4.12 Handling APP Alarm Message andPrecautions4.4.13 Handling Phone Call Alarm5. Introduction for Sensors5.1 PIR Motion Sensors5.2 Door/Window Sensor5.3 Remote Controllers5.4 Medical Panic Button5.5 Emergency Panic Button5.6 Water Leakage Detector5.7 Smoke Detector5.8 Gas Leakage Detector5.9 IP Camera6. Control Alarm Panel through APP6.1 Control Alarm Panel ARM/DISARM/STAYARM6.2 How to Add V-See IP Camera6.3 How to Add V-Cam IP Camera6.4 FAQ about IP Camera7. Gateway Settings by SMS Text7.1 Setup Phone Number by SMS7.2 Delete Phone Numbers7.3 Inquiry Set Alarm Numbers7.4 Arm/Disarm8. Installation Precautions9.How to reset the Gateway to factory default.
ForewordDear users:Thanks for selecting WiFi and GSM securiy system. The system adopts WiFi and GSM dual networkto transmit alarm message. It pushes the alarm message to users' smart phone App when alarming.Meanwhile, it’s able to send SMS and make phone calls. By using dual network, it is more stable, saferand faster. Also users could remote control the alarm panel and open IP camera monitoring on site.For more convenient using, please follow the steps on this user manual. Please feel free to contact us ifyou have any questions or problems while using, we are much pleased to be on your service.Features Adopting WiFi & GSM network, enable to be controlled by iOS and Android APP. Support 1 Householder, 99 users. Adding sensors by scanning QR code. Support 4 HD IP cameras, live video communication. 24 hours monitoring temperature and humidity, enable to preset alarm value. Auto detect WiFi & GSM signal status. 24 hours detecting doors/windows closed or not. Low battery alert for sensors, auto detect whether sensors connected alarm panel or not. Monitoring AC power, failure or recovery status. All the operation logs can be checked on Vcare App. One-key SOS alarm on App, auto record 6 seconds video and push the location map to informfamily members. Siren prompt and SMS prompt when arm/disarm by remote controller. Setup siren alert time(0 254 seconds for optional). Delay alarm/arm/disarm functions(0 60 seconds for optional). Six languages and voice prompt(English,Russian,German,Spanish,French and Chinese). Support 99 normal sensors, 20 remote controls,8 fire alarm sensors,8 panic buttons,8 emergencybuttons,4 water leakage detectors,2 wired zones. Support wireless strobe siren and 2 routes home appliance control switch.GSM Mode: When WiFi network failure,auto switch to GSM network. 3 SMS alarm numbers and 3 alarm call numbers. Support two-way communication, arm or disarm on phone keypad. Recorded voice for 10 seconds.
1. Package List1.1 KitAlarm Panel*12 PIR Detector*11 Door Sensor*12 Remote Controller*2Smoke detectorOther accessories:Power adapter*1,alarm panel mounting bracket*2,PIR mounting bracket*1door sensor double-sided adhesive*1,user manual* 2Smoke detectorNotice: The version is dual network of WiFi GSM.
2. Preparation before using2.1 Alarm Panel and Sensors2.1.1 Control Panel: Front2.1.2 Control Panel: Back
2.2 Insert SIM CardThis system is WiFi & GSM/WCDMA intelligent security system, Once alarm occurs, the host will push alarm messageto the users via WiFi. If the WiFi network failure, the alarm panel will automatically switch to the GSM network, sendingSMS and making calls to alert users for alarming. Hence, we recommend you to insert SIM card inside.1. Select the appropriate SIM card.2. SIM card is inserted into the host's SIM port.2.3 Plug Power & Turn On System1. Plug power adapter to power port.2. Push power switch from OFF to ON for turning on the system.
3. Adding Users Via APP3.1 APP Download and InstallationScan the QR code, download APP to your smart mobile system (iOS or Android System) and install it.
3.2.2 Add users, please refer to the following pictures step by step. (Note: It can add up to 99 users, the user can not setthe parameters of the host, but the other functions are same as householder.)
4. APP Interface & Features.4.1 Emergency Call Interface4.2 Main Interface4.3 Admin Management Interface
4.4 Setting Interface4.4.1 Modify languages: Support Chinese, English, Russian, French, German, Spanish. After modification, pushingmessage will use that language; (Note: Command according to APP prompts)4.4.2 Modify System Time: Recommend users reset time for new host. (Note: Command according to APP prompts)4.4.3 Adding Wireless Accessories: You can add all kinds of intrusion detectors and emergency detectors, for detailsrefer to the following description.
Example: Add and delete door/window sensor4.4.4 Set phone number for SMS message and phone call. (Note: this function are special for GSM edition. While WiFinetwork is not working, it will automatically switch to GSM network.)
4.4.5 Modify admin password. (Note: please refer to step 4.4, according to App prompts.)4.4.6 Modify installation address. (Note: please refer to step 4.4,according to App prompts)4.4.7 More settings.
4.4.8 Setup home stay arm zonesNote: All new added sensors are in home stay arm zone, the following steps can cancel home stay arm zone.4.4.9 Modify Zone Name
4.4.10 Check Sensors’ Status4.4.12 APP Alarm Handling and Some Notices1. Intrusion detectors (Door Sensor/ PIR motion sensor/ More detectors) only can be triggered to alarm when host is inARM status. Other types detectors (SOS button / medical call button / fire detector) can directly trigger to alarm even indisarm status.2. In Home Stay ARM status, the switch of intrusion detectors needs to turn on so that can be triggered to alarm.(Defaultfor newly added detectors are home stay arm detectors, user can modify the zone types, details please refer Step 4.4.8 ).3. If sensors had been triggered to alarm, there will be a red spot on sensor management interface. Other types such as(operating record/power failure/ temper switch) alarm message will appear in “Alarm Records”, with a red spot there.After checked, the red spot will disappear. Or click “clean” to delete all red spot.4. Different type of alarm message, APP will push different alarm music to inform users.5. If turn on “when GSM network breakdown, APP push message alert” function, when the host detect there issomething wrong with the GSM network, APP will push message to alert all the users.6.If turn on “When WiFi network breakdown, auto change to GSM network” function, when WiFi network breakdown,Host will send SMS to the 3 preset SMS numbers for reminder.7. When those sensors such as door/window sensor, PIR detector, gas detector, water detector, smoke detector aredisconnected with alarm host, APP will push alert message (without SMS alert message), and in sensors managementinterface the related icon will be in grey color.8. When those sensors such as door/window sensor, PIR detector, gas detector, water detector, smoke detector are in lowbattery, the APP will push low battery alert message every two hours. (This function can be turn off), also in sensormanagement interface there will be low battery icon listed.9. Door sensor closed/open status can be checked and if door had not been closed properly when host armed, APP willpush alert message, also in sensor management interface there will be door open/closed status icon listed.4.4.13 Phone Call Alarm Handling1. If choose GSM network (with GSM SIM card insert),the system will push alarm information to Vcare APP, and it willalso send SMS and make phone call to preset mobile numbers. If don’t choose GSM network, it will neither send SMStext message nor make calls when alarming. If choose “smart mode”, alarm host will send SMS and make phone call topreset phone numbers in the situation of WiFi network breakdown.2.When using GSM network, alarm host will send SMS firstly and then make phone call to preset mobile numbers. Ifsomeone answers it, the calling will stop, then hearing the pre‐record and alarm voice message, get into listeningstatus. At this moment, press “1” on mobile keypad, host will be in armed status, press”2",get into disarmed status, press”3" to start siren, press “4” to close siren prompt.If the calling is busy or no answer, it will auto dial to next mobile phone numberuntil someone answers it. It will call 3 times in cycle, if still no answer, it will stop calling finally.
5. Accessories5.1 PIR Motion Sensor5.2 Door/Window Sensor5.3 Remote Controllers
5.4 SOS Medical Call Button5.5 Panic Button5.6 Water leakage detectorUsage:1.Open the shell, remove the insulation strip.2.When installed, the metal area on the probe should touch ground.
5.7 Smoke Detector5.8 Gas DetectorUsage:1.Mounting on the wall, plug in power adapter.2.Install it where gas leakage easily take place.
5.9 HD IP Camera Introduction6. APP Interface6.1 Arm/Disarm/Home Stay Arm
6.2 How to Add V-See IP CameraStep1 .Add DevicePlug power supply to camera first, log in APP ”Camera”. Register an account with Email/Phone number/User ID, add acamera by clicking “ ” , “Smartlink”, add IP camera as the tips on APP.1.The default password of IP camera is 123.2.If it can not connect to WiFi, please long press the RESET button for 5-10 seconds until hear"Sou",that means RESET successfully. The IP camera will restart and make "Di Di Di" sound, then it can beconnected WiFi via “Smartlink” function.IP Camera InstallationChoose the wall which has a certain thickness and tolerance to mounting the camera, to avoid thecamera off the wall after been installed.1. Install BaseChoose a clean, flat wall area, the base mark align to your direction, to fix the base in the middle withscrews.
2. Install CameraEmbed the camera body into the chassis, turn the camera clockwise and hear a “click” sound said it has been tightened.6.3 How to Add V-Cam IP CameraAppearance Introduction
Step1 Network ConnectionAfter power on the camera, connect one end of the Ethernet cable to the camera Ethernet interface, and other end to therouter LAN interface (make sure the HDCP function is on ), if connected successfully, the yellow light on, the greenlight flashes.Step2 Add DevicePlease connect the AC power and network cable to IP camera first,log in APP ”My IP camera” ” ” ”addmanually”, add IP camera as per steps.(If there’s no network cable,can also choose “smartlink” way to add, only need to follow the APP prompt to operate)1 .Camera default password is 123.2. If you choose WiFi access, please press Reset button for 5 to 10 seconds until sound “Whoosh”, which means camerais reset successfully, then the camera will reboot and announce a “Di Di Di” sound, Smart WiFi link can be started andconnected automatically:Log in APP "Camera" click " " click "Smartlink" then you could connect the camera through WiFi.
6.4 FAQ about IP Camera1. Q: When adding a device, APP did not prompt the discovery of a new equipment.A: Please check if the camera and cell phone are in the same LAN;Please check if the camera’s network indicator keeps on;If camera and cell phone are not in the same LAN, it is recommended to use the ID number manually add camera.2. Q: When viewing live video, the device reminds the password is wrong.A: Please check if the remote access password which being set when add the device is right or not. If not, please selectedit to re-set it from the list of entries in the camera.If you forget your remote access password of the camera, suggest you to press the reset button to restore the device tofactory defaults(password:123).3. Q: “Device list” reminds the device is offline.A: Please check whether the network of the camera is normal, and network indicator of device is on.Please check whether the router network is normal.4. Q: Unable to search the video files during playback.A: Please check if the SD card is damaged. Please check the retrieval time of the video file, the system time of thecamera.7. Gateway Settings by SMS Text7.1. Setup Phone Number by SMSSMS Format:“Password DD 1st SMS alarm number, 2nd SMS alarm number, 3rd SMS alarm number, 1st callingnumber, 2nd calling number, 3rd calling number”For example, set 13688888888 as the 1st SMS alarm number, 13988888888 as the 3rd calling number, then send SMS:1234DD13688888888,,,,,13988888888
Remark: User can setup the 3 SMS numbers and 3 calls numbers by sending one SMS command,also can D.I.Y to setup any one or more of the phone numbers as they mind.User should use a comma to separate each phone number, and the last number is unnecessaryto add comma. (Note: The first SMS alarm number is necessary as all the setting messages willbe sent to first SMS number.)7.2. Delete Phone NumbersSMS Format: Password DD *,*,*,*,*,*Remark: *,*,*,*,*,*means relevant alarm SMS numbers and calling numbers. If need to delete1st alarm SMS number and 3rd alarm calling number, the command should be: 1234DD*,,,,,*7.3. Inquiry Set Alarm NumbersSMS Format: Password DDThe set numbers will be replied to the 1st alarm SMS number. (Note: The first SMS alarmnumber is necessary as all the setting messages will be sent to first SMS number.)7.4. Arm/DisarmArm: Password A1Disarm: Password A2For example: Initial password is 1234, arm remotely by sending SMS: 1234A1Alarm host replies with "Panel armed" , the message will be sent to the 3 alarm SMS numbers.8. Cautions1. Keep away from water.2. Install host in hidden place with good WiFi and GSM signal.3. Turn Off power when insert/take out the SIM card.4. Connect power adapter well and keep good heat dissipation.5. Enter into normal running status about 12 seconds later.6. Check all the detectors batteries in time and charges them when battery is low.7. Don’t install alarm host close to the objects with strong interference,such as TV, computer etc.8. Regularly check the SIM cad in the alarm host( Check GSM signal, balance, etc.)9. Inspect the alarm systems operation regularly.10. The smart mobile phone for installing APP should keep the network unblocked,in case information can't arrive intime.11. Design for indoor use rather than outdoor.9. How to reset the Gateway to factory default.Please switch off the power of gateway, hold pressing the REC button (the REC button is onthe back of gateway),switch on power at the same time, it will be reset successfully after thegateway make 3"di, di,di” beep sounds.You could setup the gateway again for 25s later.
If choose GSM network (with GSM SIM card insert),the system will push alarm information to Vcare APP, and it will also send SMS and make phone call to preset mobile numbers. . "Smartlink", add IP camera as the tips on APP. 1.The default password of IP camera is 123. 2.If it can not connect to WiFi, please long press the RESET button for 5 .