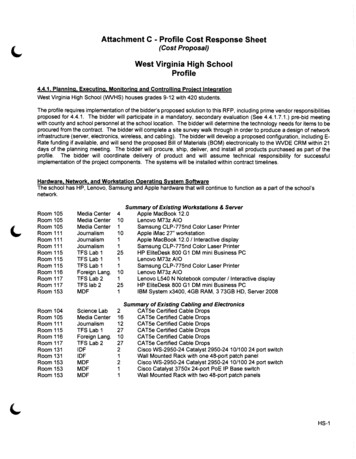
Transcription
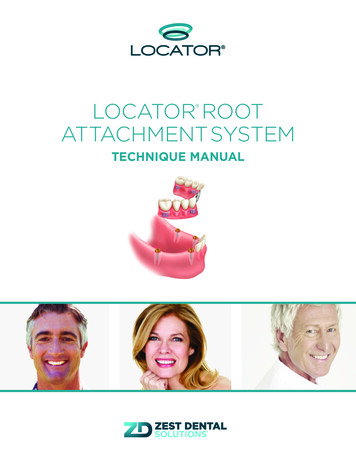
LOCATOR ROOTATTACHMENT SYSTEMTECHNIQUE MANUAL
TABLE OF CONTENTS123456THE LOCATOR COMPONENT REFERENCE LISTLOCATOR - ROOT ATTACHMENT SYSTEMLOCATOR - A FAMILY OF SOLUTIONSLOCATOR STANDARD AND EXTENDED RANGE MALESLOCATOR 3-IN-1 CORE TOOLLOCATOR ROOT ATTACHMENT SYSTEM69Placement of a LOCATOR Root AbutmentCast-To Coping10PROCESSING LOCATOR DENTURE CAPS INTO THE OVERDENTURE16MAINTENANCE OF THE LOCATOR ABUTMENT19OVERDENTURE INSERTION, REMOVAL AND CLEANING GUIDELINES20RETURN POLICY AND WARRANTY10 Direct Technique13 Indirect Technique16 Reline of Implant-Retained and Tissue Supported Overdentures19 For the Clinician and PatientPLEASE NOTE: This document is designed to serve as a guide for dental clinicians usingZest Dental Solutions Products. It is not intended to be a substitute for professionaltraining and experience. Please refer to the Instructions For Use for further information.
THE LOCATOR COMPONENT REFERENCE LISTLOCATOR ROOT ABUTMENTSROOT ABUTMENTS0 Root AbutmentStainless Steel0852010 Root AbutmentStainless Steel0852120 Root AbutmentStainless Steel08522Cast-to CopingStainless Steel08528LAB PROCESSINGImpression Coping08505Abutment AnalogBlock-Out Spacer0851408530 4mm08516 5mmProcessing Spacer08569Denture Cap Assembly08510WhiteStandard RangeMale Processing Pkg08519Extended RangeMale Processing Pkg08540Bar MaleProcessing Pkg08028BlackProcessing Male08515Yellow BarProcessing Male08026Castable Threaded Insert08013 2-5608014 2.0mmBlackYellowDelrinREPLACEMENT MALESEXTENDED RANGESTANDARD RANGEBlue LowRetention08529Pink MediumRetention08527Clear HighRetention08524Gray ZeroRetention08558Red LowRetention08548Orange MediumRetention08915Green HighRetention08547DRILLS & TAPSSpot FaceDiamond Bur08922Pilot Drill08924Bar Drill09102 1.7mm(2.0mm Thread)09103 1.8mm(2-56 Thread)Bar Tap09104 2.0mm09105 2-56Drill & TapHolder08016Paralleling Mandrel09107AngleMeasurement Guide09530TORQUE DRIVERS & TOOLSTorque Wrench Kit:Torque Wrench, 15mm SquareDrive Insert and Thumb Knob04391 20Ncm09020 30NcmSquare Drive TorqueWrench DriverLatch Type TorqueWrench Driver08926 15mm08927 21mm08913 23mm08914 29mmLOCATOR Core Tool:Male Removal Tool, Male Seating Tool& TiN Coated Abutment Driver083931
The LOCATOR Root Attachment Systemleverages the natural tooth root for the retentionof overdentures or removable partial dentures.For patients who have financial limitations or are unwilling to move forward withtraditional implant treatment for other reasons, LOCATOR Root can provide theemotional and health benefits of retention, esthetics and stability vs. traditionaldentures or partial dentures with clasps.Using the natural tooth root for retention gives the patient better outcomes andtime to prepare for the cost and procedure of dental implants in the future.Retaining the natural tooth root can also help the emotional transition intoimplants and deter further bone loss; thus, helping to maintain facial structureand ensuring future implants are placed more successfully.LOCATOR Root Attachments give youthe choice of a straight post and two angles (10 and 20degrees) to accommodate divergent roots. A cast-toversion is also available for telescopic copings, partial orfull dentures.LOCATOR Root: ImmediateRetention While Implants IntegrateUtilize the patient's natural tooth root for retentionwhile the implants are integrating. Once the implantsare integrated, extract the teeth and load the implants.Give your patients the performance and confidencethey deserve sooner!LOCATOR Root for RemovablePartials stabilizes a prosthesis without the use ofmetal clasps for improved esthetics and retention andpreserves the health of remaining teeth.20 10 20
LOCATOR - A FAMILY OF SOLUTIONSImplant AttachmentThe LOCATOR Implant Attachment with patented pivotingtechnology is the premier system for implant-retainedoverdentures. According to recent studies1, a two implantretained, tissue-supported overdenture restoration isconsidered the minimum standard of care for edentulouspatients. More than two implants may also be placed for animplant-retained overdenture.Bar AttachmentWhen a case calls for an overdenture bar, the LOCATORBar Attachment provides the same pivoting technology,self-aligning feature, superb retention, and exceptionaldurability, all in a low-profile design. It also offers threeoptions for the fabrication of a resilient attachment on animplant-supported cast alloy or milled titanium bar.Root AttachmentIn clinical situations where healthy tooth roots can beprepared for placement of attachments to retain anoverdenture, the LOCATOR Root Attachment delivers greatversatility. Its supra-radicular design gives you the choiceof a straight post, 10 and 20 angles to accommodatedivergent roots, as well as a special cast-to version.1Source: Journal of Dental Implants3
LOCATOR STANDARD AND EXTENDED RANGE MALESThe magic is in the pivot, it allows for a resilient connectionof the prosthesis and prevents damage to Males during insertion.STANDARD MALESDual retention to maximize stability andpivoting action that accommodates upto 20 divergence between two implants.Blue LowRetentionPink MediumRetentionClear HighRetentionEXTENDED RANGE MALESPivoting action accommodates up to 40 of total divergence between two implants.Gray ZeroRetention4Red LowRetentionOrange Medium Green HighRetentionRetention
LOCATOR 3-IN-1 CORE TOOLThis convenient tool is used to carry the LOCATOR Abutment, remove the LOCATOR Male and insert the Maleinto the LOCATOR Denture Cap. In order to achieve 30Ncm of torque, the Abutment Driver portion of the tool iscompatible with various types of restorative drivers.REMOVAL TOOLINSERTION TOOLABUTMENT DRIVER & SLEEVEREMOVALINSERTIONPLACEMENTThe Removal Toolhas a sharp edge on the end toengage and remove the Malefrom then Denture Cap.The Insertion Toolis used to seat theLOCATOR Male.The LOCATOR Abutment Driverwith the Abutment HolderSleeve carries the Abutmentsecurely and places itonto the implant.NOTE THE GAP ONCETURNED COUNTER CLOCKWISELoosen the Removal Tool a full 3 turns counterclockwise (you will see a visible gap).To remove a LOCATOR Male from the Denture Cap,simply insert the tip into the Cap/Male assembly andpush straight into the bottom of the Male. Then, tiltthe tool so that the sharp edge of the tip will grabhold of the Male and pull it out of the Denture Cap.To disengage the Male from the tip of the RemovalTool; point the tool down and away from you andtighten the Removal Tool clockwise back onto theCore Tool. This will activate the removal pin anddisengage the Male from the tip of the Removal Tool.Separate the Removal Tool section from the LOCATORCore Tool and use the Seating Tool end to place a newMale into the empty Denture Cap.5
LOCATOR ROOT ATTACHMENT SYSTEMPLACEMENT OF A LOCATOR ROOT ABUTMENT11 Take an impression of the arch and pour a diagnosticmodel. Reduce the teeth to 1mm above the gingivaltissue and measure the root width to determine thespace available for a LOCATOR Root Abutment.Min. 4mmNOTE: The width of the root surface must equal orexceed 4mm.2A2B2A-2B1mmMin. 4mm3A3BRadiograph the tooth roots to measureand determine the proper angle of post on theLOCATOR Abutment. Decoronate the root and performendodontic therapy. Remove the desired depth of guttapercha following standard clinical procedures. Finishcontouring of the roots. The final reduction should placethe root surface 1mm supragingival.3A-3B Hold the LOCATOR Abutment next to thePilot Drill and set the plastic Depth Reference Ring onthe Pilot Drill to match the screw threads length. Thescrew threads can be shortened if needed. Size thecanal using the Pilot Drill stopping at the depth ring.The alignment of this initial preparation will generallyfollow the canal. On a non-parallel root, the resultingdivergence can be corrected using an angled LOCATORAbutment 10 or 20 .CAUTION: The danger of root perforation exists whenthe full length of the Pilot Drill is used.4A4B4A-4BSpotface the root surface using theSpotface Diamond Bur to a depth where a full 360 recessed seat first appears on the occlusal surface ofthe root. Create the minimum possible recessed seaton the shallow side of the preparation.In the event a portion of the original depth from the Pilot Drill canal preparation is lost due to countersinking,re- establish the full depth of the canal preparation with the Pilot Drill using the original Depth ReferenceRing Setting.6
LOCATOR ROOT ATTACHMENT SYSTEMPLACEMENT OF A LOCATOR ROOT ABUTMENT (CONTINUED)5A5B5A-5BPlace a LOCATOR Parallel Post onto a 0 LOCATOR Root Abutment to act as handle. Place a 0 LOCATOR Root Abutment into each of the preparedroots and verify the proper fit and parallel alignmentof multiple Abutments. If the alignment of any of theAbutments can be improved for draw, select the mostsuitable angled LOCATOR Root Abutment (10 or20 ) and try it into the preparation to determine idealparallelism.NOTE: Make a small indexing mark on the LOCATORRoot Abutment base and the root surface to return theangled Root LOCATOR to the exact position duringcementation.66Cement the LOCATOR Root Abutment in place withCemEZ . Allow the cement to set. Round off and polishthe root surface from the metal flange to the tissue.The Parallel Post can be placed on the LOCATOR RootAbutment to protect it during polishing.Please refer to page 10 for Direct Pick-Up Techniques.7
LOCATOR ROOT ATTACHMENT SYSTEMCAST-TO COPING11mm21 CAST-TO COPINGDecoronate the root and perform endodontic therapy.Remove the desired depth of gutta percha followingstandard clinical procedures. Finish the contouring ofthe root. The final reduction/casting should place theroot surface 1mm above gingival tissue. Complete theendodontic treatment and prepare a margin on the toothutilizing a beveled shoulder or a Chamfer type marginpreparation for the custom cast coping to seat on.2Hold the Cast-To LOCATOR Abutment next to thePilot Drill and set the plastic Depth Reference Ring onthe Pilot Drill to a depth that slightly exceeds the Cast-ToCoping thread length.33Size the canal using the Pilot Drill stopping at thedepth ring. The alignment of this initial preparation willgenerally follow the canal. On a non- parallel root, theresulting divergence can be corrected using an angledLOCATOR Root Abutment (10 or 20 ).44Wax LimitComplete the preparation of the site with dentalburs of preference to ensure that the cast gold copingwill completely surround the LOCATOR Cast-ToAbutment.NOTE: The outer surface on the base of the LOCATORCast-To Abutment must remain above the level of thecoping to allow the Denture Cap to snap on withoutinterference.Please refer to page 10 for Direct Pick-Up Techniques.8
LOCATOR ROOT ATTACHMENT SYSTEMCAST-TO COPING (CONTINUED)565Take an impression of the arch picking up theprepared margins on the tooth and the endodonticallytreated roots (if needed) and prepare the dies.6Using a surveyor, place the Parallel Post with theCast-To LOCATOR Root Abutment attached in positionand parallel with other Abutments. Wax the Cast-ToLOCATOR Root Abutment directly into the die. Buildthe wax up to the bottom corner on the base of theAbutment, leaving the majority of the outer surface onthe base above the level of the coping. Complete thewax-up process for the coping being sure to pick up allof the marginal interfaces. Remove the wax up from thedie and remove the Parallel Post from the Abutment,leaving the top of the Abutment open for investmentmaterial to flow into.Invest and cast. Finish and polish the surface of thecoping. The Parallel Post can be placed on the LOCATORto protect it while polishing.77 Snap a Denture Cap with a Black Processing Maleonto each LOCATOR Analog and verify that there is nointerference with the Denture Cap seating.Proceed with the fabrication of the prosthesis.Please refer to page 10 for Direct Pick-Up Techniques.9
PROCESSING LOCATOR DENTURE CAPS INTO THEOVERDENTURE, DIRECT TECHNIQUE1DIRECT TECHNIQUE FOR NEW OREXISTING DENTURE1Place a White Block-Out Spacer around eachAbutment and press it down to the tissue. Snap aDenture Cap with a pre-loaded Black Processing Maleonto each Abutment, pressing down firmly.22 Apply fit check marking paste to the intaglio surfaceof the overdenture. Insert it into the mouth in positionover the Denture Cap. This will mark areas where theoverdenture will need to be relieved to allow space forthe Caps to be picked up.3A3B4.5mm drillingdepth4A104B3A-3BRelieve the marked areas with theCHAIRSIDE Recess Bur. Zest recommends using slightpressure and a small rocking motion to get the tip of theBur started, followed by a straight downward motionto create the desired recess site. This efficient Bur hasdistinct depth landmarks which indicate where to stopwhen drilling for the Denture Cap.4A-4B Use the CHAIRSIDE Undercut Bur to cut anundercut around the circumference of the recesses formechanical retention. Cut lingual/palatal vent windowsin the overdenture with the CHAIRSIDE Vent Bur tovisualize full seating and for excess material to vent.
PROCESSING LOCATOR DENTURE CAPS INTO THEOVERDENTURE, DIRECT TECHNIQUE (CONTINUED)55 Dry the Denture Caps. Apply a small amount ofCHAIRSIDE Attachment Processing Material around thecircumference of each Cap. Place CHAIRSIDE Materialinto the recesses in the overdenture and seat it over theCaps and onto the tissue. Have the patient close intolight occlusion and hold while the CHAIRSIDE Materialsets. Please refer to CHAIRSIDE Attachment ProcessingMaterial IFU for set times.NOTE: Excessive occlusal pressure during the settingtime may cause tissue recoil against the overdenture baseand could contribute to dislodging and premature wearof the Males.66 Disengage the overdenture from the Abutments andremove from the mouth. Verify that the Denture Capshave been securely processed into the overdenture. Fillany voids and light cure. The material will bond to itselfand will cure within 30 seconds with light applicat
The LOCATOR Root Attachment System leverages the natural tooth root for the retention of overdentures or removable partial dentures. LOCATOR Root Attachments give you the choice of a straight post and two angles (10 and 20 degrees) to accommodate divergent roots. A cast-to version is also available for telescopic copings, partial or full dentures.
