Transcription
NCR Digital Ordering and ConnectedPaymentsIntegration GuideLast Updated: October 4, 2021Confidential and proprietary information of NCR.Unauthorised use, reproduction and/or distribution is strictly prohibited.
Digital Ordering and Connected Payments, Integration GuideCopyright and Trademark InformationCopyright and Trademark InformationThe products described in this document are copyrighted works of NCR Corporation.NCR and APTRA are trademarks of NCR Corporation.Aloha is a registered trademark of NCR Corporation.Microsoft and Windows are registered trademarks of Microsoft Corporation in the United States and/or othercountries.All other trademarks are the property of their respective owners.It is the policy of NCR Corporation (NCR) to improve products as technology, components, software andfirmware become available. NCR, therefore, reserves the right to change specifications without prior notice.All features, functions and operations described herein may not be marketed by NCR in all parts of the world. Insome instances, photographs are of equipment prototypes; therefore, before using this document, consult withyour NCR representative or NCR office for information that is applicable and current. 2021 NCR CorporationAtlantaGeorgiaUSAwww.ncr.comAll Rights ReservedConfidential and proprietary information of NCR.Unauthorised use, reproduction and/or distribution is strictly prohibited.ii
Digital Ordering and Connected Payments, Integration GuideRevision RecordRevision RecordDatePageDescription of ChangeJune 03, 2021AllAdded support for Connected Payments.June 09, 2021Converted document to use new template.Confidential and proprietary information of NCR.Unauthorised use, reproduction and/or distribution is strictly prohibited.iii
Digital Ordering and Connected Payments, Integration GuideContentsContentsAbout Digital Ordering and Connected Payments . 1Prerequisites and requirements . 1Configuring Digital Ordering with Connected Payments . 2Requesting a Connected Payments company ID . 2Supporting Connected Payments and EDC . 4Configuring Connected Payments as the credit processing mode . 5Allowing a Digital Ordering session to use Connected Payments . 6Aligning the Connected Payments site ID in Web Admin . 7Configuring an ATO credit card tender . 9Passing the CP tender using AO API call . 12Using Digital Ordering with Connected Payments . 14Processing a transaction under a guest login . 14Processing a transaction under a known account with an unsaved card . 16Processing a transaction with a stored card . 18Adding a stored payment card to your profile . 20Confidential and proprietary information of NCR.Unauthorised use, reproduction and/or distribution is strictly prohibited.iv
Digital Ordering and Connected Payments, Integration GuideAbout Digital Ordering and Connected PaymentsAbout Digital Ordering and Connected PaymentsDigital Ordering and Connected Payments at a GlanceCore ProductDigital Ordering, Connected Payments, Aloha TakeoutComplementary ProductsSeparate License Required?NoOther ReferencesDigital Online Ordering Implementation Guide, DigitalOrdering Environment Setup GuideNCR Connected Payments offers merchants secure and flexible payment support, whilehelping them prepare for a future in which they must manage a multitude of paymentoptions in a tightly regulated industry. The SaaS solution leverages flexible Microsoftarchitecture, as well as redundant active/active data centers with real-time data replication,to provide rich payment functionality.The purpose of this guide is to assist you in successfully implementing and processingDigital Ordering transactions with Connected Payments. This guide addresses configurationin Digital Ordering, Connected Payments, Aloha Takeout (ATO), and the configurationmanagement tool you are using, either Aloha Configuration Center or Aloha Manager.Prerequisites and requirementsThis guide assumes your company is set up in Web Admin and that you will process creditcards with the Connected Payments product. Refer to the Digital Ordering SoftwareRequirements - HKS1521 document for minimum versions required when processing DigitalOrdering transactions with Connected Payments.Confidential and proprietary information of NCR.Unauthorised use, reproduction and/or distribution is strictly prohibited.1
Digital Ordering and Connected Payments, Integration GuideConfiguring Digital Ordering with Connected PaymentsConfiguring Digital Ordering with Connected PaymentsThis section details the configuration requirements for Digital Ordering with ConnectedPayments. If you are an experienced user, refer to Procedures at a Glance for abbreviatedsteps. If you prefer more detail, continue reading this document.Procedures at a Glance:If you are viewing this document using Adobe Acrobat Reader, click each link for detailedinformation regarding the task.1.In Web Admin, access Configuration Payment Providers Options to obtain the RSA KeyValue for the CP company and email it to an NCR Professional Services representative or aConnected Payments team member. Upon receiving the Connected Payments ID, enter it inthe same location. See page 2.2.In Web Admin, select Configuration Company Setup and type AOLO1 in ‘DefaultPayments Enterprise.’ You only perform this procedure if the company is using ConnectedPayments and Integrated Credit Mode together. See page 4.3.In Web Admin, select Configuration Site Setup Sites Submission Details tab andselect Connected Payments from the ‘Credit Processing Mode’ drop-down list to processpayments with Connected Payments. See page 5.4.In Connected Payments, obtain the Site ID and select Configuration Site Setup Sites Submission tab in Web Admin, and enter the ID in ‘Credit Site ID. See page 7.5.In CFC or Aloha Manager, select Maintenance Payments Tenders and create an APStender with ‘Not Applicable’ selected from the ‘Credit card provider’ drop-down list. Seepage 9.6.In Aloha Takeout, select Maintenance Takeout Configuration Takeout Settings Custom tab and add the custom settings for Aloha Takeout to support ConnectedPayments. Alternatively, you can edit AlohaToGoConfig.xml directly. See page 12.7.For Digital Ordering API users, configure the Tenders section of the appropriate calls tosupport Connected Payments. See page 12.Requesting a Connected Payments company IDElectronic commerce (e-commerce) is a term for any type of business or commercialtransaction that involves the transfer of information across the Internet and allowsconsumers to electronically exchange goods and services. Each e-commerce site thatprocesses payments with Connected Payments must create a dedicated cloud-basedcompany tied to a unique set of private/public RSA encryption keys used to ensure thesecurity of a session with the Connected Payments product.You must request the creation of a Connected Payments company in Web Admin by sendingthe Connected Payments RSA key value to either an NCR Professional Servicesrepresentative or a Connected Payments team member. They will create the ConnectedPayments company and send the company ID to you. The key is public and is transmittableover the public Internet with no consequences.Confidential and proprietary information of NCR.Unauthorised use, reproduction and/or distribution is strictly prohibited.2
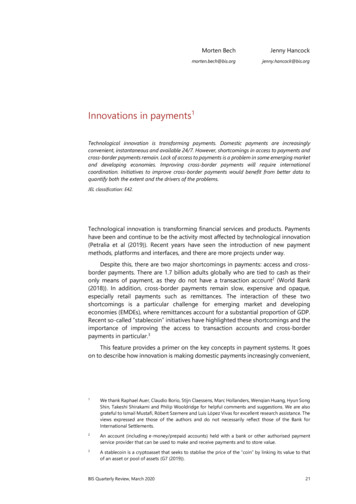
Digital Ordering and Connected Payments, Integration GuideConfiguring Digital Ordering with Connected PaymentsTo obtain the RSA key value for the Connected Payments company:1. In Web Admin, select Configuration Payment Providers Options. The ConfigurationPayment Providers (Company Level) screen appears.Figure 1 RSA Key on Configuration Payment Providers (Company Level) Screen2. Select and copy the RSA key value for the Connected Payments public key, and pastethe key value into an email.3. Send the email to the appropriate recipient.4. Exit the Configuration Payments Providers (Company Level) function.5. Once you send the RSA key value to an NCR representative or a Connected Paymentsteam member, they will return the Connected Payments company ID to you. Return toWeb Admin and enter the Connected Payments company ID.Confidential and proprietary information of NCR.Unauthorised use, reproduction and/or distribution is strictly prohibited.3
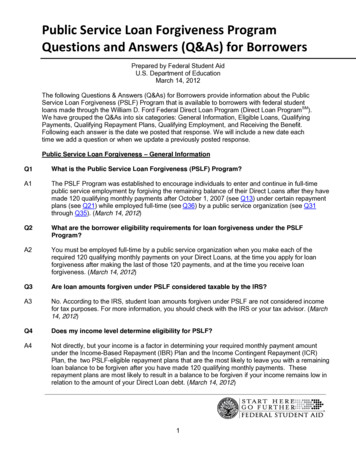
Digital Ordering and Connected Payments, Integration GuideConfiguring Digital Ordering with Connected PaymentsTo enter the Connected Payments Company Id:1. In Web Admin, select Configuration Configuration Payment Providers (CompanyLevel).Figure 2 Connected Payments Company ID2. Click to the right of Connected Payments Company Id and type the ID.3. Click Save Changes and exit the Configuration Payments Providers (Company Level)function.Supporting Connected Payments and EDCA company could have one site process transactions with Connected Payments and anothersite process with EDC (Electronic Draft Capture), referred to as integrated credit mode inWeb Admin. If you are mixing credit processing modes, you must configure the ‘DefaultPayments Enterprise Id’ in Company Setup. If you are not mixing credit processing modes,Connected Payments is considered the default payment provider and you can skip thisprocedure.Tip: You must have ‘Radiant Admin’ access to view the Company Setup function. You mightneed to contact Digital Ordering.Confidential and proprietary information of NCR.Unauthorised use, reproduction and/or distribution is strictly prohibited.4
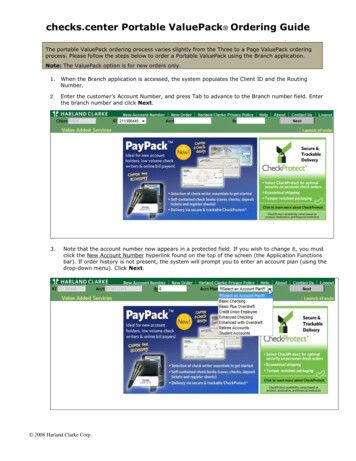
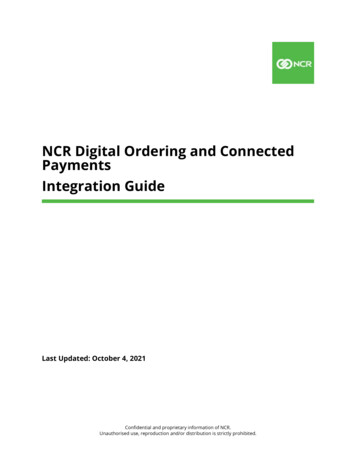
Digital Ordering and Connected Payments, Integration GuideConfiguring Digital Ordering with Connected PaymentsTo configure the Default Payments Enterprise ID:1. In Web Admin, select Configuration Company Setup.2. Click Edit Company.Figure 3 Edit Company Screen3. Type AOLO1 in ‘Default Payments Enterprise Id.’4. Click Save and exit the Company Setup function.Configuring Connected Payments as the credit processing modeAs per normal practice, you must configure the mode in which you are processing paymentsfor each site that accepts credit card transactions. Since the configuration is per site, youcan configure one site to process transactions with Connected Payments and another site touse Integrated Credit Mode (EDC).To configure Connected Payments as the credit processing mode:1. In Web Admin, select Configuration Site Set up Sites.2. Select the site from the list and click Edit Site.3. Select the Submission Details tab.Confidential and proprietary information of NCR.Unauthorised use, reproduction and/or distribution is strictly prohibited.5
Digital Ordering and Connected Payments, Integration GuideConfiguring Digital Ordering with Connected Payments4. Select Connected Payments from the ‘Credit Processing Mode’ drop-down list.Figure 4 Credit Processing Mode (Connected Payments)5. Click Update and exit the Sites function.Allowing a Digital Ordering session to use Connected PaymentsYou must configure the PayApiSessionUser company setting In Web Admin after theConnected Payments implementation is complete and Connected Payments functionsproperly on the Aloha Online Ordering website; otherwise, this setting doesn’t workcorrectly.Reference: Refer to the Digital Ordering Environment Setup Guide when creating a ticket toplace the Connected Payments private key in the Digital Ordering companyworkspace.To allow a DO session to use Connected Payments:1. Log in to Web Admin.2. Select the company from the list.3. Select Configuration Company Settings Setup.Confidential and proprietary information of NCR.Unauthorised use, reproduction and/or distribution is strictly prohibited.6
Digital Ordering and Connected Payments, Integration GuideConfiguring Digital Ordering with Connected Payments4. Type PayApiSessionUser in the ‘Search’ field. Note: If the setting does not exist, clickAdd to add the setting.Figure 5 PayApiSessionUser Company Settings5. Click Edit.6. Type engageone@ncr.com in ‘Value.’7. Click Update.8. Exit the Company Settings Setup function.Aligning the Connected Payments site ID in Web AdminFor each site that accepts payment cards with Connected Payments, you must align theConnected Payments site ID in Web Admin. The easiest way to locate the ConnectedPayments site ID is from within the Connected Payments product.To obtain the Site ID in Connected Payments:1. Log in to Connected Payments Management. The Connected Payments Dashboardappears.2. Select Store Configuration from the Administration drop-down list.Confidential and proprietary information of NCR.Unauthorised use, reproduction and/or distribution is strictly prohibited.7
Digital Ordering and Connected Payments, Integration GuideConfiguring Digital Ordering with Connected Payments3. Select the Store Management tab.Figure 6 Connected Payments Dashboard - Store Management Tab4. Locate the store from the list and make note of the corresponding Site ID, whichappears under the ‘Number’ column.5. Exit Connected Payments Management.To align the Connected Payments site ID in Web Admin:1. In Web Admin, select Configuration Site Setup Sites.2. Select a site from the list and click Edit Site.Confidential and proprietary information of NCR.Unauthorised use, reproduction and/or distribution is strictly prohibited.8
Digital Ordering and Connected Payments, Integration GuideConfiguring Digital Ordering with Connected Payments3. Select the Submission Details tab.Figure 7 Edit Site - Submission Details Tab4. Type the site ID in ‘Credit SiteId.’5. Click Update and exit the Sites function.Configuring an ATO credit card tenderYou must configure a credit card tender in the point-of-sale to pass through Aloha Takeoutto get to Digital Ordering. Be aware this is not the tender that Connected Payments uses toprocess payments through OpenEPS.In this document, we call the tender ‘APS’ for Aloha Payment Solution; however, you can useanother name such as ‘Secure Payment.’ When Connected Payments receives the APStender, it determines the actual card brand based on the prefix, and outputs the correcttender for posting and reporting. Even though this guide instructs you to configure an APStender, you must still have a tender configured for each card brand you accept, as pernormal practice.To configure an APS tender to pass through ATO to Connected Payments:1. Log in to Aloha Configuration Center or Aloha Manager.2. Select Maintenance Payments Tenders.3. Click the New drop-down arrow, select Credit Card as the type, and click OK.4. Type a name for the tender, such as ‘APS.’Confidential and proprietary information of NCR.Unauthorised use, reproduction and/or distribution is strictly prohibited.9
Digital Ordering and Connected Payments, Integration GuideConfiguring Digital Ordering with Connected Payments5. Select the Type tab.Figure 8 Tenders Function (APS Tender)6. Verify the ‘Credit card provider’ is Not Applicable. This is the default setting when youcreate a new credit card tender.7. Keep all remaining options as their default.8. Click Save and exit the Tenders function.You can also refer to the NCR Aloha Takeout Using Connected Payments Quick ReferenceGuide for further information on configuring and using Connected Payments with AlohaTakeout. Once you configure the APS tender in the point-of-sale, you must align it in AlohaTakeout.To align the APS tender with Aloha Takeout:1. With ATO selected in the product panel, select Maintenance Takeout Configuration Takeout Settings.2. Select the Tenders tab.Confidential and proprietary information of NCR.Unauthorised use, reproduction and/or distribution is strictly prohibited.10
Digital Ordering and Connected Payments, Integration GuideConfiguring Digital Ordering with Connected Payments3. Click the Add drop-down arrow, select Credit from the list, and click OK.Figure 9 Takeout Settings - Tenders Tab4. Select APS from the ‘Tender ID’ drop-down list5. Select Available for deposits.6. Click Save and exit the Takeout Settings function.Confidential and proprietary information of NCR.Unauthorised use, reproduction and/or distribution is strictly prohibited.11
Digital Ordering and Connected Payments, Integration GuideConfiguring Digital Ordering with Connected PaymentsPassing the CP tender using AO API callIf you are an API user, you can pass the connected payments tender in an AO API call. Formore information about AO API calls, contact the Digital Ordering Product Managementteam directly at AH230330 @ncr.com. If you are not using the AO API, skip this procedure.The following is an example of the tenders section in the AO 2PECombo":null,"DeviceData":null}Figure 10 Tenders Section in AO APIUsing the example shown in Figure 10 as a guideline, you must adhere to the erMaskedAdheres to the following rules: The first six digits are required for POS to identify the tender. The middle portion of the card is padded with zeros. This is neededfor APS to process the payment. The last four digits identify the particular card.Confidential and proprietary information of NCR.Unauthorised use, reproduction and/or distribution is strictly prohibited.12
Digital Ordering and Connected Payments, Integration GuideConfiguring Digital Ordering with Connected s the card type, such as Visa, Amex, and others. This is notpassed to the POS or APS and is not used for payment processing.ProcessingTypeShould always be 1 for token.AccountNumberAdheres to the following values: Token type 201 Token 4445228593320007 Token Source Optional Token Expiration Date Optional Card Expiration Date 12/1/2017Connected Payments supports the following token types: 101 Enterprise Token 102 Loyalty Token 103 Coupon Token 104 Future Use 105 OpenEPS Offline Token 106 SSN 201 Vantiv Token 301 Temp Account for Token/RGP Token 401 TAVE Token 501 Elavon TokenConfidential and proprietary information of NCR.Unauthorised use, reproduction and/or distribution is strictly prohibited.13
Digital Ordering and Connected Payments, Integration GuideUsing Digital Ordering with Connected PaymentsUsing Digital Ordering with Connected PaymentsThis section discusses how to use Digital Ordering with Connected Payments by walking youthrough different scenarios. Each procedure is similar, but may have different screens andnavigation. If the card has a chip, the token is stored for future use instead of the cardinformation.We cover the following procedures: Processing a transaction under a guest login Processing a transaction under a known account with an unsaved card Processing a transaction with a stored card Adding a stored payment card to your profileProcessing a transaction under a guest loginDigital Ordering allows you to place an order while logged in under an unknown guestaccount. The system does not know you to store payment card information under a guestaccount.To process a transaction under a guest login:1. Log in to Digital Ordering under a guest login.2. Place an order, as normal. When finished, the system navigates to the OrderConfirmation and Payment screen.Figure 11 Order Confirmation and Payment ScreenConfidential and proprietary information of NCR.Unauthorised use, reproduction and/or distribution is strictly prohibited.14
Digital Ordering and Connected Payments, Integration GuideUsing Digital Ordering with Connected Payments3. Click NCR Secure Payment. The NCR Secure Payment screen appears.Figure 12 NCR Secure Payment Screen4. Enter your payment card information and click Save. The payment screen appearswith the populated card information.Figure 13 Payment Screen5. Click Complete Order to finalize the transaction.Confidential and proprietary information of NCR.Unauthorised use, reproduction and/or distribution is strictly prohibited.15
Digital Ordering and Connected Payments, Integration GuideUsing Digital Ordering with Connected PaymentsProcessing a transaction under a known account with an unsaved cardWhen you log in using your own account, you can store payment card information. If youbegin ordering without logging in, you must log in after entering the items for the order.To process a transaction under a known account with an unsaved card:1. Log in to Digital Ordering using your own account.2. Place an order, as normal. When finished, the system navigates to the Payment screenwithout stored payment card information.Figure 14 Payment Screen3. Click NCR Secure Payment. The NCR Secure Payment screen appears (Figure 12).4. Enter your payment card information, and click Save. The payment screen appearspopulated with the payment card information.Figure 15 Payment Information ScreenConfidential and proprietary information of NCR.Unauthorised use, reproduction and/or distribution is strictly prohibited.16
Digital Ordering and Connected Payments, Integration GuideUsing Digital Ordering with Connected Payments5. Click Save Card for Future Use to save the payment card information.6. Click Complete Order to finalize the transaction.The system saves the stored card under the ‘Default Payment Information’ section of the MyProfile screen. Note: Under the current PCI regulations, the system does not store the CVVsecurity code of the card; however, once the token is stored, it is no longer necessary toenter the CVV code and the option no longer appears on the screen.Figure 16 Default Payment Information on My Profile ScreenYou can store up to five payment cards when processing with Connected Payments. Note: Ifthe site is also processing with EDC, you can only store one card.Figure 17 Stored Payment Cards on Default Payment Information SectionConfidential and proprietary information of NCR.Unauthorised use, reproduction and/or distribution is strictly prohibited.17
Digital Ordering and Connected Payments, Integration GuideUsing Digital Ordering with Connected PaymentsProcessing a transaction with a stored cardWhen you have a stored payment card in your profile, the screens populate with thepayment card information. If you have multiple saved cards, you can select a different card.Upon processing, the system still prompts you to enter the CVV code.To process a transaction with a stored card:1. Log in to Digtial Ordering under your account.2. Place an order. When finished, the system navigates to the payment screen populatedwith stored payment card information.Figure 18 Payment Screen with Populated Payment InformationConfidential and proprietary information of NCR.Unauthorised use, reproduction and/or distribution is strictly prohibited.18
Digital Ordering and Connected Payments, Integration GuideUsing Digital Ordering with Connected Payments3. If you have multiple stored cards and want to use a different card, select the stored cardfrom the ‘Card Number’ drop-down list. The screen repopulates with the paymentinformation for the selected stored card.Figure 19 Payment Screen with Multiple Stored Payment Cards4. Click Complete Order to finalize the transaction.If you wish to not use a stored card during this process, click Change Payment. The screenrepopulates with the ‘NCR Secure Payment’ and ‘Pay Upon Pickup’ buttons.Figure 20 Payment Screen with No Stored Payment Card InformationReference: At this point, you are not using a stored card. Refer to “Processing a transactionunder a known account with an unsaved card” on page 16.Confidential and proprietary information of NCR.Unauthorised use, reproduction and/or distribution is strictly prohibited.19
Digital Ordering and Connected Payments, Integration GuideUsing Digital Ordering with Connected PaymentsAdding a stored payment card to your profileYou can store a new payment card to your profile for future use without placing an order.You may want to do this if you obtain a new card and you want to be proactive by storingthe card to your profile.To add a stored payment card to your profile:1. Log in to Digital Ordering under your account and navigate to the My Profile page.2. Under the ‘Default Payment Information’ section, click NCR Secure Payment (Figure 17).The NCR Secure Payment screen appears (Figure 12).3. Enter the card information and click Save. You may encounter additional screens forsecurity purposes, such as the NCR Secure Payment screen with ‘Step 1 of 2’ in theheader.Figure 21 NCR Secure Payment Screen (Step 1)Confidential and proprietary information of NCR.Unauthorised use, reproduction and/or distribution is strictly prohibited.20
Digital Ordering and Connected Payments, Integration GuideUsing Digital Ordering with Connected Payments4. Enter the card information and click Save. Another screen appears with ‘Step 2 of 2’ inthe header. The system populates the card type, cardholder, and expiration date.Figure 225. Enter the card number again.6. Click Update. The card appears in the list of stored cards under the ‘Default PaymentInformation’ section of the My Profile page.Confidential and proprietary information of NCR.Unauthorised use, reproduction and/or distribution is strictly prohibited.21
Digital Ordering and Connected Payments, Integration GuideUsing Digital Ordering with Connected PaymentsConfidential and proprietary information of NCR.Unauthorised use, reproduction and/or distribution is strictly prohibited.22
Digital Ordering and Connected Payments, Integration GuideNCR welcomes your feedback on this document. Your comments can be of great value inhelping us improve our information products. Please contact us using the followingaddress:email: Documentation.HSR@NCR.comConfidential and proprietary information of NCR.Unauthorised use, reproduction and/or distribution is strictly prohibited.
It is the policy of NCR Corporation (NCR) to improve products as technology, components, software and firmware become available. NCR, therefore, reserves the right to change specifications without prior notice. All features, functions and operations described herein may not be marketed by NCR in all parts of the world. In