Transcription
LVS WIZARD GUIDELinksys Voice SystemInstallation, Configuration, and MaintenanceUsing the LVS WizardSPA9000 IP Telephony SystemSPA400 PSTN VoIP Gateway with Integrated Voice Mail ServerSPA9x2 IP Phones
Contents1About This Guide5Document Audience . . . . . . . . . . . . . . . . . . . . . . . . . . . . . . . . . . 5Related Documents . . . . . . . . . . . . . . . . . . . . . . . . . . . . . . . . . . . 5Finding Information in PDF Files . . . . . . . . . . . . . . . . . . . . . . . . . . 6Finding Text in a PDF . . . . . . . . . . . . . . . . . . . . . . . . . . . . . . . . 6Finding Text in Multiple PDF Files . . . . . . . . . . . . . . . . . . . . . . . . 6Online Resources . . . . . . . . . . . . . . . . . . . . . . . . . . . . . . . . . . . . 7Copyright and Trademarks . . . . . . . . . . . . . . . . . . . . . . . . . . . . . . 7Document Style Conventions . . . . . . . . . . . . . . . . . . . . . . . . . . . . 72Getting Started9LVS Solution Overview . . . . . . . . . . . . . . . . . . . . . . . . . . . . . . . . 9Introducing LVS Equipment . . . . . . . . . . . . . . . . . . . . . . . . . . . . . 10Getting to Know Your SPA9000 . . . . . . . . . . . . . . . . . . . . . . . . . 11Getting to Know Your SPA400 . . . . . . . . . . . . . . . . . . . . . . . . . . 12Getting to Know Your SPA9xx Phones and Accessories . . . . . . . . . . . 13Getting to Know Your WRV200 Router . . . . . . . . . . . . . . . . . . . . . 15Getting to Know the SLM224P Switch . . . . . . . . . . . . . . . . . . . . . 173Installation and Configuration Process Overview194Preparation20Site Survey . . . . . . . . . . . . . . . . . . . . . . . . . . . . . . . . . . . . . . . . 20System Design Considerations . . . . . . . . . . . . . . . . . . . . . . . . . . . 20Bandwidth Requirements and Call Capacity . . . . . . . . . . . . . . . . . 20Wide Area Network (WAN) Quality of Service . . . . . . . . . . . . . . . . . 21Network Setup Review . . . . . . . . . . . . . . . . . . . . . . . . . . . . . . . . 21NAT Mapping . . . . . . . . . . . . . . . . . . . . . . . . . . . . . . . . . . . . 22Linksys Voice System Wizard Guidei
ContentsQuality of Service . . . . . . . . . . . . . . . . . . . . . . . . . . . . . . . . . . . . 22Local Area Network Design . . . . . . . . . . . . . . . . . . . . . . . . . . . . . . 22Deployment Scenarios . . . . . . . . . . . . . . . . . . . . . . . . . . . . . . . . 23ITSP Service without Local PSTN Access or Voice Mail . . . . . . . . . . . 23LVS with ITSP Service, PSTN Access and Local Voice Mail Service . . . . . 24ITSP Service, PSTN and ISDN Access and Local Voice Mail Service . . . . 25Services and Equipment . . . . . . . . . . . . . . . . . . . . . . . . . . . . . . . 26Basic Services and Equipment . . . . . . . . . . . . . . . . . . . . . . . . . . 26Linksys Equipment and Services . . . . . . . . . . . . . . . . . . . . . . . . . 26Downloading Firmware . . . . . . . . . . . . . . . . . . . . . . . . . . . . . . . . 275Connecting and Configuring Your System29Connecting and Configuring the Switch . . . . . . . . . . . . . . . . . . . . . 29Connecting the Switch to the Router . . . . . . . . . . . . . . . . . . . . . . 29Configuring the Switch . . . . . . . . . . . . . . . . . . . . . . . . . . . . . . 30Introduction to the Wizard . . . . . . . . . . . . . . . . . . . . . . . . . . . . . . 32Wizard Capabilities . . . . . . . . . . . . . . . . . . . . . . . . . . . . . . . . . 32Extracting the Wizard . . . . . . . . . . . . . . . . . . . . . . . . . . . . . . . 32LVS Wizard User Guide . . . . . . . . . . . . . . . . . . . . . . . . . . . . . . . 32Connecting and Configuring the LVS Equipment (New Installation) . . . . 32Required Information . . . . . . . . . . . . . . . . . . . . . . . . . . . . . . . 33Starting the Wizard . . . . . . . . . . . . . . . . . . . . . . . . . . . . . . . . . 35End User License Agreement . . . . . . . . . . . . . . . . . . . . . . . . . . . 35Installing the SPA9000 . . . . . . . . . . . . . . . . . . . . . . . . . . . . . . . 36Installing the SPA400 (Optional) . . . . . . . . . . . . . . . . . . . . . . . . . 38Upgrading the SPA400 Firmware . . . . . . . . . . . . . . . . . . . . . 41Configuring a Static IP Address on the SPA400 . . . . . . . . . . . . . . . . 43Configuring the SPA9000 . . . . . . . . . . . . . . . . . . . . . . . . . . . . . . . 45Linksys Voice System Wizard Guideii
ContentsConfiguring a Static IP Address on the SPA9000 . . . . . . . . . . . . . . . 47Upgrading SPA9000 Firmware . . . . . . . . . . . . . . . . . . . . . . . . . . 48Configuring SPA9000 Voice Services Lines . . . . . . . . . . . . . . . . . . . . 50Configuring Steering Digits and Outbound Call Routes . . . . . . . . . . . . 53Configuring the SPA400 Voice Mail Server for the SPA9000 (Optional) . . . 54Configuring the Internal Phone Extensions . . . . . . . . . . . . . . . . . . . . 55Configuring Inbound Call Routing . . . . . . . . . . . . . . . . . . . . . . . . . 56Configuring Hunt Groups (Optional) . . . . . . . . . . . . . . . . . . . . . . 57Localizing the SPA9000 . . . . . . . . . . . . . . . . . . . . . . . . . . . . . . . . 60Downloading Custom Auto Attendant Prompts (Optional) . . . . . . . . . . 62Configuring Client Stations . . . . . . . . . . . . . . . . . . . . . . . . . . . . . 66Localizing the SPA400 Voice Mail Prompts (Optional) . . . . . . . . . . . . 736Testing Your LVS System767Maintaining Your LVS77Using the Main Menu . . . . . . . . . . . . . . . . . . . . . . . . . . . . . . . . . 78Upgrading Firmware . . . . . . . . . . . . . . . . . . . . . . . . . . . . . . . . . . 80Configuring Mediatrix Services . . . . . . . . . . . . . . . . . . . . . . . . . . . 83Backing Up and Restoring Device Configurations . . . . . . . . . . . . . . . . 84Save Configuration to File . . . . . . . . . . . . . . . . . . . . . . . . . . . . . 85Save Configuration to Device . . . . . . . . . . . . . . . . . . . . . . . . . . 86Expert User . . . . . . . . . . . . . . . . . . . . . . . . . . . . . . . . . . . . . . . 90End User License Agreement Registry Entry . . . . . . . . . . . . . . . . . 90Wizard Directories . . . . . . . . . . . . . . . . . . . . . . . . . . . . . . . . . 90Advanced Features Menu . . . . . . . . . . . . . . . . . . . . . . . . . . . . . . . 91NAT Settings . . . . . . . . . . . . . . . . . . . . . . . . . . . . . . . . . . . . . 92Client Extensions . . . . . . . . . . . . . . . . . . . . . . . . . . . . . . . . . . 97Hunt Groups . . . . . . . . . . . . . . . . . . . . . . . . . . . . . . . . . . . . . 98Linksys Voice System Wizard Guideiii
ContentsAuto Attendant . . . . . . . . . . . . . . . . . . . . . . . . . . . . . . . . . . 100Localizing the Language Dictionaries for the Phone Display . . . . . . 114Admin Password . . . . . . . . . . . . . . . . . . . . . . . . . . . . . . . . . 117SPA932 Attendant Console . . . . . . . . . . . . . . . . . . . . . . . . . . . 117Adding a Phone to an Existing Configuration . . . . . . . . . . . . . . . . . 120Replacing a Phone [Experts Only] . . . . . . . . . . . . . . . . . . . . . . . . . 122Removing a Forgotten Password [Expert Only] . . . . . . . . . . . . . . . . 126AInstallation Workbook127Additional Equipment . . . . . . . . . . . . . . . . . . . . . . . . . . . . . . . . 138Additional Installation and Configuration Notes . . . . . . . . . . . . . . . 139BContacts140North American Contacts . . . . . . . . . . . . . . . . . . . . . . . . . . . . . . 140Global Contacts . . . . . . . . . . . . . . . . . . . . . . . . . . . . . . . . . . . . 140Linksys Voice System Wizard Guideiv
About This GuideDocument AudienceAbout This GuideThis guide helps you to prepare your site and to complete the basic installation and configurationof the Linksys Voice System (LVS) by using the Configuration Wizard. This guide describes the LVSsolution and its components. It also presents step-by-step instructions to help you to install andconfigure the system, to select the features that the business needs, to verify the installation, and toresolve any problems that occur. “Document Audience” on page 5 “Related Documents” on page 5 “Online Resources” on page 7 “Copyright and Trademarks” on page 7 “Document Style Conventions” on page 7Document AudienceThis document is written for Linksys Voice System (LVS) administrators that need to: Configure new LVS installations Configure existing LVS installations Backup and restore LVS configurationsRelated DocumentsLinksys strongly recommends the use of the LVS Wizard and this Installation and Configuration Guidewhen installing, configuring and maintaining your LVS systems. Additionally, this section providesadditional documentation references for administering the LVS system and its components.These documents and more are available at Linksys.com and the Linksys Partner Connection (LPC)site.NOTE: EMEA customers can go to www.linksys-itsp.com and www.linksys-voip.eu.Document TitleDescriptionIntended AudienceLinksys Voice System Installationand Configuration Using theAdministration Web Server Manual installation of LVS, byusing the devices’ built-in WebUser Interface, instead of theLVS WizardEnd Users, VARs, and ServiceProvidersLinksys Voice System AdministrationGuideVARs and Service Providers Administration andconfiguration of systemfeatures using the SPA9000 andSPA400 Deployment options for ITSP,PSTN, and ISDN services SPA9000, SPA400, SPA900 seriesphonesLinksys Phone Administration Guide Configuration andmanagement of SPA9x2 seriesIP phones Deployment options with orwithout the SPA9000 IP PBX SPA9x2 series IP phonesLinksys Voice System Wizard GuideVARs and Service Providers5
About This GuideFinding Information in PDF FilesLinksys SPA9x2 Phone User Guide Phone setup Phone features SPA9x2 series IP phonesVARS and phone end-usersLinksys Analog Telephone AdapterAdministration Guide Administration and use ofLinksys ATAs PAP2T, SPA2102, SPA3102,SPA8000, AG310, RTP300,WRP400, and WRTP54GVARS, system administrators, andService ProvidersUser Guide for chosen switchUser Guide for chosen routerFinding Information in PDF FilesThe PDF Find/Search tool lets you find information quickly and easily online. You can: Search an individual PDF. Search multiple PDFs at once (for example, all PDFs in a specific folder or disk drive). Perform advanced searches.Finding Text in a PDF1. Enter your search terms in the Find box on the toolbar.NOTE: By default, the Find box is available at the right end of the Acrobat toolbar. If the Find tooldoes not appear, choose Edit Find.2. Optionally, click the arrow next to the Find text box to refine your search by choosing specialoptions such as Whole words only.3. Press Enter. Acrobat displays the first instance of the search term. Press Enter again to continueto more instances of the term.Finding Text in Multiple PDF FilesThe Search window lets you search for terms in multiple PDF files that are stored on your PC or localnetwork. The PDF files do not need to be open.1. Start Acrobat Professional or Adobe Reader.2. Choose Edit Search. Alternatively, click the arrow next to the Find box and then choose OpenFull Acrobat Search.3. In the Search window, complete the following steps:a. Enter the text that you want to find.b. Choose All PDF Documents in.c. From the drop-down box, choose Browse for Location.d. Choose a directory on your computer or local network, and click OK.e. If you want to specify additional search criteria, click Use Advanced Search Options, andchoose the options you want.Linksys Voice System Wizard Guide6
About This GuideOnline Resourcesf. Click Search.4. When the Results appear, click the plus sign ( ) to open a folder, and then click any link to openthe file where the search terms appear.NOTE: For more information about the Find and Search functions, see the Adobe Acrobatonline help.Online ResourcesWebsite addresses in this document are listed without http:// in front of the address because mostcurrent web browsers do not require it. If you use an older web browser, you may have to add http://in front of the web ys International om/glossaryNetwork Securitywww.linksys.com/securityCopyright and TrademarksLinksys is a registered trademarkor trademark of Cisco Systems, Inc.and/or its affiliates in the U.S. andcertain other countries. Copyright 2007 Cisco Systems, Inc. All rightsreserved. Other brands and productnames are trademarks or registeredtrademarks of their respectiveholders.Document Style ConventionsThe following style conventions are used in this document. Menus, Tabs, and Buttons: Bold type is used to indicate the name of a button, menu, or tab in anapplication.Example: Click Submit All Changes to save your entries. Screens, Page Areas, and Fields: Italic type is used to indicate the name of screens, page areas,and fields.Example: Scroll down to the PBX Parameters area of the screen. Data Input: The Courier font is used to indicate characters that you should type into a fieldexactly as printed in this guide.Example: In the Mailbox Subscribe Expires field, type 30.In this example, you would type the number 30 in the field.Linksys Voice System Wizard Guide7
About This GuideDocument Style Conventions Parameters: Angle brackets and italic type indicate parameters that you need to replace with theappropriate data.Example: Type 800@ IP address of SPA400 :5090In this example, you would type the characters 800@, followed by the IP address of your SPA400,followed by a colon and the number 5090.Linksys Voice System Wizard Guide8
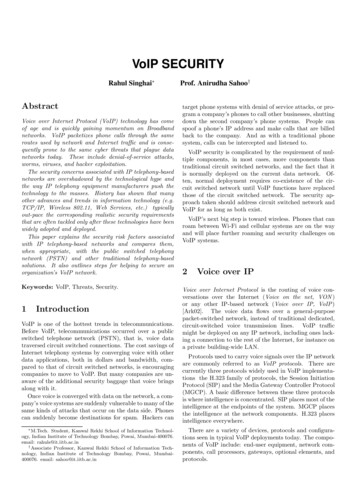
1Getting StartedLVS Solution OverviewGetting StartedBefore you start installing and configuring your system, you need to become familiar with thefeatures of the Linksys Voice System and the equipment and services that are required to meet theneeds of the business.This chapter is essential reading before you begin installing the equipment or configuring the system.Refer to the following topics: “LVS Solution Overview ” on page 9 “Introducing LVS Equipment” on page 10LVS Solution OverviewThe Linksys Voice System (LVS) is an affordable, feature-rich, multi-line voice over IP (VoIP) telephonesystem that provides sophisticated communication services to small business users. The LVS usesstandard TCP/IP protocols (although UDP is also supported) and can provide global connectivitythrough any Internet Telephony Service Provider (ITSP) that supports Session Initiation Protocol (SIP).The IP PBX system (SPA9000) provides powerful business-class services on a small business budget.The system capitalizes on VoIP service savings for long distance outbound and toll-free inboundcalling. Features include Auto Attendant, shared line appearances, configurable call routing, multipleDID numbers per VoIP line, call hunting (sequential, round robin, random), call park/unpark, calltransfer, call forward, group paging, call pick-up, music on hold, “find me” service, Do Not Disturb,call hold, call waiting, and more. Administrative tasks can be performed using an Interactive VoiceResponse system or a built-in Web Server.With the optional SPA400 PSTN Gateway, the LVS provides full inter-connectivity with the PublicSwitched Telephone Network (PSTN). Thus, a small business can maintain its legacy PSTN lines andexisting telephone numbers. The SPA400 also provides an integrated local voice mail server for up to32 individual mail boxes.Additional third party products such as Mediatrix 4400 ISDN VoIP Gateways and Plantronics andGNNetcom /Jabra headsets provide enhanced connectivity for supporting additional businessdeployment scenarios. Please contact your linksys distributor or sales representative for furtherinformation on Linksys LVS third party products.Linksys Voice System Wizard Guide9
Getting StartedIntroducing LVS EquipmentLVS Solution OverviewSPA9xx IP PhonesSPA400for Voice MailSLM224P SwitchSPA9000 IP PBXAnalog Phonesor Fax MachinesSPA400for PSTN AccessAnalogPhone LinesWRV200 RouterIntegratedAccess DeviceInternetAs illustrated, the complete LVS solution typically includes the SPA9000 IP PBX system, the SPA400PSTN gateway with voice mail, and several SPA9xx series IP phones. The system has VoIP telephoneservice through an Internet Telephony Service Provider (ITSP) but also supports legacy telephonelines (PSTN lines) through the SPA400.The following devices can be connected to an LVS system: Analog phones, fax machines: Up to two analog phones or fax machines can be connected tothe VoIP network through the SPA9000. Telephone service through PSTN, ITSP, and ISDN:–– ITSP VoIP Service: The SPA9000 can be configured to subscribe to an Internet TelephoneService Provider for VoIP service. Up to four different ITSP accounts can be configured.–– PSTN Analog Phone Access: The SPA400 can accommodate up to four PSTN lines, to supportlegacy phone numbers. Typically, one SPA400 is reserved for voice mail service. If your systemhas ITSP service, you can add up to two SPA400 devices with a total of 8 PSTN lines. If yoursystem does not have ITSP service, you can add a third SPA400 device with 4 additional PSTNlines, for a total of 12 PSTN lines.–– ISDN services: The LVS can be deployed with a Mediatrix 4400 ISDN BRI Digital gateway forISDN access.Introducing LVS EquipmentThis chapter describes the features of the LVS equipment, including the SPA9000, the SPA400, and thevarious models of SPA9xx phones. “Getting to Know Your SPA9000 ” on page 11 “Getting to Know Your SPA400 ” on page 12 “Getting to Know Your SPA9xx Phones and Accessories” on page 13Linksys Voice System Wizard Guide10
Getting StartedIntroducing LVS Equipment “Getting to Know Your WRV200 Router” on page 15 “Getting to Know the SLM224P Switch” on page 17Getting to Know Your SPA9000The SPA9000 is an IP PBX system with high-end features comparable to traditional large businessvoice services. This section describes the LEDs on the front panel and the ports on the back panel ofthe device.SPA9000 Front PanelLEDPowerDescription/Notes Green: The device is receiving power and is connected to the Internet. Flashing Green: The device is receiving power but is not connected to theInternet. Unlit: The device is not receiving power.Internet Green: The device is connected to the Internet. Flashing Green: The device is experiencing network activity. Unlit: The device is not connected to the Internet.Phone 1, Phone 2 Green: The phone is on hook and is registered with an active Internetphone service account. Unlit: The phone is on hook but is not registered with an active Internetphone service account. Flashing Green: The phone is off hook.Linksys Voice System Wizard Guide11
Getting StartedIntroducing LVS EquipmentSPA9000 Back PanelPortDescription/NotesPhone 1, Phone 2Use these ports to connect analog phones or fax machines to your IP phoneaccount.EthernetUse this port to connect a computer for administration of the SPA9000.InternetUse this port to connect the SPA9000 to the Local Area Network (LAN). Thecable may be connected to a switch, router or Integrated Access Device.PowerUse this port to connect to the external Power adapter (PA100).Getting to Know Your SPA400The SPA400 provides the SPA9000 access to the PSTN by connecting the FXO ports to analog lines.The SPA400 sets up and tears down calls between the PSTN and IP phones, offering seamlesstelephone service with Linksys VoIP equipment.The SPA400 also has a built-in voice mail server.This section describes the LEDs on the front panel and the ports on the back panel of the device.SPA400 Front PanelLEDPowerDescription/Notes Steady green: The SPA400 is receiving power and is connected to theInternet. Flashing: The SPA400 is not connected to the Internet, booting, orupgrading firmware.Status Steady green: The SPA9000 is registered to the SPA400. Flashing: The SPA9000 is not registered to the SPA400.Ethernet Steady green: The SPA400 has an active connection through the Ethernetport. Flashing: Network activity is occurring over the Ethernet port.Linksys Voice System Wizard Guide12
Getting StartedIntroducing LVS EquipmentLEDLine 1, 2, 3, 4Description/Notes Steady green: The line is active. Flashing: The line is ringing. Off: The line is idle.USB Steady green: The USB voice mail module is registered. Off: No module is detected.SPA400 Back PanelPortDescription/NotesUSBUse this port for the USB voice mail module, which contains the voicemail prompts and provides the storage location for saving voice mailboxmessages.EthernetUse this port to connect to the Local Area Network (LAN) for communicationswith SPA9000.Line 1, 2, 3, 4These FXO ports are used to connect to an analog phone lines.ResetThis button is used to reset the device.PowerUse this port to connect to the external Power adapter (PA100).Getting to Know Your SPA9xx Phones and AccessoriesLinksys provides are variety of phone models to suit the needs of small businesses. The followingtable provides a comparison of the various SPA9xx phones.Product NameRJ-45Voice LinesAdditionalFeatures/NotesSPA922*21One-line IP phone withPower over Ethernet (PoE)supportSPA942*24Four-line IP phone withPower over Ethernet (PoE)supportLinksys Voice System Wizard Guide13
Getting StartedIntroducing LVS EquipmentProduct NameRJ-45Voice LinesAdditionalFeatures/NotesSPA962*26Six-line IP Phone with highresolution color display andPower over Ethernet (PoE)supportSPA932——Attendant console (sidecar)for SPA962 with 32 buttonsand LEDs for monitoring andcall transferPOES51N/AProvides an 802.3af PoE portfor connection back to a PoEswitch for SPA9000, SPA400and SPA9x1 phonesWBP54G1N/AConverts your IP phone intoa wireless device, so it canconnect to your wirelessnetwork without an Ethernetcable*NOTE: PoE units (SPA922, SPA942, and SPA962) do not come with an external power adapter. ThePA100 power supply must be ordered separately if you are not using a PoE switch.Linksys Voice System Wizard Guide14
Getting StartedIntroducing LVS EquipmentGetting to Know Your WRV200 RouterWRV200 is a VPN router with a Wireless-G access point for small offices and home offices. It is stronglyrecommended for use with the Linksys Voice System.WRV200 Front PanelLED/PortDescriptionPower Green: The router is receiving power. Flashing Green: The router is running a diagnostic test.DMZ Green: The router has an available DMZ port. Flashing Green: The router is sending or receiving data over the DMZ port.Internet Green: The router is connected to a Broad Band Access device at theindicated speed (10, 100, 1000). Flashing Green: The router is transmitting or receiving data over theInternet port.Wireless Green: The router has a successful wireless connection. Flashing Green: The Router is actively sending or receiving data over thewireless network.1-4 (Ethernet)These four LEDs correspond to the router’s four Ethernet ports. Green: The Router is connected to a device through the correspondingport (1, 2, 3, or 4). Flashing Green: The Router is actively sending or receiving data over thecorresponding port.Linksys Voice System Wizard Guide15
Getting StartedIntroducing LVS EquipmentWRV200 Back PanelLED/PortDescriptionPowerThe port is used to connect the router to AC power, using the provided powercable.Reset The Reset button has two functions: If the Router is having problems connecting to the Internet, press theReset button for just a second with a paper clip or a pencil tip. This issimilar to pressing the Reset button on your PC to reboot it. If you are experiencing extreme problems with the router and have triedall other troubleshooting measures, press and hold in the Reset button for10 seconds. This action restores the factory defaults and clears all of theRouter’s settings, such as port forwarding or a new password.InternetUse this port to connect the router to a Broad Band Access device.1-4 (Ethernet)Use these ports to connect the router to network devices, such as PCs, printservers, or additional switches.Linksys Voice System Wizard Guide16
Getting StartedIntroducing LVS EquipmentGetting to Know the SLM224P SwitchThe SLM224P switch has 24 10/100 Copper ports with two shared Gigabit copper or optical (SFP)uplink interfaces for connecting the switch to the core network.NOTE: In this guide, the SLM224P switch is used in all examples. However, various Linksys switchescan be used with the LVS. Linksys recommends use of SLMxxxP, SRWxxxP and SRWxxxMP switchproduct families with the LVS.SLM224P Front PanelLED/PortDescriptionSystem Green: Power is being supplied to the switch. Solid Amber: The switch is performing the Power-On Self Test (POST).Link/Act (1-24) Green: The switch has a functional 10/100 Mbps network link through thecorresponding port with an attached device. Flashing: The switch is actively sending or receiving data over thecorresponding port.PoE (1-6, 13-18) Flashing Amber: Power is being supplied to an attached powered device(PD) on the corresponding port (1 through 6, 13 through 18).100M (7-12, 19-24) Amber: The switch has a functional 100 Mbps connection on thecorresponding port (7 through 12, 19 through 24) with an attacheddevice.Link/Act (G1-G2) Green: Lights up to indicate a functional 10/100/1000 Mbps network linkthrough the corresponding port (G1 through G2) with an attached device. Flashing Green: The switch is actively sending or receiving data over thecorresponding port.Gigabit (G1-G2) Amber: The switch has a functional 1000 Mbps connection on thecorresponding port with an attached device.Reset To reboot the switch, press and hold the Reset button for approximatelyfive seconds. To reset the Switch settings to the factory defaults, press and hold theReset Button for approximately ten seconds.Ethernet (1-24)The Switch is equipped with 24 auto-sensing, Ethernet network ports, whichuse RJ-45 connectors. The Fast Ethernet ports support network speeds of10 Mbps, 100 Mbps, or 1000 Mbps. They can operate in half- and full-duplexmodes. Auto-sensing technology enables each port to automatically detectthe speed of the device connected to it (10 Mbps, 100 Mbps, or 1000 Mbps),and adjust its speed and duplex accordingly.G1-G2The switch is equipped with 2 auto-sensing 10 Mbps, 100 Mbps, or 1000Mbps Gigabit Ethernet network ports, which use RJ-45 connectors. They canoperate in half- and full-duplex modes.mini-GBIC (1-2)The mini-GBIC (gigabit interface converter) port is a connection point fora mini-GBIC expansion module, so the switch can be uplinked via fiber toanother switch.Linksys Voice System Wizard Guide17
Getting StartedIntroducing LVS EquipmentSLM224P Back PanelThe back panel has one port, the Power port, which is used to connect the power cord.Linksys Voice System Wizard Guide18
2Installation and Configuration Process Overview Installation and Configuration Process OverviewThis chapter provides an overview of the installation and configuration process.A. PreparationIn Chapter 3, “Preparation”, you learn about the equipment and service requirements, bandwidthrequirements, call capacity, and related topics , to ensure that the system is well designed to meet theneeds of the customer. This chapter also describes basic procedures such as downloading firmware,which should be completed before you begin installing the equipment.B. Connecting and Configuring the LVS Using the WizardIn this phase, you will physically connect the LVS equipment to the LAN, configure the voice features,call routing, localization and business features using the LVS Wizard. Chapter 4, “Connecting andConfiguring Your System” explains step-by-step use of the Wizard for the purpose of Installing andConfiguring your system.C. Testing the LVS Installation and ConfigurationAfter the syste
LVS with ITSP Service, PSTN Access and Local Voice Mail Service 24 ITSP Service, PSTN and ISDN Access and Local Voice Mail Service 25 . Service Providers User Guide for chosen switch User Guide for chosen router Finding Information in PDF Files The PDF Find/Search tool lets you find information quickly and easily online You can: