Transcription
DVG-7111SVoIP Telephone AdapterUser’s ManualVersion 1.0(1 Sep. 2008)
2008 D-Link Corporation. All rights reserved.Reproduction in any manner whatsoever without the written permission of D-Link Corporation is strictly forbidden.Trademarks used in this text: D-Link and the D-Link logo are trademarks of D-Link Corporation/D-Link SystemsInc.; Other trademarks and trade names may be used in this document to refer to either the entities claiming themarks and names or their products. D-Link Corporation disclaims any proprietary interest in trademarks and tradenames other than its own.Warranty: please contact your D-Link Authorized Reseller or the D-Link Branch Office nearest your place ofpurchase for information about the warranty offered on your D-Link product.Information in this document is subject to change without notice.FCC WarningThis equipment has been tested and found to comply with the limits for a Class B digital device, pursuant to Part 15of the FCC Rules. These limits are designed to provide reasonable protection against harmful interference in aresidential installation. This equipment generates, uses, and can radiate radio frequency energy and, if not installedand used in accordance with the instructions, may cause harmful interference to radio communication. However,there is no guarantee that interference will not occur in a particular installation. If this equipment does cause harmfulinterference to radio or television reception, which can be determined by turning the equipment off and on, the useris encouraged to try to correct the interference by one or more of the following measures:‧ Reorient or relocate the receiving antenna.‧ Increase the separation between the equipment and receiver.‧ Connect the equipment into an outlet on a circuit different from that to which the receiver is connected.‧ Consult the dealer or an experienced radio/TV technician for help.CE Mark WarningThis is a Class B product. In a domestic environment, this product may cause radio interference in which case theuser may be required to take adequate measures.Warnung!Dies ist ein Produkt der Klasse B. Im Wohnbereich kann dieses Produkt Funkstoerungen verursachen. In diesemFall kann vom Benutzer verlangt werden, angemessene Massnahmen zu ergreifen.Precaución!Este es un producto de Clase B. En un entorno doméstico, puede causar interferencias de radio, en cuyo case, puederequerirse al usuario para que adopte las medidas adecuadas.Attention!Ceci est un produit de classe B. Dans un environnement domestique, ce produit pourrait causer des interférencesradio, auquel cas l utilisateur devrait prendre les mesures adéquates.Attenzione!Il presente prodotto appartiene alla classe B. Se utilizzato in ambiente domestico il prodotto può causare interferenzeradio, nel cui caso è possibile che l utente debba assumere provvedimenti adeguati.
Contents1. Introduction . 41-1 Product Overview . 41-2 Hardware Description . 52. Getting Started . 73. VoIP TA Web Configuration. 143-1 SETUP. 173-1-1 Internet Setup. 173-1-2 VoIP Setup . 213-1-3 LAN Settings . 263-1-4 Time and Date. 273-2 ADVANCED. 283-2-1 VoIP. 283-2-2 Access Control . 593-2-3 Firewall and DMZ . 603-2-4 Advanced Network . 663-3 MAINTENANCE. 713-3-1 Device Management . 713-3-2 Backup and Restore. 723-3-3 Firmware Update. 743-3-4 Dynamic DNS. 753-3-5 Log Settings . 763-3-6 Diagnostics. 773-3-7 Provision. 783-3-8 CDR. 803-4 STATUS. 813-4-1 Device Info . 813-4-2 VoIP Status. 823-4-3 LAN Client . 833-4-4 Statistics . 843-4-5 Logout . 844. Configuring the VoIP TA through IVR . 854-1 IVR (Interactive Voice Response) . 854-1-1 IVR Functions Table: . 864-2 IP Configuration Settings—Set the IP Configuration of the WAN Port. 874-2-1 PPPoE Character Conversion Table: . 895. Dialing Principles . 905-1 Dialing Options . 905-2 Number Translation . 905-3 Routing . 91Appendix . 93Product Features . 93
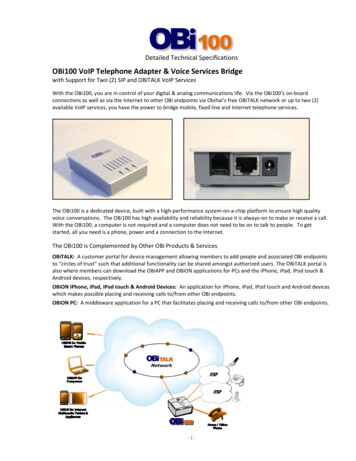
DVG-7111S User’s ManualProduct Overview1. Introduction1-1 Product OverviewThe DVG-7111S is designed to carry both voice and facsimile over the IP network. It uses the industrystandard SIP call control protocol so as to be compatible with free registration services or VoIP serviceproviders’ systems. As a standard user agent, it is compatible with all common Soft Switches and SIP proxyservers. While running optional server software, the VoIP TA can be configured to establish a private VoIPnetwork over the Internet without a third-party SIP Proxy Server.The DVG-7111S can be seamlessly integrated into an existing network by connecting to a phone set and faxmachine. With only a broadband connection such as an ADSL bridge/router, a Cable Modem or a leased-linerouter, the VoIP TA allows you to use voice and fax services over IP in order to reduce the cost of all longdistance calls.The DVG-7111S can be configured a fixed IP address or it can have one dynamically assigned by DHCP orPPPoE. It adopts either the G.711, G.726, G.729A or G.723.1 voice compression format to save networkbandwidth while providing real-time, toll quality voice transmission and reception.D-Link Systems, Inc.4
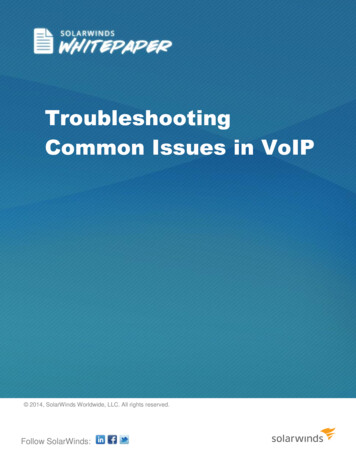
DVG-7111S User’s ManualTelephone Interface Description1-2 Hardware DescriptionFront PanelPower, Prov./Alm Indicator: Green light indicates a normal powersupply. Red light indicates when performing a self-test/booting up orthe DVG-7111S’s abnormal operation.Reg. Indicator: The Register LED will light up solid when the VoIP TAis connected to a VoIP service provider. The LED will blink if notconnected to a service provider or failed to register to a serviceprovider.Phone Indicator: This LED displays the VoIP status and Hook/Ringingactivity on the phone port that is used to connect your normaltelephone(s). If a phone connected to a phone port is off the hook orin use, this LED will light solid. When a phone is ringing, the indicatorwill blink.Line Indicator: Light on means the line is in use (off-hook).Note: When starting up DVG-7111S, all indicators will light up. After about 40 seconds, the Reg.indicator will blink in green. If the Prov./Alm indicator continues to blink, it means DVG-7111S iscurrently communicating with ISP and has yet to obtain an IP address or fail to register to VoIPService Provider.Left SideRST: Use to Restore to factory default:(1) Power on.(2) Press and hold the reset button for 5 seconds.(3) Release the reset button. Factory settings will be restored.D-Link Systems, Inc.5
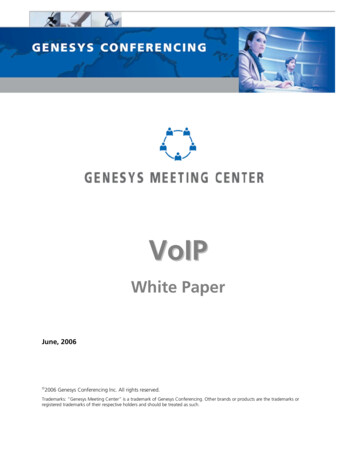
DVG-7111S User’s ManualTelephone Interface DescriptionRear Panel1.2.3.4.5.WAN: Connect to your broadband modem using an Ethernet cable.LAN: Connect to your Ethernet enabled computers using Ethernet cabling.Phone Port: Connect to your phones using standard phone cabling (RJ-11).Power Receptor: Receptor for the provided power adapter.Line: Connect to your original telephone line on the wall jack with RJ-11 cable.WARNING: DO NOT connect any phone port directly to a PSTN line (FXS to PSTN) or to aninternal PBX line (FXS to PBX extension). Doing so may damage your VoIP TA.D-Link Systems, Inc.6
DVG-7111S User’s ManualSETUP2. Getting StartedTo access the web-based configuration utility, open a web browser such as Internet Explorer and enter the IPaddress of the DVG-7111S.Open your Web browser and typehttp://192.168.8.254 into the URL addressbox. Press the Enter or Return Key.Click Login to enter Web Site.D-Link Systems, Inc.7
DVG-7111S User’s ManualSETUPClick Setup Wizard.Click Next.D-Link Systems, Inc.8
DVG-7111S User’s ManualSETUPThe username of ADMIN and USER havebeen defined and locked by default. It ishighly recommended to create a loginpassword to keep your router secure.Click Next.D-Link Systems, Inc.9
DVG-7111S User’s ManualSETUPEnter a NTP server or use the defaultserver.Click Next.D-Link Systems, Inc.10
DVG-7111S User’s ManualSETUPSelect your Internet connection type:DHCP – Most Cable ISPs or if you areconnecting the DVG-7111S behind a router.Static IP – Select if your ISP supplied you withyour IP settings.PPPoE – Most DSL ISPs.PPTP – Select if required by your ISP.Select Manual to manually enter IP address ofDNS or select Auto if DNS is assigned by ISP.Click Next.D-Link Systems, Inc.11
DVG-7111S User’s ManualSETUPRegister to the SIP Proxy Server by clicking Enable support of SIP Proxy Server. Enter Proxy ServerIP/Domain and Port.Outbound Proxy Support is optional. To register, please click on the Outbound Proxy Support box and enterOutbound Proxy IP/Domain and Port in it.Registration by phone line: Enter Number, User ID/Account and Password supplied by your ITSP. Check on theRegister box to register to Proxy Server.Click Next.D-Link Systems, Inc.12
DVG-7111S User’s ManualSETUPSetup is finished. Check the summary of yoursettings. To make new settings effective, youmust click on the Restart button to reboot theDVG-7111S.Click Restart.D-Link Systems, Inc.13
DVG-7111S User’s ManualSETUP3. VoIP TA Web ConfigurationDuring configuration, please follow the Setup Hint for some specific procedure in case the VoIP TA failsto make the changes active.Situation 1: (example: Internet Setup)1.2.3.Setup Hint:Select DHCP WAN Setup.Click “Apply”.Click “Save and Restart” to make change take effect.D-Link Systems, Inc.14
DVG-7111S User’s ManualSETUPSituation 2: (example: VoIP Service Provider)1.2.3.Setup Hint:Click “Edit” to start configuration.Click “Apply” after settings.Go to “MAINTAINACE”- “Backup and Restore” save settings and reboot the system.D-Link Systems, Inc.15
DVG-7111S User’s ManualSETUPSituation 3: (example: Enable IP Filtering)1.2.3.4.5.Setup Hint:Click “Enable IP Filtering” check box to open the main screen.Click “Add” to enter an entry.After Adding an entry, you have to click “Apply”.Don’t forget to click “Apply” which in the filed of “Enable IP Filtering”.After settings, save and reboot.1423D-Link Systems, Inc.16
DVG-7111S User’s ManualSETUP3-1 SETUP3-1-1 Internet SetupWAN (Wide Area Network) Settings are used to connect to your ISP (Internet Service Provider). TheWAN settings are provided to you by your ISP and oftentimes referred to as "public settings". Pleaseselect the appropriate option for your specific ISP.IP Configuration (Setting WAN Port)There are five methods of obtaining a WAN port IP address:1.DHCP, which means a Dynamic IP (Cable Modem)2.Static IP3.PPPoE (dial-up ADSL)4.PPTPMethods for using DHCP and PPPoE for obtaining an IP address may vary. If you are not familiar withcreating a network connection, please contact your local ISP.After selecting the suitable option, click Accept at the bottom of the screen to save the settings.You need to save the changes and restart the VoIP TA to make the changes active. Saving the settings:Click MAINTENANCE and select Save/Restart in System from the left menu. Tick Save Settings andRestart, then click Accept. Wait for about 40 seconds before the VoIP TA obtaining an IP address bythe method you selected.Note: When the system has obtained a new IP address, and you are using a WAN port to enter theWeb Configuration Screen, the new IP address has to be used before you can get connected to theVoIP TA. The same principle applies to the next two settings.D-Link Systems, Inc.17
DVG-7111S User’s ManualSETUPSETUP Internet SetupSETUP Internet SetupDHCP: Select this option if your ISP (Internet Service Provider) provides you an IP addressautomatically. Cable modem providers typically use dynamic assignment of IP Address. The Host Namefield and Vendor Class ID are optional but may be required by some Internet Service Providers.SETUP Internet SetupStatic IP: Select this option if your ISP (Internet Service Provider) provides you a Static IP address.Enter the IP address, Subnet Mask and Default Gateway IP.D-Link Systems, Inc.18
DVG-7111S User’s ManualSETUPSETUP Internet SetupPPPoE: Select this option if your ISP requires you to use a PPPoE (Point-to-Point Protocol overEthernet) connection. Enter the PPPoE Account, PPPoE Password and re-enter Password toconfirm.SETUP Internet SetupPPTP: Point-to-Point Tunneling Protocol (PPTP) is a WAN connection. Enter the IP Address, Subnetmask, PPTP Server, PPTP ID and Password.D-Link Systems, Inc.19
DVG-7111S User’s ManualSETUPSETUP Internet SetupDomain Name Server Assignment: Select Auto or Manual to get the IP address of Domain NameServer assigned by ISP or manually.Domain Name Server IP: Enter the primary and secondary IP address of Domain Name Server ifDomain Name Server Assignment is Manual. Otherwise, the VoIP TA will not be able to access hostsusing hostnames instead of IPs.SETUP Internet SetupFactory Default MAC Address: The original MAC address of the VoIP TA.Your MAC Address: It is left blank as you log-in via the WAN port.Current MAC Address: It shows the current MAC Address if you ever used the different MAC addressfrom Factory Default MAC Address. You can click Clone to automatically copy the MAC address of theEthernet Card installed in the computer used to configure the device.Note: This is only necessary to fill the field if required by your ISP.SETUP Internet SetupFactory Default MAC Address: The original MAC address of the VoIP TA.Your MAC Address: It is left blank as you log-in via the WAN port.Current MAC Address: It shows the current MAC Address if you ever used the different MAC addressfrom Factory Default MAC Address. You can click Clone to automatically copy the MAC address of theEthernet Card installed in the computer used to configure the device.Note: This is only necessary to fill the field if required by your ISP.D-Link Systems, Inc.20
DVG-7111S User’s ManualSETUP3-1-2 VoIP SetupIn this section, it supports registration to multiple Proxy Servers which is allowed to choose VoIPService Providers by user manually. If any registration problem occurs, please consult your VoIPService Provider.SETUP VoIP SetupClink Edit icon to modify the settings.The same configurations and applications apply to three Proxy Servers. Select one of three ProxyServers for SIP configuration.SETUP VoIP SetupEnable Support of SIP Proxy Server / Soft Switch: Check the box to register the VoIP TA with SIPproxy server or soft switch.ITSP Name: Enter the name of VoIP Service Provider.D-Link Systems, Inc.21
DVG-7111S User’s ManualSETUPSETUP VoIP SetupNumber: Enter the number, text or number and text in this field. It is the Caller ID for the called partywhen you make a VoIP call. If you register the VoIP TA to a SIP proxy server, then it should be thenumber that provided by SIP proxy server. Number and User ID/Account are usually the same frommost SIP proxy severs. Each line has a number. And the number of each line is not reiteration.Register: Check the box to register with SIP proxy server.Invite with ID / Account: Check the box to call through SIP proxy server without registration. It isalways ticked when Register is also ticked. Most VoIP Service Providers will interdict the connectionwithout registration.User ID/Account: User ID/Account are usually the same as Number from most SIP proxy severs.Password: Enter password and re-enter to confirm.D-Link Systems, Inc.22
DVG-7111S User’s ManualSETUPSETUP VoIP SetupProxy Server IP/Domain: Enter the IP address or URL (Uniform Resource Locator) of SIP proxy serveror soft switch.Proxy Server Port: Enter the SIP proxy server’s listening port for the SIP in this field. Leave this field tothe default if your VoIP Service Provider did not give you a server port number for SIP.Proxy Server Realm: Enter the realm for SIP proxy server. It is used for authentication in a SIP server.In most cases, the VoIP TA can automatically detect your SIP server realm. So you can leave thisoption blank. However, if your SIP server requires you to use a specific realm you can manually enter itin.TTL (Registration interval) [10-7200 s]: Enter the desired time interval at which the VoIP TA willreport to your SIP proxy server.SIP Domain: Enter the SIP domain provided by your VoIP Service Provider. (Note some SIP proxyservers might not require this.) If you enable “Uses Domain to Register”, the VoIP TA will register to theSIP proxy server with the domain name you filled in. Otherwise, the VoIP TA will register to a SIP proxyserver with the IP it resolves.Use Domain to Register: Check the box to use Domain to register with SIP proxy server. The VoIP TAis registered to the SIP proxy server with IP address if un-ticked.Note: Proxy Server Realm, SIP Domain and Use Domain to Register are the parameters providedby VoIP Service Provider. If you fail to make a call, please contact your VoIP Service Provider.Bind Proxy Interval for NAT: Check the box to keep the binding exist by sending packets when theVoIP TA is behind a NAT and SIP proxy server is not able to keep the binding.Initial Unregister: Check the box to send an unregistered message initially by the VoIP TA and then itwill perform a general register process.D-Link Systems, Inc.23
DVG-7111S User’s ManualSETUPSETUP VoIP SetupOutbound Proxy Support: Check the box to send all SIP packets to the destined outbound proxyserver. An outbound proxy server handles SIP call signaling as a standard SIP proxy server would do.Further, it receives and transmits phone conversation traffic (media) between two communicationparties. This option tells the VoIP TA to send and receive all SIP packets to the destined outboundproxy server rather than the remote VoIP device. This helps VoIP calls to pass through any NATprotected network without additional settings or techniques. Please make sure your VoIP ServiceProvider supports outbound proxy services before you enable it.Outbound Proxy IP/Domain: Enter the outbound proxy’s IP address or URL.Outbound Proxy Port: Enter the outbound proxy’s listening port.SETUP VoIP SetupEnable P-Assert: Check the box to enable the caller ID protection.Privacy Type: It is used to disguise the caller ID when queried via an VoIP Service Provider/Third-PartyAssertion. The Privacy Type includes ‘user’, ‘header’, ‘session’, ‘none’, ‘critical’, ‘id’ and ‘history’.SETUP VoIP SetupThe rule of dialing of inviting to VoIP Service Providers may vary. That is, you have to configuredifferent Digit Map for different VoIP Service Providers. In this filed, you can configure individual dialingplan for each VoIP Service Provider. The following examples introduce some cases. For generalconfiguration, refer to Digit Map page.Note: Press “Add” to add an entry. Don’t forget to press “Apply” which in the above of NumberTranslation.D-Link Systems, Inc.24
DVG-7111S User’s ManualSETUPFor example (Example in Taiwan),If Server 1 is local VoIP Service Provider you can refer to Digit Map page for general settings.If Server 2 is global VoIP Service Provider (VoIP STUN, free to dial to some cities free charge) you canset individual dialing plan for VoIP STUN in Number Translation field. Scan Code can be your dialingcustom, and VoIP Dial-out is the number on the basis of the dialing rule needed by VoIP STUN. Itsdialing rule is Country code Area Code phone number. When you make calls to Taipei through VoIPSTUN, you don’t change the dialing custom, just dial 02xxxxxxxx, and the system will change thenumber from 02xxxxxxx to 8862xxxxxxxx. The same rule is for #2. When you make calls to UK via VoIPSTUN, you’ll dial 00244xxxxxx, and the system will change it to 44xxxxxx.The settings for Server 2 appear like:If Server 3 is a VoIP Service Provider in UK, you can set individual dialing plan in Number Translationfield. As you make calls to UK through this VoIP Service Provider, “Country code” should be removedand plus “0” by the system. The settings for Server 3 appear like:D-Link Systems, Inc.25
DVG-7111S User’s ManualSETUP3-1-3 LAN SettingsSETUP LAN SetupInterface Mode: Select the VoIP TA serving as a Router with NAT or Bridge between WAN port andLAN port without NAT.Note: It is still accessible if LAN Interface Mode is Bridge.LAN Port Address: Enter the LAN IP address of the VoIP TA. It is also the default gateway for DHCPclients.Subnet Make: Enter the subnet mask for DHCP clients.Enable DHCP Server: This variable is to assign the IP address for the devices connected to LAN portof the VoIP TA.IP Pool Starting Address: Enter the starting IP address for the DHCP server's IP assignment.IP Pool Ending Address: Enter the ending IP address for the DHCP server's IP assignment.IP Pool Uses Other Default Gw: Check the box to assign different default gateway for DHCP clients.IP Pool Default Gateway: Enter the new default gateway that is different from LAN IP of the VoIP TA.IP Pool Subnet mask: Enter the new subnet mask.D-Link Systems, Inc.26
DVG-7111S User’s ManualSETUPLease Time: Enter the length of time for the IP lease.Domain Name Server Assignment: Select Auto or Manual to get the IP address of Domain NameServer assigned by ISP or manually.Domain Name Server IP: Enter the primary and secondary IP address of Domain Name Server ifDomain Name Server Assignment is Manual. Otherwise, the VoIP TA will not be able to access hostsusing hostnames instead of IPs.3-1-4 Time and DateSETUP Time and DateAutomatically synchronize with Internet time servers: The VoIP TA should automatically sync upwith time servers.First NTP time server: Select the desired domain name of a NTP server as first priority.Second NTP time server: Select the domain name of a NTP server as second priority.Current Router Time: It shows the current time of the VoIP TA.Time Zone: Select your time zone from the drop-down menu.D-Link Systems, Inc.27
DVG-7111S User’s ManualADVANCED3-2 ADVANCED3-2-1 VoIP3-2-1-1 Caller FilterThis function allows you to accept or reject any incoming call from the IP address listed in the filter rule.The call from the IP address of SIP proxy server is always accepted, despite Deny is selected or the IPaddress of SIP proxy server is not in the filter rule of Allow.ADVANCED VoIP Caller FilterCaller Filter: It is to allow or deny the filter rule.Status: It is to show the status of enable or disable.Filter IP Address: Enter the start IP address which you would like to Allow or Deny.Subnet mask: Enter the subnet mask you would like to Allow or Deny.D-Link Systems, Inc.28
DVG-7111S User’s ManualADVANCED3-2-1-2 Caller IDADVANCED VoIP Caller IDFXS Caller ID Generation: Select DTMF, FSK or FSK Type II Caller ID to enable the caller ID displayfunction on FXS port. When enabled, the caller’s phone number will be displayed on your phone setwhen the call comes through. FSK Type II Caller ID is used for displaying the caller ID when receivingcall waiting calls.Note: Make sure that your phone set supports Type II Caller ID before you select it.Send Caller ID After The Firs Ring: Check the box to send the caller ID after the first ring by FXS port;otherwise, the caller ID is sent before the first ring.FXO Caller ID Detection: Check the box to active FXO port to detect the caller ID from PSTN side.Detection Level: Select the level for FXO detecting the caller ID.FSK Caller ID Type: Either Bellcore or ETSI can be selected.D-Link Systems, Inc.29
DVG-7111S User’s ManualADVANCED3-2-1-3 Calling FeaturesADVANCED VoIP Calling FeaturesDo Not Disturb: Check the box to reject (busy tone played) incoming calls.Unconditional Forward: Check the box to forward incoming calls to the assigned “ForwardingNumber” automatically. If configured forwarding to FXO it only makes FXO hook off, but not makingFXO dial out.Busy Forward: Check the box to forward incoming calls to the “Forward incoming Number” when theline is busy.No Answer Forward: Check the box to forward incoming calls to the “Forward incoming Number” afterFXS port ringing timeout (configurable from 10 to 60 seconds) expires.Call Hold: Check the box to hold the call on the specific FXS port.Note: Call Transfer or Call Waiting can only be activated when Call Hold is checked.Call Transfer: Check the box to transfer the call to another destination (FXS port only).Call Waiting: Check the box to accept incoming call while talking (FXS port only).Local Mixer: Check the box to setup the build-in conference call when your VoIP Service Provider didnot support Three-Way Calling service.D-Link Systems, Inc.30
DVG-7111S User’s ManualADVANCEDADVANCED VoIP Calling FeaturesEnable Call Feature Code: Check the box to enable/disable some call feature codes through a phoneset.Call Feature Code Instructions:1. If you would like enable DND function of FXS, pick up the phone connected to FXS and dial “*74#”.2. If you would like enable Unconditional Forward of FXS and assign the number, pick up the phoneand dial “*77 0912345678#”. 0912345678 is the number which the
DVG-7111S VoIP Telephone Adapter User's Manual Version 1.0 (1 Sep. 2008)