Transcription
Nespresso Inissia DisassemblyGuide ID: 126345 - Draft: 2019-11-05Nespresso Inissia DisassemblyFull disassembly to expose all replaceable parts.Written By: Léon WittemanThis document was generated on 2019-11-17 01:35:45 AM (MST). iFixit — CC BY-NC-SAwww.iFixit.comPage 1 of 13
Nespresso Inissia DisassemblyGuide ID: 126345 - Draft: 2019-11-05INTRODUCTIONThe machine in question is from Magimix. The other available version (Krups) is very similar and thisguide should be applicable to those.First of all consider your machine’s warranty (usually 2 years), after (partial) disassembly you’re noteligible for warranty anymore.Unplug the machine and find a workplace that you’re not afraid to scratch, which I found out the hardway.TOOLS:Flathead Screwdriver (1)Flathead 3/32" or 2.5 mm Screwdriver (1)T20 Torx Screwdriver (1)Small Chain Nose Pliers (1)This document was generated on 2019-11-17 01:35:45 AM (MST). iFixit — CC BY-NC-SAwww.iFixit.comPage 2 of 13
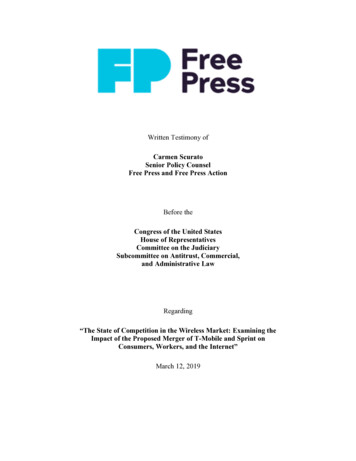
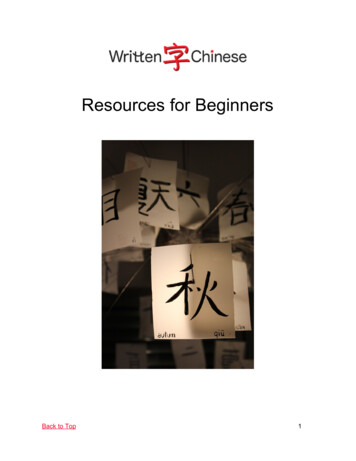
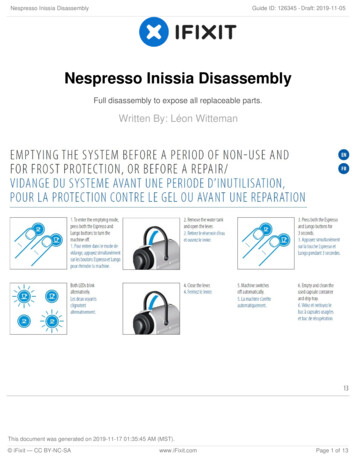
Nespresso Inissia DisassemblyGuide ID: 126345 - Draft: 2019-11-05Step 1 — Emptying the machine Remove all water from the system. (From the Nespresso manual.) image 2: exploded view of the machine. Source: buyspares.comStep 2 — Remove the first part Pull straight forward with a fair amount of force. Once you hear a click, pull the part straight down. This should go easilly.This document was generated on 2019-11-17 01:35:45 AM (MST). iFixit — CC BY-NC-SAwww.iFixit.comPage 3 of 13
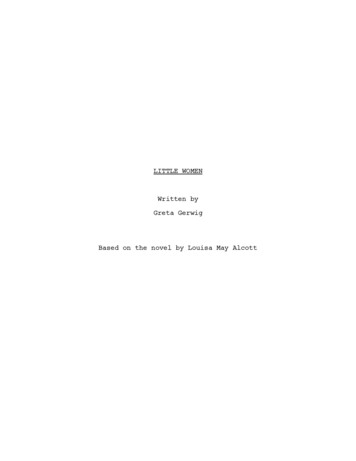
Nespresso Inissia DisassemblyGuide ID: 126345 - Draft: 2019-11-05Step 3 — Remove the handle Use a T20 torx bit (star-shaped). A screwdriver that fits should work fine.Step 4 — Remove side cover 1/2 Close the cup-holder firmly. Photo's 2 and 3, push the screwdriver in and wiggle a bit to undo the clips. There's a total of 4clips.This document was generated on 2019-11-17 01:35:45 AM (MST). iFixit — CC BY-NC-SAwww.iFixit.comPage 4 of 13
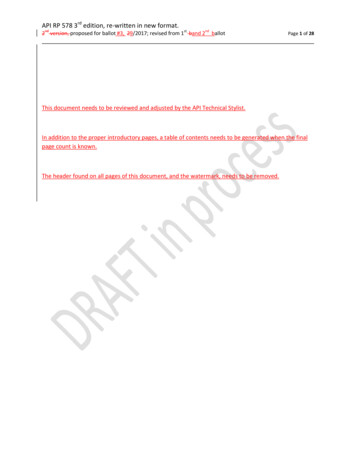
Nespresso Inissia DisassemblyGuide ID: 126345 - Draft: 2019-11-05Step 5 — Remove side cover 2/2 Make sure the notch lines up. Pull the cover away. Once there's a little room, move your fingers up a bit and pull on the sides.Step 6 — Remove other side cover Repeat on the other sideThis document was generated on 2019-11-17 01:35:45 AM (MST). iFixit — CC BY-NC-SAwww.iFixit.comPage 5 of 13
Nespresso Inissia DisassemblyGuide ID: 126345 - Draft: 2019-11-05Step 7 — Remove the white clip Insert wisdom here.Step 8 — Remove power wires Unplug the device first! Remove ground, life and neutral wires. Remove the whole wire from its slot.This document was generated on 2019-11-17 01:35:45 AM (MST). iFixit — CC BY-NC-SAwww.iFixit.comPage 6 of 13
Nespresso Inissia DisassemblyGuide ID: 126345 - Draft: 2019-11-05Step 9 — Remove the water tank seat Unclip the clips using a thinscrewdriverStep 10 — Remove inner housing first side Pry loose on these four spots and remove.This document was generated on 2019-11-17 01:35:45 AM (MST). iFixit — CC BY-NC-SAwww.iFixit.comPage 7 of 13
Nespresso Inissia DisassemblyGuide ID: 126345 - Draft: 2019-11-05Step 11 — Remove inner housing second side Photo 1: Using leverage, pull up. Photo 2: unclip the two clips on the inside of the cover. Photo 3: turn over and lift the cover off.Step 12 — Remove the lever seats Push on the assembly, front to back, to free up the lever seats. Then pull them out.This document was generated on 2019-11-17 01:35:45 AM (MST). iFixit — CC BY-NC-SAwww.iFixit.comPage 8 of 13
Nespresso Inissia DisassemblyGuide ID: 126345 - Draft: 2019-11-05Step 13 The top part can be removed byhaving the metal pins follow the slotsin an L shape.Step 14 Pry open both clips on one side of the spout, then both on the other side.This document was generated on 2019-11-17 01:35:45 AM (MST). iFixit — CC BY-NC-SAwww.iFixit.comPage 9 of 13
Nespresso Inissia DisassemblyGuide ID: 126345 - Draft: 2019-11-05Step 15 Mark one of the black leads for proper reinstallation. Remove the yellow and brown wire. And the white connector.Step 16 Wiggle loose the last bit of black plastic. Pry off the white and black water lines.This document was generated on 2019-11-17 01:35:45 AM (MST). iFixit — CC BY-NC-SAwww.iFixit.comPage 10 of 13
Nespresso Inissia DisassemblyGuide ID: 126345 - Draft: 2019-11-05Step 17 These clips are tricky to remove. Photo 1: Pull open and down one of the ends. Photo 2: with a small/tiny screwdriver puch the wire down as far as you're able to and hold firmlywith your finger. Photo 3: While holding the latter firmly, open up and move down the other part of the wire. Thismight require a few tries.Step 18 Photo 1 and 2, note the tapered edges, these hold the wire clip in place. Reinstallation is simple,just push the on again. This was as far as I was able to go. In my case the part shown on the right in photo 3 was leakingin between the metal and plastic. Sadly it couldn't be disassembled any further.This document was generated on 2019-11-17 01:35:45 AM (MST). iFixit — CC BY-NC-SAwww.iFixit.comPage 11 of 13
Nespresso Inissia DisassemblyGuide ID: 126345 - Draft: 2019-11-05Step 19 Assembly is the reverse of disassembly. The next steps are some points of note. Photo 1: reverse of step 11: The easiest way to reassemble the side is to lay it flat and lower theinner body onto the side. Photo 2: reverse of step 11: Make sure the black line goes over the white one. Fit the rubber collar back over the pump.Step 20 Photo 1: Don't forget this cover. Photo 2: reverse of step 10: make sure the clips line up with the slots.This document was generated on 2019-11-17 01:35:45 AM (MST). iFixit — CC BY-NC-SAwww.iFixit.comPage 12 of 13
Nespresso Inissia DisassemblyGuide ID: 126345 - Draft: 2019-11-05To reassemble your device, follow these instructions in reverse order, please take note of steps 19 and20.This document was generated on 2019-11-17 01:35:45 AM (MST). iFixit — CC BY-NC-SAwww.iFixit.comPage 13 of 13
(From the Nespresso manual.) image 2: exploded view of the machine. Source: buyspares.com Step 2 — Remove the first part Pull straight forward with a fair amount of force. Once you hear a click, pull the part straight down. This should go easilly. Nespresso Inissia Disassembly Guide ID: 126345