Transcription
FIBERME Communications LLC.Configuring FAG410X with FreePBX
Table of ContentsOVERVIEW . 3CONNECT FreePBX TO FAG410X USING PEER SIP TRUNK . 4Create IVR On FreePBX .4Create Peer SIP TRUNK On FreePBX . 5Configure Outbound Rule On FreePBX .5Configure Inbound Rule On FreePBX .6Connect FAG410X with FreePBX .7Configure FXO Port on FAG410X . 8Create Port Group on FAG410X . 9REGISTER FAG410X ON FreePBX AS AN EXTENSION . 10Create SIP Extension on FreePBX . 10Configure FAG410X SIP Account as a Registered Extension on FreePBX . 10FAG410X CALL Routing . 12Configure IP to Tel on FAG410X . 12Configure TEL to IP on FAG410X . 13Page 1
Table of FiguresFigure 1: Create IVR on FreePBX . 4Figure 2: Create Peer SIP Trunk on FreePBX . 5Figure 3: Configure Outbound Rule on FreePBX . 6Figure 4: Configure Inbound Rule on FreePBX . 6Figure 5: Connect FAG410X with FreePBX: Registrar IP Address . 7Figure 6: Connect FAG410X with FreePBX: Register Gateway . 8Figure 7: Configure FXO Port on FAG410X: Modify Port . 8Figure 8: Configure FXO Port on FAG410X: Port Configurations . 8Figure 9: Create Port Group on FAG410X: Add New . 9Figure 10: Create Port Group on FAG410X: Group Configurations . 9Figure 11: Create SIP Extension on FreePBX. 10Figure 12: FAG410X SIP Account Settings . 10Figure 13: FAG410X Registrar IP Address . 11Figure 14: FreePBX - SIP Extension Status . 11Figure 15: FAG410X – IP to TEL . 12Figure 16: IP to TEL Settings . 12Figure 17: FAG410X – TEL to IP . 13Figure 18: TEL to IP Settings . 13Page 2
OVERVIEWThis document describes basic configuration to interconnect FreePBX and FAG410X. In this document, weare using FAG4108 as an example. The following methodology can be used for the FAG4104 as well. Thisis typically applied to the scenario where users would like to add a FAG410X not only as a remote extensionbut also as an external PSTN trunk.There are two ways to set up the FreePBX with the FAG410X. Method 1: Configure FAG410X as a SIP Peer Trunk. Method 2: Register FAG410X on FreePBX directly as an extension.Page 3
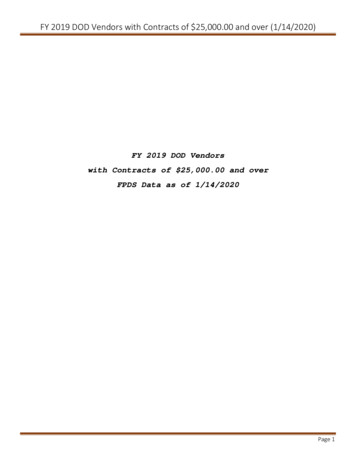
CONNECT FreePBX TO FAG410X USING PEER SIP TRUNKCreate IVR On FreePBXOn the FreePBX web GUI, create an IVR extension under Applications - IVR - Add IVR.In IVR settings, if "Direct Dial" is enabled, the calls dialing into the FreePBX IVR will be able to reach theinternal extensions registered to FreePBX. Also, you can assign the "IVR Entries" to different destinations.Figure 1: Create IVR on FreePBXPage 4
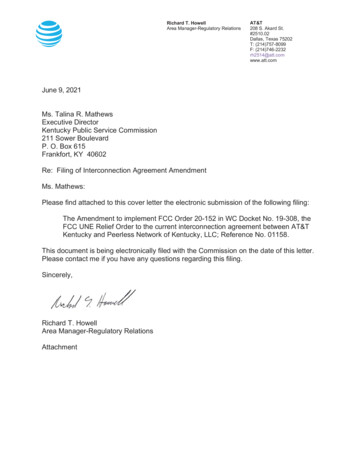
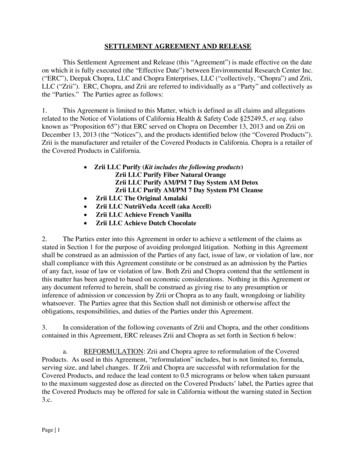
Create Peer SIP TRUNK On FreePBXOn the FreePBX web GUI, create a peer SIP trunk under Connectivity - Trunks - Add SIP (Chan pjsip)Trunk. In this example, the FAG4108 IP address is 192.168.99.239.Figure 2: Create Peer SIP Trunk on FreePBXConfigure Outbound Rule on FreePBXOn FreePBX web GUI, go to Connectivity - Outbound Routes - Add Outbound Route to create a newoutbound rule. This would allow the extension on FreePBX to reach numbers in PSTN network via the peer SIPtrunk we just configured.Page 5
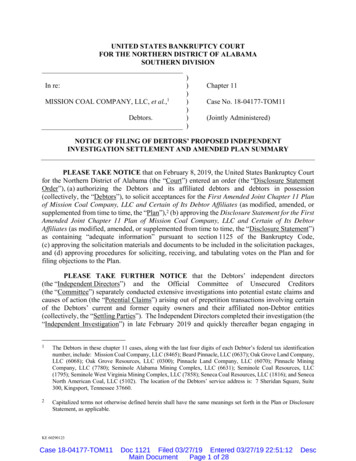
Figure 3: Configure Outbound Rule on FreePBXIn this example prefix "9", 9 is the first dialing digit and it will be stripped off when the callgoes out.Configure Inbound Rule on FreePBXOn FreePBX web GUI, go to Connectivity - Inbound Routes - Add Inbound Route to create a newinbound rule. In this example, we set the DID Number as 20000, which will be used in the FAG410X callforward setting.Figure 4: Configure Inbound Rule on FreePBXThe default destination is configured to IVR. Ensure to select the proper IVR.Page 6
Connect FAG410X with FreePBX1. On the FAG410X web GUI, go to the VoIP- SIP page and enterthe IP address of the FreePBX thatyou are peering with.Figure 5: Connect FAG410X with FreePBX: Registrar IP Address2. Please make sure the Register Gateway option under VoIP- SIP is set to No. In the followingexample, FreePBX Server has IP address 192.168.99.127.Figure 6: Connect FAG410X with FreePBX: Register GatewayPage 7
Configure FXO Port on FAG410X1. Connect the PSTN line to the FAG410X FXO port.2.On the FAG410X web GUI, go to the Port- FXO page and press Modify on the FXO port you willuse.Figure 7: Configure FXO Port on FAG410X: Modify Port3. Enter the SIP Account Number 20000 to be matched with the DID number we configured in FreePBXInbound Route.Figure 8: Configure FXO Port on FAG410X: Port ConfigurationsPage 8
Create Port Group on FAG410X1.On the FAG410X web GUI, go to the Port- Port Group page and press “Add New”.Figure 9: Create Port Group on FAG410X: Add New2.Select the FXO port you will use.Figure 10: Create Port Group on FAG410X: Group ConfigurationsPage 9
REGISTER FAG410X ON FreePBX AS AN EXTENSIONCreate SIP Extension on FreePBXTo manually create new SIP user, go to FreePBX web GUI Applications - Extensions - Add New SIP[chan pjsip] Extension. A new dialog window will show for users to fill in the extension information.Figure 11: Create SIP Extension on FreePBXConfigure FAG410X SIP Account as a Registered Extension on FreePBXUnder FAG410X web GUI- VoIP- SIP, please set Register Gateway to Yes, then enter SIP Extensioninformation created earlier in FreePBX. In this example, extension 1002 is used in order to register FAG410Xas an extension user on FreePBX.Figure 12: FAG410X SIP Account SettingsP a g e 10
Under FAG410X web GUI, VoIP- SIP, please fill in FreePBX information as explained in method 1.Figure 13: FAG410X Registrar IP AddressWe can check FreePBX SIP Extension Status to see if FAG410X has been successfully registered asan extension device. go to Admin - Asterisk-Cli, In CLI Command write “pjsip list contacts” and pressSend Command. “Avail” under Status means that the extension is registered successfully as belowscreenshot.Figure 14: FreePBX - SIP Extension StatusNow FAG410X is registered at FreePBX as an extension device. Please refer to method 1 in the previoussection to configure FXO Port settings on FAG410X.P a g e 11
FAG410X CALL RoutingConfigure IP to Tel on FAG410X1. On the FAG410X web GUI, go to the Route- IP TEL page, Press “Add New”.Figure 15: FAG410X – IP to TEL2. Enter the FreePBX Server IP address in “Source IP” and select the Port Group you will use from “CallDestination”.Figure 16: IP to TEL SettingsP a g e 12
Configure TEL to IP on FAG410X1. On the FAG410X web GUI, go to the Route- TEL IP page, Press “Add New”.Figure 17: FAG410X – TEL to IP2.Select the Port Group you will use from “Source Port Group” and enter the FreePBX Server IP addressin “Destination Address”.Figure 18: TEL to IP SettingsP a g e 13
On the FreePBX web GUI, create a peer SIP trunk under Connectivity - Trunks - Add SIP (Chan_pjsip) Trunk. In this example, the FAG4108 IP address is 192.168.99.239. Figure 2: Create Peer SIP Trunk on FreePBX Configure Outbound Rule on FreePBX On FreePBX web GUI, go to Connectivity - Outbound Routes - Add Outbound Route to create a new outbound .