Transcription
Owner’sManualDouble-Door, Double-Drawer,Stainless Steel, 0 GEmonogram.com
Consumer InformationStainless Steel RefrigeratorIntroductionYour new Monogram refrigerator makes an eloquent statement of style, convenience and kitchenplanning flexibility. Whether you chose it for its purity of design, practical storage arrangements orassiduous attention to detail—or for all of these reasons—you’ll find that your Monogram refrigerator’ssuperior blend of form and function will delight you for years to come.The information on the following pages will help you operate and maintain your refrigerator properly.If you have any other questions, visit our Website at: monogram.comContentsConsumer ServicesOperating InstructionsImportant Phone Numbers . . . . . . . . . . . . . . . . . .27Model and Serial Numbers . . . . . . . . . . . . . . . . . . . .3Performance Data Sheet . . . . . . . . . . . . . . . . . . . .25Problem Solver . . . . . . . . . . . . . . . . . . . . . . . . . .20–24Product Registration . . . . . . . . . . . . . . . . . . . . . . . . . .3Safety Instructions . . . . . . . . . . . . . . . . . . . . . . . . 4–7State of CaliforniaWater Treatment Device Certificate . . . . . . . . . .26Warranty . . . . . . . . . . . . . . . . . . . . . . . . . .Back CoverAutomatic Icemaker . . . . . . . . . . . . . . . . . . . . . . . . .17Additional Features . . . . . . . . . . . . . . . . . . . . . . . . . .15Crispers . . . . . . . . . . . . . . . . . . . . . . . . . . . . . . . . . . . . .16Internal Water Dispenser . . . . . . . . . . . . . . . . . . . .10Other Controls . . . . . . . . . . . . . . . . . . . . . . . . . . . . . . . .9Performance Air Flow System . . . . . . . . . . . . . . . . .8Shelves and Bins . . . . . . . . . . . . . . . . . . . . . . . . .12–14Temperature Controls . . . . . . . . . . . . . . . . . . . . . . . .8TurboCool . . . . . . . . . . . . . . . . . . . . . . . . . . . . . . . . . . .9Water Filter . . . . . . . . . . . . . . . . . . . . . . . . . . . . . . . . .11Care and CleaningCleaning—Outside and Inside . . . . . . . . . . . . . . . .18Light Bulb Replacement . . . . . . . . . . . . . . . . . . . . . 19Moving . . . . . . . . . . . . . . . . . . . . . . . . . . . . . . . . . . . . .18Vacation . . . . . . . . . . . . . . . . . . . . . . . . . . . . . . . . . . . .18BeforeusingyourrefrigeratorRead this manual carefully. It is intended to helpyou operate and maintain your new refrigeratorproperly.Keep it handy for answers to your questions.If you don’t understand something or needmore help, there is a list of toll-free consumerservice numbers included in the back sectionof this manual.ORVisit our Website at: monogram.com2
Consumer InformationStainless Steel RefrigeratorWritedownthe model& serialnumbersYou’ll see them on a label inside the fresh foodcompartment at the top on the right side.Please write these numbers on the ConsumerProduct Ownership Registration Card includedwith the packing material.Before sending in this card, please also writethese numbers here:Model NumberSerial NumberUse these numbers in any correspondenceor service calls concerning your refrigerator.If youreceived adamagedrefrigeratorImmediately contact the dealer (or builder) thatsold you the refrigerator.Save time& moneyBefore you request service, check the ProblemSolver in the back of this manual.It lists causes of minor operating problems thatyou can correct yourself.If youneedserviceTo obtain service, see the Consumer Servicespage in the back of this manual.For customers in Canada:We’re proud of our service and want you to bepleased. If for some reason you are not happywith the service you receive, here are steps tofollow for further help.For customers in the USA:FIRST, contact the people who serviced yourappliance. Explain why you are not pleased.In most cases, this will solve the problem.FIRST, contact the people who serviced yourappliance. Explain why you are not pleased.In most cases, this will solve the problem.NEXT, if you are still not pleased, write allthe details—including your phone number to:Manager, Consumer RelationsMabe Canada Inc.1 Factory Lane, Suite 310Moncton, N.B. E1C 9M3NEXT, if you are still not pleased, write allthe details—including your phone number—to:Manager, Customer RelationsGE AppliancesAppliance ParkLouisville, KY 402253
IMPORTANT SAFETY INSTRUCTIONSREAD AND SAVE THESE INSTRUCTIONSWARNING: When using thisappliance, always exercise basic safety precautions,including the following: Use this appliance only for its intended purposeas described in this Owner’s Manual. This refrigerator must be properly installed inaccordance with the Installation Instructionsbefore it is used. Do not allow children to climb, stand or hangon the shelves in the refrigerator. They coulddamage the refrigerator and seriously injurethemselves. Do not touch the cold surfaces in the freezercompartment when hands are damp or wet.Skin may adhere to these extremely cold surfaces. Do not store or use gasoline or other flammablevapors and liquids in the vicinity of this or anyother appliance. Keep fingers out of the “pinch point” areas:clearances between the doors and betweenthe doors and cabinet are necessarily small.Be careful closing doors when children arein the area. Unplug your refrigerator before cleaning andmaking repairs. NOTE: We strongly recommendthat any servicing be performed by a qualifiedindividual. Before replacing a burned-out light bulb,the refrigerator should be unplugged in orderto avoid contact with a live wire filament.(A burned-out light bulb may break whenbeing replaced.)NotE: Turning control to OFF does not removepower to the light circuit. Do not refreeze frozen foods which have thawedcompletely. In refrigerators with automatic icemakers,avoid contact with moving parts of the ejectormechanism, or with the heating element locatedon the bottom of the icemaker. Do not placefingers or hands on the automatic icemakingmechanism while the refrigerator is plugged in.DANGER: RISK OF CHILD ENTRAPMENTChild entrapment and suffocation are not problemsof the past. Junked or abandoned refrigerators arestill dangerous even if they will sit for “just a fewdays.” If you are getting rid of your old refrigerator,please follow the instructions below to help preventaccidents.Before you throw away your old refrigeratoror freezer: Take off the doors. Leave the shelves in place so that childrenmay not easily climb inside.REFRIGERANTSAll refrigeration products contain refrigerants, whichunder federal law must be removed prior to productdisposal.4If you are getting rid of an old refrigeration product,check with the company handling the disposalabout what to do.
MESURES DE SÉCURITÉ IMPORTANTESLIRE ET CONSERVER CES INSTRUCTIONSAVERtISSEMENt : Lorsquevous utilisez le réfrigérateur, observez toujourscertaines précautions de base, notamment : N’utilisez le réfrigérateur que pour son usageprévu, comme décrit dans le présent manuel. Installez le réfrigérateur conformément auxdirectives d’installation avant de l’utiliser. Ne laissez pas les enfants grimper, s’asseoir,se tenir debout ni se pendre aux clayettesdu réfrigérateur. Ils pourraient endommagerle réfrigérateur et se blesser gravement. Une fois le réfrigérateur en marche, ne touchezpas les surfaces froides du congélateur, surtoutsi vous avez les mains humides ou mouillées :la peau risque d’adhérer à ces surfaces trèsfroides. N’entreposez et n’utilisez pas d’essence ouautres vapeurs et liquides inflammables àproximité de cet appareil ou de tout autreappareil électroménager. Éloignez les doigts des parties du réfrigérateuroù l’on peut facilement se pincer : les espacesentre les portes et entre les portes et les placardssont toujours étroits. Soyez prudent lorsquevous fermez les portes de l’appareil en présencedes enfants. Débranchez votre réfrigérateur avantde le nettoyer et de le réparer. REMARQUE : Nousvous recommandons vivement de confier touteréparation à un technicien qualifié. Avant de remplacer une ampoule grillée,le réfrigérateur doit être débranché afind’éviter tout contact avec un fil sous tension.(Une ampoule grillée peut se briser pendantl’opération).REMARQUE : Lorsque vous placez la commandesur éteint, l’alimentation électrique de l’ampoulen’est pas coupée. Ne faites pas recongeler des aliments surgelésqui ont complètement dégelé. Pour les réfrigérateurs dotés d’une machineà glaçons automatique, évitez le contact avecles pièces mobiles du mécanisme éjecteur,ou avec l’élément chauffant situé à la partieinférieure de la machine à glaçons. Ne posezpas les doigts ou les mains sur le mécanismede la machine à glaçons pendant quele réfrigérateur est branché.DANGER: RISQUES POUR LES ENFANTSLes enfants pris au piège ou morts d’asphyxie sonttoujours d’actualité. Les appareils de réfrigérationabandonés sont toujours aussi dangereux, mêmesi on n’attend que “quelque jours” pour s’endébarasser. Si vous ne gardez pas votre ancienappareil, veuillez suivre les directives ci-dessousafin de prévenir les accidents.Avant de vous débarasser de votre vieuxappareil de réfrigération : Démontez les portes. Laissez les clayettes en place afin d’empêcherles enfants de grimper à l’intérieur.REFRIGERANTSTous les appareils de réfrigération contiennentdes refrigerants qui, conformément aux loisfédérales, doivent être enlevés avant touteélimination de l’appareil.Si vous vous débarrassez de vieux appareils deréfrigération, vérifiez, auprès de la société quis’occupe de leur élimination, ce que vousdevez faire.5
IMPORTANT SAFETY INSTRUCTIONSHOW TO CONNECT ELECTRICITYDo not, under any circumstances, cut or removethe third (ground) prong from the power cord.For personal safety, this appliance must beproperly grounded.The power cord of this appliance is equippedwith a 3-prong (grounding) plug which mateswith a standard 3-prong (grounding) wall outletto minimize the possibility of electric shockhazard from this appliance.Have the wall outlet and circuit checked bya qualified electrician to make sure the outletis properly grounded.Where a standard 2-prong wall outlet isencountered, it is your personal responsibilityand obligation to have it replaced with aproperly grounded 3-prong wall outlet.This provides the best performance and alsoprevents overloading house wiring circuits whichcould cause a fire hazard from overheated wires.Never unplug your refrigerator by pullingon the power cord. Always grip plug firmlyand pull straight out from the outlet.Repair or replace immediately all power cordsthat have become frayed or otherwise damaged.Do not use a cord that shows cracks or abrasiondamage along its length or at either end.When moving the refrigerator away from the wall,be careful not to roll over or damage the power cord.The refrigerator should always be plugged intoits own individual electrical outlet which hasa voltage rating that matches the rating plate.USE OF EXTENSION CORDSBecause of potential safety hazards undercertain conditions, we strongly recommendagainst the use of an extension cord.However, if you must use an extension cord, it isabsolutely necessary that it be a UL-listed, 3-wiregrounding type appliance extension cord havinga grounding type plug and outlet and thatthe electrical rating of the cord be 15 amperes(minimum) and 120 volts.SAVE THESE INSTRUCTIONS6
MESURES DE SÉCURITÉ IMPORTANTESRACCORDEMENT ÉLECTRIQUENe coupez ni retirez en aucun cas la troisièmebroche (mise à la terre) de la fiche du cordond’alimentation. Pour votre sécurité, cet appareildoit être correctement mis à la terre.Le cordon d’alimentation de cet appareil estmuni d’une fiche à 3 broches (mise à la terre)qui se branche dans une prise mural ordinaireà 3 alvéoles (mise à la terre) pour réduire auminimum les risques du chocs électriques.Faites examiner la prise de courant et le circuitpar un électricien qualifié pour vous assurerque la prise est correctement mise à la terre.Si la prise murale est du type standard à 2 alvéoles,il vous incombe de la faire remplacer par une priseà 3 alvéoles correctement mise à la terre.La machine à glaçons doit toujours êtrebranché dans sa propre prise de courant,dont la tension nominale est identiqueà celle indiquée sur la plaque signalétique.Cette précaution est recommandée pour garantirun rendement optimum et éviter une surcharge descircuits électriques de la résidence, ce qui pourraitcréer un risque d’incendie par surschauffe des fils.Ne débranchez jamais l’appareil en tirant le cordond’alimentation. Saisissez fermement la fichedu cordon et tirez droit pour la retirer de la prise.Réparez ou remplacez immédiatement tout cordoneffiloché ou endommagé. N’utilisez pas un cordonfendillé ou présentant des signes d’usure.Lorsque vous déplacez l’appareil du mur, faitesattention de ne pas la faire rouler sur le cordond’alimentation afin de ne pas l’endommager.CORDONS PROLONGATEURSNous vous recommandons fortement de ne pasutíliser de cordons prolongateurs à cause desrisques potentiels qu’ils présentent dans certainesconditions.Toutefois si vous décidez d’utiliser tout de mêmeun cordon prolongateur, il est absolument nécessairequ’il s’agisse d’un cordon à 3 fils avec mise à la terrepour appareils électroménagers homologué ULaux États-Unis) ou homologué CSA (au Canada),pourvu d’une fiche et d’une prise mises à la terrede 15 ampères (minimum) et de 120 volts.CONSERVEZ CES DIRECTIVES7
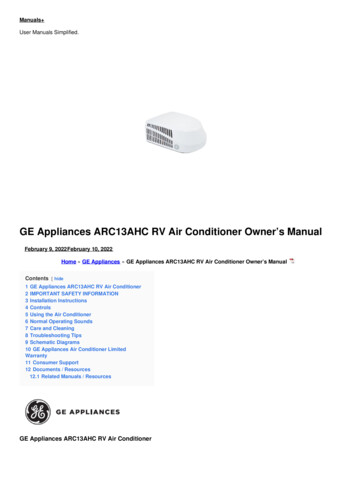
Operating InstructionsStainless Steel RefrigeratorTemperaturecontrolsThe temperature controls are preset in the factory at 37 Ffor the fresh food compartment and 0 F for the freezercompartment. Allow 24 hours for the temperature to stabilizeto the preset recommended settings.The temperature controls can display both the SEt temperatureas well as the actual temperature in the fresh food and freezercompartments. The actual temperature may vary slightlyfrom the SEt temperature based on usage and operatingenvironment.Setting either or both controls to oFF stops cooling in boththe freezer and fresh food compartments but does not shutoff electrical power to the refrigerator.NotE: The refrigerator is shipped with protective film coveringthe temperature controls. If this film was not removed duringinstallation, remove it now.To change the temperature, press and releasethe(warmer) or(colder) pad. The SET lightwill come on and thedisplay will show the set temperature. To changethe temperature, tap either the(warmer) or(colder) pad until thedesired temperature is displayed. Fresh foodtemperatures can be adjusted between 34 Fand 44 F and the freezer temperatures can beadjusted between -6 F and 6 F.Once the desired temperature has beenset, the temperature display will return tothe actual fresh food and freezer temperaturesafter 5 seconds. Several adjustments maybe required. Each time you adjust controls,allow 24 hours for the refrigerator to reachthe temperature you have set.PerformanceAir FlowSystem8The Performance Air-Flow System is designed tomaximize temperature control in the fresh foodand freezer compartments. This unique specialfeature consists of the Air Tower along the topand back walls of the fresh food compartmentand the Air Tunnel on the bottom portion ofthe freezer rear wall. Placing food in front ofthe louvers on these components will not affectperformance.To turn the cooling system off, tapthe(warmer) pad for either the fresh foodcompartment or the freezer until thedisplay shows OFF. To turn the unit back on,pressthe(colder) pad for either the fresh foodcompartment or freezer. The SET light willilluminate on the side you selected. Then pressthe(colder) pad again (on the side wherethe SET light is illuminated) and it will gotothe preset points of 0 F for the freezer and 37 Ffor the fresh food compartment.Although the Air Tower and the Air Tunnelcan be removed, doing so will affect temperatureperformance. (For removal instructions, on-line,24 hours a day, contact us at GEAppliances.comor call 800.444.1845. In Canada, call us at1.800.561.3344.)
Other ControlsStainless Steel RefrigeratorHowTurboCool worksTurboCool rapidly coolsthe refrigerator compartment inorder to more quickly cool foods.Use TurboCool when addinga large amount of food to the refrigeratorcompartment, putting away foods after theyhave been sitting out at room temperatureor when putting away warm leftovers. It canalso be used if the refrigerator has beenwithout power for an extended period.Once activated, the compressor will turn onimmediately and the fans will cycle on andoff at high speed as needed for 8 hours.The compressor will continue to run untilthe refrigerator compartment cools toapproximately 34 F (1 C), then it will cycleon and off to maintain this setting. After8 hours, or if TURBOCOOl is pressed again,the refrigerator compartment will returnto the original setting.How to useTurboCool1 Press TURBOCOOl. The refrigeratortemperature display will show TC.NotES: The refrigerator temperature cannotbe changed during turboCool.2 After TurboCool is complete,the refrigerator compartmentwill return to the original setting. The freezer temperature is not affected duringturboCool. When opening the refrigerator door duringturboCool, the fans will continue to run ifthey have cycled on.Door AlarmThe door alarm will soundif either door is open for more than2 minutes. The beeping sound willstop when you close the door.9
Internal Water DispenserStainless Steel RefrigeratorInternal WaterDispenserThe water dispenser is located on the left wallinside the refrigerator compartment.To dispense water:1 Hold the glass against the recess.2 Push the water dispenser button.3 Hold the glass underneath the dispenserfor 2–3 seconds after releasing the dispenserbutton. Water may continue to dispenseafter the button is released.If no water is dispensed when the refrigerator isfirst installed, there may be air in the water linesystem. Press the dispenser button and run 11 2gallons to remove trapped air from the water lineand to fill the water system. During this process,the dispenser noise may be loud as the air ispurged from the water line system. To flush outimpurities in the water line, throw away the first6 glassfuls of water.NotE: To avoid water deposits, the dispensershould be cleaned periodically by wiping witha clean cloth or sponge.10
Water FilterStainless Steel RefrigeratorWater filterWater Filter Cartridge5 Run 11 2 gallons from the dispenser to clear theThe water filter cartridge islocated in the back upperright corner of therefrigerator compartment.6 Press and hold the RESEt WAtERWhen to Replace the FilterNotE: A newly-installed waterfilter cartridge may cause waterto spurt from the dispenser.There is a replacement indicator light for thewater filter cartridge on the temperature display.This light will turn orange to tell you that youneed to replace the filter soon. The filter cartridgeshould be replaced when the replacementindicator light turns red or if the flow of water tothe dispenser or icemaker decreases.On models with external dispensers, the top ofthe LCD screen will display, “Replace Water Filter.”Installing the Filter Cartridge1 If you are replacing thecartridge, first removethe old one by slowly turning itto the left. DO NOT pull down onthe cartridge. A small amount ofwater may drip down.system and prevent sputtering. See To Use theDispenser section.FILtER pad for 3 seconds.Filter Bypass PlugYou must use the filter bypass plug whena replacement filter cartridge is not available.The icemaker will not operate without the filteror filter bypass plug.Replacement Filters:To order additional filter cartridgesin the United States, visit our Website,GEAppliances.com, or call GE Parts andAccessories, 800.626.2002.Filter Model MWFCustomers in Canada should consult the yellowpages for the nearest Mabe Service Center.CAUtIoN:If air has been trapped inthe system, the filter cartridge may be ejected asit is removed. Use caution when removing.2 Remove the protective foil from the end of thecartridge.3 Fill the replacement cartridge with water from thetap to allow for better flow from the dispenserimmediately after installation.4 Lining up the arrow on thecartridge and the cartridgeholder, slowly rotate thecartridge clockwise until itstops. When the cartridge isproperly installed, you will feelit “click” as it locks into place.Do not overtighten.11
Shelves and BinsStainless Steel RefrigeratorRearrangingthe shelvesShelves in the refrigerator compartmentare adjustable.Refrigerator Compartment21To remove:1 Remove all items from the shelf.2 Tilt the shelf up at the front.3 Lift the shelf up at the back and bringthe shelf out.Some models have wire shelves thatcan be adjusted in the same manner.To replace:1 While tilting the shelf up, insert the top hookat the back of the shelf in a slot on the track.12 Lower the front of the shelf until the bottomof the shelf locks into place.Slide-outspillproofshelfThe slide-out spillproof shelf allows you to reachitems stored behind others. The special edgesare designed to help prevent spills from drippingto lower shelves.To remove:1 Remove all items from shelf.2 Slide the shelf out until it stops.3 Lift the front edge of the shelf until the centraltabs are above the front bar.4 Continue pulling the shelf forward untilit can be removed.To replace:1 Place the rear shelf tabs just in frontof the central notches on the shelf frame.2 Slide the shelf in until the central tabsare slightly behind the front bar.QuickSpace shelfThis shelf splits in half and slides under itselffor storage of tall items on the shelf below.This shelf can be removed and replaced orrelocated just like Slide-Out Spillproof Shelves.On some models, this shelf can not be usedin the lowest position.1223 Lower the shelf into place until it is horizontaland slide the shelf in.Make sure that the shelf sits flat after reinstallationand doesn’t move freely from side to side.Make sure you push the shelves all the wayin before you close the door.
Shelves and BinsStainless Steel RefrigeratorBasketremoval (topdrawer)To Remove the Full-Width Basket onTop Freezer Drawer Models:1 Open the top freezer drawer until it stops.2 The freezer basket rests on the inside tabson the drawer slides.3 Lift the front end of the basket so that the fronttwo alignment tabs come out of the metal slidebracket first. Then rotate the front edge of thebasket up while lifting the remaining two rearalignment tabs out of the metal slide bracket.4 Make sure the plastic sleeves remain attachedto the 4 slots on the metal slide brackets.Appearance may varyWhen Replacing the Full-Width Basket:Tilt the basket back and lower it down intothe drawer. Rotate the basket to a horizontal positionand press it down into the 4 alignment tabs.TabNotE: Always be sure that all 4 basket slotsare engaged in the metal slide brackets before slidingback into the freezer.Adjustabledivider inbottomfreezerbasketThe freezer basket has a divider that can be bothrepositioned or removed.To Remove the Divider in the BottomFreezer Basket:Pull the divider forward until the rear locating tabsare out of the slots. Turn the divider slightly to theside to release the front locating tabs and lift out.TabsTo Replace the Divider in the BottomFreezer Basket:To Reposition the Divider in the BottomFreezer Basket:Turn the divider slightly to one side so the tabs onthe front fit into the vent slots on the basket. Positionthe divider so the back locating tabs snap into placein the back vent slots.1 Remove the divider as instructed above.2 Slide the divider left or right to the desiredlocation and replace as instructed above.13
Shelves and BinsStainless Steel RefrigeratorBasket removal To Remove the 2-Piece Basket:(bottom1 Open the bottom freezer drawer untilit stops.drawer)2 Pull the divider forward until the rear locating tabsare out of the slots. Turn the divider slightly to theside to release the front locating tabs and lift out.3 The freezer basket rests on the metal slidebrackets and is held in place with swing locks.4 Turn the swing locks from horizontal to verticalposition.5 Lift the front of the basket up, rotate it towardyou, and bring it straight up to remove.6 Lift the back portion of the basket up and outof the drawer.When Replacing the 2-Piece Basket:1 Place the rear of the basket onto the metalslide brackets. There will be 2 pins on eachunderside of the back that will align forsecuring the basket.2 Seat the front of the basket onto the metal slidebrackets and over the swing locks.3 Turn the swing locks from vertical to horizontalposition to lock the basket in place.Appearance may vary4 Turn the divider slightly to one side so the tabson the front fit into the vent slots on the basket.Position the divider so the back locating tabssnap into place in the back vent slots.Adjustablebins onthe doorAdjustable bins can easily be carried fromrefrigerator to work area.To remove: Lift bin straight up, then pull out.To replace or relocate: Slide in the bin just abovethe molded door supports, and push down.The bin will lock in place.The snugger helps prevent tipping, spillingor sliding of small items stored on the door shelf.NonAdjustablebins onthe doorNonAdjustablebeveragerack14To remove: Lift the bin straight up, thenpull out.To replace: Engage the bin in the moldedsupports on the door and push down. It will lockin place.To remove: Lift the rack straight up, then pull out.To replace: Engage the rack in the moldedsupports on the door and push down. It will lockin place.Grip the finger hold near the rear of the snuggerand move it to fit your needs.
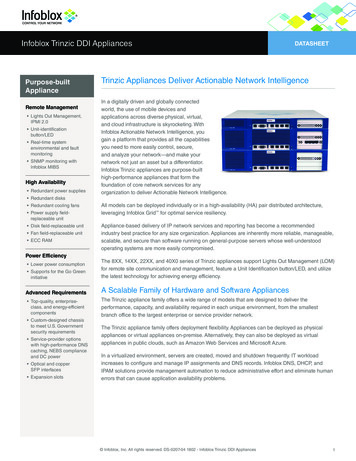
Additional FeaturesStainless Steel RefrigeratorDoor swingclearancesThe doors are factory set for a 150 door swing. To avoid contact damageto the refrigerator doors or to adjacentcabinetry or walls, observe the minimumclearances shown.15"15"150 Door Swing90 Door Swing24-5/8"19-1/16" Allow 4" clearance on each sideto an adjacent wall for a 90 openingand access to drawers. Allow 15" clearance on each sideto an adjacent wall for removal of drawers.DooralignmentIf the top of the doors are uneven, first try to raisethe lowest door by turning the leveling leg onthe same side as the door until the doors areeven. If the unit rocks, re-adjust the levelinglegs to the extent that the unit is stable.If the doors remain uneven, turn the adjustablepin to raise, or lower, the left door to matchthe right door. Use a 1/4 Allen wrenchto turn the pin.Adjustable PinLevelingLeg15
Crispers and PansStainless Steel RefrigeratorFruit andvegetablecrispersExcess water that may accumulate in the bottomof the drawers should be wiped dry.AdjustablehumiditycrispersSlide the control all the way to the HIGH settingto provide high humidity recommended for mostvegetables.Convertiblemeat panThe convertible meat pan has its own cold airduct to allow a stream of cold air from the freezercompartment to flow to the pan.Slide the control all the way to the lOW settingto provide lower humidity levels recommendedfor most fruits.The variable temperature control regulatesthe air flow from the Climate Keeper.Set the control to the coldest setting to storefresh meats.Deli panremovalSet the control to Cold to convert the panto normal refrigerator temperature and provideextra vegetable storage space. The cold air ductis turned off. Variable settings between theseextremes can be selected.To remove:1 Remove the fruit and vegetable drawers.2 Pull the drawer out to the stop position.3 Lift the lid to access the 4 swing locks.4 Rotate all four swing locks to the unlockposition.5 Lift the front of the drawer up and out.To replace:1 Make sure all four swing locks are in the unlockposition.2 Place the sides of the drawer into the drawersupports, making sure the swing locks fiton the drawer slots.3 Lock all four swing locks by rotating themto the lock position.4 Lower the lid and slide in the drawer.5 Replace the fruit and vegetable drawers.16Swing Locks –Unlock PositionSwing Locks –Lock Position
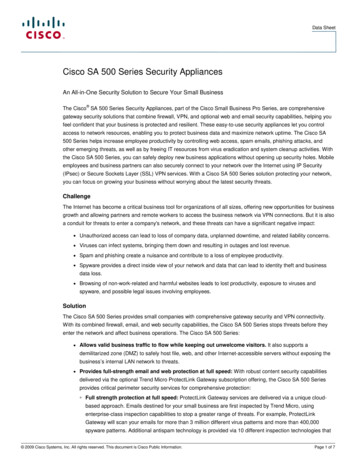
Automatic IcemakerStainless Steel RefrigeratorAutomaticicemakerNotE: A newly installed refrigerator may take 12 to 24 hours to begin making ice.The icemaker will produce seven cubesper cycle—approximately 100–130 cubesin a 24-hour period, depending on freezercompartment temperature, room temperature,number of door openings and other useconditions.See below for how to access ice and reachthe power switch.If the refrigerator is operated beforethe water connection is made to the icemaker,set the power switch in the o (off) position.When the refrigerator has been connectedto the water supply, set the power switchto the l (on) position. The icemaker power lightwill turn green when the freezer light switch ispressed in or when the freezer door is closed.The icemaker will fill with water when it cools to15 F (–10 C). A newly installed refrigerator maytake 12 to 24 hours to begin making ice cubes.You will hear a buzzing sound each timethe icemaker fills with water.PowerSwitchGreenPower LightIcemakerFeeler ArmWhen the bin fills to the level of the feeler arm,the icemaker will stop producing ice. It is normalfor several cubes to be joined together.If ice is not used frequently, old ice cubes willbecome cloudy, taste stale and shrink.NotE: In homes with lower-than-average waterpressure, you may hear the icemaker cyclemultiple times when making one batch of ice.NotE: Set the power switch to the o (off) positionif the water supply is shut off.Throw away the first few batches of ice to allowthe water line to clear.Be sure nothing interferes with the sweepof the feeler arm.Accessing iceand reachingthe powerswitchTo reach the icemaker power switch, open the topfreezer drawer and remove the full-width basket.Always be sure to replace the basket.To access ice, open the bottom freezer drawer.The ice bucket is located below the mullion. Pull itforward to access ice.IceBucketMullionTo reach the power switch.To access ice.17
Care and CleaningStainless Steel
(A burned-out light bulb may break when being replaced.) NotE : Turning control to OFF does not remove power to the light circuit. Do not refreeze frozen foods which have thawed completely. IMPORTANT SAFETY INSTRUCTIONS DANGER: RISK OF CHILD ENTRAPMENT Child entrapment and suffocation are not problems of the past. Junked or abandoned .