Transcription
VC520 ProInstruction Manual 安裝指南取扱説明書 安装指南
English . . .1繁體中文. . .11日本語. . .21简体中文 . 31
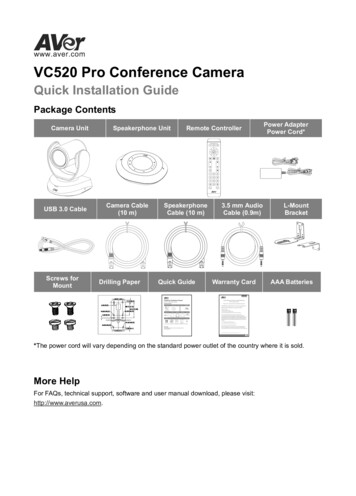
Quick Installation GuidePackage ContentsCamera UnitUSB 3.0 CableDrilling PaperSpeakerphone UnitSpeakerphoneCableQuick GuideRemote Controller3.5 mm AudioCableL-MountBracketPower AdapterPower Cord*Screws forMountWarranty Card46.00[1.81]Ø5.50[Ø0.22]P/N: 303AU340-AGR51.00[2.01]*The power cord will vary depending on the standard power outlet of the country where it is sold.More HelpFor FAQs, technical support, software and user manual download, please visit: http://www.aver.com.English-1
Overview121345678Status LED5RS232 in/out port2IR sensor6Ethernet port3Speakerphone port7DC 12V power jack8Kensington Lock(Blue cable)4USB3.1 Type B port9 1011 129Speakerphone port11Line out port(For extended speakerphone12Camera portand microphone connection/Red cable)1013(Blue cable)13Phone in portEnglish-2Kensington Lock
Installation1.Connect the camera to power outlet.Power cordPower adapter2.Connect the camera to thespeakerphone using the includedcompatible cable.[Note] Both speakerphone and camera port aremarked in blue. The back cover of the speakerphone willneed to be removed to connect thespeakerphone cable.Speakerphonecable3.Connect other necessary cables.[Note] USB and RS232 cable need to secure thecable with attached screw. Make sure the cable is well connected tothe connector on the camera beforesecuring the cable.English-3
4.Connect the camera to the computer.[Note] Use the USB 3.0 cable that is includedin package.USB cableRemote Controller Camera Select: If you only haveone camera and don’t need toCamera SelectCamera DirectionalControlOSD Menu**SmartFrameZoom In/OutPresetBrightness Call/Answer*Enter**adjust custom settings, the defaultis camera 1. If you press camera 2or 3 on the remote control, you willMute/Un-muteVolume Up/Downfind your remote can’t control yourcamera. In this case, please presscamera 1 on your remote again. SmartFrame: Press and holdPreset Hot Keyon the remote for 2 secondsPreset Positionto switch the SmartFramingfunction between auto and manualmode; a message (as figureshown) will display on the screento indicate auto or manual mode.Brightness Hang Up*[Note] While in the videoconference meeting, participantsmust face the camera for proper*Function requires AVer PTZAppface detection (SmartFrame). Side**Not supported for VC520 Profacial profiles are not detectable. Press and hold the number button” to turn the WDR function on“or off. AAA Batteries (required)English-4
Wall Mount Installation1. Use the drilling paper included in the package to drill the holes in the wall where the user wantsto mount the camera.2. Use the screw to secure the A L-mount bracket on the wall.3. Then, assemble the A B L-mount bracket with screws (included in package).4. After assembling the L-mount bracket, secure the lower part of L-mount bracket on the wall.5. Pass the cables through the hole on the L-mount bracket and connect the cables tocorresponding connection ports.6. Use the screws (included in package) to secure the cameras on the L-mount bracket.12346.00[1.81]AØ5.50[Ø0.22]P/N: 303AU340-AGR51.00[2.01]BA456English-5
Making a Video CallA computer is required to use this device.Step 1: Open your video collaboration application such as Zoom, Microsoft Teams, Skype forBusiness, Skype, Google Hangouts, Intel Unite , RingCentral, BlueJeans, V-Cube, LiveOn, CyberLink U Meeting , TrueConf, Adobe Connect, Cisco WebEx , Fuze, GoToMeeting , MicrosoftLync , Vidyo, vMix, WebRTC, Wirecast, XSplit.Step 2: Set the VC520 Pro as your primary camera device in your application (Please consult yourapplication setup guide for details).Step 3: Ready to make a video call.[Note] VC520 Pro is a plug-n-play conference camera. The system requires no special drivers. Foradvanced setting and firmware update, please download AVer PTZApp.Setup the Camera through the Web BrowserVC520 Pro has an Ethernet port for IP streaming and allows administrators to remotely control and setup the camera via an internet access. Moreover, VC520 Pro also supports RTSP and RTMP functions.For further details, please refer to user’s manual or contact our technical support.1. Make sure the VC520 Pro has an internet access connection.2. Open the browser and enter the IP address of the camera.[Note] The browser supports: Chrome: version 76.x or above Firefox: version 69 or above IE: Doesn’t supportThe camera default IP address is 192.168.1.168. User can use “AVer IP Finder” app to find the camera(Please refer to “Using AVer IP Finder to Find the Camera” section).3. When login screen is shown, enter the password (default password is aver4321).4. The web main screen is displayed.LogoutEnglish-6
Using AVer IP Finder to find the CameraTo find the IP address of your cameras, you can use the AVer IP Finder application. Follow the belowsteps to find the IP address of camera.Download the IP Finder from http://www.aver.com/download-center .1. Run the IP Finder.2. Click “Search”, and all available devices will be listed on the screen.3. Select a camera from the list. The corresponding fields of IP address will display.4. To change the IP address of camera, select “DHCP” or “Static IP”.The DHCP should get the IP address from local dynamic IP sever. The static IP, user can enter thespecific IP address. Click “Apply” to apply the setting to the camera. The login password isrequired (default password is aver4321; same as web access password).5. Click “Search” button to re-scan the camera.6. Double-click on the IP address of camera from the list can connect to camera through the browser.[Note] If IP Finder cannot find the camera, please check following: Please make sure the Ethernet connection of camera is well connected. The camera and PC (IP Finder) are in the same LAN segment.English-7
Install AVer PTZAppIn AVer PTZApp, user can configure the parameters of the camera.Please go to http://www.aver.com/download-center to download the AVer PTZApp. After downloading,double-click on the file and follow the on-screen instructions to complete the installation.Use AVer PTZApp1. After installing the AVer PTZApp, double-click on theAVer PTZApp icon to run the application.2. During your video call, you can use the AVerPTZApp to pan, tilt and zoom the camera in/out andenable/disable the backlight feature, set up cameraHome or Sleep mode preset points. For moredetails, please refer to the user manual.3. Tracking mode: It is a SmartFrame function whichcan auto detect faces of people to find the best viewfor all meeting participants. Users can changeSmartFrame function status in AVer PTZApp. InAVer PTZApp, select “Settings” “Tracking mode” “Auto frame/Manual frame/off”.Also, pressingon the remote for 1 secondcan switch the SmartFrame function between autoand manual; a message (as figure shown) willdisplay on the screen to indicate in auto or manualstatus.[Note] While in conferencing meeting, participantsmust face the camera for face detection. The sideface is not detectable.4. Flip: If the camera is installed in the upside downposition, please enable the "Flip" function in theAVer PTZApp, and the screen will display normally.English-8
5. Hotkey Control: Enable hotkey control to use keyboard control camera’s movement andbacklight. The default is off.A hotkey tip will display when mouse is moved tothe PTZ control button in PTZ mode.If the hotkey function is enabled after installing thePTZApp, PTZApp auto launch next time the PCreboots. Therefore, the customer can use all thehotkey commands when PTZApp is auto running insystem tray.6. Speakerphone: setup speakerphone functionparameters.-Nosie suppression: Reduce ambient noise.Automatically gain control: Enable/disable theauto gain control.-Echo cancellation: Enable/disable echosituation.-Keyboard noise suppression: Enable/disablekeyboard noise reduction.-Phone in jack Phone in: When the mobile phone isconnecting to Phone in port, please select“Phone in” option. 3.5 mm microphone only: The speakerphone will transfer the sound that it receivesfrom the external microphone (connected on phone in port) to far site. 3.5 mm microphone mix in: The speakerphone will transfer the sound that it receivesfrom the external microphone (connected on phone in port) and speakerphone to far site.-Expansion mic mute All: To mute all connected speakerphones. Individual: To individually mute a speakerphone and not the extended speakerphones.English-9
Contact InformationGlobalAVer Information Inc.www.aver.com8F, No.157, Da-An Rd., Tucheng Dist.,New Taipei City, TaiwanEuropean HeadquartersAVer Information Europe B.V.Westblaak 140, 3012KM, Rotterdam, NetherlandTel: 31(0)10 7600 550Technical support: EU.RMA@aver.comFederal Communication Commission Interference StatementNOTE: This equipment has been tested and found to comply with the limits for a Class A digital device, pursuant topart 15 of the FCC Rules. These limits are designed to pro-vide reasonable protection against harmful interferencewhen the equipment is operate din a commercial environment. This equipment generates, uses, and can radiateradiofrequency energy and, if not installed and used in accordance with the instruction manual, may cause harmfulinterference to radio communications. Operation of this equipment in a residential area is likely to cause harmfulinterference in which case the user will be required to correct the interference at his own expense.FCC Caution: Any changes or modifications not expressly approved by the party responsible for compliance couldvoid the user's authority to operate this equipment.This device complies with part 15 of the FCC Rules.Operation is subject to the following two conditions:(1) This device may not cause harmful interference, and(2) this device must accept any interference received, including interference that may cause undesired operation.Warning:This is a class A product. In a domestic environment this product may cause radio interference in which case theuser may be required to take adequate measures.CAUTION- Risk of explosion if battery is replaced by an incorrect type.- Dispose of used batteries in a safe and proper manner. 2020 AVer Information Inc. All rights reserved.English-10
B 3.0 �易安裝手冊電源變壓器遙控器3.5 mm 音源線電源線*L 型壁掛架保固卡46.00[1.81]Ø5.50[Ø0.22]P/N: �網址: http://tw.aver.com �城區大安路 157 號 8 ��
產品介紹12341 狀態燈號56785 RS232 輸入/輸出埠2 IR 接收器6 乙太網路埠3 喇叭麥克風連接埠7 DC 12V 電源插孔(藍色接頭)8 Kensington 防盜孔4 USB3.1 Type B 埠9 1011 12913喇叭麥克風連接埠11 色接頭)12 攝影機連接埠10 音源輸入埠(藍色接頭)13 Kensington 防盜孔繁體中文-12
�風線連接攝影機與喇叭麥克風。[註] �色接頭連接。 �上。喇叭麥克風線3.使用包裝內含的 USB ��繁體中文-13
4.連接必要的連接線。[註] USB 和 RS232 �上固定連接線。RS232 �購買。 ��上。遙控器*功能需搭配 AVerPTZ 於 VC520 Pro 上不支援 攝影機選擇鍵: �預設值為「1」。如果在遙控器 Camera select ��捷鍵字 2 或 ��次按 Camera select 1鈕,恢復到預設的 1。 智慧對焦鍵:按 1 ��度 撥打/接聽*Framing)模式。亮度 掛斷*[註] ��細說明請參見使用手冊。 長按數字鍵「」可啟動或關閉WDR 功能。 需安裝 2 顆 AAA 電池。繁體中文-14
壁掛安裝1. �裝壁掛位置進行鑽孔。2. 將 L 型壁掛 A 鎖於鑽孔位置(請使用符合的螺絲)。3. 然後將 L 型壁掛 A B 用螺絲(內含於包裝內)組合起來。4. �定於牆上(如圖所示)。5. �線另一端穿過壁掛架穿孔位置。6. �掛架上。12346.00[1.81]AØ5.50[Ø0.22]P/N: 303AU340-AGR451.00[2.01]BA56繁體中文-15
�電視或螢幕是必要的設備。 步驟 1:啟動你的視訊軟體,例如 :Zoom、 Microsoft Teams、 Skype for Business, Skype、 Google Hangouts、 Intel Unite 、 RingCentral、 BlueJeans、 V-Cube, LiveOn、 CyberLink U Meeting 、 TrueConf、 Adobe Connect、 Cisco WebEx 、 Fuze, GoToMeeting 、 Microsoft Lync 、 Vidyo,vMix、 WebRTC、 Wirecast、 XSplit。步驟2:在你的視訊軟體上,將 VC520 Pro設定為主要的攝影機 ��)。步驟 3:進行視訊會議撥打。建議安裝 AVer PTZApp 可獲得更佳的使用體驗,請造訪 http://tw.aver.com 服務支援 �影機VC520 Pro �過瀏覽器,連接到 VC520 Pro 進行設定。 VC520 Pro也支援 RTSP 和 RTMP �或連絡圓展技術服務人員。1. 請確認 VC520 Pro 的網路連線正常運作。2. �下面所列。[註] 支援的瀏覽器: Chrome: version 76.x 或以上 Firefox: version 69 或以上 IE: 不支援攝影機預設 IP 位址是 192.168.1.168。使用者可使用「AVer IP ��參照「使用 AVer IP Finder 軟體」章節)。3. �,請輸入預設密碼(aver4321)。Web 6
使用 AVer IP Finder 軟體要找到攝影機的IP位址,請執行IP �找尋攝影機的IP位址。1. 從 http://www.aver.com/download-center 下載IP Finder軟體,並安裝於電腦上。2. 安裝完成後,執行IP Finder軟體。3. �列出。4. 會顯示於螢幕上。5. P」或是「Static ��址。「Static ��好後,點選「Apply」變更IP位址。在IP ver4321,與登入Web的密碼相同)。6. 攝影機。7. 影機連接。[註] 若IP �事項: � 攝影機與電腦(IP �-17
安裝 AVer PTZApp請到網站 http://tw.aver.com 服務支援 下載中心 下載。 �安裝。使用 AVer PTZApp1. 安裝後,請雙擊位於桌面的 AVer PTZ app 捷徑啟動程式。2. 在視訊會議時,可使用 AVer PTZ app �。3. �有參與者於鏡頭內。可透過 AVer PTZApp 設定,選擇「Settings 」 「追蹤模式設定」 �、「關閉」。按遙控器上的「」鍵 1 ��息告知目前模式[註] ��法偵測。4. ��體中文-18
5. �制攝影機的移動、預設點、WDR �。當熱鍵控制功能啟動時,在 PTZ �現快捷鍵提示。如過在安裝 AVer PTZApp 後啟動熱鍵控制功能,PTZApp �使用者可以使用所有熱鍵,因為PTZApp 在系統托盤中自動運行。6. Speakerphone: 孔 �上時,請選擇此選項。 3.5 mm microphone ��遠端。 3.5 mm microphone mix in: �到的聲音到遠端。-延伸麥克風靜音 �音狀態,包含延伸的喇叭麥克風。 �含延伸的喇叭麥克風。繁體中文-19
版權宣告 2020 圓展科技 版權所有。遙控器電池安全資訊 請將電池存放在涼爽與乾燥的位置。 ��送回原購買商店。 ��安全方式棄置電池。 不可混用新舊電池。 �(碳鋅)或可充電(鎳鎘)電池。 不可將電池棄置於火源中。 �Mercury 鎘Cadmium(Hg)(Cd)Hexavalentchromium(Cr 6 )電路板及零組件(電子料或電機料 等)塑膠組件(外殼或導電泡棉 等)金屬組件(鐵殼或鐵條或螺柱 等)配件(電源供應器或遙控器或電纜線 等)紙製品及包裝件(紙盒或手冊或泡殼 二苯醚Polybrominated diphenylethers (PBDE)- - - 備考 1.〝超出 0.1 wt %〞及〝超出 0.01 wt ��比含量基準值。Note 1:“Exceeding 0.1 wt %” and “exceeding 0.01 wt %” indicate that the percentage content ofthe restricted substance exceeds the reference percentage value of presence condition.備考 2.〝 �出百分比含量基準值。Note 2:“ ” indicates that the percentage content of the restricted substance does not exceed thepercentage of reference value of presence.備考 。Note 3:The “ ” indicates that the restricted substance corresponds to the 20
ド*USB 3.0 5 mm オーディオケーブルL 0[Ø0.22]P/N: 303AU340-AGR ください。 http://jp.aver.com 。日本語-21
製品各部名称12134ステータス LED56578RS232 入出力ポート2IR カーフォンポート7DC 12V ��色ケーブル)4USB3.1 Type B ポート9 1011 �ク
��カーフォンへ接続します。[注意] �、共に青色にマークされています。 ューターへ接続します。[注意] パッケージ付属の USB 3.0 �属のUSBケーブル日本語-23
す。[注意] USB と RS232 �定してください。 リモコン 操作カメラ切替: カメラが 1 �操作カメラ切替決定**ルトでカメラ 1 �モコンでカメラ 2 または 3 �でカメラ 1 る SmartFrame: 1 秒間押すと、スマ トフレ ��手動モ ドを示すメッセ �話応答*のように)が 面に表示されます。明るさ 通話終了*[注意] 議の 議中、 �てください。 側面は検出できません。 詳細については、ユ ザ ズマニュアルを 照してください。*この機能は AVer PTZApp が必要です**VC520 Pro では対応していません 数字ボタン「」を押し続けると、WDR 機能がオフになります。 単四乾電池(必須) 。日本語-24
壁固定での設置方法(マウント使用)1. ��けます。2. ネジを使用し、壁へ A L 字型ブラケットを固定します。※ ��さい。3. � A B L 字型ブラケットを組み立てます。4. L 字型ブラケットを組み立てた後、L 字型ブラケット B の下部を壁に固定します。5. L ��を接続します。6. �ラ本体を L [1.81]AØ5.50[Ø0.22]BAP/N: 303AU340-AGR451.00[2.01]56日本語-25
プ 1:Zoom、Microsoft Teams、Skype for Business、Skype、Google Hangouts、Intel Unite erLink U Meeting 、TrueConf、Adobe Connect、CiscoWebEx 、Fuze、GoToMeeting 、Microsoft Lync 、Vidyo、vMix、WebRTC、Wirecast、XSplit などの使用する Web �ップ 2:各ソフトウェアの設定より、CAM520 Pro �い。)[注意] CAM520 Pro 更新については、AVer PTZApp のインストールを推奨します。Web ブラウザを通じてカメラを設定CAM520 Pro 。1. CAM520 Pro の LAN 端子と LAN 接続が可能な端子を LAN ケーブルで接続してください。2. Web ブラウザーを開き、カメラの IP アドレスを入力します。[注意] 対応ブラウザーは以下の通りです。 Chrome:バージョン 76.x またはそれ以降 Firefox:バージョン 69 フォルト IP アドレスは 192.168.1.168 です。※「AVer IP �メラを検索できます。(「AVer IP Finder �ください)。3. �ードを入力します です)。4. ��-26
AVer IP Finder �AVer IP �さい。1. http://jp.aver.com/download-center からIP Finderをダウンロードします。2. IP Finderを実行します。3. ��示されます。4. �5. 、「DHCP」または「Static ��ードと同じ「aver432」です)。6. �てカメラを再度スキャンします。7. �メラへ接続できます。[注意] IP �下の作業をお試しください。 �ていることを確認してください。 カメラとPC(IP �本語-27
AVer PTZApp をインストールAVer PTZApp ��。http://jp.aver.com/download-center にて AVer PTZApp ールを完了してください。AVer PTZApp の使用1. AVer PTZApp をインストールした後、AVer �プリケーションを実行します。2. ビデオ通話時、AVer PTZApp �マニュアルをご参照ください。3. ーム機能です。AVer PTZApp 「Settings(設定) Tracking mode(追跡モード) Auto �リモコンのボタンを 1 �ータスを示します。[注意] ません。4. �する場合、AVer PTZApp �-28
5. �PTZ モードでマウスを PTZ �ーのヒントが表示されます。PTZApp �有効にされた場合、次回の PC 起動時に PTZApp ます。6. �効または無効にします。日本語-29
-フォン入力ジャック ��オプションを選択します。 3.5 mm ます。 3.5 mm ��張マイクミュート �をすべてミュートします。 ��す。この装置は、クラス A ��ォメーション株式会社http://jp.aver.com 160-0023 東京都新宿区西新宿 3-2-26 立花新宿ビル 7 階TEL: 03-5989-0290日本語-30VCCI-A
B 3.0 �易安装手册电源变压器遥控器3.5 mm 音源线电源线*L 型壁挂架保固卡46.00[1.81]Ø5.50[Ø0.22]P/N: �网址: http://cn.aver.com �城区大安路 157 号 8 ��
产品介绍12341 状态灯号256785 RS232 输入/输出埠IR 接收器6 以太网络端口3 喇叭麦克风端口7 DC 12V 电源插孔(蓝色接头)8 Kensington 防盗孔4 USB3.1 Type B 埠9 1011 129 喇叭麦克风端口11 色接头)10 音源输入埠1312 摄影机端口(蓝色接头)13 Kensington 防盗孔简体中文-32
�风线连接摄影机与喇叭麦克风。[注] �色接头连接。 �上。喇叭麦克风线3.使用包装内含的 USB SB线简体中文-33
4.连接必要的连接线。[注] USB 和 RS232 �上固定连接线。RS232 �购买。 ��上。遥控器*功能需搭配 AVerPTZ 认值为「1」。如果在遥控器 Camera select 按数字 2 或 音键智慧對焦缩小/放大键**于 VC520 Pro 上不支援 摄像机选择键: �再次按 Camera select 1 钮,恢复到预设的 1。 智慧对焦键:按 1 )或手动(Manual ��听*亮度 [注] 侦测。详细说明请参见使用手册。 长按数字键「」可启动或关闭WDR 功能。 需安装 2 颗 AAA 电池。简体中文-34
壁挂安装1. �装壁挂位置进行钻孔。2. 将 L 型壁挂 A 锁于钻孔位置(请使用符合的螺丝)。3. 然后将 L 型壁挂 A B 用螺丝(内含于包装内)组合起来。4. �定于墙上(如图所示)。5. �线另一端穿过壁挂架穿孔位置。6. �挂架上。12346.00[1.81]AØ5.50[Ø0.22]P/N: 303AU340-AGR451.00[2.01]BA56简体中文-35
�和电视或屏幕是必要的设备。 步骤 1:启动你的视讯软件,例如 :Zoom、 Microsoft Teams、 Skype for Business, Skype、 Google Hangouts、 Intel Unite 、 RingCentral、 BlueJeans、 V-Cube, LiveOn、 CyberLink U Meeting 、 TrueConf、 Adobe Connect、 Cisco WebEx 、 Fuze, GoToMeeting 、 Microsoft Lync 、 Vidyo,vMix、 WebRTC、 Wirecast、 XSplit。步骤2:在你的视讯软件上,将 VC520 Pro设定为主要的摄影机 ��)。步骤 3:进行视频会议拨打。建议安装 AVer PTZApp 可获得更佳的使用体验,请造访 http://cn.aver.com 服务支持 �影机VC520 Pro �浏览器,连接到 VC520 Pro 进行设定。 VC520 Pro也支持 RTSP 和 RTMP �或连络圆展技术服务人员。1. 请确认 VC520 Pro 的网络联机正常运作。2. �见下面所列。[注] 支持的浏览器: Chrome: version 76.x 或以上 Firefox: version 69 或以上 IE: 不支援摄影机默认 IP 地址是 192.168.1.168。用户可使用「AVer IP ��参照「使用 AVer IP Finder 软件」章节)。3. �,请输入默认密码(aver4321)。Web 6
使用 AVer IP Finder 软件要找到摄影机的IP地址,请执行IP �找寻摄影机的IP地址。1. 从 http://www.aver.com/download-center 下载IP Finder软件,并安装于计算机上。2. 安装完成后,执行IP Finder软件。3. �列出。4. 会显示于屏幕上。5. P」或是「Static ��址。「Static ��好后,点选「Apply」变更IP地址。在IP ver4321,与登入Web的密码相同)。6. 摄影机。7. 影机连接。[注] 若IP �事项: � 摄影机与计算机(IP �-37
安装 AVer PTZApp请到网站 http://cn.aver.com 服务支持 下载中心 下载。 �安装。使用 AVer PTZApp1. 安装后,请双击位于桌面的 AVer PTZ app 快捷方式启动程序。2. 在视频会议时,可使用 AVer PTZ app �。3. �有参与者于镜头内。可透过 AVer PTZApp 设定,选择「Settings 」 「追踪模式设定」 �、「关闭」。按遥控器上的「」键 1 ��息告知目前模式[注] ��法侦测。4. ��体中文-38
5. �控制摄影机的移动、预设点、WDR �。当热键控制功能启动时,在 PTZ �现快捷键提示。如过在安装 AVer PTZApp 后启动热键控制功能,PTZApp �此使用者可以使用所有热键,因为 PTZApp 在系统托盘中自动运行。6. Speakerphone: 孔 �上时,请选择此选项。 3.5 mm microphone ��远程。 3.5 mm microphone mix in: �到的声音到远程。-延伸麦克风静音 �音状态,包含延伸的喇叭麦克风。 �含延伸的喇叭麦克风。简体中文-39
版权宣告 2020 圆展科技 版权所有。遥控器电池安全信息 请将电池存放在凉爽与干燥的位置。 ��送回原购买商店。 ��安全方式弃置电池。 不可混用新旧电池。 �(碳锌)或可充电(镍镉)电池。 不可将电池弃置于火源中。 0
Call/Answer* Brightness - Enter** Mute/Un-mute Volume Up/Down Pr es tHo K y Preset Position Hang Up* Brightness *Function requires AVer PTZApp **Not supported for VC520 Pro Camera Select: If you only have one camera and don't need to adjust custom settings, the default is camera 1. If you press camera 2 or 3 on the remote control, you will