Transcription
Managing Your EmailA step-by-step guide to email management in Coldwell Banker Email
Table of ContentsI.About Coldwell Banker Email . . . . . . . . . . . . . . . . . . . . . . . . . . . . . . . . . . 3II.Coldwell Banker Email Basics. . . . . . . . . . . . . . . . . . . . . . . . . . . . . . . . . . . 5Find out more about the Coldwell Banker Email system and your accountReading Your EmailUsing Email FunctionsComposing and Sending MessagesChanging Your PasswordUsing the Signature FeatureUsing AttachmentsViewing Email HistoryIII. Forwarding Your Account . . . . . . . . . . . . . . . . . . . . . . . . . . . . . . . . . . . . . . .14Set your Coldwell Banker Email account to forward messages to another emailaddressIV. IMAP/POP3 Settings for Outlook & Outlook Express . . . . . . . . . . . . . . . . . 16How to setup your Coldwell Banker Email account to work with Microsoft OutlookV. Using the Vacation Reply. . . . . . . . . . . . . . . . . . . . . . . . . . . . . . . . . . . . . . . 26Automatically send a custom message to the sender of every email you receiveVI. Using the Address Book . . . . . . . . . . . . . . . . . . . . . . . . . . . . . . . . . . . . . . . 27Learn how to create contacts, groups, and export contact informationVII. Avoiding Spam . . . . . . . . . . . . . . . . . . . . . . . . . . . . . . . . . . . . . . . . . . . . . . .31Learn how to minimize the junk mail in your Inbox2
About Coldwell Banker EmailColdwell Banker Email is a web-based email system for Coldwell Banker. It allows you to check your emailthrough a Web-based interface, forward email to a free Web account, or access mail through software such asMicrosoft Outlook. The Coldwell Banker Email interface provides the basic features that have become familiar toemail as well as some unique features. This document will help you get the most out of your email.Before you go farther in this document, you should understand the business rules of Coldwell Banker Email. Thefollowing are some basic functions and standards of Coldwell Banker Email which have been put in place soColdwell Banker can offer you the best email experience possible.Click on any title to link to that section:1.2.3.4.5.Account CreationStorage Capacity & Quota CounterAccount SuspensionSPAM filtersHelp DeskAccount CreationFor affiliate offices, new COLDWELL BANKER EMAIL accounts are automatically generated when someone isentered into CREST. Once their data is entered in CREST, their data is fed into the COLDWELL BANKER EMAIL database and a new account is created. The standard for creating an account isfirstname.lastname@coldwellbanker.com. (Ex: john.doe@coldwellbanker.com) If there is already a person in theemail database with the same name, a number will be placed after the username. (Ex:john.doe1@coldwellbanker.com, john.doe2@coldwellbanker.com, etc.) Your password is initially setup to be yourCREST ID number.For NRT offices, your NRT metro administrator for COLDWELL BANKER EMAIL creates new COLDWELLBANKER EMAIL accounts individually. Contact your office manager or your metro area contact to determinewhom you should call to create new accounts.Storage Capacity & Quota CounterColdwell Banker Email permits up to 10 megabytes (MB) of storage space. You can keep track of youraccount’s current capacity by looking at the message at the top of your Welcome Page. The quota will indicatewhat percentage of your account you are currently using. So if the quota displays “You are currently using 30%of your 10 MB quota.” your account is using 3 MB of storage and has 7 MB of free space. When you exceed8MB of storage, a notification will appear by the Quota counter alerting you that you are approaching youraccount’s storage limit.If you exceed the 10 MB limit, the Quota counter will read “EXCEEDED” and you will not be able to sendmessages until your account is back under the 10 MB storage limit. You can free up storage space by deleting oldmessages and removing messages with large attachments. To avoid exceeding the storage limit, it isrecommended that you delete old email messages or messages with attachments after you have savedthe attachments to your computer.Account SuspensionExcept for Coldwell Banker Email accounts that have set a forwarding address, any Coldwell Banker Emailaccount that has not been logged into for 6 months will be suspended. The owner of that account will not be ableto log in to their account and all messages in that account will be removed. The owner’s address book will remainintact and the owner will be able to reactivate their account by contacting the help desk at 1-877-263-6589.3
About Coldwell Banker EmailSPAMColdwell Banker does not condone the sending of spam through the Coldwell Banker Email system. Spam filtersare active on the Coldwell Banker Email servers to help block spam from coming through to Coldwell Banker Email accounts. Unfortunately, all spam cannot be blocked so each Coldwell Banker Email account has theability to setup custom filters to help remove spam from your Inbox. Please be careful of what websites yousupply with your email address as this is the most common way your email address can be picked up byspammers.Help DeskIf you have questions or are experiencing problems with your account, you can contact the Coldwell Banker Email Help Desk at 1-877-263-6589. The help desk is open from 9 am to 6 pm Eastern Standard Time.Now that you have covered the basics of the Coldwell Banker Email system we encourage you to continuethrough the rest of this document to help you understand some of the unique features that are available to you inColdwell Banker Email.4
Coldwell Banker Email BasicsReading Your EmailThe Read Mail page or Inbox allows you to read all messages received and stored in your account. Messagesare displayed in a list, and indicate if the email is new, who the sender is, the date received, the subject and sizeof the email.To read your messages on the Web interface, please follow these steps:Click Read Mail on the Navigation Bar on the left side of the Web browser window or theInbox link on the Welcome page to view all of your messages.1. To read a message in your Inbox, click the sender's name listed in the Fromcolumn. You can also access other folders from your Inbox by using the Go Todrop-down menu to take you to a selected folder.2. To read a message in another folder, click the ( ) box next to Read Mail and thenclick a folder. The selected folder will display the messages stored there. Click asender's name to open and read that selected message.Note: If you have selected to use the Pop Up Read Mail Window in Preferences and Settings, a separatewindow will open when you click the sender's name in the From column.How To Use Mail FunctionsAfter a message is opened, you can perform any of the following functions by using the appropriate buttonslocated at the top or bottom of the Read Mail page. Arrows: Click ( ) to move to the next message or ( ) to return to the previous message. Note: Thesedisplay only if there is a next and/or previous message in the active folder.Delete: Click Delete to delete the message.Forward: Click Forward to send the message on to another email address. Note: The original messagewill appear as an attachment to the recipient.Reply: Click Reply to write a response to the sender's message.Reply All: Click Reply All to write a response to the sender and all recipients of the message.Submit as Spam: Click Submit as Spam to send the selected message(s) to the USA.NET systemabuse manager. You will not receive a response regarding your submission; however, the input will beused to improve future system spam blocking.Note: If this button is not available, click on Services found on the left-hand Navigation Bar. Next, clickon Spam Filtering to adjust your spam settings. Select an option in the Enhanced Spam Filteringsection. This will activate the Submit as Spam button.Move To: Click the pull-down menu and select the folder into which you'd like to move the message, thenclick Move To.5
Coldwell Banker Email BasicsWhen reading an email message, the following additional options are available: Add to Address Book: Click Add to Address Book to add the sender of the message to your AddressBook.Block Sender: Adds this sender to your personal spam filter.Allow Sender: Adds this sender to your personal “white list” (always approved sender).More Details: Click More Details to see additionalrouting information about the message.Fewer Details: Click Fewer Details to return to theoriginal view of the message. Note: The Fewer Details option will only be displayed if you have clickedMore Details.Print Preview: Click Print Preview to see how the message will print in memo format, with only theheader and message text, excluding all Coldwell Banker COLDWELL BANKER EMAIL buttons andpage formatting. Note: Click File along the top of the Web browser window and select Print to actuallyprint the message.Note: You can also move and/or delete messages with the Move Tobutton. Select the message by checking the box next to the message.To move a message, click the drop-down menu next to Move To, selectappropriate folder and then click Move To.theTo delete a particular message, click Delete.Composing and Sending MessagesTo compose and send messages, please followthese steps:1. Click Write Mail on the Navigation Bar.Note: If the Pop Up Write Mail Windowin Preferences/Settings is checked, aseparate Write Mail window will bedisplayed. If not, the Write Mail windowwill be displayed in the main frame of thebrowser window.2. Address your message:o To: Type in the email address ofall recipients, or a nickname orgroup name. Note: The nicknameor group name that you entermust correspond with theaddresses in your AddressBook. Separate each addresswith a comma.6
Coldwell Banker Email BasicsoooSubject: Type in the subject of the message.CC: Type in the email addresses of any additional recipients you wish to receive a copy of yourmessage.BCC: Type in the email addresses of any recipients thatyou would like to send a copy without the other recipients'knowledge.Note: You can also click on the Address Book tab to select message recipients.3. Compose your message in the large message area provided.4. Click Send Mail at the top or bottom of the window.How To Change Your PasswordTo change your password, please follow these steps.1. Click Preferences on theNavigation Bar on the left sideof the screen.2. Click Password.3. Choose a new password that isat least five alphanumericcharacters in length.Note: Passwords are casesensitive.4. Enter your current password inthe Current Password field.5. Enter your new password in theNew Password field.6. Verify your new password by re-typing it in the Retype New Password field.7. Click Ok. Your new password will be required the next time you login to yourColdwell Banker COLDWELL BANKER EMAIL account.Note: You may encounter security warnings when changing your password, becauseColdwell Banker COLDWELL BANKER EMAIL uses a secure connection for all password transactions.Please refer to Online Help section How to Disable Security Warnings on Your Browser forinformation on disabling these warnings.How To Use SettingsTo access Settings, please follow these steps:1. Click Preferences on the Navigation Bar on the left side of the screen.2. Click Settings.7
Coldwell Banker Email BasicsGeneral Settings.Number of items to display per pageSelect the number of items you want to display per page from the drop-down menu. The number selectedwill determine the number of items that display in Read Mail, History, and other pages.Empty Trash on logoutCheck this box to automatically clear the contents of the Trash folder every time you logout.Note: Once deleted from Trash, these messages can no longer be accessed.Default time zoneChoose the preferred time zone for your Coldwell Banker COLDWELL BANKER EMAIL account byselecting from the drop-down menu.Note: The time zone selection is reflected on all incoming and outgoing messages. Daylight SavingsTime is applied where necessary, based on the time zone selection.Preferred languageSelect the radio button next to the default language of choice for viewing theColdwell Banker COLDWELL BANKER EMAIL Web client.Note: This setting will not affect the language in which your messages are sent or received.Disable warnings when emptying Trash/Junk Mail FoldersCheck this box if you would like to disable popup confirmation boxes when emptying your Trash or JunkMail Folders.8
Coldwell Banker Email BasicsView attached images inside messagesCheck this box if you want images received as attachments to be automatically opened at the bottom ofyour message.Note: This option allows particular file types such as .gif, .jpeg, or HTML to automatically open. Fileattachments that require another application be used for viewing will not open within your message.Hide images from the Internet in HTML messagesCheck this box if you want to hide all images from the Internet when reading HTML messages. Ifselected, images from the Internet will be replaced with a gray box when viewing the message. You willbe notified of this change on the Read Mail page and you may select an option to view the images forspecific emails.Note: This option does not apply to attachments (see "View attached images inside messages" above) orto certain types of embedded images such as stationery.View messages using a fixed-width fontCheck this box if you want all message text to be displayed with equal space between each character.Pop-up read mail windowCheck this box to display a separate pop-up window when reading a message.Notify when new messages are received while logged inCheck this box to receive notification via a popup window when new messages are received while youare logged into the webmail. There may be a delay between the time a message is received and the timethe notification is displayed since the system will only periodically poll your Inbox for new messages. Youwill only be notified of new mail in your Inbox and not in other folders.Note: This feature may not work on all browsers. If you are using a popup blocker, this feature may notwork unless you allow popups from this site. This feature requires a constant connection to the Internet; ifyour Internet connection is lost, your browser may attempt to reconnect to the Internet.Resize columns on message list pageCheck this box to enable resizing of columns on the message list page. You can change the size of theFolder, From/To, Subject, Date, and Size columns to meet your needs.9
Coldwell Banker Email BasicsNote: This feature may not work on all browsers. If the Read Mail page does not appear correct after youselect this option, you should uncheck this feature. This feature works best on latest versions of InternetExplorer, Netscape, and Firefox browsers.Name that appears in outgoing mailChoose the name that you want to appear on all outgoing mail, next to your email address.Note: This feature changes the name that appears on outgoing messages, it DOES NOT change THEColdwell Banker Coldwell Banker Email login name. Continue to login to yourColdwell Banker COLDWELL BANKER EMAIL account with your original login name.Save copy of outgoing mail in Sent folderCheck this box to save a copy of every outgoing mail in your Sent Folder.Note: Saving a copy of your outgoing message allows you to reference then at a later time. However,these messages count toward your storage allotment so it is recommended that you periodically clear thisfolder.Pop-up write mail windowCheck this box to display a separate pop-up window when writing, replying to or forwarding messagesallowing you to reference another message or document while composing an outgoing message.Note: After clicking Ok, you must click Reload or Refresh on your Web browser's toolbar to activate thisfeature.Quote original messageCheck this box to include a bracket ( ) before each line of the original message when using Reply orReply All.Note: The original message will always be included. The Quote Original Message option simplyhighlights that original message with a bracket.Forward Inline or as AttachmentSelect whether you want forwarded messages to appear as Attachments or Inline (within the document).10
Coldwell Banker Email BasicsSignaturesSignature files can be created to save you time composing a message. Once created, a signature can be addedto the end of outgoing mail. If a signature file is designated Default, it will automatically be added to the end ofeach outgoing message unless you specify otherwise.How To Create SignaturesTo create a signature file for outgoing messages, please follow these steps:1. Click Preferences on the Navigation Bar on the left side of the screen.2. Click Signatures.3. Click New.4. Enter a name for the signature file.o Check Send as HTML ifyou want an HTMLsignature. You will need toknow HTML programmingto create this signature.5. Type your signature information.6. Click Ok to save your signature file.How to Edit SignaturesTo edit an existing signature file for outgoing messages, please follow these steps:1. Click Preferences on the Navigation Bar on the left side of the screen.2. Click Signatures.3. Locate the signature file you wish to edit and click Edit. COLDWELL BANKER EMAIL will display thesignature information.4. Type in your changes. Click Ok to save your changes or Cancel to exit.11
Coldwell Banker Email BasicsHow to Delete SignaturesTo delete an existing signature file, please follow these steps:1. Click Preferences on the Navigation Bar on the left side of the screen.2. Click Signatures.3. Locate the signature file you wish to delete and click Delete.How to Change Your Default SignatureTo select an existing signature file as the default signature file, please follow these steps:1. Click Preferences on the Navigation Bar on the left side of the screen.2. Click Signatures.3. Locate the signature file you wish to select as the default and click the Default check box.To remove the default from an existing signature file, please follow these steps:1. Click Preferences on the Navigation Bar on the left side of the screen.2. Click Signatures.Locate the signature file currently selected as the default and click the Default check box to inactivate the default.How To Use AttachmentsColdwell Banker Email allow users to send multiple files with each outgoing message.To attach files to your outgoing message, please follow these steps:1.2.3.4.Click Write Mail on the Navigation Bar on the left side of the Web browser window.Address and compose the message.Before sending the message, click Browse at the bottom of the window.Select the file you would like to attach. Note: You may need to change the file type to All in the pop-upwindow.5. Click Open when you have selected the appropriate file from the pop-up window.6. Click Attach to attach the file to your message. Click Remove to detach the file from your message.7. To send your message, click Send Mail located at the top or bottom of the Write Mail window.How To View Your HistoryThe History File allows you to view an itemized listing of all incoming and outgoing email.12
Forwarding Your AccountTo view your history, follow these steps:1. Click Services on the Navigation Bar on the left side of your screen.2. Click on the History option.To view information about a particular message in the History list:3. Click on the mail link in the "Address" column. The following information about your message will display:o The message ID (also called the Internal Tracking Number).o The date and time that the message was received in your Coldwell Banker COLDWELLBANKER EMAIL account.o The sender of the message. (From)o The recipient of the message.o The subject of the message.o The size of the message.o The action taken on the message (each action will have a separate History detail).4. To read a message from the History File, click the Subject link. Note: You can only access thosemessages that are stored in one of your Folders. In order to read your outgoing mail, the "Save in SentFolder" option must be selected for your outgoing mail. The "Save in Sent Folder" option is available inSettings, under Preferences.NOTE: When a History entry turns 8 days old, it will automatically be deleted from the History File.13
Forwarding Your AccountThe Forward to Email feature allows you to forward selected email from your COLDWELL BANKER EMAILaccount to another email address. To configure the Forward to Email service, follow these steps:1. Click Services on the Navigation Bar on the left side of the screen.2. Click the Forward to Email option.3. To create a new Forward to Email filter, click the "New" button.4. Enter the email address to which you would like youremail forwarded. You must include the domainname, e.g., jdoe@domain.com.5. Next, you must decide when this forwarding servicewill be used.If you select Always, please proceed to step 7.If you select When, you can create a filter to “match”messages that you wish to forward under certaincriteria:o Subject: Sender, To, CC, or To and CC:Contains: Doesn't Contain, Is, Isn't,Starts With, Ends With, Is Empty:In the third box, type in the text that will beused to flag the Forward to Email service.oMail Type: If you would like your mail filtered according to type, click this button.Your choices for filtering by Mail Type are: Is Text, Is HTML, and Contains Attachments. Note:When you filter your mail by type, the entire message is used to determine filtering criteria,including signatures and attachments.oMail is received between/and: If you would like your mail filtered according to time, click thisbutton. The pull-down menus contain all hours of the day, both AM and PM.oMail Priority is: If you would like your mail filtered according to priority, make a selection fromthis pull-down menu. For example, any incoming mail with a high priority flag could be forwardedto a specific email address.oMail Size is: You can filter your mail by selecting whether the size of the message is greater orless than a given size. All sizes are in Kilobytes.You have the option of creating additional criteria on the filter, to do so click on the "More" button.6. Click "Ok" when you have finished setting up your Forward to Email filter.14
Forwarding Your Account7. Your Forward to Email service will be listed on the main Forward to Email page. It will automatically beactivated. To deactivate it, uncheck the Active check box.You can also perform the following tasks on this page: Edit: Click the "Edit" button to edit a current Forward to Email filter.Delete: Check the box to the left of the Forward to Email filter(s) you would like to delete then Click the"Delete" button.Keep Local Copy of Forwarded Mail: Checkthis box if you would like to keep a copy ofyour forwarded email in your COLDWELLBANKER EMAIL account.How To Use Notification FiltersNotification Filters allow you to forward selected messages (without attachments) from your COLDWELLBANKER EMAIL account to another email address. Notification Filters are ideal for forwarding messages toSMTP-addressable wireless devices.1. Click Notification Filters in the navigation bar. Check a filter and then press Activate/Disable/Delete to turn it on/off/delete it.Click Edit to change a current notification filter.2. Click New to create a new notification filter.Note: A local copy of all forwarded mail isautomatically kept on the server. This ensures thatyou will receive messages (and attachments) viayour primary email account even though you haveforwarded a copy to a wireless device.3. You can create filters based upon When messages match certain criteria before forwardingto your wireless device. Use the filter criteria tosetup a filter according to Subject, Mail type,time of day, priority or Mail Size.4. Click Ok to activate your new notification filter.15
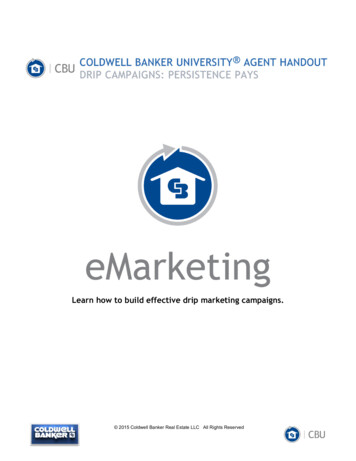
IMAP/POP3 Settings for Outlook & Outlook ExpressColdwell Banker Email provides the ability to use email clients, like Microsoft Outlook and Outlook Expressthrough the available IMAP & POP3. What are IMAP and POP3? Here’s a quick description of each function:IMAP: A setting in email that allows your email messages to be pulled down to an email client, such as Outlook,while still storing the messages in your web based Coldwell Banker Email account. Note: Using the IMAP settingwill still hold your account to the 10 MB storage limit as your messages are still being stored in your web-basedaccount.POP3: An email setting that pushes your email messages from your web based account down to your email clienton your computer. Once your messages are received in Outlook, they are no longer stored in your web basedColdwell Banker Email account, but rather stored on your computer’s hard drive. It is recommended that youuse the POP3 setting instead of IMAP, as POP3 will keep your account from exceeding its storage capacity asit moves the messages from your account on the Internet down to your computer.Setting up your Coldwell Banker Email account in an email client, like Outlook, can help you better manage youremails and combine email with other features like to-do lists, calendars, and more.To create a NEW IMAP or POP3 account in MS Outlook, follow these steps:Step 1: Once you are in Outlook from the main menu click ToolsAccounts to obtain the following screen.Step 2: Click “Add”“Mail”16
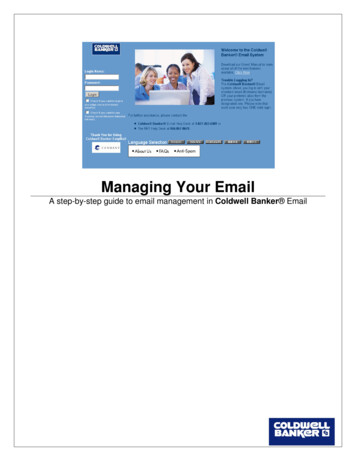
IMAP/POP3 Settings for Outlook & Outlook ExpressStep 3: Enter your desired Display Name.Step 4: Enter your name@coldwellbanker.comColdwell Banker Email address17
IMAP/POP3 Settings for Outlook & Outlook ExpressStep 5: Select IMAP or POP3 from the “Myincoming mail server is a” pull down.Step 6: In the “Incoming mail server” box input:imap.coldwellbanker.com for IMAP users andpop.coldwellbanker.com for POP usersStep 7: Enter the Outgoing SMTP mail server currentlyprovided to you by your IT department or ISP service at home.IMPORTANT: Contact your IT dept or ISP for exact setting.18
IMAP/POP3 Settings for Outlook & Outlook ExpressStep 8: Enter your account name. This willgenerally be your firstname.lastname@coldwellbanker.com. Note that you mustinclude the entire email address.Step 9: Click the “Rememberpassword” box and enter yourpassword.Optional: Check only if required by your IT department.19
IMAP/POP3 Settings for Outlook & Outlook ExpressStep 10: If connecting from your office’s Internetconnection, check LAN option.Otherwise, check either the phone line or manualoptions. If you have any question please consultyour IT department or ISP.20
IMAP/POP3 Settings for Outlook & Outlook ExpressStep 11: Click the “Finish” button21
IMAP/POP3 Settings for Outlook & Outlook ExpressOnce the Account is created you should double-check the configurations and make sure all the settings arecorrectly set. Follow the instructions below to complete the setup.Step 1: From the main menu click ToolsAccounts to obtain this screen:Step 2: Select your IMAP or POP entry that youhave createdStep 3: Click the “Properties”button.Step 4: Under the “General” settings tab be sureyour Name and email address are correct.22
IMAP/POP3 Settings for Outlook & Outlook ExpressStep 5: Click the “Servers” tab and make sure the“Incoming mail” box reads: imap.coldwellbanker.comor pop3.coldwellbanker.com, depending on the typeof server being used.Check with your IT dept. or ISP for exact settingof Outgoing mail (SMTP).Optional: Check only if required by your IT department.23
IMAP/POP3 Settings for Outlook & Outlook ExpressStep 6: Select the “Advanced” tabStep 7: Outgoing mail (SMTP) should be:25Step 8: Incoming Port should be. . .- if IMAP: 993- if POP3: 995Step 9IMPORTANT: This server, unlike the priorsystem, DOES NOT require a secure connection(SSL).24
Using A Vacation ReplyThe Vacation Reply FeatureThe Vacation Reply feature allows you to automatically send a reply in response to all incoming mail for aspecified time period.To create a Vacation Reply setting, follow these steps:1. Click Services on the Navigation Bar on the left side of your screen.2. Click the Vacation Reply option.The Vacation Reply page will display, showing the current Vacation Reply setting, if there is one. Note:You may have only one Vacation Reply setting created at a time.3. To create a new Vacation Reply message, click New.4. Select the time periodduring which your VacationReply message willautomatically be sent toincoming mail. Select thestart and end dates.5.Write the content of yourVacation Reply message inthe large message area.If you'd like to send yourVacation Reply message asHTML, you must compose themessage in HTML and click the"Send as HTML" box.6. If you'd like to attach aSignature to your VacationReply message, select fromthe pull-down menu.7. Click the "Ok" button when you have finished setting up your Vacation Reply message.NOTE: Your Vacation Reply message will be listed on the main Vacation Reply page.It will automatically be activated. To deactivate it, uncheck the Active check box.25
Using the Address BookUsing the Address BookUse your personal address book to store contacts and contact groups. Your contact list is closely integrated withall mail functions, so it is easy to address emails using your contact list. You can view, edit, and delete contactsand contact group, print contacts, and import and export contacts to synchronize with other email clients. To useyour Personal Address Book, follow these steps:1. Login to your Coldwell Banker Email account.2. Click Address Book on the Navigation Bar on the left side of your screen. If you have access to more thanone Address Book, click on the Personal Address Book link. Your Contacts list will display.3. You may search your contact list by entering a search string into the "Name or Email" box and pressingSearch. This search string will be compared a
Coldwell Banker Email Basics 6 When reading an email message, the following additional options are available: Add to Address Book: Click Add to Address Book to add the sender of the message to your Address Book. Block Sender: Adds this sender to your personal spam filter. Allow Sender: Adds this sender to your personal "white list" (always approved sender).