Transcription
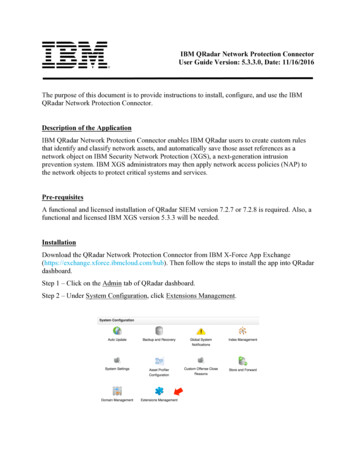
IBM QRadar Network Protection ConnectorUser Guide Version: 5.3.3.0, Date: 11/16/2016The purpose of this document is to provide instructions to install, configure, and use the IBMQRadar Network Protection Connector.Description of the ApplicationIBM QRadar Network Protection Connector enables IBM QRadar users to create custom rulesthat identify and classify network assets, and automatically save those asset references as anetwork object on IBM Security Network Protection (XGS), a next-generation intrusionprevention system. IBM XGS administrators may then apply network access policies (NAP) tothe network objects to protect critical systems and services.Pre-requisitesA functional and licensed installation of QRadar SIEM version 7.2.7 or 7.2.8 is required. Also, afunctional and licensed IBM XGS version 5.3.3 will be needed.InstallationDownload the QRadar Network Protection Connector from IBM X-Force App . Then follow the steps to install the app into QRadardashboard.Step 1 – Click on the Admin tab of QRadar dashboard.Step 2 – Under System Configuration, click Extensions Management.
Step 3 – Click Add in the top-right corner of the window. Browse the file system for thedownloaded app, and select it. Check the Install Immediately checkbox, and then click Add.Step 4 – After Validating Install window finished processing, check Overwrite option, then clickInstall.Step 5 – Close the Extensions Management window, and then select the QRadar NetworkProtection Connector tab within QRadar.The QRadar Network Protection Connector tab will appear within QRadar dashboard. Pleasecheck next section for configuration.ConfigurationClick Setting of QRadar Network Protection Connector, and enter correct data into fields:QRadar Server IP Address, QRadar Authentication Token, XGS Server IP Address, XGSAuthentication Name, XGS Authentication Password, and Triggering Interval, as shown in thefollowing.
Please obtain your QRadar Authentication Token from Authorized Services under Admin tab ofQRadar dashboard, as shown in the following, by Add Authorized Service.
Using the ApplicationIBM QRadar Network Protection Connector Main Panel contains a list of rules and four buttons:New, Setting, Refresh, and “Run Now”. You can define a new (logical) set of assets by clickingNew and specifying its name and rules. You can change the configuration in Setting, in whichyou should have configured QRadar API Key and XGS authentication. Clicking on Refresh willupdate the list of rules, bringing up assets found according to the rules. Finally Run Now allowsyou to request an immediate run of asset checking, instead of waiting for next batch. Operationdetails are shown in the following sections.1. Main PanelWhen you browse to the QRadar Network Protection Connector tab, you should see thefollowing Main Panel. It contains Sets of IP Addresses to Watch, which consists of a rule list andfour buttons. The rule list contains four columns: Name of set, Rules defining set, Assets in set,and Actions. In Actions, there are two smaller buttons, one is Edit, which will take you to theEdit Panel (explained in a later section); the other is Delete, which will delete current set andrules.The four big buttons are: New, Setting, Refresh, and Run Now. Clicking on New button willbring up New Panel (explained in next section), and clicking on Setting button will bring upSetting Panel (explained in later section). Refresh button allows you to update Assets in set,which is shown in the rule list. Run Now button, when clicked, will force the backend service torun asset scanning immediately without waiting for next batch. Note that: the batch interval isdefined in the Triggering Interval of Setting Panel.
2. New PanelAfter clicking on New button in Main Panel, another panel for you to input set name and ruleswill show up, along with three buttons Save, Cancel, and Reset, as shown in the following. Youmust provide Name of this set, before it can be saved. In the Rules defining this set box, you canclick on Add rule, to add another rule at the same level; or you can click on Add group, whichallows you to create lower-level rules. For multiple rules at the same level, you can click on theAND OR icon to change the way the rules will be evaluated (AND condition vs OR condition).Finally, you can always Delete a rule that is no longer needed. The big buttons are explained inthe following.Save button: clicking on this button will save the edited data, then take you back to the MainPanel. Cancel button: clicking on this button will discard whatever edited, and take you back tothe Main Panel. Reset button: clicking on this button will delete edited data, and give you a cleansheet to start over.
3. Edit PanelAfter clicking on the (small) Edit button located in Actions column in Main Panel, another panelfor you to edit the corresponding rules (on the same row of the Edit) will show up, along withthree buttons Save, Cancel, and Reset. All the buttons have same functions as that in New Panel,however, Name of this set will not be editable.
4. Setting PanelAfter clicking on the (big) Setting button in Main Panel, another panel for you to edit theconfiguration will show up, along with three buttons Save, Cancel, and Reset. All the buttonshave same functions as that in New Panel. If you accidentally Reset your configuration, justCancel current editing, and it will go back to Main Panel.More InformationMore information can be found at the following URL: http://apps.xforce.ibmcloud.com
that identify and classify network assets, and automatically save those asset references as a network object on IBM Security Network Protection (XGS), a next-generation intrusion prevention system. IBM XGS administrators may then apply network access policies (NAP) to the network objects to protect critical systems and services. Pre-requisites