Transcription
AC-14100EAC-14100HPortable Air ConditionerOWNER’S MANUALRead and save these instructions.Manual v1.1
2A Name You Can TrustTrust should be earned and we will earn yours. Customer happiness is the focusof our business.From the factory to the warehouse, from the sales floor to your home, thewhole NewAir family promises to provide you with innovative products,exceptional service, and support when you need it the most.Count on NewAir.As a proud NewAir owner, welcome to our family. There are no robots here,real people shipped your product and real people are here to help you.Contact Us:For questions regarding your product, please contact us comwww.newair.comConnect with .NewAir.com
3READ AND SAVE THESE INSTRUCTIONS.TABLE OF CONTENTSSafety Information & Warnings . 4Safe Operation Guidelines . 4Energy SAving Tips . 6Disposal Guidelines . 6Parts List . 7Parts Diagram. 8Assembly & Installation . 8Installation . 8Installing the Activated Carbon Filter . 12Operating Instructions . 12Control Panel Diagram . 13Control Operation . 13Energy Efficiency Boosting Function . 16Automatic Functions . 17Draining the Unit. 17Continuous Drainage . 18Heating Mode . 18Cleaning & Maintenance. 19Cleaning Your Portable Air Conditioner . 19End of Season Storage . 20Troubleshooting . 20Limited Manufacturer’s Warranty . 22SPECIFICATIONSMODEL NO.VOLTAGE:FREQUENCY:POWER CONSUMPTION, COOLING:POWER CONSUMPTION, HEATING:AIR VOLUME (MAX SPEED):DEHUMIDIFICATION CAPACITY:AC-14100E115V60Hz1417W / 12.8AN/A250 CFM2.96 pints/hourAC-14100H1270W / 11.4A
4COMPRESSOR TYPE:REFRIGERANT TYPE:NUMBER OF FAN SPEEDS:TIMER:EXHAUST PIPE DIMENSIONS:COOLING CAPACITY:EER:NOISE RATING:RotaryR-410A31 – 24hours5.59” x 59.06” (120 x 1500 mm)14,000 BTUs9.8857 dBSAFETY INFORMATION & WARNINGSSAFE OPERATION GUIDELINESTo reduce the risk of fire, electrical shock and/or injury to persons or propertyplease follow basic safety precautions. Be sure to read all instructions beforeusing this appliance and observe the following safety tips:ALWAYS DO THIS: Your air conditioner should beused in such a way that it isprotected from moisture: e.g.condensation, splashed water,etc. Do not place or store yourair conditioner where it can fallor be pulled into water or anyother liquid. If your unitbecomes wet, unplugimmediately.Always transport your airconditioner in a vertical positionand stand on a stable, levelsurface during use.Turn the product off when notin use.NEVER DO THIS:ooooooDo not operate your airconditioner in a wet room suchas a bathroom or laundry room.Do not touch the unit with wetor damp hands or whenbarefoot.Do not press the buttons on thecontrol panel with anythingother than your fingers.Do not remove any fixed covers.Never use this appliance if it isnot working properly, or if it hasbeen dropped or damaged.Never use the plug to start andstop the unit. Always use theswitch on the control panel.http://www.NewAir.com
5 Contact a qualified person tocarry out repairs. If the powercord is damaged it must berepaired by a qualifiedtechnician.Keep an air path of at least 14”(36 cm) all around the unit fromwalls, furniture and curtains.If the air conditioner is knockedover during use, turn off the unitand unplug it from the powersupply immediately.ooooDo not place objects on the unit,and do not cover or obstruct theinlet or outlet grilles.Do not use hazardous chemicalsto clean or come into come intocontact with the unit. Do notuse the unit in the presence offlammable substances or vaporsuch as alcohol, insecticides,gasoline, etc.Do not allow children to operatethe unit unsupervised.Do not use this product forfunctions other than thosedescribed in this instructionmanual.Shock Hazard – Electrical Grounding Required Never attempt to repair or perform maintenance on the unit until theelectricity has been disconnected. Never remove the round grounding prong from the plug and never use atwo-prong grounding adaptor. Altering or cutting of power cord, removal of power cord, removal of powerplug, or direct wiring can cause serious injury, fire, loss of property and/orlife, and will void the warranty. Never use an extension cord to connect power to the unit. Avoid operating this beverage cooler in excessively moist or humidenvironments.Important Precautions: Do not lift unit by door handle. Never install or operate the unit behind closed doors. Failure to clean the condenser every six months can cause the unit tomalfunction. Allow unit temperature to stabilize for 24 hours before use. Do not block any internal fans.
6 Keep the beverage cooler away from hazardous materials orcombustible/flammable substances. Use only genuine supplier’s replacement parts. Imitation parts can damagethe unit, affect its operation or performance, and may void the warranty.ENERGY SAVING TIPSFor maximum efficiency: Use the air conditioner in the recommended room size (Up To 525 SquareFeet). Keep doors and windows closed while the portable air conditioner is in use. Keep curtains and blinds closed during the sunniest part of the day while theair conditioner is in operation. Keep the filters clean. Once the room or area has reached your desired comfort level, be sure toreduce the unit’s temperature and ventilation settings.DISPOSAL GUIDELINESDo not dispose of this product as unsorted municipal waste. Collection of suchwaste separately for special treatment is necessary. Disposing of waste inforests and landscapes endangers your health when hazardous substances leakinto the ground-water and find their way into the food chain.It is prohibited to dispose of this appliance in domestic household waste. Fordisposal, the following options may be available: The municipality has established collection systems, where electronic wastecan be disposed of free of charge to the user. When buying a new product the retailer will take back the old product freeof charge. The manufacturer will take back the old appliance for disposal free of chargeo the user. As old products contain valuable resources, they can be sold to scrap metaldealers.http://www.NewAir.com
7PARTS LISTWhen you receive your unit, carefully remove the exterior and interiorpackaging. It is recommended that you retain the packaging for future use.Check to make sure the following parts are included: Air conditionerExhaust hose (A)Hose adaptor (B)Adaptor cover (C)Extendable window kit (3 pcs) (D)Drain hose (E)Activated carbon filter (F)Remote control (G)1 instruction manual
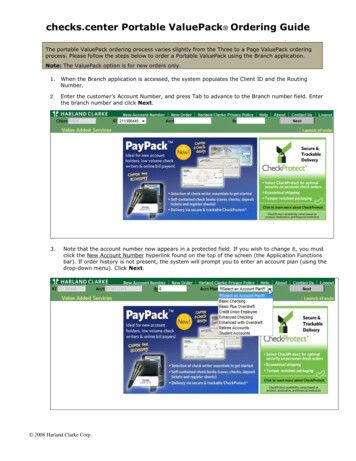
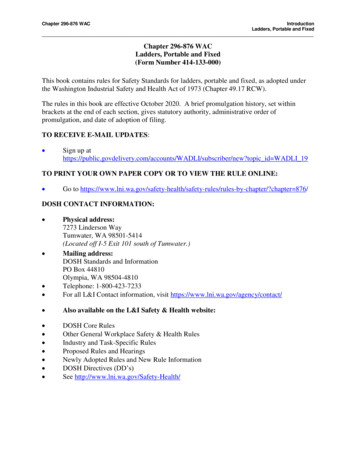
8PARTS DIAGRAM1.2.3.4.ControlpanelCarryinghandleWater tankCasters5.6.7.8.Air louversAir filterExhaust airoutletAir filter9.10.11.12.Air inletCord storageAir inletWaterplug/drainageholeASSEMBLY & INSTALLATIONINSTALLATIONBefore connecting the appliance to a power source, let it standupright for approximately 2 hours. This will reduce the possibilityof a malfunction in the cooling system from handling duringtransportation.http://www.NewAir.com
9LOCATIONThis unit is a portable air conditioner that may be moved from room to room.Hot air must be exahusted out of the room for the appliance to work. This canbe done with the included window kit or by cutting a hole into a wall. The air conditioner should be placed on a firm foundation to minimizenoise and vibration.The unit has casters to aid placement, but it should only be rolled onsmooth, flat surfaces. Use caution when rolling on carpet surfaces. Do notattempt to roll the unit over objects.The unit must be placed within reach of a properly rated grounded socket.Never place any obstacles around the air inlet or outlet of the unit.Allow 12 inches to 40 inches of space from the wall to the window forefficient air conditioning.WINDOW SLIDER KIT INSTALLATIONYour window slider kit has been designed to fit most standard “vertical” and“horizontal” window applications. However, it may be necessary toimprovise/modify some aspects of the installation procedures for certain typesof windows.Note: If the window opening is less than the minimum length of the windowslider kit, cut the piece with a hole in it, so that it is the correct size to fit thewindow opening. Leave the hole in the window slider kit intact. Never cut outthe hole in the window slider kit.1.2.3.Open the window and insert the window kit into the open gap.Close the window until the window kit is held securely. You may need toexpand the size of the window kit using the included window spacers. Thistechnique can also be used for sash windows.Insert one end of the exhaust hose into the exhaust air outlet located onthe back of the air conditioner. Attach the exhaust hose adapter to theother end of the exhaust hose and connect the adapter to the window kit.Venting through a Wall
101.2.3.4.Cut a 6” (152 mm) diameter hole in the wall.Insert one end of the exhaust hose into the exhaust air outlet located onthe back of the air conditioner.Insert the exhaust hose through the hole. On the other side of the wall,attach the round connector to the exhaust hose.When the air conditioner is not in use, cover the hole with the providedexhaust cap.http://www.NewAir.com
11POSITIONING THE EXHAUST HOSE Slide the hose adaptor over the opening on the back of the unit. Insert one end of the exhaust hose into the adapter. Avoid kinks and bends in the exhaust hose. This can cause moist air toaccumulate, resulting in overheating and unexpected shut offs. The exhaust hose may be extended from 12” (300 mm) to 59” (1500 mm),but for maximum efficiency use the shortest hose length possible.WARNING: The included exhaust hose is specially designed to fit thespecifications of this unit. Do not extend it with your own hose, as this cancause the air conditioner to malfunction.
12INSTALLING THE ACTIVATED CARBON FILTER1.2.Remove thefilter from theunit.Separate thefilter from thefilter holder.3.4.5.Remove the activated carbon filter from its plastic bag.Insert the activated carbon filter into the filter and attach holder.Reattach the filter holder onto the filter (make sure the activecarbon filters will be held properly between the two pieces).Insert the filter set into the unit.OPERATING INSTRUCTIONSBefore you begin, thoroughly familiarize yourself with the control panel andremote control and all its functions, and then follow the symbols for thefunctions you desire.This unit can be controlled by the unit control panel alone or with the remotecontrol.http://www.NewAir.com
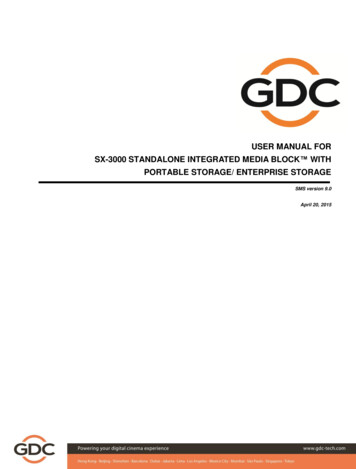
13CONTROL PANEL DIAGRAMBUTTONS1. ON/OFF (power) button2. Mode button3. Temperature increasebutton4. Temperature decreasebutton5. Fan speed (ventilation)button6. Timer button7. Sleep mode buttonCONTROL OPERATIONLIGHTS AND INDICATORSa. Displayb. Heater indicator (AC14100H only)c. Automatic mode indicatord. Cooling indicatore. Fan indicatorf. High speed indicatorg. Medium speed indicatorh. Low speed indicatori. Receiver for remote controlj. Timer indicatork. Sleep mode indicatorl. Full tank indicator
14TURNING THE UNIT ON AND OFF1.2.3.Press the ON/OFF button. The unit will work in cooling mode on lowfan speed. The preset temperature is 75 F.At this time, the indicator lights will show any functions that are inprogress. Please note the display window will show ambient roomtemperatures ranging from 32 F to 122 F.To turn the unit off, press the ON/OFF button again.SETTING THE FAN/VENTILATION SPEEDPress the fan speed button to select the desired fan speed (high, medium, orlow). The desired fan speed will be shown in the display screen.SETTING THE TIMER1.2.Press the time button to set the desired number of operating hours (from1 to 24 hours). When the set time has been reached, the machine willautomatically turn off. The display window will show the number ofhours being set as you press the TIMER button. If the TIMER is not set,the unit will work continuously.By pressing the timer button without selecting any other modes orsettings, you can set the number of hours to be delayed before the unitturns on. For example, if you press the timer to “2”, the unit willautomatically turn on after 2 hours.HEATING MODE (AC-14100H model only)This portable air conditioner can work as a heater because it has a heat pump.Ambient warm air is recycled and used to heat your immediate area. Theexhaust hose will still need to be fitted onto the unit in order for the cold airto be removed. When in heating mode, the machine can be set on HIGH orLOW speed.DEHUMIDIFICATION FUNCTION:When the air conditioner is in dehumidification mode, the temperaturecannot be adjusted, and the fan speed will automatically be set to low.http://www.NewAir.com
15SETTING THE MODE/FUNCTION1.2.Press the MODE button to select the desired mode (cooling, heating andfan). Heating mode is only available on the AC-14100H.The selected mode’s indicator light will turn on.SETTING THE TEMPERATURE1.2.3.Press the increase temperature or decrease temperature button tochange the set temperature.The display window will then indicate the set temperature. If notemperature is set, the display will show the room’s ambienttemperature.Please note that the default temperature of this portable air conditioneris 75 F for cooling and 68 F for heating.SLEEP MODE1.2.3.4.5.When in cooling mode, press the sleep button. The set temperaturewill increase 1 F on the first hour, another 1 F on the second hour,and then maintain that temperature onwards.When in heating mode, press the sleep button. The set temperaturewill decrease 1 F on the first hour, another 1 F on the second hour,and then maintain that temperature onwards.In sleep mode, the fan will automatically be set to low. By pressingthe sleep button again, the set temperature and fan speed will revertback to the previous settings.The unit will shut down automatically after it has been in sleep modefor 12 hours.Sleep mode will not work when the unit is in the fan,dehumidification, or auto mode. It will only work in cooling orheating mode.ERROR MESSAGES:This machine is equipped with a self-diagnosisfunction. If there is an error with the air conditioner,the LCD screen will display “E1” or “E2.” If either ofthese error messages appears, please contact themanufacturer or a service center.
16All of the above functions can be controlled with the included remote. Theremote requires 2 AAA batteries.ENERGY EFFICIENCY BOOSTING FUNCTIONThis unit is equipped with an energy efficiency boosting function. By addingwater to the tank as shown below, energy efficiency can be increased,therefore saving you money on your energy bill and conserving theenvironment. The water helps to cool the compressor, cooling the exhaust andminimizing frost accumulation.This is very effective for dry, arid climates because an air conditioner needssome humidity to work efficiently and cooling the compressor will providecooler air. However, it is not recommended for especially humid areas becausethe unit will have plenty of moisture in the air with which to run efficiently.Please note: To use the energy efficiency boosting function, please follow thesteps above at least one hour before operation.CAUTION: After turning off the unit, please wait at least 3 minutesbefore turning it back on. This will prolong the life of thecompressor.http://www.NewAir.com
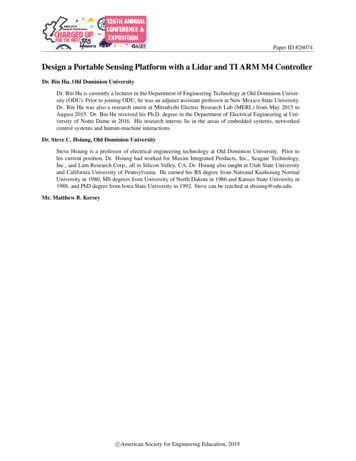
17AUTOMATIC FUNCTIONS The cooling system will turn off if the ambient temperature is lower thanthe set temperature. However the fan will continue operating at the setlevel. Once the ambient temperature rises above the set temperature,cooling will resume.The heating system will turn off if the ambient temperature is higher thanthe set temperature. However, the fan will continue operating at the setlevel. Once the ambient temperature drops below the set temperature,heating will resume.This machine is equipped with an ANTI-FROST function. When using theheating function in low temperature the heater will occasionally stopheating in order to melt any frost that has accumulated within the airconditioner. Normal operation will resume in a few moments.DRAINING THE UNITDuring the cooling and dehumidifying processes, some water will be extractedfrom the air and stored within the unit’s water reservoir.If the water reservoir is full, both the compressor and motor will stop and theunit will beep (press any button to stop the beeping sound). The full water tankindictor light will also start flashing.To resume cooling, first empty the reservoir by following these steps:1.2.3.Turn off the air conditioner andunplug it from the wall socket. Toprevent water leakage, avoidmoving the unit when full.Place a container (such as a smallpan) underneath the drainage port.Remove the water plug from thedrainage port and allow the waterto drain out.
184.5.6.7.When the container is almost full, replace the water plug back into thedrainage port and empty the water container.Repeat until the water reservoir is completely empty.Replace the water plug back into the drainage port and make sure it isfirmly in place.Turn the unit back on. The warning signal should be off.CONTINUOUS DRAINAGETo operate the unit continuously without manually emptying the tank, followthese steps:1.2.3.Remove the drain plug from theback of the unit and retain it forfuture use.Connect the drainage hose includedwith the unit to the drainage port asshown.Connect the other end of the hoseinto a drain.Please note: The drain must be at or below the level of the drainage port. The full water tank indicator will not work when the unit is beingcontinuously drained. To extend the drainage hose, you can add an extension hose with an overalldiameter of approximately 0.7” (18 mm).HEATING MODEMODEL AC-14000H ONLY. In order to properly exhaust cool air, make sure the exhaust hose andwindow kit are installed correctly.http://www.NewAir.com
19 Set up the air cond
Use the air conditioner in the recommended room size (Up To 525 Square Feet). Keep doors and windows closed while the portable air conditioner is in use. Keep curtains and blinds closed during the sunniest part of the day while the air conditioner is in operation. Keep the filters clean.