Transcription
Draw GuideChapter 11Advanced Draw Techniques
CopyrightThis document is Copyright 2011–2015 by the LibreOffice Documentation Team. Contributorsare listed below. You may distribute or modify it under the terms of either the GNU General PublicLicense (http://www.gnu.org/licenses/gpl.html), version 3 or later, or the Creative CommonsAttribution License (http://creativecommons.org/licenses/by/4.0/), version 4.0 or later.All trademarks within this guide belong to their legitimate owners.ContributorsMartin FoxJohn A SmithJohn ClelandPeter SchofieldJean Hollis WeberFeedbackPlease direct any comments or suggestions about this document to the Documentation Team’smailing list: documentation@global.libreoffice.orgNote: Everything you send to a mailing list, including your email address and any other personalinformation that is written in the message, is publicly archived and cannot be deleted.AcknowledgmentsThis chapter is based on an original French document written for OpenOffice.org 1.x by MichelPinquier (translated into English by Alex Thurgood) and previous content revised by Jim Taylor.The chapter was revised for OpenOffice.org 2.0 by Linda Worthington, Daniel Carrera, Jean HollisWeber, and Agnes Belzunce, and later translated into German by Wolfgang Uhlig. The Germanrevisions were then translated into English and revised for OpenOffice.org 3.3 and LibreOffice 3.3by Martin Fox. Other contributors included Peter Hillier-Brook, Hazel Russman, Gary Schnabl, andClaire Wood.Publication date and software versionPublished 20 January 2015. Based on LibreOffice 4.3.Note for Mac usersSome keystrokes and menu items are different on a Mac from those used in Windows and Linux.The table below gives some common substitutions for the instructions in this chapter. For a moredetailed list, see the application Help.Windows or LinuxMac equivalentEffectTools Optionsmenu selectionLibreOffice PreferencesAccess setup optionsRight-clickControl click or right-clickdepending on computer systemOpen context menuCtrl (Control) (Command)Used with other keysF5Shift F5Open the NavigatorF11 TOpen Styles and Formatting windowDocumentation for LibreOffice is available at http://www.libreoffice.org/get-help/documentation
ContentsCopyright. 2Contributors. 2Feedback. 2Acknowledgments. 2Publication date and software version. 2Note for Mac users.2Multi-page documents. 5Using the page pane. 5Master pages. 6Master page view. 7Creating master pages. 7Renaming master pages. 7Deleting master pages. 7Inserting fields. 8Assigning master pages. 8Templates.9Templates from other sources. 10Creating templates. 10Using templates. 11Setting default template. 11Setting a custom template as default. 11Resetting default template. 12Editing templates. 12Editing. 12Updating documents from a modified template. 12Organizing templates. 13Creating template folders. 13Deleting template folders. 13Moving templates. 13Deleting templates. 13Importing templates. 14Importing template collections using the Extension Manager. 14Exporting templates. 15Multiple layers. 15Default layers. 15Inserting layers. 16Modifying layers. 16Working with layers. 17Selecting a layer. 17Hiding layers. 17Showing hidden layers. 17Locking layers. 17Unlocking layers. 17Renaming layers. 17Deleting layers. 17Advanced Draw Techniques3
Dimensioning. 18Configuring dimensioning. 18Drawing object styles. 18Context menu. 19Dimensioning dialog. 19Dimensioning objects. 20Drawing to scale.21Gallery images.22Using the Gallery. 22Creating themes and adding images. 22Deleting gallery themes and images. 24Updating the Gallery. 24Colors and color palettes.25Using colors. 25Selecting colors. 26Color palettes. 26Creating colors. 26Using color values. 26Using the Color Picker. 27Deleting colors. 28Bézier curves.28Drawing Bézier curves. 28Edit Points tools. 30Adding comments to a drawing. 31Connecting and breaking lines.32Advanced Draw Techniques4
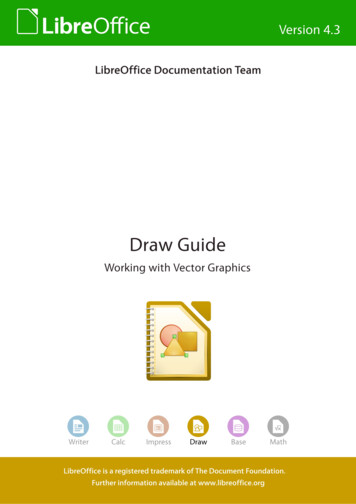
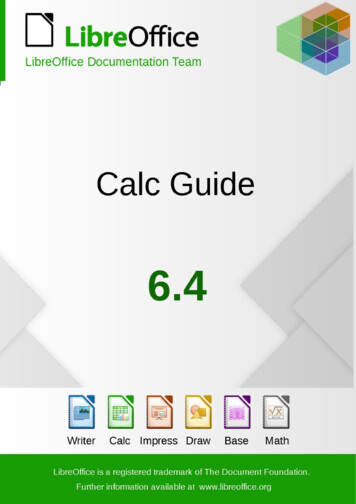
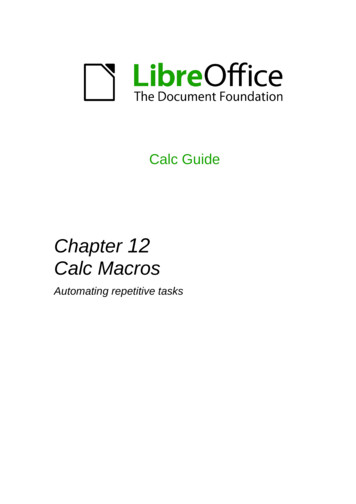
Multi-page documentsDraw documents, like Impress presentation documents, can consist of multiple pages. This allowsyou to create a drawing that has several sections that are stored as one file on a computer.When pages are inserted into a drawing, they are automatically named as Slide 1, Slide 2, and soon in the Navigator. As you change page order, the pages are automatically renumbered. However,if you want to easily identify each page, then it is recommended to give each page a memorablename.Using the page paneBy default the Page Pane (Figure 1) appears docked on the left of the workspace when you openDraw and shows every page in the drawing as a thumbnail. If the Page Pane is not displayed, goto View Page Pane on the main menu bar.Figure 1: Page Pane, Workspace, and SidebarNoteThe Page Pane is called Pages when it is in its docked position on the left of theworkspace. Select a thumbnail in the Page Pane and the corresponding page is loaded in theworkspace. Click on a page in the Workspace to activate it for editing. Alternatively, click on the Navigator iconon the Standard toolbar or press the F5 keyor go to View Navigator on the main menu bar to open the Navigator dialog (Figure 2)and select pages using this dialog. Alternatively, click on the Navigator iconon the Sidebar to open the Navigator section(Figure 3) and select pages using the Sidebar.Multi-page documents5
Figure 2: Navigator dialogFigure 3: Navigator section on Sidebar Select a thumbnail in the Page pane, then drag and drop the thumbnail to change the orderof pages in the document. Click and drag on the separator line between the Page pane and workspace to change thewidth of the Page pane. Click on the middle of this line to show or hide the Page pane (highlighted in Figure 1). Press and hold the Ctrl key, then double-click in the title bar of the Page pane to undock itand turn it into a floating window. Press and hold the Ctrl key, then double-click in the title bar of the undocked Page pane todock it back into its default position on the left of the workspace. Right-click in the Page pane and, using options in the context menu, you can insert, deleteor rename pages and cut, copy, and paste pages. Go to Insert Slide on the main menu bar to insert a new page or Insert DuplicateSlide to insert a duplicate page.Master pagesA master page is a page that is used as the starting point for other pages in your drawing. It issimilar to a page style in Writer and controls the basic formatting of all pages based upon it. Adrawing can have more than one master page so that you can assign a different look to pages inyour drawing, for example title page, contents page, and drawing pages.A master page has a defined set of characteristics, including the background color, graphic, orgradient; objects (such as logos, decorative lines, and other graphics) in the background, theformatting of text, blocks of standard text, and insert fields such as page numbering, date, andfilename.Multi-page documents6
NoteLibreOffice uses interchangeable terms for one concept: slide master, master slide,and master page. All refer to a page which is used to create other pages. Whensearching for information in Draw Help, it may be necessary to use alternativesearch terms.Master page viewTo add objects and fields to a master page, go to View Master on the main menu bar to open themaster page view. The Master View toolbar (Figure 4) also opens when you switch to master view.If this toolbar does not appear, go to View Toolbars Master View on the main menu bar.To return to normal page mode, click on Close Master View in the Master View toolbar or go toView Normal on the main menu bar.Figure 4: Master View toolbarCreating master pagesEach drawing you create already has a default master page, but you can create extra masterpages to change the look of some of the pages in your multi-page drawing.1) Go to View Master on the main menu bar to open the master page view.2) Click on the New Master iconin the Master View toolbar to create a new master page.The new master page is automatically selected allowing you to add a new set of items tocreate a new look for your pages.Renaming master pagesEach new master page created has the default name of Default 1, Default 2, and so on. It isrecommended to rename your new master page with a more meaningful name. The default masterpage that was created when you first created your drawing can also be renamed.1) Go to View Master on the main menu bar to open the master page view.2) Right-click on a master page in the Page pane and select Rename Page from the contextmenu or click on the Rename Master iconon the Master View toolbar. This opens adialog where you can type a new name.3) Click OK to save the master page with its new name.Deleting master pages1) Go to View Master on the main menu bar to open the master page view.2) Select the master page you want to delete.3) Right-click on a master page that you created in the Page pane and select Delete Pagefrom the context menu or click on the Delete Master iconNoteon the Master View toolbar.The Delete option and Delete icon are only available when there is more than onemaster page in your drawing. You cannot delete the default master page that wascreated when you first created your drawing.Multi-page documents7
Inserting fieldsYou can insert fields on each master page by going to Insert Fields on the main menu bar andselecting a field from the context menu. The following fields can be inserted into a master page. Date (fixed) – inserts the current date into the master page as a fixed field. The date is notautomatically updated. Date (variable) – inserts the current date into the master page as a variable field. The dateis automatically updated when you reload the file. Time (fixed) – inserts the current time into the master page as a fixed field. The time is notautomatically updated. Time (variable) – inserts the current time into the master page as a variable field. The timeis automatically updated when you reload the file. Author – inserts the first and last names listed in the LibreOffice user data into the activepage. Page Number – inserts the page number into every page of the drawing. To change thenumber format, go to Format Page on the main menu bar and select a format from thedrop-down list in Layout Settings. File name – inserts the name of the active file. The name only appears after you save thefile.Assigning master pagesWhen your drawing has more than one master page, you can assign different master pages todifferent pages.1) Make sure you are in normal page view by going to View Normal on the main menu barand select the page you want to assign a new master page to it.2) Right-click on the page in the workspace area and select Page Slide Design from thecontext menu to open the Slide Design dialog (Figure 5).Figure 5: Slide Design dialogMulti-page documents8
Figure 6: Load Slide Design dialog3) If necessary, click Load to open the Load Slide Design dialog and use any predefinedDraw master pages or templates (Figure 6).4) If necessary, select the Exchange background page option to use the selected masterpage for all pages in the drawing.5) If necessary, select the Delete unused backgrounds option to delete any master pagesshown in the Slide Design dialog that have not been assigned to a page.6) Click OK to assign the selected master page to your page.TemplatesA template is a special type of document that you use as a basis for creating other documents. Forexample, you can create a template for company drawings so that any new drawing has yourcompany logo and name on the first page and any remaining pages in your drawing only show thecompany name.Templates can contain anything that regular documents can contain, such as text, graphics, a setof styles, and user-specific setup information such as measurement units, language, the defaultprinter, and toolbar and menu customization.All documents created using LibreOffice are based on templates. You can create a specifictemplate for any document type (text, spreadsheet, drawing, or presentation). If you do not specifya template when you start a new document, then the document is based on the default template forthat type of document. If you have not specified a default template, LibreOffice uses the blanktemplate for that type of document that is installed with LibreOffice. This default template can bechanged, see “Setting default template” on page 11 for more information.For more information on templates, see the Getting Started Guide Chapter 3 Using Styles andTemplates.NoteTemplatesDraw does not have any predefined templates when it is installed on a computer.However, you can install templates from other sources or create your owntemplates; these methods are described in the following sections.9
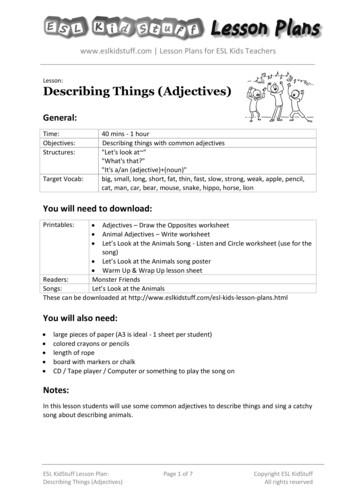
Templates from other sourcesYou can download templates for LibreOffice from many sources, including the official templaterepository at http://templates.libreoffice.org/, and install them on your computer. On other websitesyou may find collections of templates that have been created using OpenDocument format thatDraw uses as its default format. These templates from other sources are installed using theExtension Manager, as described in “Importing template collections using the Extension Manager”on page 14.Some of these templates are free of charge; others are available for a fee. Check the descriptionsto see what licenses and fees apply to the ones that interest you. To import individual templates,see “Importing templates” on page 14 for more information and to import a template collection, see“Importing template collections using the Extension Manager” on page 14 for more information.Creating templates1) Open the drawing that you want to use for a template, or open a template that you want touse as a basis for your template.2) Add any extra content and styles or edit the content and styles in your drawing.3) Go to File Templates Save As Template on the main menu bar to open the TemplateManager (Figure 7).4) Open the My Templates folder as your destination folder to activate the Save iconthen click the Save icon.Alternatively, click on the New Folder icon,and create your own folder for your Drawtemplates, then open your own folder to activate the Save iconand click the Saveicon.5) Type a name for the new template in the Enter template name text box.6) Click OK to save the new template in the destination folder.7) Close the Template Manager.Figure 7: Template Manager as it appears when saving a templateNoteTemplatesWhen you are saving a new template, the Template Manager shows only one tab,Documents, as shown in Figure 7. However, when you are creating a documentfrom a template, as described in "Using templates" below, four tabs are shown inthe Template Manager (see Figure 8). The new template is automatically displayedon the tabbed page corresponding to that type of template. For example, Drawtemplates are located on the Drawings page.10
Figure 8: Template Manager when creating a document from a template, showingDrawing templates located in two folders, one of which is user-created. See note below.The Drawings tab shows all Drawing templates, regardless of their location infolders.NoteIn Figure 8, the user has created a separate folder for My Drawings and has savedone Drawing template in it. If you have not created a separate folder for drawingsand saved or moved a template into it, all of your templates will be displayed in theMy Templates folder; the example shows one Drawing template there.Using templates1) Click on Templates in the LibreOffice Start Center, or go to File New Templates on themain menu bar, to open the Template Manager (Figure 8).2) Click on the Drawings tab to open the page containing all the templates for use in Draw.3) Navigate to the folder that contains the selection of drawing templates you want to use.4) Select the template you want to use.5) Click on the Open iconon the Template Manager toolbar or double-click on thetemplate. A new drawing will be created using the selected template and the TemplateManager dialog will close.Setting default templateIf you create a presentation by using File New Drawing on the main menu bar and do notselect a template, LibreOffice creates the drawing from the default Draw template, which isnormally a blank template. However, you can set any drawing template to be the default template,even a template that you have created, so long as it is located in a folder displayed in the TemplateManager dialog. You can always reset the default template back to the blank template later if youso choose.Setting a custom template as defaultTo set a template that you have created or imported as default instead of using the Draw defaulttemplate:1) Click on Templates in the LibreOffice Start Center or go to File New Templates toopen the Template Manager and select the Drawing tab (Figure 8).2) Double-click on the My Templates folder or the folder that contains the template you wantto use to open the folder.Templates11
3) Select the template you want to use as the default template.4) Click the Set as default iconand your selected template becomes the defaulttemplate. The next time that you create a new drawing using Draw, the drawing will becreated from the default template you have just set.Resetting default templateTo reset the default template for a new drawing to use the Draw default template:1) Click on Templates in the LibreOffice Start Center or go to File New Templates toopen the Template Manager (Figure 8).2) Select the Action Menu iconand choose Reset Default Template from the dropdown menu. This command does not appear unless the default template has beenpreviously changed to a template of your choosing.3) Select Drawing from the drop-down list to reset the default template. If other modules inLibreOffice have had their default template changed, then these modules will also appear inthis drop-down list.4) The next time that you create a new drawing using Draw, the drawing will be created fromthe default Draw template.Editing templatesYou can edit template styles and content, and then, if you wish, you can reapply the templatestyles to drawings that were created from that template.NoteYou can only reapply styles. You cannot reapply content.Editing1) Click on Templates in the LibreOffice Start Center or go to File New Templates toopen the Template Manager (Figure 8).2) Navigate to the folder where the template you want to edit is located and click once on it toactivate the file handling controls.3) Select the Edit iconand the template opens in Draw. Edit the template just as youwould any other drawing.4) To save your changes, go to File Save on the main menu bar.Updating documents from a modified templateThe next time that you open a drawing that was created from the changed template, you will beasked to confirm whether you want to update the styles in your drawing to the formatting used inthe modified template.Click Update Styles to update any styles in the template that have been changed in the document.Click Keep Old Styles if you do not want to update any styles in the template that have beenchanged in the document. Whichever option you choose, the message box closes and the drawingopens in Draw.NoteTemplatesIf you select Keep Old Styles, then this message will not appear again the next timeyou open the document after changing the template it is based on. You will not getanother chance to update the styles from the template.12
Organizing templatesLibreOffice can only use templates that are in LibreOffice template folders. You can create newLibreOffice template folders and use them to organize your templates. For example, separatetemplate folders for different projects or clients. You can also import and export templates.TipThe location of LibreOffice template folders varies with your computer operatingsystem. To learn where the template folders are stored on your computer, go toTools Options LibreOffice Paths.Creating template foldersTo create a template folder:1) Go to File New Templates on the main menu bar to open the Template Manager.2) Select the Drawings tab to open the tab for drawings (Figure 8).3) Click the New Folder iconand enter a name for the new folder in the Enter foldername box, then click OK.4) Alternatively, click on the template you want to move to a new folder and the file handlingcontrols are displayed.5) Click the Move to folder iconand select New folder from the drop list that appears.6) Type a name for the new folder in the Enter folder name box, then click OK. The selectedtemplate is then moved to the new folder you have just created.Deleting template foldersYou cannot delete the template folders supplied with LibreOffice or installed using the ExtensionManager. You can only delete folders that you have created.To delete a template folder that you have created:1) Go to File New Templates on the main menu bar to open the Template Manager.2) Select the Drawings tab to open the tab for drawings (Figure 8).3) In the Template Management dialog select the folder that you want to delete.4) Select the Delete iconClick Yes.and a message box appears asking you to confirm the deletion.Moving templatesTo move a template from one template folder to another template folder:1) Go to File New Templates on the main menu bar to open the Template Manager.2) Select the Drawings tab to open the tab for drawings (Figure 8).3) Navigate to the template that you want to move and then select it.4) Click the Move to folder iconyour selected template.and select the folder from the drop-down list to moveDeleting templatesYou cannot delete the templates supplied with LibreOffice or installed using the ExtensionManager. You can only delete templates that you have created or imported.Templates13
To delete a template:1) Go to File New Templates on the main menu bar to open the Template Manager.2) Select the Drawings tab to open the tab for drawings (Figure 8).3) Navigate to the template that you want to delete and then select it.4) Click the Delete icondeletion. Click Yes.and a message box appears and asks you to confirm theImporting templatesIf the template
Figure 2: Navigator dialog Figure 3: Navigator section on Sidebar Select a thumbnail in the Page pane, then drag and drop the thumbnail to change the order of pages in the document. Click and drag on the separator line between the Page pane and workspace to change the width of the Page pane. Click on the middle of this line to show or hide the Page pane (highlighted in Figure 1).