Transcription
Draw GuideChapter 1Introducing DrawDrawing Vector Graphics in LibreOffice
CopyrightThis document is Copyright 2011–2014 by the LibreOffice Documentation Team. Contributorsare listed below. You may distribute or modify it under the terms of either the GNU General PublicLicense (http://www.gnu.org/licenses/gpl.html), version 3 or later, or the Creative CommonsAttribution License (http://creativecommons.org/licenses/by/4.0/), version 4.0 or later.All trademarks within this guide belong to their legitimate owners.ContributorsMartin FoxJohn A SmithJohn ClelandPeter SchofieldJean Hollis WeberFeedbackPlease direct any comments or suggestions about this document to the Documentation Team’smailing list: documentation@global.libreoffice.orgNote: Everything you send to a mailing list, including your email address and any other personalinformation that is written in the message, is publicly archived and cannot be deleted.AcknowledgmentsThis chapter is based on an original French document written for OpenOffice.org 1.x by MichelPinquier (translated into English by Alex Thurgood) and previous content revised by Jim Taylor.The chapter was revised for OpenOffice.org 2.0 by Linda Worthington, Daniel Carrera, Jean HollisWeber, and Agnes Belzunce, and later translated into German by Wolfgang Uhlig. The Germanrevisions were then translated into English and revised for OpenOffice.org 3.3 and LibreOffice 3.3by Martin Fox. Other contributors included Peter Hillier-Brook, Hazel Russman, Gary Schnabl, andClaire Wood.Publication date and software versionPublished 12 September 2014. Based on LibreOffice 4.3.Note for Mac usersSome keystrokes and menu items are different on a Mac from those used in Windows and Linux.The table below gives some common substitutions for the instructions in this chapter. For a moredetailed list, see the application Help.Windows or LinuxMac equivalentEffectTools Optionsmenu selectionLibreOffice PreferencesAccess setup optionsRight-clickControl click and/or right-clickdepending on computer systemOpen a context menuCtrl (Control) (Command)Used with other keysF5Shift F5Open the NavigatorF11 TOpen the Styles and Formatting windowDocumentation for LibreOffice is available at http://www.libreoffice.org/get-help/documentation
ContentsCopyright. 2Contributors. 2Feedback. 2Acknowledgments. 2Publication date and software version. 2Note for Mac users.2Introduction. 4Draw workplace.4Workspace. 4Page Pane. 5Sidebar. 5Properties. 5Styles and Formatting. 6Gallery. 6Navigator. 6Rulers. 6Status bar. 7Toolbars. 8Standard toolbar. 9Drawing toolbar. 9Line and Filling toolbar. 9Text Formatting toolbar. 9Options toolbar. 10Floating and moving toolbars. 10Available toolsets. 10Default toolbars. 11Customizing toolbars. 11Choosing and defining colors. 12Grid, snap, and help lines. 14Introducing Draw3
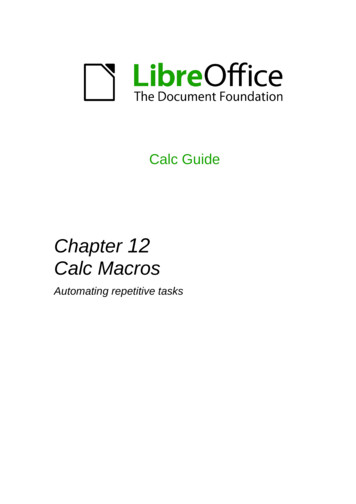
IntroductionDraw is a vector graphics drawing tool, although it can also perform some operations on rastergraphics (pixels) such as photographs. Using Draw, you can quickly create a wide variety ofgraphical images.Vector graphics store and display a picture as simple geometric elements such as lines, circles,and polygons rather than as a collection of pixels (picture elements or points on the screen). Thispermits simpler storage and supports precise scaling of the picture elements.Draw is fully integrated into the LibreOffice suite and this simplifies exchanging graphics with allcomponents of the suite. For example, if you create an image in Draw, reusing it in a Writerdocument is as simple as copying and pasting the image. You can also work with drawings directlyfrom within Writer or Impress using a subset of the functions and tools from Draw.The functionality of LibreOffice Draw is extensive and, even though it was not designed to rivalhigh-end graphics applications, it possesses significantly more functionality than the drawing toolsthat are generally integrated with most office productivity suites.A few examples of the drawing functions are: layer management, magnetic grid-point system,dimensions and measurement display, connectors for making organization charts, 3D functionsthat enable small three-dimensional drawings to be created (with texture and lighting effects),drawing and page-style integration, and Bézier curves.This Draw Guide is not a course book to be worked through from beginning to end. Rather, it is areference work in which you can browse for guidance on particular topics.This document describes only the functions associated with Draw. Some concepts, such as filemanagement or the way the LibreOffice environment works, are mentioned only briefly; they arecovered in more detail in the Getting Started Guide.Draw workplaceThe main components of the Draw interface are shown in Figure 1.NoteThe maximum size of a drawing page in LibreOffice Draw is limited by your computersetup and the page size that you can set and use in your printer.WorkspaceThe large area in the center of the window is where you make the drawings and is called theWorkspace. You can surround this drawing area with toolbars and information areas. The numberand position of the visible tools vary with the task in hand and user preferences. Therefore yoursetup may look different. For example, some users put the main Drawing toolbar on the left-handside of the Workspace and not in the default position at the bottom of the Workspace, as shown inFigure 1.By default, the Workspace consists of three layers (Layout, Controls and Dimension Lines) and thetabs for these default layers appear in the bottom left corner of the Workspace. The default layerscannot be deleted or renamed, but you can add layers as and when necessary. For moreinformation on layers, see Chapter 11 Advanced Draw Techniques.4Introducing Draw
Figure 1: LibreOffice Draw workspacePages PaneYou can split drawings in Draw over several pages. Multi-page drawings are used mainly forpresentations. The Pages Pane, on the left side of the Draw workspace in Figure 1, gives anoverview of the pages that you create. If the Pages Pane is not visible on your setup, you canenable it by going to View Page Pane on the main menu bar. To make changes to the pageorder, just drag and drop one or more pages into a new position.SidebarOn the right of the Workspace is the Sidebar, which gives you quick access to object propertiesand options. If the Sidebar is not visible on your setup, you can enable it by going to View Sidebar on the main menu bar.The Sidebar has four sections and to expand a section, either click on its icon or click on the smalltriangle at the top of the icons and select a section from the drop-down list. Only one section at atime can be open.PropertiesClicking on the Properties iconopens the Properties section of the Sidebar showing theoptions that are available for a selected object in your drawing. These options are similar to theoptions available when you use a Draw dialog.Draw workplace5
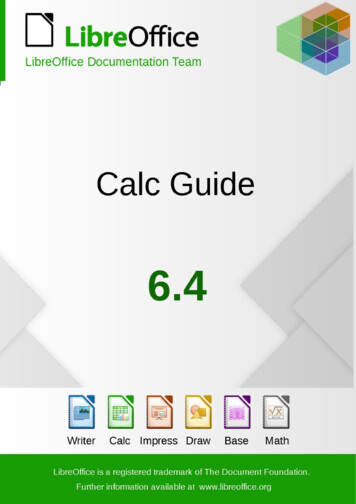
Styles and FormattingClicking on the Styles and Formatting iconopens the Styles and Formatting section of theSidebar showing the image styles that are available for a selected object in your drawing. Here youcan edit and apply image styles. When you edit a style, the changes are automatically applied to allof the elements formatted with this style in your drawing.GalleryClicking on the Gallery iconopens the Gallery section of the Sidebar opens the Draw gallerywhere you can insert an object into your drawing as a copy. This copy is independent of theoriginal object in the Gallery.NavigatorClicking on the Navigator iconopens the Navigator section of the Sidebar opens the Drawnavigator, in which you can quickly move to another object or another page in your drawing. It isrecommended to give objects and pages in your drawing meaningful names so that you can easilyidentify them when using the Navigator.RulersYou should see rulers (bars with numbers) on the upper and left-hand sides of the Workspace. Ifthey are not visible, you can enable them by selecting View Ruler in the main menu bar. Therulers show the size of a selected object on the page using double lines (highlighted in Figure 2).When no object is selected, they show the location of the mouse pointer, which helps to positiondrawing objects more accurately.You can also use the rulers to manage object handles and guide lines, making it easier to positionobjects.Figure 2: Rulers showing size of a selected object6Introducing Draw
Figure 3: Ruler unitsThe page margins in the drawing area are also represented on the rulers. You can change themargins directly on the rulers by dragging them with the mouse. The margin area is indicated bythe grayed out area on the rulers as shown in Figure 2.To modify the measurement units of the rulers, which can be defined independently, right-click onthe desired ruler, as illustrated for the horizontal ruler in Figure 3.The default position of the zero for each of the rulers is located in the top left corner of the pagewhere the left and top margins start. This zero position can be adjusted by clicking in the top leftcorner of the workspace (Figure 2) where the horizontal and vertical rulers meet and dragging to anew zero position.Status barThe Status bar is located at the bottom of the Draw window and includes several Draw-specificfields. Information area shows which action is being carried out, or which object type is selected. Position and Object size show different information depending on whether objects areselected or not.–When no object is selected, the position numbers show the current position (X and Ycoordinates) of the mouse cursor.–When an object is selected and being resized with the mouse, the object size numbersshow the size of the object (width and height).NoteThe sizes are given in the current measurement unit (not to be confused with the rulerunits). This measurement unit is defined in Tools Options LibreOffice Draw General.–If an object is selected, the position numbers shows the X and Y coordinates of theupper-left corner and the object size number pair displays the size of the object. Thesenumbers do not relate to the object itself, but to the selection outline, which is thesmallest possible rectangle that can contain the visible part or parts of the object; seeChapter 3 Working with Objects and Object Points for more information.–When an object is selected, a double-click in either of these areas opens the Positionand Size dialog; see Chapter 4 Changing Object Attributes for more information.Draw workplace7
Figure 4: Draw status bar Unsaved changes are indicated whenever any change is made to the document but notyet saved to disk. Digital signature indicates if the document has been digitally signed. A double-click orright-click in this area opens the Digital Signatures dialog. A document must be saved atleast once before it can be digitally signed. After a document is digitally signed, an indicatorappears in this area. Slide number shows the sequence number for the current drawing page and the totalnumber of pages created for the drawing. If you select an object, the information enclosedby parentheses indicates on which layer the object is placed within the drawing. In theexample shown in Figure 4, the object is on the Layout layer of Slide 1 and there is a totalnumber of one slide in the drawing. Page style shows which template is being used for the drawing. Zoom slider changes the zoom percentage of how the drawing appears on the computerdisplay. Clicking on the plus ( ) sign increases zoom and on the minus (-) sign decreaseszoom. You can also drag the slider to increase or decrease the zoom percentage. Thevertical bar in the middle of the Zoom slider represents a zoom percentage of 100%. Zoom percentage shows the level of zoom as a percentage. Double-clicking on the zoompercentage opens the Zoom & View Layout dialog. Right-clicking on the zoom percentageopens a menu where you can select a zoom level. See Chapter 3 Working with Objectsand Object Points for more information on working with the zoom functions.ToolbarsYou can display or hide the various Draw toolbars, according to your needs. To display or hide atoolbar, click View Toolbars. On the menu that appears, select which toolbar you want todisplay.Figure 5: Selection of visible toolbar icons8Introducing Draw
You can also select the icons or buttons that you want to appear on toolbars. To change the visibleicons or buttons on any toolbar, right-click in an empty area on the toolbar and select VisibleButtons from the context menu. Visible icons or buttons are indicated by a shaded outline aroundthe icon as shown by the icons in Figure 5. Click on an icon to hide or show it in the toolbar.Standard toolbarThe Standard toolbar (Figure 6) is the same for all LibreOffice components and is described indetail in the Getting Started Guide.Figure 6: Standard toolbarDrawing toolbarThe Drawing toolbar (Figure 7) is the most important toolbar in Draw. It contains all the necessaryfunctions for drawing various geometric and freehand shapes, and for organizing them in thedrawing. It is described in detail in Chapter 2 Drawing Basic Shapes.Figure 7: Drawing toolbarLine and Filling toolbarThe Line and Filling toolbar (Figure 8) lets you modify the main properties of a drawing object. Theicons and pull-down lists vary according to the type of object selected. For example, to change thestyle of a line, click on the up and down arrows for Line Style and select the required style.The functions on the Line and Filling toolbar let you change the color, style, and width of the linedrawn, the fill color and style, and other properties of an object. The object must first be selectedwith a mouse click. If the selected object is a text frame, the Line and Filling toolbar changes to theText Formatting toolbar (Figure 9).Figure 8: Line and Filling toolbarText Formatting toolbarThe Text Formatting toolbar (Figure 9) is similar to the Formatting toolbar in Writer and onlyappears when a text object has been selected in your drawing. For an explanation of the functionson this toolbar, see Chapter 4 Changing Object Attributes. For information on adding andformatting text, see Chapter 9 Adding and Formatting Text.Figure 9: Text Formatting toolbarDraw workplace9
Figure 10: Options toolbarOptions toolbarUse the Options toolbar (Figure 10) to activate or deactivate various drawing aids. The Optionstoolbar is not displayed by default. To display it, go to View Toolbars Options on the mainmenu bar. The tools available on this toolbar are shown in Figure 10 and described in greaterdetail in other chapters of this Draw Guide.Floating and moving toolbarsAvailable toolsetsMany icons have a small triangle pointing downward to the right side of the icon. This triangleindicates that the icon has additional tools available. Click on the triangle to display the full set oftools (Figure 11).You can “tear off” this toolset so it becomes a floating toolbar. Click the area at the bottom of thetoolset, drag it across the screen to a location you want and then release the mouse button. Toclose a floating toolbar, click on the X on the right of the toolbar title.Figure 11: Available toolset and floating toolbar10Introducing Draw
NoteWhen a toolset is made into a floating toolbar, the icon on the existing toolbarremains in the toolbar and always shows the last tool you used. This means that theicon you see on your screen may differ from the icon shown in this guide.TipWhen you double-click on an icon on a toolbar, the command corresponding to thaticon will become active and remain active. You can then repeat this action as oftenas you like. To exit from this mode, press the Esc key or click on another icon.Please note that this may not work for every icon on every toolbar.Default toolbarsWhen you open Draw, the default set of toolbars are already docked or fixed in their positions atthe top and bottom of the workspace. This default set of toolbars normally consist of the Standard,Line and Filling, and Drawing toolbars. These toolbars can be undocked and become floatingtoolbars. To undock a toolbar, move the mouse cursor to the far left of the toolbar and over thetoolbar handle (Figure 12). The cursor will change shape, normally to a grabbing hand, butthis is dependent on computer setup and operating system. Click and drag on the toolbarhandle to move the toolbar until it becomes a floating toolbar. This floating-toolbar capabilityis common to all components of LibreOffice. To dock a floating toolbar at the top of the Draw workspace, press and hold the Ctrl keythen double click on the title of the toolbar. The toolbar will move into available space at thetop of the Draw workspace. An alternative method of docking a toolbar is to click in the toolbar title and drag the toolbarto the docked position that you require. This can be the top, bottom or one of the sides ofthe Draw workspace.Figure 12: Toolbar handlesCustomizing toolbarsYou can customize toolbars in several ways to show or hide icons defined for a toolbar, see“Toolbars” and Figure 5 on page 8.To add functions to a toolbar, move tools between toolbars, or create new toolbars:1) Select View Toolbars Customize on the main menu bar, or right click in an empty areaon a toolbar and select Customize Toolbar from the context menu to open the Customizedialog (Figure 13).2) Select the Toolbars tab and the toolbar you want to change from the Toolbar drop-downlist.3) Select the desired function for that toolbar from the Commands list.4) If necessary, reposition the new function on the Commands list using the up and downarrows.Draw workplace11
Figure 13: Customize dialog – Toolbars page5) Click Toolbar and select how you want the toolbar to appear in Draw from the contextmenu – Icons Only, Text Only, Icons & Text, or Restore Default Settings.6) Click OK to save your changes and close the dialog.For more information when adding a new function, or modifying a toolbar, see the Getting StartedGuide.Choosing and defining colorsThe Color dialog (Figure 14) displays the current color palette. It lets you rapidly select the color ofthe various objects (lines, areas, and 3D effects) in your drawing. The first box in the panelcorresponds to none or no color. If the Color dialog is not displayed go to View Toolbars ColorBar. By default, the Colors dialog appears at the bottom of the Workspace and displays the currentcolor palette. To make this dialog a floating dialog, hold down the Ctrl key and click at the top of theColors dialog.You can access several specialized color palettes in Draw, as well as change individual colors toyour own taste. This is done using the Colors page in the Area dialog by selecting Format Areaon the main menu bar or clicking the Area iconthe Colors tab (Figure 15).12on the Line and Filling toolbar, then selectingIntroducing Draw
Figure 14: Colors dialogFigure 15. Area dialog – Colors pageTo load another palette, click on the Load Color List icon. The file selector dialog asks you tochoose one of the standard LibreOffice palettes (files with the file extension *.soc). For example,web.soc is a color palette that is adapted to creating drawings for placing in web pages. Thesecolors will display correctly on workstations with screens capable of at least 256 colors.The color selection box also lets you individually change any color by modifying the numericalvalues in the fields provided to the right of the color palette. You can use the color schemes knownas CMYK (Cyan, Magenta, Yellow, Black) or RGB (Red, Green, Blue).Click on the Edit button to open the Color dialog, where you can set individual colors, see theGetting Started Guide for more information. A more detailed description of color and options canalso be found in Chapter 11 Advanced Draw Techniques in this guide.Choosing and defining colors13
Grid, snap, and help linesDraw provides a grid and snap lines as drawing aids and these can be turned on or off by clickingon the Display Gridor Display Snap Linesicons on the Options toolbar. The grid andsnap lines are displayed only on the screen and are not shown on a printed drawing or when thedrawing is used in another LibreOffice module. The color, spacing and resolution of the grid pointscan be individually chosen for each axis.Help lines when moving objects can be displayed and these are turned on or off by clicking on theHelplines While Movingicon on the Options toolbar. Showing the position of the object whilemoving it makes positioning the object much easier. If this function is activated, pairs of vertical andhorizontal lines enclosing the object are shown while moving the object. These lines extend to theedges of the drawing area.Draw also offers several snap functions to help you can position objects exactly in a drawing.For more information on the grid, snap lines, snap functions, and help lines, see Chapter 3Working with Objects and Object Points.14Introducing Draw
Draw workplace The main components of the Draw interface are shown in Figure 1. Note The maximum size of a drawing page in LibreOffice Draw is limited by your computer setup and the page size that you can set and use in your printer. Workspace The large area in the center of the window is where you make the drawings and is called the Workspace.