Transcription
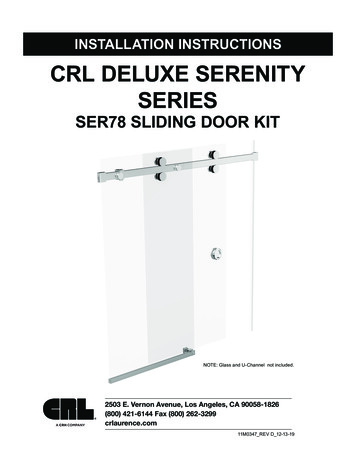
INSTALLATION INSTRUCTIONSCRL DELUXE SERENITYSERIESSER78 SLIDING DOOR KITNOTE: Glass and U-Channel not included.2503 E. Vernon Avenue, Los Angeles, CA 90058-1826(800) 421-6144 Fax (800) 262-3299crlaurence.com11M0347 REV D 12-13-19
CRL DELUXE SERENITY SER78 SLIDING DOOR KITORDER OF ASSEMBLY AND INSTALLATIONPARTS LIST 2SPECIFICATIONS 3GLASS FABRICATION 4SLIDING DOOR PREPARATION 5Unpack Rollers 5Install Top Rollers 5SITE PREPARATION 6Mark Location for Header Support Bar 6FRAME FABRICATION 6Prepare Header Support Bar 6FRAME INSTALLATION 7 - 10Mount Track Holder Fittings 7Install Header 7Bottom Guide Mounting Options and U-Channel Preparation (Optional) 8Unpack and Prepare Bottom Door Guide 8Install Fixed Panel Curb Mounts 8Install Fixed Panel 9Place Bottom Door Guide 9Install Bottom Door Guide 10SLIDING DOOR INSTALLATION 10Hang Sliding Door 10Install Bottom Rollers 10FINISHING 11Unpack and Install Thru-Glass Pull 11Position and Tighten Stopper 11Install L-Seal 11IMPORTANT: READ THIS MANUAL THOROUGHLY BEFORE BEGINNING INSTALLATION.crlaurence.com usalum.com2
CRL DELUXE SERENITY SER78 SLIDING DOOR KITPARTS LISTSERNG2Reversible Door Guide5/16” or 3/8” (8 or 10 mm) Inserts andMounting Screw and Anchor IncludedSERNHP2Thru-Glass Pull with GasketsSERNDS1StopperSERNR1RollerTotal Four Included in KitSERFP2Fixed Panel FittingSet of Two per PackageScrews for 3/8” (10 mm) GlassUse with Rollers3 and 4 mmAllen WrenchesSERH2Header Support Bar78 - 3/4” (2 m) LongSERAHW2Adjustable Height Track Holder FittingSet of Two per PackageFour Mounting Screws and AnchorsDK98LL-Seal95” (2413 mm) LongNOTE: Track Holder Mounting Fittings, Longer Screws for Rollers and Tools Packed with Fixed Panel FittingsSPECIFICATIONSDrawing not to scale. Shown from exterior.OPENING WIDTHHEADER LENGTH1”(25 mm)3” (76 mm)Fixed Panel and Sliding Door Align at TopSLIDING DOORMOUNTING HEIGHTOVERALL HEIGHTSLIDING DOORFIXED PANELOVERALL HEIGHTFIXED PANELSliding Door Overlaps Fixed Panel2” (51 mm)3/16” (5 mm)Standard Gapfor U-Channel1/8” (3 mm) Standard Gapcrlaurence.com usalum.com5/16” (8 mm)Standard Gap1/8” (3 mm) Standard Gap3
CRL DELUXE SERENITY SER78 SLIDING DOOR KITGLASS FABRICATIONNOTE: For use with 5/16” to 3/8” (8 - 10 mm) Tempered Glass only. Do Not use Laminated Glass.1 - 3/4” (44 mm)2 - 7/16” (62 mm)3 - 1/2”(89 mm)SLIDING DOORSLIDING DOOR WIDTHFIXED PANEL1/8” (3 mm)2 - 1/2”(64 mm)1 - 7/8” to 2” (47 to 50 mm)DiameterCenter Vertically to Doorfor Suggested Mounting Position.3 - 1/2”(89 mm)1/2” (12 mm) DiameterFIXED PANEL HEIGHT3 - 1/2”(89 mm)5/8”(16 mm)DiameterSLIDING DOOR HEIGHT5/8”(16 mm)Diameter3” (76 mm)3 - 1/2”(89 mm)FIXED PANEL WIDTHSLIDING DOOR AND FIXED PANEL WIDTH : Overall Width Divided by 2, plus 7/8” (22 mm)FIXED PANEL HEIGHT : Overall Height minus 3/16” (5 mm)SLIDING DOOR HEIGHT : Overall Height minus 5/16” (8 mm)OPENING WIDTHTRACK LENGTHFixed Glass aligns withtop of Sliding Panel.1/4” (6 mm) Gapbetween Sliding Doorand wall for L-Seal.FIXED PANEL HEIGHTSLIDING DOOR HEIGHTSliding DooroverlapsFixed Glass2” (51 mm)OVERALL HEIGHTMounting Height3/16” (5 mm) Gap forClamps or U-Channeland Setting Block.NOTE: Drawings not shown to scale. Track is cut 1” (25 mm) less than Opening Width and centered in opening. Overall Height is height fromcurb/floor to top of glass. Drawings shown from interior with Bottom Door Guide cupping Fixed panel. See Page 8 for Guide mounting options.crlaurence.com usalum.com4
CRL DELUXE SERENITY SER78 SLIDING DOOR KITSLIDING DOOR PREPARATIONUnpack Rollers1Screws for 3/8”(10 mm) GlassUnpack and disassemble two sets of Rollers.1NOTE: Rollers shipped assembled withscrews for 5/16” (8 mm) Glass. Screwsfor 3/8” (10 mm) Glass and Allen Wrenchpackaged with Fixed Panel Fittings.2 Adjust wheel height.SERNR1Roller (Four Each)A14 mmAllenWrenchInterior PlateEXTERIORGasketInstall Top RollersMid GasketMid Plate3 Install Top Rollers on Sliding Door.NOTE: Lower Rollers are installedafter door is hung. See Page 10.2Screw for5/16” (8 mm)GlassBWheelEXTERIORExterior PlateCenteredCenteredMaximumMinimumInterior PlateGasketLoosen Screw and Turn Interior Plate to Adjust Roller Height when Installed.NOTE: Install Rollers with Interior Plate and Gasket aligned at center of out-of-round position. This makes it easier to adjust door height.3A3BInstall Top Rollers.Lower Rollers installedafter door is hung.3Tighten with IncludedB 4 mm Allen Wrench.NOTE: Longer Screwfor 3/8” (10 mm)Glass Shown.INTERIOR DOORFACING UPcrlaurence.com usalum.com5
CRL DELUXE SERENITY SER78 SLIDING DOOR KITSITE PREPARATION1Mark Location for Header Support BarA1 Mark and drill holes for Header Support Bar.1/2” (13 mm)EXTERIOR CURBMinimum 1-3/16” (30 mm)from edgeMOUNTINGPOSITIONDOORFIXED PANELBMOUNTING HEIGHT3” (76 mm)MOUNTING HEIGHTOVERALL HEIGHT1Minimum1-3/16” (30 mm)from edgeNOTE: Header Support Bar is generally centered to vertical jamb. Allow at least 1”(25 mm) from edge to install Bottom Guide. Fixed Panel mounted to outside HeaderSupport Bar shown in this manual. Mirror instructions to mount Fixed Panel to inside.EXTERIORFRAME FABRICATIONPrepare Header Support Bar2 Measure opening width at mounting points.3 Cut SERH2 Header Support Bar.4Drill holes for Fixed Panel Fittings.NOTE: Header Support Bar is cut 1” (25 mm) short from tight dimension and centered in opening, leaving 1/2” (13 mm) gap on each endto mount. Refer to Fixed Panel Glass fabrication and gap allowance between Fixed Panel and wall to determine mounting hole placement.OPENING WIDTHHEADER LENGTH OPENING WIDTH MINUS 1” (25 mm)ABHEADER1/2”(13 mm)Gap atWallFIXED PANEL GLASSB3 - 1/2”(89 mm)Gap atWallA 3” (76 mm) plus Gap at WallB Fixed Panel Width minus 7” (178 mm)3 - 1/2”(89 mm)NOTE: A 3 - 1/8” (79 mm) in this example.1/8” (3 mm) Standard Gap Used43HEHeaderSupport BarADERNOTE: Header Support Bar ismade of stainless steel. Usehacksaw or special cutting tool.LEØ 1/4”(6 mm)NGTH1/2”(13 mm)Gap atWall4ACenter holes to Header.Drill 1/4” Diameterholes through.HeaderSupport BarBEXTERIOREXTERIORcrlaurence.com usalum.com6
CRL DELUXE SERENITY SER78 SLIDING DOOR KITFRAME INSTALLATIONNOTE: Track Holder Fittings shown orientated for installation.Set Screw at end holds Base to Mounting Blocks whilesecond Set Screw secures Base to Header when installed.Mount Track Holder Fittings1 Unpack Track Holder Fittings. Loosen1Set Screws and remove Mounting Blocks.ANOTE: Screws, Anchors and 3 mm AllenWrench packaged with Fixed Panel Fittings.SERAHW2Track Holder Fitting3 mmAllenWrenchFittingBase2 Fasten Mounting Blocks to wall.1Install HeaderScrews and AnchorsSet Screwat EndBMountingBlocks3 Unpack and loosen Set ScrewsInstall Mounting Blocks centeredto hole. If needed, moveOuter Block up or downto level Header.on top and bottom of Stopper.4 Slide Stopper and Track Holder22Fittings onto Header.NOTE: Orient Stopper with Rubber Bumpers facing Sliding Door andTrack Holder Fittings with closer Set Screw next to ends of Header.15 Align Header with Mounting Block. Slide Track HolderBFittings to wall and tighten Set Screws to secure.3 : Ensure Header is level.If not, loosen screws holdingMounting Blocks to adjust height.EXTERIORcrlaurence.com usalum.com7
CRL DELUXE SERENITY SER78 SLIDING DOOR KITFRAME INSTALLATION (CONTINUED)Bottom Guide Mounting Options and U-Channel Preparation (Optional)NOTE: Fixed Panel may be fastened to curb with clamps. Use dimensions shown below to calculate length of U-Channel for each mounting option.1 Determine Bottom Door Guide mounting option.OR3/4”(19 mm)15/16”(24 mm)Door Guide fitsunder Fixed Panel.Door Guide capsend of U-Channel.Unpack and Prepare Bottom Door Guide2 Unpack Bottom Door Guide. Rotate orientation if needed. (Optional)NOTE: Door Guide shipped oriented to cap Fixed Panel on right. Remove Set Screw and loosen Socket Head Screwto rotate base to change orientation. Insert for 5/16” (8 mm) glass installed. Insert for 3/8” (10 mm) glass included.2SERNG2Door GuideCRotate Base22ABRemoveSet ScrewLoosen SocketHead Screw4 mmAllen Wrench(Included)4 mmAllen Wrench(Included)22DTighten SocketHead ScrewInstallSet ScrewFSet Screwat minimum toinstall Fixed Panel3 Change Glass Insert. (Optional)3/8” (10 mm)Insert Glass5/16” (8 mm)Insert Glass3A3BInstall Fixed Panel Curb Mounts4 Mount Clamps or U-Channel on curb.NOTE: Door Guide installed after Sliding Door is hung. Door Guide with 3/8” (10 mm)Glass Insert positioned under Fixed Panel shown in example installation in this manual.crlaurence.com usalum.comEXTERIOR4NOTE: U-Channel notincluded. Shown as example only.8
CRL DELUXE SERENITY SER78 SLIDING DOOR KITFRAME INSTALLATION (CONTINUED)1Install Fixed PanelA4 mmAllenWrench1 Unpack and disassemble Fixed Panel Fittings.SERFP2Fixed Panel Fittings2 Fit Interior and Mid Plates in Header Mounting Holes.3 Align holes in Fixed Panel with Header Mounting1Holes. Install Exterior Plate and tighten Fittings.Interior PlateScrew2ScrewBMid PlateFit Exterior Plate into Fixed Panel.Turn to engage with Screw.Use Allen Wrench tosecurely tighten.GasketInterior PlateExterior Plate(with Gasket)3BMid PlateFIXEDPANELGasketSlide Stopper betweenHoles before installing Panel.MidGasket PlateHeader InteriorPlate2Lower Fixed Panelinto U-Channel, thenalign holes with Fittings.4ExteriorPlateAHang Sliding Door and carefully slideback and forth to check height.5 Place Door Guide to engage with Sliding6FIXED PANELDoor. Close Door, adjust Guide positionand outline.BSLIDING DOOR4NOTE: See Page 5 to Prepare Door beforehanging and to adjust Roller height if needed.5AScrewPlace Bottom Door Guide43AC6 Remove Door to mark hole.FIXED PANELinsert anchor.7AB7Bcrlaurence.com usalum.com5SLIDING DOOR7 Remove Guide. Drill hole andEXTERIOR65ABNOTE: U-Channel not included.Shown as example only.9B
CRL DELUXE SERENITY SER78 SLIDING DOOR KITFRAME INSTALLATION (CONTINUED)Install Bottom Door Guide11SlideGasket between1A Panel and Guide.EXTERIORB1C4 mmAllenWrenchSLIDING DOOR INSTALLATIONHang Sliding DoorGasketRubber tippedSet ScrewNOTE: Set Screw tipped withrubber to protect glass. Gasketprovided for other side of Panel.22 Hang Sliding Door placingCFIXED PANEL1 Fasten Bottom Door Guide and tighten Set Screw to Fixed Panel.Glass inside Bottom Guide.Install Bottom Rollers3 Prepare and install Bottom Rollers.NOTE: See Page 5 before installing Rollers.AExteriorPlateWheelFIXED PANELHeaderMidMidPlate GasketSLIDING DOOR32EXTERIOR3CGasketInteriorPlateSLIDING DOORB3FIXED PANEL3SLIDING DOORFIXED PANELNOTE: Align at centerof out-of-round position.See Page 5.EXTERIORcrlaurence.com usalum.comDScrew4 mmAllenWrenchEXTERIORNOTE: Screw for 3/8” (10 mm) Glass shown.Shorter screw used for 5/16” (8 mm) Glass.10
CRL DELUXE SERENITY SER78 SLIDING DOOR KITFINISHINGUnpack and Install Thru-Glass Pull1 Unscrew Thru-Glass Pull. Separate Cover from1Base, select combination of gaskets, andreassemble on Sliding Glass Door.NOTE: Three pairs of Gaskets in various widths included.Select one gasket or combine several to obtain desiredthickness. Place on each side of glass so Pull is snug.11BaseAGasketsHold Base while turning Covercounter-clockwise to loosen andclockwise to tighten.CCover21EXTERIORDSERNHP2Thru-Glass Pullwith GasketsBAEXTERIORPosition and Tighten Stopper2 Move Door to desired maximum open position.2BSlide Stopper so Rubber Bumpers contactDoor Panel. Tighten securely.2CTightenTop andBottom SetScrews with3 mmAllen WrenchINTERIORInstall L-Seal13CBAlignL-Sealto topof glass.Temporarilyattach toDoor withpainter’stape.3 Cut and install L-Seal.NOTE: Temporarily attachL-Seal to Sliding Door anduse as guide for final position.Top of Glass Door3ACutL-SealLengthINTERIOREXTERIORRemove protective linerfrom L-Seal and closeDoor so L-Sealadheres towall.3Remove painter’s tape fromDoor. Open Door andpush seal firmlyinto place.3CDSeal and tool L-Seal edgeswith Cat. No. RTV408Sealant.3ECurbVIEW FROM INTERIORcrlaurence.com usalum.comINTERIORINTERIORINTERIOR11
curb/floor to top of glass. Drawings shown from interior with Bottom Door Guide cupping Fixed panel. See Page 8 for Guide mounting options. . Do Not use Laminated Glass. 1/4" (6 mm) Gap between Sliding Door and wall for L-Seal. Mounting Height 3/16" (5 mm) Gap for Clamps or U-Channel and Setting Block. Sliding Door overlaps Fixed Glass 2 .