Transcription
Configure Microsoft CA Server to Publish theCertificate Revocation Lists for ponents UsedConfigureCreate and Configure a Folder on the CA to House the CRL FilesCreate a Site in IIS to Expose the New CRL Distribution PointConfigure Microsoft CA Server to Publish CRL Files to the Distribution PointVerify the CRL File Exists and is Accessible via IISConfigure ISE to use the New CRL Distribution PointIntroductionThis document describes the configuration of a Microsoft Certificate Authority (CA) server thatruns Internet Information Services (IIS) to publish the Certificate Revocation List (CRL) updates. Italso explains how to configure the Cisco Identity Services Engine (ISE) (versions 3.0 and later) toretrieve the updates for use in certificate validation. ISE can be configured to retrieve CRLs for thevarious CA root certificates it uses in certificate validation.PrerequisiteRequirementsThere are no specific requirements for this document.Components UsedThe information in this document is based on these software and hardware versions:Cisco Identity Services Engine Release 3.0Microsoft Windows Server 2008 R2The information in this document was created from the devices in a specific lab environment. All ofthe devices used in this document started with a cleared (default) configuration. If your network islive, ensure that you understand the potential impact of any command. ConfigureIn this section, you are presented with the information to configure the features described in thisdocument.
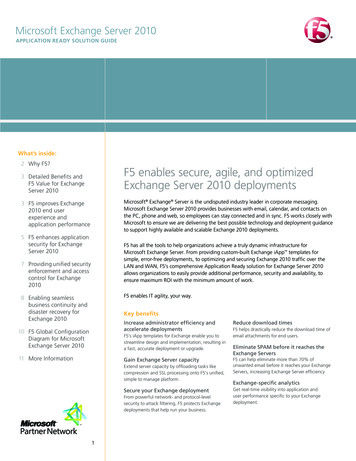
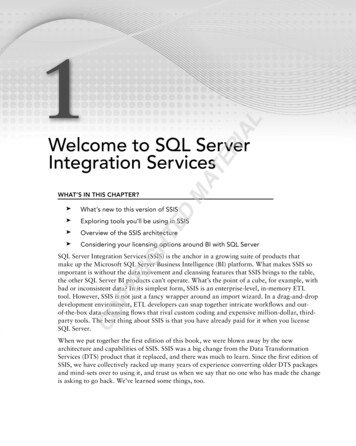
Create and Configure a Folder on the CA to House the CRL FilesThe first task is to configure a location on the CA server to store the CRL files. By default, theMicrosoft CA server publishes the files to C:\Windows\system32\CertSrv\CertEnroll\Rather than use this system folder, create a new folder for the files.1. On the IIS server, choose a location on the file system and create a new folder. In thisexample, the folder C:\CRLDistribution is created.2. In order for the CA to write the CRL files to the new folder, sharing must be enabled. Right-clickthe new folder, choose Properties, click the Sharing tab, and then click Advanced Sharing.
3. In order to share the folder, check the Share this folder check box and then add a dollar sign( ) to the end of the share name in the Share name field to hide the share.
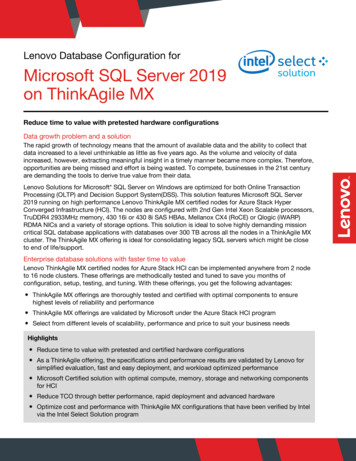
4. Click Permissions (1), click Add (2), click Object Types (3), and check the Computers checkbox (4).5. In order to return to the Select Users, Computers, Service Accounts, or Groups window, clickOK. In the Enter the object names to select field, enter the computer name of the CA server in thisexample: WIN0231PNBS4IPH and click Check Names. If the name entered is valid, the namerefreshes and appears underlined. Click OK.
6. In the Group or user names field, choose the CA computer. Check Allow for Full Control togrant full access to the CA.Click OK. Click OK again to close the Advanced Sharing window and return to the Propertieswindow.
7. In order to allow the CA to write the CRL files to the new folder, configure the appropriatesecurity permissions. Click the Security tab (1), click Edit (2), click Add (3), click Object Types(4), and check the Computers check box (5).
8. In the Enter the object names to select field, enter the computer name of the CA server, andclick Check Names. If the name entered is valid, the name refreshes and appears underlined.Click OK.9. Choose the CA computer in the Group or user names field and then check to Allow for Fullcontrol to grant full access to the CA. Click OK and then click Close to complete the task.
Create a Site in IIS to Expose the New CRL Distribution PointIn order for ISE to access the CRL files, make the directory that houses the CRL files accessiblevia IIS.1. On the IIS server taskbar, click Start. Choose Administrative Tools Internet InformationServices (IIS) Manager.2. In the left pane (known as the Console Tree), expand the IIS server name and then expandSites.
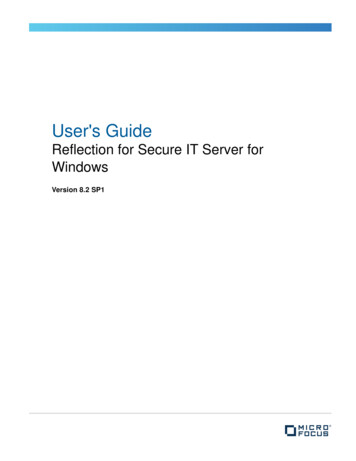
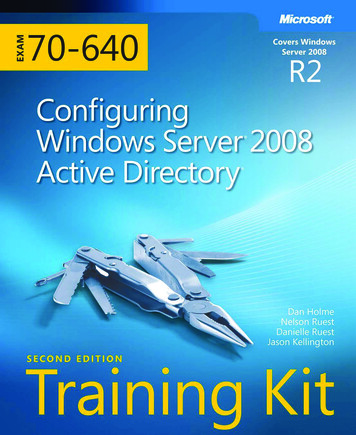
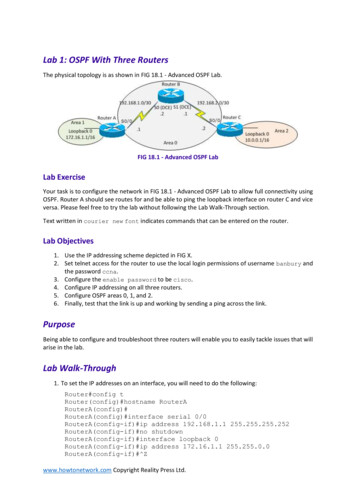
3. Right-click Default Web Site and choose Add Virtual Directory, as shown in this image.
4. In the Alias field, enter a site name for the CRL Distribution Point. In this example, CRLD isentered.
5. Click the ellipsis (. . .) to the right of the Physical path field and browse to the folder created insection 1. Select the folder and click OK. Click OK to close the Add Virtual Directory window.6. The site name entered in step 4 must be highlighted in the left pane. If not, choose it now. In thecenter pane, double-click Directory Browsing.
7. In the right pane, click Enable to enable directory browsing.8. In the left pane, choose the site name again. In the center pane, double-click ConfigurationEditor.
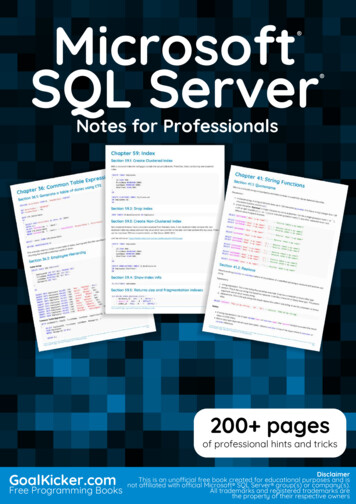
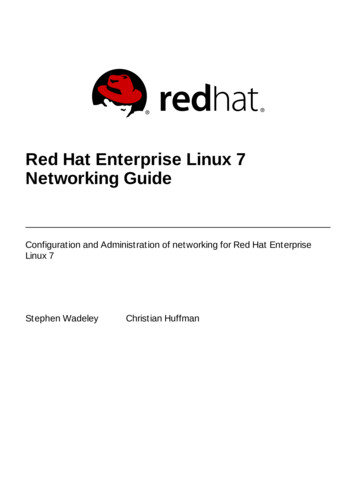
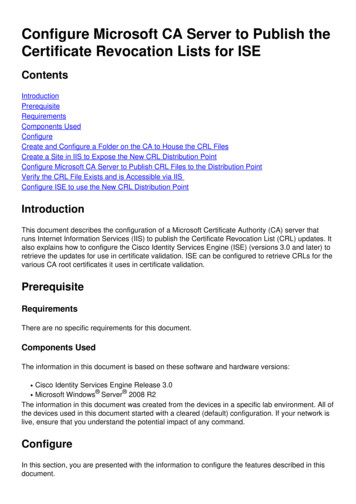
9. In the Section drop-down list, choose system.webServer/security/requestFiltering. In theallowDoubleEscaping drop-down list, choose True. In the right pane, click Apply, as shown inthis image.
The folder must now be accessible via IIS.Configure Microsoft CA Server to Publish CRL Files to the Distribution PointNow that a new folder has been configured to house the CRL files and the folder has beenexposed in IIS, configure the Microsoft CA server to publish the CRL files to the new location.1. On the CA server taskbar, click Start. Choose Administrative Tools CertificateAuthority.2. In the left pane, right-click the CA name. Choose Properties and then click the Extensionstab. In order to add a new CRL distribution point, click Add.3. In the Location field, enter the path to the folder created and shared in section 1. In the examplein section 1, the path is:
\\WIN-231PNBS4IPH\CRLDistribution 4. With the Location field populated, choose CaName from the Variable drop-down list and thenclick Insert.
5. From the Variable drop-down list, choose CRLNameSuffix and then click Insert.
6. In the Location field, append .crl to the end of the path. In this example, the Location is:\\WIN-231PNBS4IPH\CRLDistribution \ CaName CRLNameSuffix .crl7. Click OK to return to the Extensions tab. Check the Publish CRLs to this location check boxand then click OK to close the Properties window.A prompt appears for permission to restart Active Directory Certificate Services. Click Yes.
8. In the left pane, right-click Revoked Certificates. Choose All Tasks Publish. Ensure thatNew CRL is selected and then click OK.
The Microsoft CA server must create a new .crl file in the folder created in section 1. If the newCRL file is created successfully there will be no dialog after OK is clicked. If an error is returned inregards to the new distribution point folder, carefully repeat each step in this section.Verify the CRL File Exists and is Accessible via IISVerify the new CRL files exist and that they are accessible via IIS from another workstation beforeyou start this section.1. On the IIS server, open the folder created in section 1. There must be a single .crl filepresent with the form CANAME .crl where CANAME is the name of the CA server. Inthis example, the filename is:abtomar-WIN-231PNBS4IPH-CA.crl2. From a workstation on the network (ideally on the same network as the ISE primary Adminnode), open a web browser and browse to http:// SERVER / CRLSITE where SERVER isthe server name of the IIS server configured in section 2 and CRLSITE is the site name chosenfor the distribution point in section 2. In this example, the URL is:http://win-231pnbs4iph/CRLD
The directory index displays, which includes the file observed in step 1.Configure ISE to use the New CRL Distribution PointBefore ISE is configured to retrieve the CRL, define the interval to publish the CRL. The strategyto determine this interval is beyond the scope of this document. The potential values (in MicrosoftCA) are 1 hour to 411 years, inclusive. The default value is 1 week. Once an appropriate intervalfor your environment has been determined, set the interval with these instructions:1. On the CA server taskbar, click Start. Choose Administrative Tools CertificateAuthority.2. In the left pane, expand the CA. Right-click the Revoked Certificates folder and chooseProperties.3. In the CRL publication interval fields, enter the required number and choose the time period.Click OK to close the window and apply the change. In this example, a publication interval of7 days is configured.
4. Enter the certutil -getreg CA\Clock* command to confirm the ClockSkew value. The defaultvalue is 10 minutes.Example output:
Values:ClockSkewMinutesREG DWORS a (10)CertUtil: -getreg command completed successfully.5. Enter the certutil -getreg CA\CRLov* command to verify whether the CRLOverlapPeriod hasbeen manually set. By default the CRLOverlapUnit value is 0, which indicates that no manualvalue has been set. If the value is a value other than 0, record the value and units.Example output:Values:CRLOverlapPeriodREG SZ HoursCRLOverlapUnitsREG DWORD 0CertUtil: -getreg command completed successfully.6. Enter the certutil -getreg CA\CRLpe* command to verify the CRLPeriod, which was set instep 3.Example output:Values:CRLPeriodREG SZ DaysCRLUnitsREG DWORD 7CertUtil: -getreg command completed successfully.7. Calculate the CRL Grace Period as follows:a. If CRLOverlapPeriod was set in step 5: OVERLAP CRLOverlapPeriod, in minutes;Else: OVERLAP (CRLPeriod / 10), in minutesb. If OVERLAP 720 then OVERLAP 720c. If OVERLAP (1.5 * ClockSkewMinutes) then OVERLAP (1.5 * ClockSkewMinutes)d. If OVERLAP CRLPeriod, in minutes then OVERLAP CRLPeriod in minutese. Grace Period OVERLAP ClockSkewMinutesExample:As stated above, CRLPeriod was set to 7 days, or 10248 minutes and CRLOverlapPeriod was not set.a. OVERLAP (10248 / 10) 1024.8 minutes b. 1024.8 minutes is 720 minutes : OVERLAP 720minutes c. 720 minutes is NOT 15 minutes : OVERLAP 720 minutes d. 720 minutes is NOT 10248minutes : OVERLAP 720 minutes e. Grace Period 720 minutes 10 minutes 730 minutesThe grace period calculated is the amount of time between when the CA publishes the next CRLand when the current CRL expires. ISE needs to be configured to retrieve the CRLs accordingly.8. Log in to the ISE Primary Admin node and choose Administration System Certificates. Inthe left pane, select Trusted Certificate
9. Check the check box next to the CA certificate for which you intend to configure CRLs. ClickEdit.10. Near the bottom of the window, check the Download CRL check box.11. In the CRL Distribution URL field, enter the path to the CRL Distribution Point, which includesthe .crl file, created in section 2. In this example, the URL 4IPH-CA.crl12. ISE can be configured to retrieve the CRL at regular intervals or based on the expiration(which, in general, is also a regular interval). When the CRL publish interval is static, more timelyCRL updates are obtained when the latter option is used. Click the Automatically radio button.13. Set the value for retrieval to a value less than the grace period calculated in step 7. If the valueset is longer than the grace period, ISE checks the CRL distribution point before the CA haspublished the next CRL. In this example, the grace period is calculated to be 730 minutes, or 12hours and 10 minutes. A value of 10 hours will be used for the retrieval14. Set the retry interval as appropriate for your environment. If ISE cannot retrieve the CRL at theconfigured interval in the previous step, it will retry at this shorter interval.15. Check the Bypass CRL Verification if CRL is not Received check box to allow certificatebased authentication to proceed normally (and without a CRL check) if ISE was unable to retrievethe CRL for this CA in its last download attempt. If this check box is not checked, all certificatebased authentication with certificates issued by this CA will fail if the CRL cannot be retrieved.16. Check the Ignore that CRL is not yet valid or expired check box to allow ISE to use expired(or not yet valid) CRL files as though they were valid. If this check box is not checked, ISEconsiders a CRL to be invalid prior to their Effective Date and after their Next Update times. ClickSave to complete the configuration.
Cisco Internal Information1. Microsoft. "Configure a CRL Distribution Point for ibrary/ee649260%28v ws.10%29.aspx, Oct. 7, 2009 [Dec 18,2012]2. Microsoft. "Manually publish the certificate revocation list." %28v ws.10%29.aspx, Jan. 21, 2005 [Dec. 18, 2012]3. Microsoft. "Configure CRL and Delta CRL Overlap Periods." .aspx, Apr. 11, 2011 [Dec 18, 2012]4. MS2065 [MSFT]. "How EffectiveDate (thisupdate), NextUpdate and NextCRLPublish arecalculated." publish-are-calculated.aspx, Jun. 4, 2008 [Dec 18, 2012]
In order for the CA to write the CRL files to the new folder, sharing must be enabled. Right-click . carefully repeat each step in this section. . is also a regular interval). When the CRL publish interval is static, more timely CRL updates are obtained when the lat