Transcription
Resistance Band & TubingInstruction ManualVolume 4The Hygenic Corporation1245 Home AvenueAkron, OH 44310(330) 633-8460 or (800) mThera-Band GmbHMainzer Landstraße 19D-65589 Hadamar, Germany49 6433 9164 0www.thera-band.deTHERA-BAND , the color pyramid logo, and the Associated Colors are trademarks ofThe Hygenic Corporation. All rights reserved. Unauthorized use is strictly prohibited. 2006 The Hygenic Corporation.22136 Rev. 1/06Printed in USA
Instruction ManualTable of ContentsIntroduction. . . . . . . . . . . . . . . . . . . . . . . . . . . . . . . . . . . . . . . . . . . 2Information for Healthcare Professionals . . . . . . . . . . . . . . . . . . . . 3Information for Patients and Consumers . . . . . . . . . . . . . . . . . . . . 4Practical Exercise Tips. . . . . . . . . . . . . . . . . . . . . . . . . . . . . . . . . . . 5Caring for Elastic Bands and Tubing . . . . . . . . . . . . . . . . . . . . . . . 5Directions for Handling, Connecting, and SecuringThera-Band Resistance Bands and Tubing . . . . . . . . . . . . . . . . . . 6Exercise Resistance Pull Force Charts. . . . . . . . . . . . . . . . . . . . . . 11Outcomes . . . . . . . . . . . . . . . . . . . . . . . . . . . . . . . . . . . . . . . . . . . 13Exercise List Summary . . . . . . . . . . . . . . . . . . . . . . . . . . . . . . . . . 14Exercise Illustrations . . . . . . . . . . . . . . . . . . . . . . . . . . . . . . . . . . . 15www.Thera-BandAcademy.com . . . . . . . . . . . . . . . . . . . . . . . . . . 391
Instruction ManualInstruction ManualIntroductionInformation for Healthcare ProfessionalsRecognized as the original system of progressive resistance for over 25 years, andendorsed by the American Physical Therapy Association (APTA), Thera-Band elastic resistance has been proven to increase strength, mobility and function, aswell as reduce joint pain1, 2, 3. Evidence-based exercise programs utilizing TheraBand bands and tubing rehabilitate injuries, improve the functional ability of olderadults, improve athletic performance, and aid in treating many chronic diseases.IndicationsThera-Band resistance bands and tubing are low-cost, portable and versatile.Made of natural rubber latex, they are easily recognized by the trademarkThera-Band colors – yellow, red, green, blue, black and silver, as well as our othercolors of tan and gold. Advancing through the sequential system of progressiveresistance provides positive reinforcement and feedback for gauging results.The progressive resistance levels speak of success; the colors tell youit’s Thera-Band .Thera-Band ColorResistance LevelWorkout levelTanExtra termediateGreenHeavyIntermediateBlueExtra HeavyIntermediate/AdvancedBlackSpecial HeavyAdvancedSilverSuper HeavyAdvanced PlusGold*MaxAdvanced Plus* Bands onlyFor those who have allergies to latex, Thera-Band Latex Free Resistance Bandsprovide the same benefits as regular bands.1. Jette AM et al. 1999. Exercise—It’s never too late: The Strong for Life Program.Am J Public Health: 89(1):66-72.2. Mikesky AE et al. 1994. Efficacy of a home-based training program for older adultsusing elastic tubing. Europ J Appl Physiol : 69:316-320.3. Topp R. et al. 2002. The effect of dynamic versus isometric resistance training on pain andfunctioning among adults with osteoarthritis of the knee. Arch Phys Med Rehabil: 83:1187-1195.For a comprehensive database of references,visit www.Thera-BandAcademy.com/research.2In addition to general wellness and fitness programs, elastic resistanceis indicated for use in a variety of impairments: Resistance training forPostural impairmentsMotor function impairmentsMuscle performance impairments Stretching exercises for muscle length impairments Balance training for balance and gait impairments Cardio training for cardiorespiratory impairments Functional and sport-specific training for functional limitationsProduct Safety Use of any products described in this manual can cause serious injury whennot used properly. Healthcare professionals are advised to prescribe onlythose exercises deemed safe for their patients. For patients using the bands or tubing as part of a home therapy program,it is imperative to instruct the patient on safe and proper use of the bandsor tubing to avoid injury. Patients with latex allergies should use Thera-Band Latex-Freeresistance bands. Avoid choosing bands and tubing that are too short. Healthcare professionalsshould ensure adequate length of the band to avoid high pull forces and toprovide more user control. Avoid exercises that involve stretching the Thera-Band resistance band ortube in such a fashion that it may snap toward the head and cause injuryto the head or eyes. Protective eye wear should be worn if performingthis type of exercise. Always examine the resistive band or tube before use for small nicks, tears,or punctures that may cause the band to break. If you find any flaws, discardthe product and replace before performing any exercises. Be sure the resistance band or tubing is securely anchored to a sturdy objector attachment before using. Do not overstretch bands or tubing by more than 3 times its restinglength. Example: a 12” (30 cm) band should not be stretched to morethan 36” (90 cm) total length.3
Instruction ManualInformation for Patients and ConsumersPrecautions Always consult your physician before beginning an exercise program. Your rehabilitation or exercise professional should help develop anindividualized program to meet your needs and abilities. Use of any products described in this manual can cause seriousinjury when not used properly. Patients with latex allergies should use Thera-Band Latex-Freeresistance bands. Avoid exercises that involve stretching the Thera-Band resistance bandsor tubing in such a fashion that they may snap toward the head and causeinjury to the head or eyes. If these types of exercises are prescribed,protective eyeware should be worn.Instruction ManualPractical Exercise Tips With all exercises, posture and body alignment is critical. Keep the shouldersand hips aligned, tighten the abdominals, and relax the knees. Be sure topractice the safest posture possible by maintaining a natural spinal curve Use the band or tubing prescribed by your physician or therapist for theprescribed sets and repetitions. Rest between sets. Include proper warm-up and cool-down activities with your elasticresistance training program. Perform all exercises in a slow and controlled manner. At no time shouldyou feel “out of control”; remember to control the band or tubing rather thanallowing it to control you. Do not allow the band or tubing to snap back. Avoid hyperextending or over-flexing joints when exercising. Don’t lockthe joints. Thera-Band resistance bands and tubing are not toys; consult a physicianbefore allowing children to exercise. Breathe evenly while performing these exercises. Exhale during the moredifficult phase of the repetition. Don’t hold your breath. If you experience sharp pain, shortness of breath, dizziness or lightheadedness with any of these exercises, stop immediately and contact yourhealthcare provider. For beginners, perform the exercises without the band or tubing until youare comfortable, then add resistance. Begin with 8 to 10 exercises that targetmajor muscle groups. As with any exercise program, muscle soreness may be experienced over thefirst few days. If your pain should persist for more than 3 or 4 days, consultyour physician or therapist. Do not exercise while experiencing pain. Exercise with the color band that was prescribed for you, or with a colorthat allows you to complete 2 to 3 sets of 10 to 15 repetitions with mildfatigue on the last set. Be sure the resistance band or tubing is securely anchored to a sturdy objector attachment before using. Progress to the next color band when you are able to easily completethe 3 sets of 10 to 15 repetitions. Do not overstretch the resistance band or tube by more than 3 timesits resting length. Example: a 12” (30 cm) band should not be stretchedto more than 36” (90 cm) total length. Protect the Thera-Band resistance band or tubing by keeping it away fromsharp objects. Remove rings from the fingers before using the resistancebands or tubing. Be aware of long, sharp fingernails.Caring for Elastic Bands and Tubing Always examine the resistance band or tubing before use for small nicks,tears, or punctures that may cause the band to break. If you find any flaws,discard the product and replace before performing any exercises. Store all resistance bands and tubing out of direct sunlight and away fromextreme temperatures. After use in chlorinated water, rinse the bands or tubing with tapwater and dry flat. If the bands or tubing becomes sticky, clean with mild soap and water,dry flat, and then dust with talcum powder.45
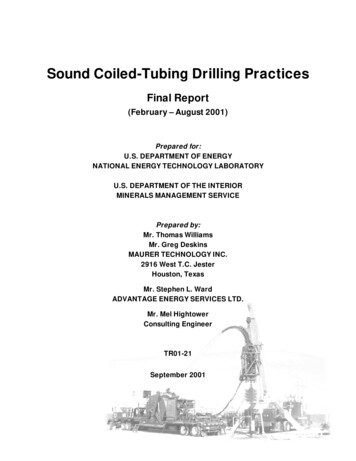
Instruction ManualDirections for Handling, Connecting,and Securing Thera-Band ResistanceBands and TubingInstruction ManualCreating LoopsLoops can be easily created for upper or lower body exercises.Always examine your band or tubing before use; discard and replace if you noticeany tears or nicks. Protect the eyes during exercises that may cause the band or tubingto snap back toward the head. Check routinely for evidence of wear of the band ortubing at connection points and replace the band if evidence is found.Handling the BandsYour elastic band or tubing should be securely attached to your hand or footbefore use to avoid slippage and possible injury. “Double wrapping” the band mayhelp secure it to your hand or foot. Never exercise with the band or tubing unlessit is wrapped around your hand.Short length loop: Tie eachend in a square knotLong length loop: Tie endstogether in a simple knot,leaving long loop.Using Bands for Lower BodyGrip WrapLay the band flat in your handwith the end toward your pinkyfinger. Wrap the long end of theband around the back of yourhand. Repeat as needed.Firmly grasp.Palm WrapBegin with palms up and ends of band betweenthe thumb and finger. Rotate your palms inward,bringing the band around the back of your hands.Repeat as needed. Firmly grasp.Euro WrapBegin with your palm facing forwardand the ends of the band between thethumb and palm. Rotate your arminward. Turn your hand downward,bringing the band around the back ofyour hand. Return the palm facingforward, bringing the band betweenthe thumb and fingers.6Foot Loop: Stand on the middle of theband. Loop over the top of the foot andstabilize other ends with opposite foot.Foot Wrap: Stand on the middleof the band. Wrap one end aroundthe top of the foot.Ankle Wrap: Place the back of your ankle in the middleof the band. Cross the ends in front of your ankle andbring them down on the sides of the ankle. Cross theends under the foot and bring up around the sides.7
Instruction ManualHandling the TubingLooped Handle: Begin by wrapping the tubing around the palm to determine thesize of the loop. Make a loop by crossing the tubing over and around, pulling theend through the hole. Be sure the loops are tight and secure before using thetubing. Repeat on the other end of tubing.Place entire hand throughthe tubing loop and grasp.Instruction ManualUsing Elastic Resistance AccessoriesAccessories can also be used to connect or secure elastic resistance, including handles,door anchors, extremity straps, sports handles, and Assist straps. Monitor theattachment periodically for slippage and tighten as necessary.Using the Cinching System(Handles, Door Anchors,Extremity Straps andSports Handle): Whilepulling down the blackbuckle on the accessory,push up the webbing tocreate a double loop.Thread one end of the band or tubing through one loop and back through theother. Tighten down the buckle to lock in place. Loop a band once and tubingtwice to secure safely. Slide buckle towards the looped band or tubing to tighten.Using the Assist strap: Lay the end of the bandover the middle of the Assist (between thelarge and small loops). Bring the large loop ofthe Assist through the small loop. Cinch theAssist down to tighten.Leg Tubing Loop: Place oneend of the tubing loop throughthe loop on the other end of thetubing making a large loop. Stepinto the large loop and pull onthe end of the tubing to tighten.Place wrist inside the large loop and grasp theAssist. Use around the foot for ankle exercises.89
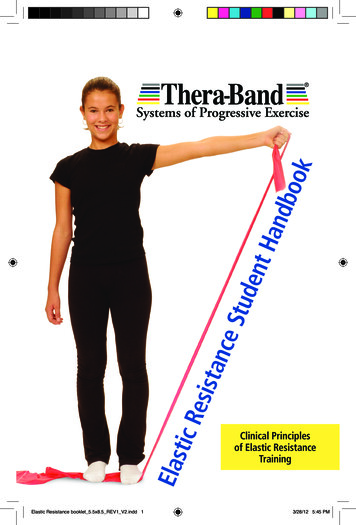
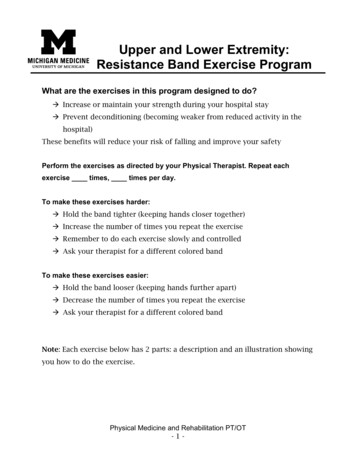
Instruction ManualSecuring the Band / TubingInstruction ManualElastic Resistance Pull Force ChartsIf you are connecting your band or tubing to an external stationary object, be surethat object is heavy and sturdy enough to resist the exercise.Heavy gym equipment*:*Recommend using the Assist strapwith external equipmentElastic resistance is a unique type of resistance training compared to othertraditional forms, such as isotonic or isokinetic resistances. The resistanceprovided by elastic bands or tubing is based on the amount that the band ortubing is stretched. This resistance can be measured in pounds of force dependingon the percentage the band or tubing is stretched from its resting length; this isknown as “force-elongation”. Regardless of how long the band or tubing is beforeit’s stretched, the force produced at its stretched length depends on the percentelongation. For example, an initial 2 foot (60 cm) length of green band that isstretched to 4 feet (120 cm) (double its resting length), is at 100% elongation.Therefore, the resistance of the band is 5 pounds (2.3 kg) at that elongation.If the band is then further stretched to 6 feet (180 cm) (200% elongation), theresistance would be about 8 pounds). There is approximately a 20-30% increasein resistance between Thera-Band colors at 100% elongation.Resistance in Pounds of Thera-Band ResistanceBased on Percent ElongationDoor (Using Door Anchor):Wall Tree (Using Assist Strap)Percent ElongationResistance in ata from Page et al. 2000. JOSPT 30(1):A47-8.1011
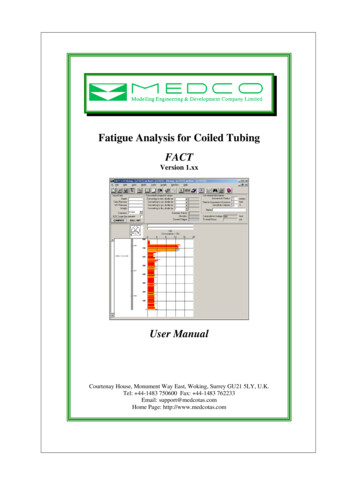
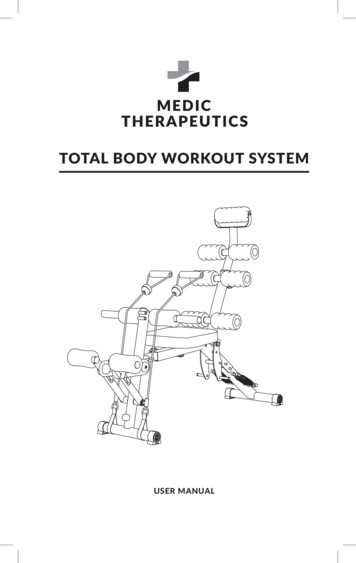
Instruction ManualResistance in Kilograms of Thera-BandResistance Based on Percent ElongationOutcomesClinical research has proven that elastic resistive exercise, includingThera-Band resistance bands and tubing:Resistance in KilogramsPercent ElongationInstruction 91.31.62.33.6 Increases Strength Improves Gait50%0.81.21.52.12.93.96.3 Increases Power Increases Grip Strength Improves Balance andProprioception Improves .31.82.33.24.46.09.8125%1.52.02.63.75.06.911.2 Prevents Falls Decreases Blood Pressure150%1.82.23.04.15.67.812.5 Improves Posture175%2.02.53.34.66.18.613.8 Decreases Pain Decreases Disabilityand Improves 7.410.516.6250%2.63.24.46.08.011.518.2When applied as an exercise, elastic resistance offers astrength curve (torque) similar to human strength curvesand isotonic resistance exercises (a bell-shaped curve).This is because of the angle created between the elasticresistance and the lever-arm, the “Force Angle”.Lever ArmForceAngleOur database contains over 500 articles and studies on elastic resistanceincluding nearly 100 randomized clinical trials using elastic resistance.For a comprehensive database of references,visit www.Thera-BandAcademy.com/research.ForceShoulder TorqueTorque 0#0306090120150Shoulder AngleData from Hughes et al. 1999. JOSPT 29(7):413-4201213
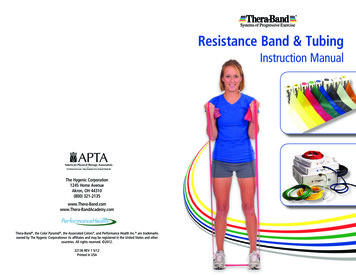
Instruction ManualJointLevel 1 – Isolated / RehabLevel 2 – Multi-joint / FitnessThera-Band Resistance Bands andTubing ExercisesShoulderFlexion (Unilateral)Extension (Unilateral)Abduction (Unilateral)Adduction (Unilateral)ScaptionInternal RotationExternal RotationLateral RaiseFront RaiseOverhead PressDiagonal FlexionDiagonal ExtensionShoulderElbow FlexionElbow ExtensionWrist FlexionWrist ExtensionSupinationPronationUlnar DeviationRadial DeviationKick BackConcentration CurlChestHorizontal Adduction(Unilateral)Serratus PressChest PressChest FliesDynamic HugUpper BackHorizontal Abduction(Unilateral)ShrugScapular RetractionSeated RowLat Pull DownReverse FliesUpright RowBent Over RowExercise ListArmsShoulder Flexion* Slowly return to starting position.Shoulder Extension Secure elastic at waist level as shown. Grasp elastic and pull arm backwardskeeping elbow straight.Abs and BackCurl-upTrunk TwistBack ExtensionLower Ab crunchSide BendDiagonal LiftDiagonal ChopHipsHip Flexion (standing)Hip Flexion (sitting)Hip ExtensionHip AbductionHip AdductionHip Internal RotationHip External RotationHip Abduction ExternalRotation (Clam)Dead LiftQuick KicksTerminal Knee ExtensionKnee Extension (Sitting)Knee Extension (Prone)Knee Flexion (Sitting)Knee Flexion (Prone)MinisquatLeg PressSquatLunge1-leg on Begin with arm at side, elbow straight, thumb up. Raise arm in front over head, keeping elbow straight.Isometric ExtensionIsometric Side BendingIsometric RotationAnkles Stand on elastic. Grasp elastic.NeckKnees14Instruction Manual Slowly return to start position.Shoulder Abduction* Stand on elastic. Begin with arm at side, elbow straight,holding elastic, palm forward. Raise arm upward, out to sideand over head. Slowly return to starting position.*Caution: User must wear suitable eye protection such as safety goggles during thisexercise to protect against possibility of eye injury as a result of the band or tubesnapping towards the face if grip is lost or if the band or tube breaks.15
Instruction ManualInstruction ManualLateral RaiseShoulder Adduction Stand on elastic. Attach elastic to secure object at waist level. Hold elastic in both hands. Grasp elastic in hand. Begin with arms at sides. Pull arm inward, keeping elbow straight. Position palms forward. Slowly return to start position and repeat. Keep elbows straight and liftarms to shoulder level. Slowly lower and repeat.Scaption (Abduction in Scapular Plane) Stand on elastic. Begin with arm at side, elbow straight,holding elastic, thumb up. Raise arm in a position halfway betweenthe front and side, over head.Front Raise* Secure elastic at waist level as shown. Grasp elastic and pull arm backwardskeeping elbow straight. Slowly return to start position. Slowly return to starting position.Overhead Press*Shoulder Internal Rotation Stand on elastic. Secure elastic at waist level. Grasp elastic in hands, arms at side,elbows bent, as shown. Sit or stand with involved side to elastic,elbow at 90 degrees, arm at side. Push arms up and overhead. Grasp elastic and pull hand inward, acrossbody, as shown. Slowly return to start position and repeat. Slowly return to start position and repeat.Shoulder Diagonal D1 Flexion* Secure elastic to secure object at floor level.Shoulder External Rotation Sit or stand, arm at side. Attach elastic to secure object at waist level. Grasp elastic in hand, palm forward. Place pillow between elbow and body. Grasp elastic in hand, elbow bent to 90 degrees. Lift arm upward and across body to oppositeshoulder, bending elbow, ending with palm inward. Rotate arm outward and return. Slowly return to start position and repeat. Slowly return to start position and repeat.*Caution: User must wear suitable eye protection such as safety goggles during thisexercise to protect against possibility of eye injury as a result of the band or tubesnapping towards the face if grip is lost or if the band or tube breaks.1617
Instruction ManualInstruction ManualArmsShoulder Diagonal D2 Flexion* Attach elastic to secure object at floor level. Begin with arm crossed over trunk, holdingelastic, palm inward, at opposite hip.Elbow Flexion* Stand on elastic Raise arm up and diagonally across, endingwith palm facing forward. Grasp elastic in hand, palm up, arm straight. Slowly return to start position and repeat. Slowly return to start position and repeat.Shoulder Diagonal D1Extension* Attach elastic to secure object as shown. Grasp elastic with hand at oppositeshoulder, palm inward. Pull arm down and across body,ending in palm outward. Pull upward, bending at elbow.Elbow Extension Attach elastic to secure object at waist level. Grasp elastic, thumb up, elbow bent, as shown. Straighten elbow, keeping elbow at side. Slowly return to starting position. Slowly return to start position and repeat.Shoulder Diagonal D2 Extension* Attach elastic to secure object above head level. Begin with arm up and out from side as shown. Grasp elastic, palm forward and pull downand across. End with hand at opposite hip, palm inward. Slowly return to start position and repeat.*Caution: User must wear suitable eye protection such as safety goggles during thisexercise to protect against possibility of eye injury as a result of the band or tubesnapping towards the face if grip is lost or if the band or tube breaks.18Wrist Flexion Secure elastic under foot. Grasp elastic in hand. Place forearm on table with hand offedge of table, palm up, as shown. Move wrist upward. Slowly return to starting position.*Caution: User must wear suitable eye protection such as safety goggles during thisexercise to protect against possibility of eye injury as a result of the band or tubesnapping towards the face if grip is lost or if the band or tube breaks.19
Instruction ManualInstruction ManualRadial DeviationWrist Extension Secure elastic under foot. Secure elastic under foot. Support forearm on tableor knee as shown. Grasp elastic with hand. Place forearm on table with hand offedge of table, palm down as shown. Hold elastic in hand, thumb up. Move hand upward. Move wrist upward. Return to start position and repeat. Slowly return to starting position.Supination Secure elastic near floor. Support forearm on table or armchair.Elbow Kick Back* Position hand palm down with elasticcrossing over thumb as shown. Hold elastic in hand of involved arm. Rotate hand to palm up, elastic shouldresist this movement. Slowly return to start position. Place one end of elastic underopposite foot. Slightly bend hips and support upperbody with other arm as shown. Pull up on elastic, raising elbowto shoulder height. Extend elbow backward,contracting Triceps.Pronation Secure elastic near floor. Support forearm on table or armchair. Slowly return to start positionand repeat. Position hand palm up with elasticcrossing under thumb as shown. Rotate hand to palm down, elasticshould resist this movement.Concentration Curl* Slowly return to start position. Attach elastic to secure object at floor level. Grasp elastic in hands, palms up, arms straight.Ulnar Deviation Sit and secure ends of the band underyour feet, creating a loop in the middle. Pull upward, bending at elbows. Keep trunk straight Slowly return to start position and repeat. Keep elbow at side, grasp middle loopof band, keeping thumb forward. Keep elbow next to side and move wrist backward. Hold and slowly return and repeat.*Caution: User must wear suitable eye protection such as safety goggles during thisexercise to protect against possibility of eye injury as a result of the band or tubesnapping towards the face if grip is lost or if the band or tube breaks.2021
Instruction ManualInstruction ManualChestChest Flies Secure middle of elastic to stationaryobject at shoulder level.Horizontal Adduction* Attach elastic to secure object at shoulder level. Face away from attachment in astaggered step, one leg in front ofother as shown. Grasp elastic in involved hand and pull inward,across body, as shown. Keep elbow straight and do not twist at waist. Grasp bands at shoulder level withyour elbows straight. Slowly return and repeat. Keep elbows straight and pull inwardwith palms inward. Slowly return and repeat.Serratus Press Attach elastic to secure object atshoulder height.Dynamic Hug Face away, grasp elastic in hand withelbow straight, arm in front, as shown. Begin with band wrappedaround upper back, holdingeach end in hands. Push arm forward. Abduct shoulders to 60 degreesand bend elbows to 45 degrees. Slowly return to start position. Keep shoulders elevated and pusharms forward and inward in ahugging motion.Chest Press Attach elastic to secure objectat shoulder level. When hands touch, hold, slowlyreturn to start position and repeat. Sit or stand as shown. Hold elastic in hands, arms outfrom side, elbows bent, as shown. Push forward, straightening elbows. Slowly return to start positionand repeat.*Caution: User must wear suitable eye protection such as safety goggles during thisexercise to protect against possibility of eye injury as a result of the band or tubesnapping towards the face if grip is lost or if the band or tube breaks.2223
Instruction ManualInstruction ManualUpper BackSeated Row Attach elastic to secure object.Horizontal Abduction* Grasp elastic in hands. Attach elastic to secure object at shoulder level. Grasp elastic with hand, as shown. Sit in chair with back unsupported,maintaining proper posture. Pull arm outward, keeping elbow straight. Keep elbows near sides, elbows bent. Do not twist at waist. Squeeze shoulder blades together,pulling arms back. Slowly return to start position and repeat. Slowly return to start and repeat.Shrug* Stand, arms at sides. Stand on elastic as shown,holding elastic in hands.Lat Pull Down* Raise shoulders upward towardsears, and roll backwards. Attach elastic overhead to secure object. Keep elbows straight. Pull down, bending elbows, squeezingshoulder blades together. Slowly return to start position. Grasp elastic in hands as shown. Slowly return to start position and repeat.Scapular Retraction Hold arms at sides with elbows bent,holding ends of elastic in each hand. Squeeze shoulder blades togetherby moving hands outward slightly. Slowly return to starting position.*Caution: User must wear suitable eye protection such as safety goggles during thisexercise to protect against possibility of eye injury as a result of the band or tubesnapping towards the face if grip is lost or if the band or tube breaks.24Reverse Flies* Grasp elastic in hands, elbowsstraight, as shown. Move arms away from eachother, out to sides. Slowly return to start position.*Caution: User must wear suitable eye protection such as safety goggles during thisexercise to protect against possibility of eye injury as a result of the band or tubesnapping towards the face if grip is lost or if the band or tube breaks.25
Instruction ManualInstruction ManualNeckUpright Row* Stand on elastic. Grasp elastic in both hands in frontof hips, elbows straight. Lift upward toward chin, bending elbows. Keep hands close to chest. Slowly lower and repeat.Isometric Cervical Extension* Place middle of band around back of head. Grasp ends of band in hands with elbowsbent, and hold in front of head as shown. Keep neck in a neutral position with chinslightly tucked inward. Hold head and neck steady and do notallow neck to bend. Extend elbows, stretching the band in front. Slowly return and repeat.Isometric Cervical Side Bending* Place middle of band around back of head.Bent Over Row* Secure elastic under opposite foot. Hold elastic in involved arm. Slightly bend hips and knees and supportupper body with other arm as shown. Pull up on elastic, raising elbow toshoulder height. Grasp both ends of band in hand with bent elbow,to one side of head as shown. Keep neck in aneutral position with chin slightly tucked inward. Extend elbow outward to side, stretching theband away from head. Hold head and neck steady and do not allowneck to bend. Slowly return and repeat extending with other hand. Slowly return to start position and repeat.Isometric Cervical Rotation* Place middle of band around backof head. Cross the ends of bandover forehead. Grasp ends of band at eye levelnear head as shown. Keep neckin a neutral position with chinslightly tucked inward. Extend one elbow outward to side,stretching the band away from head. Hold head and neck steady and do not allow to rotate. Slowly return and repeat extending with other hand.*Caution: User must wear suitable eye protection such as safety goggles during thisexercise to protect against possibility of eye injury as a result of the band or tubesnapping towards the face if grip is lost or if the band or tube breaks.26*Caution: User must wear suitable eye protection such as safety goggles during thisexercise to protect against possibility of eye injury as a result of the band or tubesnapping towards the face if grip is lost or if the band or tube breaks.27
Instruction ManualInstruction ManualAbs and BackBack Extension* Attach elastic to secure object at shoulderlevel while sitting on stool as shown. Grasp elastic in hands and hold to chest. Pull backward, straightening trunk. Slowly return and repeat.Trunk Curl-up Securely attach the ends of bandto a stationary object near floor. Lie on back with knees bent, holdingends of bands in hands, arms in frontand elbows straight.Lower Abdominal Crunch Keep hands close together and curl trunkupward, lifting shoulder blades from floor. Lie on back with hips and kneesflexed. Stretch band over knees andcross underneath. Hold and slowly return. Hold each end of band in hands andplace arms at sides, with elbowsstraight. Lift knees upward, lifting hipsoff the floor.Trunk Twist Hold and slowly return. Attach elastic to secure objectat waist level. Sit in chair. Grasp elastic in both hands,hold elastic at navel. Twist away from elastic. Slowly return and repeat thesets in th
resistance bands. Avoid exercises that involve stretching the Thera-Band resistance bands or tubing in such a fashion that they may snap toward the head and cause injury to the head or eyes. If these types of exercises are prescribed, protective eyeware should be worn. Thera-Band resistance bands and tubing are not toys; consult a physician