Transcription
Stair-PRO Stair ChairOperations Manual62516252EN6252-009-001 Rev E.02020/03
SymbolsOperating instructions/Consult instructions for useCE markAuthorized representative in the European CommunityEuropean medical deviceGeneral warningCautionCatalogue numberLot (batch) code Serial numberFor US Patents see www.stryker.com/patentsManufacturerDate of manufactureSafe working load6252-009-001 Rev E.0EN
Table of ContentsWarning/Caution/Note Definition .2Summary of safety precautions .2Introduction .4Product description .4Indications for use.4Clinical benefits .4Expected service life .4Disposal/recycle .4Contraindications .5Specifications .5Product illustration .6Contact information .7Serial number location.7Date of manufacture.7Setup .7Operation .8Operating guidelines .8Unfolding the chair .8Folding the chair .9Transferring the occupant to the chair.10Securing the occupant with the restraint straps.10Attaching the chest restraint straps.11Attaching the ankle strap .12Proper lifting techniques .12Transporting the occupant on flat surfaces .12Transporting the occupant down stairs - Model 6251 .12Transporting the occupant down stairs - Model 6252 .13Transporting the occupant up stairs.14Applying or releasing a wheel lock.14Raising or lowering the locking rear lift handles .14Attaching the optional head support to the upper control handle .15Supporting the occupant’s head with the optional head support .15Positioning operators and helpers for additional assistance .15Installing the elastic oxygen bottle holder .16Accessories and parts .18Cleaning .19Cleaning the track frame.19Suggested cleaners .19Preventive maintenance .216252-009-001 Rev E.01EN
Warning/Caution/Note DefinitionThe words W A R N I N G , C A U T I O N , and N O T E carry special meanings and should be carefully reviewed.WARNINGAlerts the reader about a situation which, if not avoided, could result in death or serious injury. It may also describepotential serious adverse reactions and safety hazards.CAUTIONAlerts the reader of a potentially hazardous situation which, if not avoided, may result in minor or moderate injury to theuser or patient or damage to the product or other property. This includes special care necessary for the safe and effectiveuse of the device and the care necessary to avoid damage to a device that may occur as a result of use or misuse.N o t e - Provides special information to make maintenance easier or important instructions clearer.Summary of safety precautionsAlways read and strictly follow the warnings and cautions listed on this page. Service only by qualified personnel.WARNING Always use all restraint straps to secure the occupant on the product. An unrestrained occupant may fall from theproduct and be injured. Do not apply a wheel lock when an occupant is on the product or when you move the product to avoid the risk of tipping. Always avoid getting dirt or other obstructions inside the tracks. The S t a i r - T R E A D system may not work the same on allstair surfaces and in all environmental conditions. Based on conditions, you may encounter varying amounts ofresistance. Water, ice, or debris on the stairs can affect operator footing and proper operation of the S t a i r - T R E A Dsystem. To avoid injury, clear the path or consider an alternate route. Condensation, water, ice, or debris on the S t a i r T R E A D system can cause unpredictable performance that results in a sudden change in the weight that the operatorsmust support. Do not attempt to transport occupant loads greater than what you can safely lift. Always clear any obstacles that may interfere and cause injury to the operator or occupant before you operate theproduct. Always make sure that the chair is locked in the unfolded position before use. An unlocked chair may fold during use. Do not use the chair with suspected cervical, spinal, or fracture injuries. Do not leave an occupant unattended. Hold the product while an occupant is on the product. Do not push the Model 6252 with the upper control handle in the fully extended position. Pushing the chair with thehandle in the fully extended position may cause the chair to tip when you encounter obstacles. Always transport the occupant on stairs with a minimum of two trained operators. Always lock the lift handles in position before you use the lift handles to lift the chair. Always lock the Model 6252 S t a i r - T R E A D system in position before you transport an occupant. Always clean and dry the S t a i r - T R E A D system before you transport an occupant. Do not install or apply a wheel lock on a product with worn wheels that are less than 6 in. diameter. Always lock the lift handles in position before you use the handles to tip the chair back. Always make sure that you secure all tubes, regulators, and accessories for the oxygen bottle to prevent interferencewith the tracks, wheels, or other mechanisms of the chair. Always properly clean or dispose of contaminated chair components to avoid risk of exposure to bloodborne pathogensand injury to the occupant or operator. Always use any appropriate personal protective equipment while power washing to avoid inhaling contagion. Powerwashing equipment may aerate contamination.CAUTION Improper usage of the product can cause injury to the occupant or operator. Operate the product only as described inthis manual.EN26252-009-001 Rev E.0
Do not modify the product or any components of the product. Modifying the product can cause unpredictable operationresulting in injury to occupant or operator. Modifying the product also voids its warranty. Always use caution when you use casters. Casters are not suitable for all surfaces. Always release the red track release bar before you click the S t a i r - T R E A D system into the locked position. Try to foldthe chair before you descend the stairs to make sure that the S t a i r - T R E A D system is locked. The elastic oxygen bottle holder is for use only with Stryker Evacuation Chairs and S t a i r - P R O Stair Chairs. Use onlyD-size oxygen bottles with the elastic oxygen bottle holder. Always properly secure the oxygen bottle and oxygen bottle accessories so they do not interfere with the operation ofthe chair. Always make sure that you secure the oxygen bottle to the elastic oxygen bottle holder using the red V e l c r o strap. Always make sure that you secure the oxygen bottle in the elastic oxygen bottle holder and that the regulator valve of theoxygen bottle does not protrude from the width of the chair. Always remove the oxygen bottle from the elastic oxygen bottle holder before you attempt to fold or store the chair. Do not steam clean or ultrasonically clean the product. Do not exceed 180 F (82 C) as the maximum water temperature. Do not exceed 1500 psi (130.5 bar) as the maximum water pressure. If you are using a hand held wand to wash theproduct, keep the pressure nozzle at a minimum of 24 in. (61 cm) from the product. Always allow to air dry. Do not clean, service, or perform maintenance while the product is in use.6252-009-001 Rev E.03EN
IntroductionThis manual assists you with the operation or maintenance of your Stryker product. Read this manual before operating ormaintaining this product. Set methods and procedures to educate and train your staff on the safe operation or maintenanceof this product.CAUTION Improper usage of the product can cause injury to the occupant or operator. Operate the product only as described inthis manual. Do not modify the product or any components of the product. Modifying the product can cause unpredictable operationresulting in injury to occupant or operator. Modifying the product also voids its warranty.Note This manual is a permanent part of the product and should remain with the product even if the product is sold. Stryker continually seeks advancements in product design and quality. This manual contains the most current productinformation available at the time of printing. There may be minor discrepancies between your product and this manual. Ifyou have any questions, contact Stryker Customer Service or Technical Support at 1-800-327-0770.Product descriptionThe Model 6251 and Model 6252 S t a i r - P R O stair chair is a manual transport device. The product supports and transportsthe body of a human occupant in a seated position up or down a set of stairs. The chair holds adult, adolescent, or childoccupants who can remain seated in the chair and secured by restraint straps. The S t a i r - T R E A D system on Model6252 controls the speed of descent of the occupant-loaded chair. Front and rear wheels allow operators to transport theoccupant on flat surfaces.Indications for useThe Model 6251 and Model 6252 S t a i r - P R O stair chair supports and transports the body of a human occupant in a seatedposition up or down a set of stairs. The product is intended for use in pre-hospital environments, in emergency and nonemergency applications. The product supports a maximum capacity of 500 lb. Operate the product by trained professionalsonly. This includes emergency medical service and medical first responders.Clinical benefitsTransport occupants up or down stairsExpected service lifeThe S t a i r - P R O stair chair has a seven year expected service life under normal use conditions and with appropriateperiodic maintenance.Disposal/recycleAlways follow the current local recommendations and/or regulations governing environmental protection and the risksassociated with recycling or disposing of the equipment at the end of its useful life.EN46252-009-001 Rev E.0
ContraindicationsDo not use the S t a i r - P R O stair chair to transport occupants who may have cervical, spinal, or fracture injuries.SpecificationsModel62516252500 lb228 kg500 lb228 kgHeight36 in.91 cm37.5 in.95.25 cmWidth20.5 in.52 cm20.5 in.52 cmDepth228 in.71 cm28 in.71 cmFolded depth8 in.20 cm8 in.20 cmWeight323 lb10 kg32.8 lb14.9 kgSafe workingload1Dimensions are measured from the outermost edges of the main frame. Specifications are rounded. Conversions arecalculated before rounding.Model 6252 is compliant to BS EN 1865-4:2010 standard with the one-piece vinyl seat option (6250-020-000) and withoutthe footrest option (6252-027-000).1Safe working load capacity is total weight distributed in accordance to basic human anatomy. Operators must consider theweight of the occupant, equipment, and accessories when they determine the total load on the product.2Depth dimensions are measured with extendable handles retracted.3The weight of the Model 6252 includes the one-piece vinyl seat option, but does not include the footrest option.Stryker reserves the right to change specifications without notice.The yellow and black color scheme is a proprietary trademark of Stryker Corporation.Environmental conditionsOperationTemperature-30 F(-34 C)130 F(54 C)-30 F(-34 C)93%Relative humidity0%700130 F(54 C)93%0%1060 hPaAtmospheric pressure6252-009-001 Rev E.0Storage and transportation1060 hPa7005EN
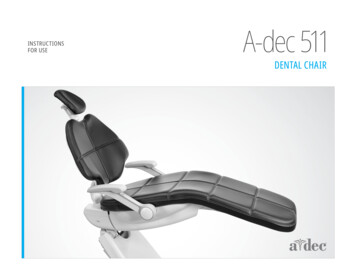
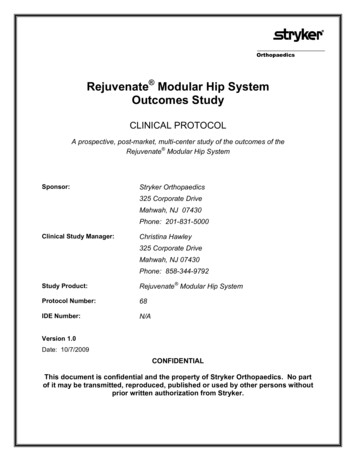
Product illustrationEDACBFigure 1 – 6251AWheel lockDLock barBCasterEHead end lift handleCFoot end lift handleIHGFDJAECBFigure 2 – 6252AWheel lockFUpper control handle release cableBCasterGLift handle release leverCFoot end lift handleHUpper control handleEN66252-009-001 Rev E.0
DLock barIS t a i r - T R E A D systemEFoot end lift handle buttonJHead end lift handleContact informationContact Stryker Customer Service or Technical Support at: 1-800-327-0770.Stryker Medical3800 E. Centre AvenuePortage, MI 49002USAN o t e - The user and/or the occupant should report any serious product-related incident to both the manufacturer and theCompetent authority of the European Member State where the user and/or occupant is established.To view your operations or maintenance manual online, see https://techweb.stryker.com/.Have the serial number (A) of your Stryker product available when calling Stryker Customer Service or Technical Support.Include the serial number in all written communication.Serial number locationADate of manufactureThe year of manufacture is the first 2 digits of the serial number.SetupDuring setup, unpack the cartons and check all items for proper operation. Make sure that the product operates before youplace it into service.Remove all the shipping and packaging materials from the product before use.The vehicle patient compartment where the product will be used must be large enough to accommodate the foldeddimensions of the chair.When necessary, modify the vehicle to fit the chair. Do not modify the chair.6252-009-001 Rev E.07EN
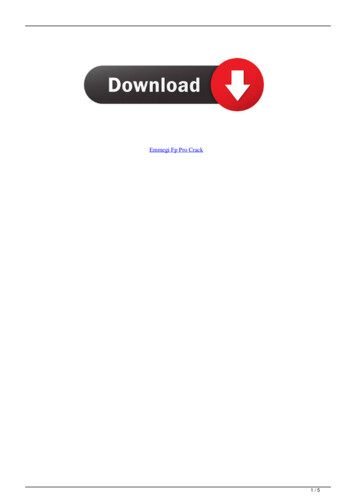
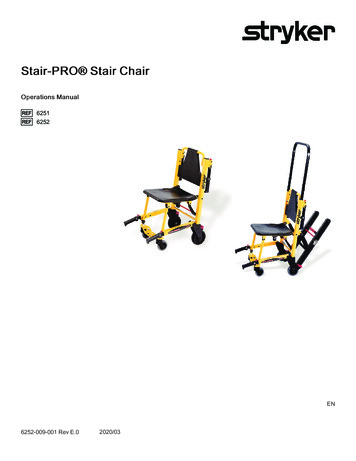
OperationOperating guidelinesWARNING Always use all restraint straps to secure the occupant on the product. An unrestrained occupant may fall from theproduct and be injured. Do not apply a wheel lock when an occupant is on the product or when you move the product to avoid the risk of tipping. Always avoid getting dirt or other obstructions inside the tracks. The S t a i r - T R E A D system may not work the same on allstair surfaces and in all environmental conditions. Based on conditions, you may encounter varying amounts ofresistance. Water, ice, or debris on the stairs can affect operator footing and proper operation of the S t a i r - T R E A Dsystem. To avoid injury, clear the path or consider an alternate route. Condensation, water, ice, or debris on the S t a i r T R E A D system can cause unpredictable performance that results in a sudden change in the weight that the operatorsmust support. Do not attempt to transport occupant loads greater than what you can safely lift. Always clear any obstacles that may interfere and cause injury to the operator or occupant before you operate theproduct. Operate the product only as described in this manual. Read all labels and instructions on the product before use. Always operate the chair on stairs with a minimum of two trained operators. Always advise the occupant before you roll the chair, ascend stairs, or descend stairs. Stay with the occupant andcontrol the product at all times. Only use the wheel locks during occupant transfer or without an occupant on the product. Always use all restraint straps to secure the occupant on the product. An unrestrained occupant may fall from theproduct and be injured. Use properly trained helpers to control the product, when necessary.Unfolding the chairW A R N I N G - Always make sure that the chair is locked in the unfolded position before use. An unlocked chair may foldduring use.To unfold the chair:1. Stand behind the chair.2. Apply the wheel locks.3. Pull the backrest and the extension handle apart (Figure 3).4. Pull up on the seat to make sure that it is locked in the unfolded position. If the chair does not fold, then the chair islocked.EN86252-009-001 Rev E.0
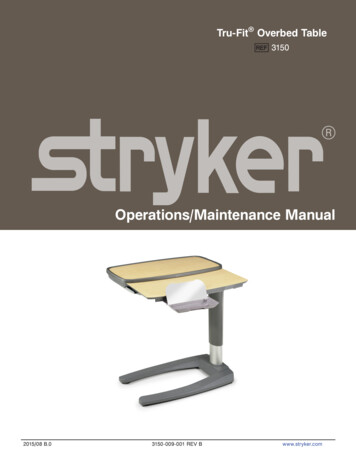
Figure 3 – Unfolding the chairFolding the chairW A R N I N G - Always make sure that the chair is locked in the unfolded position before use. An unlocked chair may foldduring use.To fold the chair:1. Apply the wheel locks.2. Buckle the restraint straps. Fold the straps to prevent them from interfering.3. Stand at the side of the chair.4. Pull up on the red lock bar (A) at the rear of the chair (Figure 4).5. Tip the chair forward.6. Fold the seat up to the backrest until the front legs lock into the clips on the bottom of the seat tube.N o t e - If applicable, rotate the front casters, so they do not interfere when you fold the chair.Store the chair in a cool, dry environment that is above freezing temperature and out of direct sunlight.6252-009-001 Rev E.09EN
AFigure 4 – Folding the chairTransferring the occupant to the chairWARNING Do not use the chair with suspected cervical, spinal, or fracture injuries. Do not leave an occupant unattended. Hold the product while an occupant is on the product.To transfer the occupant to the product:1. Place the product beside the occupant.2. Apply the wheel locks to stop the product from moving.3. Open the restraint straps.4. Transfer the occupant to the product by using accepted EMS procedures.5. Secure the occupant to the product with all of the restraint straps.6. Release the wheel locks before you transport the product.Securing the occupant with the restraint strapsYou can use the restraint straps in two configurations.W A R N I N G - Always use all restraint straps to secure the occupant on the product. An unrestrained occupant may fall fromthe product and be injured.EN106252-009-001 Rev E.0
Figure 5 – Cross-chest configurationBuckle the chest restraint straps in an X pattern across theoccupant’s chest.Figure 6 – Chest and lap configurationBuckle one restraint strap across the occupant’s chest.Buckle the other restraint strap across the occupant’s lap.For both configurations, match up the color coded restraint straps, and then buckle the ankle restraint strap across theoccupant’s legs.Secure restraint straps to the product in the required attachment locations (Figure 5 or Figure 6). Restraint strap attachmentlocations should provide strong anchorage and proper restraint position. Do not allow restraint straps to interfere withequipment or accessories. Buckle restraint straps when the chair is not in use.Open the restraint straps and place them at either side of the chair while you position the occupant on the seat. Lengthenthe restraint straps, buckle them around the occupant, and shorten them to tighten. To open the restraint strap, press the tabs on the side of the buckle receiver. This allows you to release the buckle latchplate and pull it out of the receiver. To close the restraint strap, push the latch plate into the receiver until you hear a click. To lengthen the restraint strap, grasp the buckle latch plate, turn it at an angle to the webbing, then pull it out. A hemmedtab at the end of the webbing prevents the latch plate from coming off of the strap. To shorten the restraint strap, grasp the hemmed tab and pull the webbing back through the latch plate to tighten.When you buckle a restraint strap around an occupant, secure the latch plate and remove any loose webbing from thechair.Attaching the chest restraint strapsTo attach the chest straps in the cross-chest configuration:1. Wrap each strap around the chair frame. Insert the end of the strap through the loop. Pull the strap tight.2. Pull the strap across the occupant’s chest. Lengthen the strap as necessary.3. Buckle the strap.4. Pull the loose end of the strap to tighten it around the occupant.5. Repeat for the second strap and the lap belt.6252-009-001 Rev E.011EN
Attaching the ankle strapTo attach the ankle strap:1. Remove the three plastic pieces from the strap.2. Thread the strap through one of the plastic D rings and slide the ring down to the end of the strap up to the white label.3. Loop the strap around the front leg of the chair and pull the loose end of the strap through the ring. Pull until the ringrests against the footrest tube.4. Thread the strap through the other D ring.5. Loop the strap around the other front leg of the chair and pull the loose end of the strap through the loop. Pull until the Dring rests against the footrest tube.6. Attach the final male end clip on the strap.Proper lifting techniquesWhen you lift the product and occupant, follow these proper lifting techniques to avoid the risk of injury: Keep your hands close to your body Keep your back straight Coordinate all movement with your partner Lift with your legs Avoid twistingTransporting the occupant on flat surfacesW A R N I N G - Do not push the Model 6252 with the upper control handle in the fully extended position. Pushing the chairwith the handle in the fully extended position may cause the chair to tip when you encounter obstacles.C A U T I O N - Always use caution when you use casters. Casters are not suitable for all surfaces.To transport the occupant on flat surfaces:1. Push and guide the chair with the head end lift handles or the backrest tube.2. Lift the chair over and around obstructions with the head end and foot end lift handles.Transporting the occupant down stairs - Model 6251WARNING Always transport the occupant on stairs with a minimum of two trained operators. Always lock the lift handles in position before you use the lift handles to lift the chair.To transfer the occupant down stairs:1. Foot end operator: Position yourself in front of the chair.2. Head end operator: Align yourself with the stairs.3. Foot end operator: Push each red foot end lift handle button and pull out each handle until it stops. Release the button tolock the handle into position.4. Head end operator: Unfold the head end lift handles and face down the stairs.5. Foot end operator: Face backward for better occupant monitoring or forward for a better view of the stairs and tomaneuver around obstacles.EN126252-009-001 Rev E.0
N o t e - Although the head end operator can face either direction while lifting and carrying, always follow any applicableprotocols when you carry the chair.6. Both operators - Lift the chair together. Use the head end lift handles and foot end lift handles. Follow (Proper liftingtechniques (page 12)). Avoiding any obstructions, carry the chair slowly down the stairs.Transporting the occupant down stairs - Model 6252WARNING Always transport the occupant on stairs with a minimum of two trained operators. Always lock the lift handles in position before you use the lift handles to lift the chair. Always lock the Model 6252 S t a i r - T R E A D system in position before you transport an occupant. Always avoid getting dirt or other obstructions inside the tracks. The S t a i r - T R E A D system may not work the same on allstair surfaces and in all environmental conditions. Based on conditions, you may encounter varying amounts ofresistance. Water, ice, or debris on the stairs can affect operator footing and proper operation of the S t a i r - T R E A Dsystem. To avoid injury, clear the path or consider an alternate route. Condensation, water, ice, or debris on the S t a i r T R E A D system can cause unpredictable performance that results in a sudden change in the weight that the operatorsmust support. Always clean and dry the S t a i r - T R E A D system before you transport an occupant. Do not attempt to transport occupant loads greater than what you can safely lift.C A U T I O N - Always release the red track release bar before you click the S t a i r - T R E A D system into the locked position.Try to fold the chair before you descend the stairs to make sure that the S t a i r - T R E A D system is locked.To transport the occupant down stairs:1. Roll the chair to the stairs and align it with the edge of the first step.2. Foot end operator: Push the red release buttons to extend the foot end lift handles and pull the handles out until theystop. Release the buttons to lock the handles.3. Head end operator: Use one hand to pull the red upper control handle release cable. Use the other hand to pull up andfully extend the handle. Release the cable and make sure that the handle is locked on both sides in the fully extendedposition.4. Head end operator: Squeeze the red track release bar against the black cross tube. Relax your grip on the release barand forcefully pull the S t a i r - T R E A D system to the fully extended position until both sides lock securely. Always makesure that both sides of the S t a i r - T R E A D system are locked by trying to fold it back up.5. Operators face each other while you descend the stairs.6. Head end operator: Tilt the chair back just far enough to allow the S t a i r - T R E A D system to contact the floor.7. Both operators - Maintaining the angle, guide the chair over the edge of the stairs. Allow the S t a i r - T R E A D system toconnect with the first step.8. Both operators - Glide down the stairs until the treads are level across the edges of two or three steps.9. Head end operator: Apply slight downward pressure on the extendable upper control handle while the foot end operatorapplies slight upward pressure on the foot end lift handles to keep the chair from rocking forward as it glides down thestairs.10. Foot end operator: when the track reaches the last step, release the front handles. Head end operator: allow the chair totip forward until all four wheels are on the ground. Roll the chair, see Transporting the occupant on flat surfaces (page12).11. To fold the S t a i r - T R E A D system, pull the red track release bar toward the black crossbar and fold the track up towardthe chair. Make sure that the S t a i r - T R E A D system is locked in place.If, while descending the stairs, either operator needs to pause or rest, tilt the chair forward just enough to allow the rearwheels to rest on the tread of the stair. To continue down the stairs from the resting position, the head end operator exertsslight downward press
The Model 6251 and Model 6252 Stair-PRO stair chair is a manual transport device. The product supports and transports the body of a human occupant in a seated position up or down a set of stairs. The chair holds adult, adolescent, or child occupants who can remain seated in the chair and secured by restraint straps. The Stair-TREAD system .