Transcription
ThingWorx ManufacturingApps Setup andConfiguration Guide8.1.0
Copyright 2017 PTC Inc. and/or Its Subsidiary Companies. All Rights Reserved.User and training guides and related documentation from PTC Inc. and its subsidiary companies (collectively"PTC") are subject to the copyright laws of the United States and other countries and are provided under alicense agreement that restricts copying, disclosure, and use of such documentation. PTC hereby grants to thelicensed software user the right to make copies in printed form of this documentation if provided on softwaremedia, but only for internal/personal use and in accordance with the license agreement under which theapplicable software is licensed. Any copy made shall include the PTC copyright notice and any otherproprietary notice provided by PTC. Training materials may not be copied without the express written consentof PTC. This documentation may not be disclosed, transferred, modified, or reduced to any form, includingelectronic media, or transmitted or made publicly available by any means without the prior written consent ofPTC and no authorization is granted to make copies for such purposes. Information described herein isfurnished for general information only, is subject to change without notice, and should not be construed as awarranty or commitment by PTC. PTC assumes no responsibility or liability for any errors or inaccuraciesthat may appear in this document.The software described in this document is provided under written license agreement, contains valuable tradesecrets and proprietary information, and is protected by the copyright laws of the United States and othercountries. It may not be copied or distributed in any form or medium, disclosed to third parties, or used in anymanner not provided for in the software licenses agreement except with written prior approval from PTC.UNAUTHORIZED USE OF SOFTWARE OR ITS DOCUMENTATION CAN RESULT IN CIVILDAMAGES AND CRIMINAL PROSECUTION.PTC regards software piracy as the crime it is, and we view offenders accordingly. We do not tolerate thepiracy of PTC software products, and we pursue (both civilly and criminally) those who do so using all legalmeans available, including public and private surveillance resources. As part of these efforts, PTC uses datamonitoring and scouring technologies to obtain and transmit data on users of illegal copies of our software.This data collection is not performed on users of legally licensed software from PTC and its authorizeddistributors. If you are using an illegal copy of our software and do not consent to the collection andtransmission of such data (including to the United States), cease using the illegal version, and contact PTC toobtain a legally licensed copy.Important Copyright, Trademark, Patent, and Licensing Information: See the About Box, or copyrightnotice, of your PTC software.UNITED STATES GOVERNMENT RIGHTSPTC software products and software documentation are “commercial items” as that term is defined at 48 C.F.R. 2.101. Pursuant to Federal Acquisition Regulation (FAR) 12.212 (a)-(b) (Computer Software) (MAY 2014)for civilian agencies or the Defense Federal Acquisition Regulation Supplement (DFARS) at 227.7202-1(a)(Policy) and 227.7202-3 (a) (Rights in commercial computer software or commercial computer softwaredocumentation) (FEB 2014) for the Department of Defense, PTC software products and softwaredocumentation are provided to the U.S. Government under the PTC commercial license agreement. Use,duplication or disclosure by the U.S. Government is subject solely to the terms and conditions set forth in theapplicable PTC software license agreement.PTC Inc., 140 Kendrick Street, Needham, MA 02494 USA
ContentsAbout This Guide .4Installing ThingWorx Manufacturing Apps.5Product Requirements .6Import as a ThingWorx Extension.7Configure Communication with KEPServerEX .9Configure Java for Tomcat. 11Introducing ThingWorx Manufacturing Apps .13Console Overview .15Administration and Configuration.16Configure Users and Roles.17Manage Resources.19Alert Editing.33Configure Email and Text Delivery.35Apps Overview.37Controls Advisor .39Production Advisor.50Asset Advisor .52Alert Monitoring .60Trending and Troubleshooting .61Advanced Configuration .62Creating Custom Roles .63Configuring the URL Shortening Service .64Modifying Data Retention Settings .65Configuring Remote Access and Control .66Configuring Anomaly Detection.69Asset Simulator.76Installing the Asset Simulator.77Asset Simulator Configuration .80Using the Asset Simulator .82Frequently Asked Questions .84Release Notes .863
About This GuideThis ThingWorx Manufacturing Apps guide describes the following: Installation of ThingWorx Manufacturing Apps as an extension to ThingWorx.Initial setup and configuration steps to get started with ThingWorxManufacturing AppsThis guide assumes that the prerequisite products on page 6 are installed andconfigured, including a KEPServerEX with connected devices.Related DocumentationIt may be useful to refer to the following documents located at the PTC ReferenceDocuments website under the product categories: ThingWorx ManufacturingApps Family and ThingWorx Service Apps Family. What’s New in ThingWorx Manufacturing Apps ThingWorx Manufacturing and Service Apps Customization GuideCommentsPTC welcomes your suggestions and comments on its documentation. To submityour feedback, you can send an email to documentation@ptc.com. To help usmore quickly address your concern, include the name of the PTC product and itsrelease number with your comments. If your comments are about this book,include the ThingWorx Manufacturing Apps Setup and Configuration Guide booktitle.4ThingWorx Manufacturing Apps Setup and Configuration Guide
1Installing ThingWorxManufacturing AppsProduct Requirements .6Import as a ThingWorx Extension .7Configure Communication with KEPServerEX .9Configure Java for Tomcat . 11This chapter describes product requirements and installation for ThingWorxManufacturing Apps.5
Product RequirementsThis product works in connection with ThingWorx servers and Kepware servers.To use ThingWorx Manufacturing Apps, you must have the support identifiedbelow.Related DocumentationThingWorx Manufacturing Apps shares the same core system requirements andcompatibility matrix with ThingWorx Core. It is useful to refer to the followingdocument located at the PTC Reference Documents website under the productcategory: ThingWorx ThingWorx Core 8.1 System RequirementsFor more information about ThingWorx, refer to the ThingWorx Help Center.Platform and Operating System SupportThingWorx Manufacturing Apps are compatible with ThingWorx 8.1. Foroperating system support, please refer to the compatibility matrix located in thedocument ThingWorx Core 8.1 System Requirements. NoteWindows Server 2008 R2 SP1, Windows 2012 R2, and Cent OS 7.1 arerecommended and fully tested for production. Servers running Japanese OS are not supported.KEPServerEX SupportThingWorx Manufacturing Apps supports data from KEPServerEX Version 6.2 orKEPServerEX Version 6.3, which include ThingWorx Native Interface. NonKepware servers and earlier versions of KEPServerEX can be connected to eithera KEPServerEX 6.2 or KEPServerEX 6.3 server used as an aggregator.6ThingWorx Manufacturing Apps Setup and Configuration Guide
NoteIf you plan to install the Asset Simulator, when prompted to Select Featuresduring KEPServerEX installation, do the following: Expand the Communication Drivers tree and OPC Connectivity Suitesubtree. Select OPC UA Client. Ensure that OPC Quick Client is selected for installation in theCommunications Server tree.KEPServerEX and ThingWorx can be installed on the same machine. However,for production we recommend separate machines.For more information, see KEPServerEx Version 6 Install Guide.Database SupportThingWorx Manufacturing Apps are compatible with ThingWorx 8.1. Fordatabase support, please refer to the compatibility matrix located in the documentThingWorx Core 8.1 System Requirements.Client Browser SupportThingWorx Manufacturing Apps are compatible with ThingWorx 8.1. For clientbrowser support, please refer to the compatibility matrix located in the documentThingWorx Core 8.1 System Requirements.Import as a ThingWorx ExtensionThingWorx Manufacturing Apps are imported as a ThingWorx extension.NoteAssetRemoting.zip is an optional extension that you can choose toimport along with ThingWorx Manufacturing Apps. This extension enablesyou to use the remote access and control capability available in Asset Advisor.For more information, see Configuring Remote Access and Control on page66Installing ThingWorx Manufacturing Apps7
PrerequisitesBefore importing this product as a ThingWorx extension, consider the followingprerequisites: Review Product Requirements on page 6.Review the ThingWorx 8.1 requirements. For more information, seeThingWorx Core 8.1 System Requirements.Install ThingWorx 8.1. For more information, see Installing ThingWorx 8.1.Follow the instructions to Configure Java for Tomcat on page 11.ImportYou import this product as a ThingWorx extension into an existing ThingWorxplatform install (version 8.1). To locate the download, go to the PTC SoftwareDownloads page and expand the following folders: PTC Smart ConnectedApplications Release APPs ThingWorx Manufacturing AppsExtension most recent datecode .1. Do the following:a. Download and unzip the contents of the following undle.zipb. Optional: Download, but do not unzip the file AssetRemoting.zip2. From ThingWorx Composer, navigate to Import/Export Import.NoteThe extension files must be imported in the correct order as described inthe following steps.3. In the Import Extensions window, navigate endencies.zip4. Click Import and refresh the window if prompted.5. Again, select Import/Export Import.6. In the Import Extensions window, navigate p7. Click Import and refresh the window if prompted.8ThingWorx Manufacturing Apps Setup and Configuration Guide
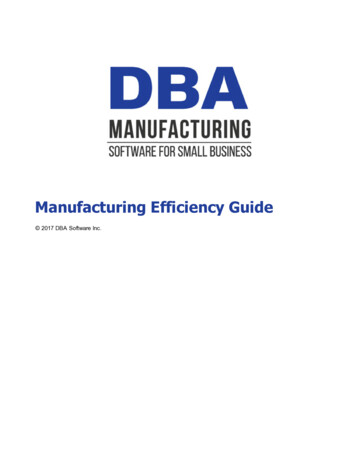
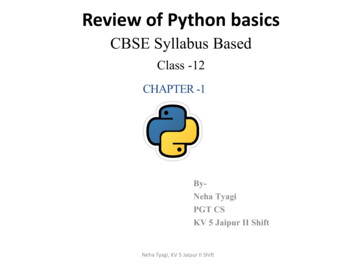
NoteComplete the next three steps only if you have downloaded the optionalAssetRemoting.zip extension.Otherwise, proceed to the last step.8. Again, select Import/Export Import.9. In the Import Extensions window, navigate to:AssetRemoting.zip10. Click Import and refresh the window if prompted.11. View the extensions after the import by selecting Import/Export Manage.VerifyTo verify that you can access the apps, go to the following URL on yourThingWorx server. You need to enter your port number.https://localhost: port /Thingworx/FormLogin/WelcomeThe default user name is Administrator. The password is the one youspecified during the installation and configuration of ThingWorx.Configure Communication withKEPServerEXThe connection with KEPServerEX provides the data needed by ThingWorxManufacturing Apps. One or more KEPServerEX servers can be connected.KEPServerEX can be on the same server or a different server than ThingWorx.To configure communication with KEPServerEX:1. When you open ThingWorx Manufacturing Apps for the first time using thelink provided on the last page of the installer or one of the shortcut createdduring the installation, you are guided to create your first connection to yourKEPServerEX server. You are prompted to enter a server or Thing name.Ensure that the name is one you can use to identify this KEPServerEXinstance. A list of configuration parameters is generated automatically. Print orcopy that information before launching ThingWorx Manufacturing Apps.2. Input the configuration parameters under the ThingWorx tab of your instanceof KEPServerEX. Right-click Project, select Properties, and then click theThingWorx tab.Installing ThingWorx Manufacturing Apps9
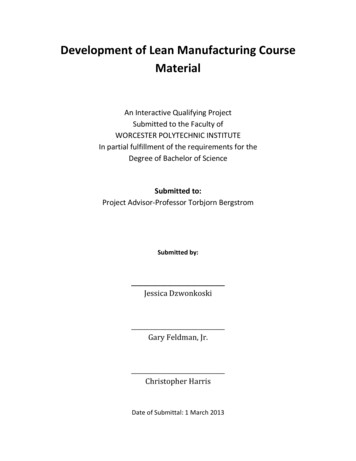
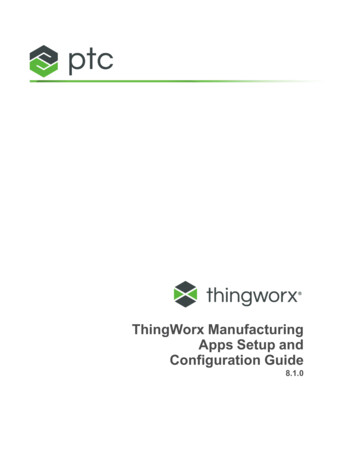
KEPServerEX then solicits the connection with your product.3. In the KEPServerEX configuration, a confirmation regarding a connection toThingWorx displays in the Event column, as shown in the following figure.10ThingWorx Manufacturing Apps Setup and Configuration Guide
If you receive an error message indicating that the connection to theThingWorx platform failed and could not initialize a secure socket connection,follow these steps: Verify that the host, port, resource, application key, and Thing name arevalid and correct. Verify that the host of KEPServerEX can reach the machine on which yourproduct is installed. To do so, ping the hostname or IP address of theThingWorx Manufacturing Apps host. Verify that the proper certificate settings are enabled.4. Launch ThingWorx Manufacturing Apps.5. Later, you can click Controls Advisor from the main console to create andmanage additional server connections.For more information, see Controls Advisor on page 39.Configure Java for TomcatTo assure that ThingWorx Manufacturing Apps runs properly, you must make thefollowing changes to your Java for Tomcat configuration.Installing ThingWorx Manufacturing Apps11
To change your Tomcat configuration:1. From the Start menu, launch the Configure Tomcat program.2. Enter values in the Initial memory pool and Maximum memory pool fields.The recommended value is 5120.3. Increase the default cache settings that affect static file caching. To do so, addthe following line within the tags in the TOMCAT HOME\conf\context.xml file: Resources cacheMaxSize "501200" cacheObjectMaxSize "2048" cacheTtl "60000"/ 12ThingWorx Manufacturing Apps Setup and Configuration Guide
2Introducing ThingWorxManufacturing AppsConsole Overview .15ThingWorx role-based manufacturing apps simplify the digital transformation ofmanufacturing and accelerate time-to-value with unmatched deploymentflexibility.ThingWorx Manufacturing Apps include the following applications.Controls AdvisorThingWorx Controls Advisor is a web/mobile application that rapidly connects toand remotely visualizes data from virtually any PLC in the factory. Controlsengineers are notified instantly of data communication errors that may cause theloss of critical production data. Simple tools enable users to trend and visualizedata for rapid troubleshooting.Key features include: Real-time visibility of asset and device status Instant notification and alerts of device connectivity errors The ability to easily trend tags in minutesThingWorx Controls Advisor readily connects to Kepware to provide instantconnectivity to your various assets and is built on the ThingWorx industrial IoTplatform. This allows for accelerated time-to-value and the ability to quickly kickstart your manufacturing journey.13
Asset AdvisorRemotely monitor physical assets in real-time, automatically detect anomalies andtrigger alerts to improve efficiency and quality. ThingWorx Asset Advisor is aweb/mobile application that provides maintenance and service technicians withreal-time visibility into the health and status of critical assets. It alerts you topotential problems that may impact production while delivering simple, easy-touse tools for trending and troubleshooting issues.Key features include: Unified connectivity to disparate assets Real-time anomaly detection Condition-based monitoring Asset trending and troubleshootingThingWorx Asset Advisor readily connects to KEPServerEX and other OPCservers, providing instant connectivity to your assets. Built on the ThingWorx IoTplatform, it provides accelerated time-to-value so you can kick start yourmanufacturing journey.Production AdvisorReal-time visibility and insight into production line performance and status.ThingWorx Production Advisor is a web/mobile application for productionmanagers that rapidly unifies disparate sources of operational and business data.Users have real-time visibility into production status and critical KPIs such asavailability, performance, quality and OEE.Key features include: Real-time visibility into performance and issues The ability to drill down into underlying data for root cause analysis Normalized manufacturing KPIs with historical trendingThingWorx Production Advisor readily connects to KEPServerEX and otherOPC servers, providing instant connectivity to your various assets. Built on theThingWorx IoT platform, it provides accelerated time-to-value so you can kickstart your manufacturing journey.14ThingWorx Manufacturing Apps Setup and Configuration Guide
Console OverviewThingWorx Manufacturing Apps are a set of role-based apps built on ThingWorxthat solve common problems in the factory. The apps unify data from enterprisebusiness systems, physical assets, and sensors to deliver user information andinsights in context to make better decisions faster.The tiles available on the console are described by role below. The tiles you seedepend on your company’s implementation as well as on your user role. For moreinformation, see Configure Users and Roles on page 17.From any window in the app, click the tile icontiles.Introducing ThingWorx Manufacturing Appsto quickly move between15
3Administration and ConfigurationConfigure Users and Roles .17Manage Resources .19Alert Editing .33Configure Email and Text Delivery .35This chapter describes the tasks required for the initial setup of ThingWorxManufacturing Apps. Most tasks are completed using the Administration andConfiguration tile on the console.16ThingWorx Manufacturing Apps Setup and Configuration Guide
Configure Users and RolesTo configure ThingWorx Manufacturing Apps users and roles:1. Go to Administration and Configuration Users and Access Control.2. Click Create User.3. Enter profile information for the user. The user name must be unique. The cell phone number is required for alert notification. Use the format: number with international code Passwords are case sensitive and must contain at least 15 characters. Role AssignmentsTipYou can create a user with multiple roles. For example, you could assign auser all of the following roles. Controls Engineer Production Manager Maintenance Engineer A user can be assigned to two roles. However, the result is permissionscommon to both roles – not the union of the role permissions.Each role is described in the following table. Begin by creating a user foryourself in the Controls Engineer role.RoleControls EngineerProduction ManagerAccessAll tiles Alert Monitoring Administration and ConfigurationTrending and Troubleshooting17
RoleMaintenance ManagerAccessAsset AdvisorAdministration and Configuration: Manage ResourcesMaintenance Engineer Alert Editing Trending and Troubleshooting Alert MonitoringAsset AdvisorAdministration and Configuration: Alert Editing Trending and Troubleshooting Alert MonitoringNoteThe Notification Preference selections for each user determine if and howalerts are delivered to that user. The Email and Mobile Phone values enteredare used for the Email and SMS notification methods, respectively.4. Repeat steps 2 and 3 to add additional users.18ThingWorx Manufacturing Apps Setup and Configuration Guide
Manage ResourcesThe procedures in the following sections describe how to create and configureyour resources in ThingWorx Manufacturing Apps.Resources are collections of lines, assets, and sites. Sites allow you to group yourlines and assets by location. Sites and lines are used in Production Advisor. Formore information, see Relate a Site to a Resource on page 32.Create Resources1. Go to Administration and Configuration Manage Resources.2. Click new resource.3. Select a type, either Asset, Line, or Site.Delete Resource1. Go to the Administration and Configuration Manage Resources page.2. Select the resources to be removed.3. Click Delete Resource.4. Confirm the deletion.Administration and Configuration19
Configure ResourcesOnce resources are created, configure the resources to establish relationships,properties, status, performance metrics, and alerts.1. Go to Administration and Configuration Manage Resources.2. Select a resources from the table and click Configure Resource.3. From the details page of the resource, enter information on each page asdescribed in the following steps. Remember to click Save before moving to adifferent page.Here is the suggested workflow:a. Create lines and assets. For more information, see Create Resources onpage 19b. Relate assets to a line. For more information, see Relate Asset to Line onpage 30.c. Define the status for your assets based on the tags selected fromKEPServerEx. For more information, see Configure Status on page 23.d. Create properties on your assets. For more information, see ConfigureAdditional Properties on page 24.e. Define performance metrics for your assets (optional). For moreinformation, see Configure Performance Metrics on page 26.f. Create alerts for your assets. For more information, see Configure Alertson page 29.g. Create properties for your line. For more information, see ConfigureAdditional Properties on page 24.h. Define the status for your line based on the assets in the line. For moreinformation, see Configure Status on page 23.i. Define performance metrics for your line. For more information, seeConfigure Performance Metrics on page 26.j. Create alerts for your line. For more information, see Configure Alerts onpage 29.Configure General Information1. Go to Administration and Configuration Manage Resources.2. Select a resource from the table and click Configure Resource3. On the General Information page of the resource, do the following.20ThingWorx Manufacturing Apps Setup and Configuration Guide
a. Upload an image to depict the resource.i. Click Browse, then select an image file.ii. Click Upload to display the image, then click Save.b. In the General Information area for the resource, enter text in theDescription field.c. Select the Site Name for the resource from the drop-down list.d. Enter numbers in the following fields. Planned Operation Time (enter time as HH:MM) Start and Duration (enter time as HH:MM)TipStart and Duration describes the planned time when the resource isavailable for use. It is defined in the system using a start time and aduration time. KPI Calculation PeriodAdministration and Configuration21
TipKPI Calculation Period is the time range over which a keyperformance indicator is calculated for display to others. It isdefined in minutes and cannot be set to less that one minute.e. Click Save to persist the configuration.TipConfiguration data is lost if you navigate away from the page withoutsaving. 22NoteThe Name field is not editable once the resource is created.ThingWorx Manufacturing Apps Setup and Configuration Guide
Configure Status1. Go to Administration and Configuration Manage Resources.2. Select a resource from the table and click Configure Resource.3. For each state, enter an expression. For more information, see StatusCalculations on page 23You can enter the expression manually, or browse to select tags. You can alsoselect properties from other resources.For more information, see Configure Additional Properties on page 24For lines, the expressions can relate to the assets of the line. For example, aline could be in planned downtime if either of the two assets in the line are inplanned downtime. Copy the planned downtime expressions for eachappropriate asset and paste them into the planned downtime expression for theline.4. Click Save.Status Calculations There are 6 states provided by default. You can define 4 of them. The Warning status is defined by default to appear when the asset has activealerts. The default can be changed to whatever you like.Administration and Configuration23
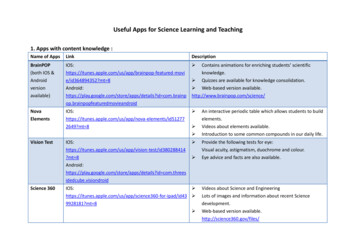
The expressions appear in the table in the order they are evaluated. You canchange that order by selecting the Move Up and Move Down arrows. After you define the expression of each of the states, make sure they are in thetable in the correct order. “not Configured” and “unavailable” status cannot be moved. If none of the expressions can be evaluated, then the status is “unavailable”. If a state does not have an expression defined it is ignored. When writing an expression the following can be used. Valid operators: AND, OR, , , , , , ! , (, ) Valid operands: true, false, numbers and tags Strings must appear between single quotes ('). KEPServerEX tags betweendouble quotes (").Configure Additional PropertiesProperties added to assets here display on the Additional Properties page of anasset detail in Asset Advisor.Add properties or tags from KEPServerEX. You can add: static properties by specifying the name, type and valueproperties that pull the value from a KEPServerEX tagThe following example pulls the temperature tag from KEPServerEX.1. Go to Administration and Configuration Manage Resources.2. Select a resource from the table and click Configure Resource3. On the Additional Properties page, click new property.You can either create static properties by entering a name, type, and value, orproperties for which the value is driven by a KEPServerEX tag, where youenter the name and select the tag. The property type is automatically inheritedfrom the KEPServerEX tag type.4. Enter information in the Name and Type fields.24ThingWorx Manufacturing Apps Setup and Configuration Guide
5. For Value, click the icon to browse for a tag. Locate and select the informationfrom your KEPServerEX.6. Click OK, then click the Save button to save the property.Administration and Configuration25
Configure Performance MetricsThe following table explains how performance metrics are calculated by default.MetricAvailabilityDefault CalculationRun Time/Planned Production TimeRun Time Warning Time Running timePerformancePlanned Production Time Warning Time Running time Unplanned Downtime Unavailable timeGood Count / Total Count since the beginning of the plannedoperation time.(Total Count / Run Time) / Ideal Run RateOEERun Time Warning Time Running TimeAvailability * Performance * QualityQualityTo configure custom performance metrics for a resource:1. Go to the Administration and Configuration Manage Resources page.2. Select a resource from the table and click Configure Resource.3. On the Performance Metrics page, enter information for your performancethresholds and calculations as described in the example below and detail therequired equations.TipQuality and Performance can be overridden by selecting a KEPServerEXtag directly.NoteThe following example assumes you have a KEPServerEX tag from whichyou can access the number of good parts and bad parts for the day.26ThingWorx Manufacturing Ap
KEPServerEX can be on the same server or a different server than ThingWorx. To configure communication with KEPServerEX: 1. When you open ThingWorx Manufacturing Apps for the first time using the link provided on the last page of the installer or one of the shortcut created during the installation, you are guided to create your first connection .