Transcription
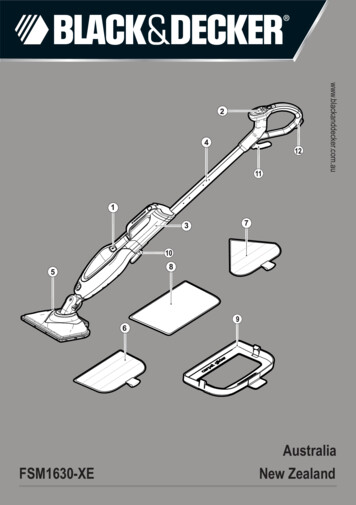
www.blackanddecker.com.auFSM1630-XEAustraliaNew Zealand
ABCDEF2
GHIJK3
ENGLISH(Original instructions)Using your applianceDo not direct steam at people, animals, electrical appliances or electricaloutlets.Do not expose to rain.Safety instructionsDo not immerse the appliance in water.Do not leave the appliance unattendRead all@ Warning!ed.safety warnings andDo not leave the appliance connectedall instructions. Failure toto an electrical outlet when not in use.follow the warnings and instrucNever pull the power lead to discontions listed below may result innect the appliance from the socket.electric shock, fire and/or seriKeep the appliance lead away fromous injury.heat, oil and sharp edges.Do not handle steam cleaner with wetWarning!Whenusingmainshands.@ powered appliances, basicDo not pull or carry by cord, use cordsafety precautions, including theas a handle, close door on cord, pullfollowing, should always be folcord around sharp corners or exposelowed to reduce the risk of fire,cord to heated surfaces.electric shock, personal injuryDo not use appliance in an enclosedand material damage.space filled with vapour given off byoil-base paint thinner, some mothRead all of this manual carefully beproofing substances, flammable dust,fore using the appliance.or other explosive or toxic vapours.The intended use is described in thisCheck the type of floor with the manumanual. The use of any accessoryfacturer.or attachment or the performanceDo not use on leather, wax polishedof any operation with this appliancefurniture or floors, synthetic fabrics,other than those recommended in thisvelvet or other delicate, steam-sensiinstruction manual may present a risktive materials.of personal injury.Retain this manual for future reference.Intended useYour Black & Decker steam mop has been designed forsanitising and cleaning sealed hardwood, sealed laminate,linoleum, vinyl, ceramic tile, stone and marble floors and forrefreshing carpets. This appliance is intended for indoorhousehold use only.uuuuuuuuuuuuuu4
(Original instructions)Do not use on@ Warning!unsealed wood or unsealeduENGLISHCare should be taken when using thisappliance. DO NOT touch any partswhich may become hot during use.Switch the appliance off and return thehandle to the upright position beforeremoving the water tank.For floor use only; do not use the unitupside down. This appliance is intended for indoor household use only.laminate floors. On surfaces thathave been treated with wax orsome no wax floors, the sheenmay be removed by the heatand steam action. It is alwaysrecommended to test an isolated area of the surface to becleaned before proceeding. We After usealso recommend that you checkUnplug the appliance and allow to coolthe use and care instructionsbefore cleaning.from the floor manufacturer.When not in use, the appliance shouldNever put descaling, aromatic, alcobe stored in a dry place.holic or detergent products into theChildren should not have access tosteam cleaner, as this may damage itstored appliances.or make it unsafe for use.Inspection and repairsIf the home circuit breaker activatesUnplug the appliance and allow to coolwhile using the steam function, disbefore performing any maintenance orcontinue product use immediately andrepairs.contact the customer support centre.(Beware of the risk of electrical shock.) Before use, check the appliance fordamaged or defective parts. Check forThe appliance emits very hot steam tobreakage of parts, damage to switchessanitize the area of use. This meansand any other conditions that may afthat the steam head, cleaning padsfect its operation.and carpet attachment get very hotRegularly check the power lead forduring use.damage.Caution! Always wear suitableDo not use the appliance if any part isshoes when using your steam mopand when changing the accessories on damaged or defective.Have any damaged or defective partsyour steam mop. Do not wear slippersrepaired or replaced by an authorizedor open toed footwear.repair agent.The lid may become hot during use.Never attempt to remove or replaceSteam may escape from the applianceany parts other than those specified induring use.this manual.uuuuuuuuuuuuuuuuu5
ENGLISH(Original instructions)Safety of othersThis appliance can be used by childrenaged from 8 years and above andpersons with reduced physical, sensory or mental capabilities or lack ofexperience and knowledge if they havebeen given supervision or instructionconcerning use of the appliance in asafe way and understand the hazardsinvolved. Children shall not play withthe appliance. Cleaning and usermaintenance shall not be made bychildren without supervision.Children should be supervised toensure that they do not play with theappliance.uuResidual risks.Additional residual risks may arisewhen using the tool which may notbe included in the enclosed safetywarnings. These risks can arisefrom misuse, prolonged use etc.Even with the application of therelevant safety regulations and theimplementation of safety devices,certain residual risks can not beavoided. These include:uuuu6Injuries caused by touching any moving parts.Injuries caused by touching any hotparts.Injuries caused when changing anyparts or accessories.Injuries caused by prolonged use ofthe appliance. When using any appliance for prolonged periods ensure youtake regular breaks.Electrical safetyWarning! This prod@ uctmust be earthed.Always check that thepower supply corresponds to the voltageon the rating plate.Power plugs must match the outlet.Never modify the plug in any way.Unmodified plugs and matchingoutlets will reduce risk of electricshock.uIf the supply cord is damaged, it mustbe replaced by the manufacturer oran authorised Black & Decker ServiceCentre in order to avoid a hazard.Extension cables & Class 1productA 3-core cable must be used as yourappliance is earthed and of Class 1construction.Up to 30m (100 ft) can be used withoutloss of power.uuLabels on the applianceThe following pictograms are shown on the tool:Warning! To reduce the risk of injury, the usermust read the instruction manual.Warning! Danger of scalding.
(Original instructions)FeaturesThis appliance includes some or all of the following features.1. ON/Off switch2. Smartselect TM button3. Removable water tank4. Handle5. Steam head6. Steam head cleaning pad7. Delta head cleaning pad8. Resting mat9. Carpet glider10. Bottom cable tidy hook11. Top cable tidy hook12. Cable management clipAssemblyWarning! Before attempting any of the following operations,make sure that the appliance is switched off and unpluggedand that the appliance is cold and does not contain any water.Attaching the handle (Fig. A) Slide the bottom end of the handle (4) into the top end ofthe steam mop body (13) until it clicks into place.Attaching the steam head (Fig. B) Slide the bottom end of the steam mop body (13) onto thesteam head (5) until it clicks into place.The steam head can be removed from the Steam mopbody by pressing the steam head release button (14) andpulling the steam mop body (13) off the steam head (5).Attaching the water jug (Fig. C) Clip the water jug (3) onto the handle (4).Slide the water jug (3) down into the Steam mop bodyAttaching a cleaning pad (Fig. D)Replacement cleaning pads are available from your Black &Decker dealer:- (cat. no. FSMP20-XE). loop’ side facing up.Lightly press the steam mop down onto the cleaning pad(6 or 7).Caution! Always place your steam mop on the resting mat (8)with the handle (4) in the upright position when stationary andmake sure the steam mop is turned off when not in use. Removing a cleaning pad (Fig. E)Caution! Always wear suitable shoes when changing thecleaning pad on your steam mop. Do not wear slippers oropen toed footwear.ENGLISH Return the handle (4) to the upright position and turn thesteam mop ‘OFF’.Place the steam mop on the resting mat and wait until it Place the front of your shoe onto the cleaning pad removal Lift the steam mop up off the cleaning pad.Caution! Always place the steam mop on the resting mat (8)with the handle (4) in the upright position when stationary andmake sure the steam mop is turned off when not in use.Attaching the carpet glider (Fig. F) Lightly press the steam mop down onto the carpet glider(9) until it clicks into place.Caution! Always place the steam mop on the resting mat (8)with the handle (4) in the upright position when stationary andmake sure the steam mop is turned off when not in use. Removing the carpet glider (Fig. F)Caution! Always wear suitable shoes when changing thecarpet glider on your steam mop. Do not wear slippers oropen toed footwear. Return the handle (4) to the upright position and turn thesteam mop ‘OFF’. Place the steam mop on the resting mat and wait until it Place the front of your shoe onto the carpet glider removal Lift the steam mop up off the carpet glider (9).Caution! Always place the steam mop on the resting mat (8)with the handle (4) in the upright position when stationary andmake sure the steam mop is turned off when not in use.The Delta Head (Fig. G)This Steam Mop incorporates a built in delta head whichenables you to access into tight corners and narrow gaps.Caution! Always wear suitable shoes when accessing thedelta head on your steam mop. Do not wear slippers or opentoed footwear. Return the handle (4) to the upright position and turn thesteam mop ‘OFF’. Place the steam mop on the resting mat and wait until it Place the front of your shoe onto the steam head removaltab (18) and press down gently.Lift the delta head (17) up off the steam head (5).Fit the delta head cleaning pad to the bottom of the deltahead.7
ENGLISH(Original instructions)Note:head to the steam head. delta head clicks into place.Caution! Always place the steam mop on the resting mat (8)with the handle (4) in the upright position when stationary andmake sure the steam mop is turned off when not in use.Smartselect TM Technology (Fig. J)Smartselect TM button (2)which shows various cleaning applications. They are used toselect the correct operating mode for your particular cleaningoperation.Using Smartselect TM , choose from one of the following applications by pressing the smartselect button (2) until the requiredsetting is selected:Wood/LaminateFilling the water tank (Fig. H)The watertank on your steam mop is removable for conviThis Steam Mop incorporates an anti-calc system to helpprolong the life of the system.Note: Fill the water tank with clean tap water.Note: In areas of very hard water, the use of de-ionised wateris recommended. Remove the water tank (3). (20).Fill the water tank (3) with water.Warning! Your water tank has a 0.5 litre capacity. Do not over Note:UseImportant! This unit will kill 99.9% of bacteria & germs whenSwitching on and offTo switch the appliance on, press the ON/OFF button (1).It takes approximately 15 seconds for the steam mop toheat up.Note:ervoir will glow red. Once the steam mop is ready to use thewater reservoir will glow blue. To switch the appliance off, press the ON/OFF button (1).Caution! Never leave the steam mop in one spot on anysurface for any period of time. Always place the steam mop onthe resting mat (8) with the handle (4) in the upright positionwhen stationary and make sure the steam mop is turned offwhen not in use.Caution! Always empty the steam mop after use.Stone/MarbleTiles/VinylThe steam mop will select the correct volume of steamrequired for your particular cleaning operation.Note: Always check you are using the correct setting beforeusing your steam mop. For convienience the steam mop willremember the last setting you chose.Steam burst (Fig. I)The steam mop is equipped with a steam bust button to aid inthe removal of stubborn marks and stains. During use, press the steam bust button (21) to applyextra cleaning power.Note: The stem burst will last for 10 seconds then the stemmop will return to the chosen setting.Hints for optimum use 8GeneralCaution!cleaning pad. During use you can use the cable mamagement clip (11)to keep your cable out of the way of the work area. mop.The easiest way to use the machine is to tilt the handle toa 45 angle and clean slowly, covering a small area at atime.Do not use chemical cleaners with your steam mop. Tocan use the steam burst button to apply extra steam tothe area or pre-treat with a mild detergent and some waterbefore using the steam mop.
(Original instructions)Steam cleaning loop’ side facing up.Raise the steam mop off the resting mat (8) and lightlypress it down onto the cleaning pad (6 or 7).Place the steam mop on the resting mat.Connect the steam mop to the mains.Press the ON/OFF button (1). It takes approximately 15seconds for the steam mop to heat up.Press the Smartselect TM button (2) till the required settingis reached.Pulling the handle (4) back will activate the steam pump.After a few seconds steam will start to come out of thesteam head.It takes a few seconds for steam to enter the cleaning pad.The steam mop will now glide easily over the surface to besanitised/cleaned.ENGLISHPress the Smartselect TM button (2) to the Wood/Laminatesetting. Pulling the handle (4) back will activate the steam pump.After a few seconds steam will start to come out of thesteam head. Push and pull the steam mop slowly across the carpet tothoroughly refresh each section.Note: During use you may turn off the steam pump by returning the handle (4) to the upright position, this convenientfeature will allow you to place the steam mop on the restingmat (8) so that you may move items of furniture with out theneed to switch the appliance off. handle (4) to the upright position and turn it ‘OFF’, place iton the resting mat (8) and wait until the steam mop coolsCaution! It is important to monitor the water level in the water thoroughly steam clean each section.Note: During use you may turn off the steam pump by returning the handle to the upright position, this convenient featurewill allow you to place the steam mop on the resting mat fora short time so that you may move items of furniture, thencontinue cleaning without the need to switch the appliance off. handle (4) to the upright position and turn it ‘OFF’, place iton the resting mat (8) and wait until the steam mop coolsCaution! It is important to monitor the water level in the waterreturn the handle (4) to the upright position and turn the steammop ‘OFF’. Unplug the unit from the electrical wall outlet,Caution! Never leave the steam mop in one spot on anysurface for any period of time. Always place the steam mop onthe resting mat (8) with the handle (4) in the upright positionwhen stationary and make sure the steam mop is turned offwhen not in use.Carpet refreshing loop’ side facing up.Raise the steam mop off the resting mat (8) and lightlypress it down onto the cleaning pad (6 or 7). Lightly press the steam mop down onto the carpet glider(9) until it clicks into place.Place the steam mop on the resting mat. (8)Connect the steam mop to the mains.Press the ON/OFF button (1). It takes approximately 15seconds for the steam mop to heat up.return the handle (4) to the upright position and turn the steammop ‘OFF’. Unplug the unit from the electrical wall outlet,Caution! Never leave the steam mop in one spot on anysurface for any period of time. Always place the steam mop onthe resting mat (8) with the handle (4) in the upright positionwhen stationary and make sure the steam mop is turned offwhen not in use.After use (Fig. J & K) Return the handle (4) to the upright position and turn thesteam mop ‘OFF’, Place the steam mop on the resting mat (8) and wait untilUnplug the steam mop from the electrical wall outlet.Empty the water tank (3). Remove the cleaning pad (6 or 7) and wash it ready fornext use. (Take care to follow the wash care instructionsprinted on the cleaning pad). Wrap the supply cable around the cable tidy hooks (10 &11).Note: The top cable tidy hook (11) rotates to easily release thecable ready for next use. Clip the supply cable onto itself using the cable tidy clip(22) close to the plug. Place steam mop on the resting mat (8) for storage.Note: With the handle (4) in the upright position, the cableneatly wrapped around the cable tidy hooks (10 & 11) andsecured with the cable tidy clip (22) your steam mop will standon its own for storage. Alternatively there is a hanging bracket(23) built into the hand grip (24) which will allow your steammop to be hung from a suitable hook on the wall. Alwaysensure that your wall hook is capable of supporting the weightof the steam mop safely. 9
ENGLISH(Original instructions)Maintenance and cleaningYour Black & Decker corded appliance has been designed tooperate over a long period of time with a minimum of maintenance. Continuous satisfactory operation depends uponproper appliance care and regular cleaning.Warning! Before performing any maintenance or cleaning oncorded appliances switch off and unplug the appliance. Wipe your appliance over using a soft damp cloth. For stubborn marks you can use a mild solution of soapand water to dampen your cloth.Care of the cleaning padsWash care instructions - No fabric conditioner - Allow to dryfully before re-use.Caution! Follow the cleaning instructions printed on the labelof the cleaning pad.Protecting the environmentZSeparate collection. This product must not bedisposed of with normal household waste.needs replacement, or if it is of no further use to you, do notdispose of it with household waste. Make this product available for separate collection.zSeparate collection of used products and packagingallows materials to be recycled and used again.Re-use of recycled materials helps prevent environmental pollution and reduces the demand for rawmaterials.Local regulations may provide for separate collection of electrical products from the household, at municipal waste sites orby the retailer when you purchase a new product.Black & Decker provides a facility for the collection andrecycling of Black & Decker products once they have reachedthe end of their working life. To take advantage of this serviceplease return your product to any authorised repair agent whowill collect them on our behalf.You can check the location of your nearest authorised repairthe address indicated in this manual. Alternatively, a list ofauthorised Black & Decker repair agents and full details of ourafter-sales service and contacts are available on the Internetat: www.2helpU.com10Technical dataFSM1630-XE(Type 1)VoltageVacPowerWTank capacitymlWeightkg23016005002.7
Australia & New ZealandStanley Black & Decker82 Taryn Drive, Epping, VIC 3076 AustraliaTel.1800 338 002 (Aust) or Tel. 0800 339 258 (NZ)9059138910/12
Your Black & Decker steam mop has been designed for . sanitising and cleaning sealed hardwood, sealed laminate, linoleum, vinyl, ceramic tile, stone and marble floors and for . If the home circuit breaker activates : while using the steam function, dis- . repair agent. u: Never attempt to remove or replace any parts other than those .